Page is loading ...

SOLAR-POWERED LED LIGHT BALL
LED-AURINKOKENNO-PALLOVALAISIN
Käyttö- ja turvaohjeet
SOLAR-POWERED LED LIGHT BALL
Operation and Safety Notes
LED-SOLAR-KUGELLEUCHTE
Bedienungs- und Sicherheitshinweise
LED-KLOTLAMPA MED SOLCELL
Bruksanvisning och säkerhetsanvisningar
OKRĄGŁA, SOLARNA LAMPA LEDOWA
Wskazówki dotyczące obsługi i bezpieczeństwa
IAN 273026IAN 273025 IAN 273027

GB / IE Operation and Safety Notes Page 5
FI Käyttö- ja turvaohjeet Sivu 13
SE Bruksanvisning och säkerhetsanvisningar Sidan 21
PL Wskazówki dotyczące obsługi i bezpieczeństwa Strona 29
DE / AT / CH Bedienungs- und Sicherheitshinweise Seite 38
LED-AURINKOKENNO-PALLOVALAISIN
Käyttö- ja turvaohjeet
OKRĄGŁA, SOLARNA LAMPA LEDOWA
Wskazówki dotyczące obsługi i bezpieczeństwa

A B C
D E
12
11
10
9
8
7
6
5 4 13 2
4
5
2
1
3
2
10
7
8
10
9
F
9
10
11
12


5 GB/IE
Intended use .............................................................................................................................Page 6
Parts Description ...................................................................................................................Page 6
Scope of delivery..................................................................................................................Page 6
Technical Data .........................................................................................................................Page 7
Safety instructions ...............................................................................................................Page 7
Product-specific safety instructions .................................................................................................Page 8
Safety instructions for rechargeable batteries ...............................................................................Page 8
Initial use
Mounting the light ...........................................................................................................................Page 9
Installing the light ............................................................................................................................Page 9
Preparing the light prior to initial use .............................................................................................Page 9
Switching the light on / off ..............................................................................................................Page 10
Replacing the rechargeable battery ..............................................................................................Page 10
Troubleshooting ....................................................................................................................Page 10
Maintenance / Cleaning ...................................................................................................Page 11
Disposal ........................................................................................................................................Page 11
Warranty ..................................................................................................................................... Page 12

6 GB/IE
Solar-powered LED light ball
Intended use
The solar light is intended as an outdoor accent light.
The product is not intended for commercial use.
Not suitable for ordinary lighting in
household room illumination.
This product is suitable for extreme tempera-
tures below -20 °C.
The solar module built into this product converts
sunlight into electricity and stores it in the recharge-
able NiMH battery. The light switches on at dusk.
The in-built light-emitting diodes are a very long-
life and energy-saving light source.
The light duration depends on the amount of sun-
light, the angle at which light hits the solar panel,
and the temperature (the battery capacity varies
by temperature). A vertical angle of light at tem-
peratures above the freezing point is ideal.
The battery does not achieve maximum capacity
until after several charge and discharge cycles.
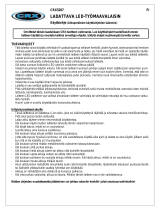
Parts Description
1 Ground spike
2 Spacer tube approx. 7 cm
3 Spacer tube approx. 20 cm (on IAN 273025);
approx. 17 cm (on IAN 273026);
approx. 25 cm (on IAN 273027)
4 Sphere
5 Solar module
6 On / Off switch
7 Cross-head screws (housing)
8 Housing
9 Cross-head screws (cover)
10 Cover
11 Rechargeable AAA battery
12 Solar cell
Scope of delivery
Immediately after unpacking, verify the parts are
complete and the product is in proper condition.
1 Ground spike 1
1 Spacer tube approx. 7 cm 2
1 Spacer tube approx. 20 cm (on IAN 273025);
approx. 17 cm (on IAN 273026);
approx. 25 cm (on IAN 273027) 3
1 Sphere 4
1 Solar module incl. LED and rechargeable
Ni-Mh battery, AAA / 1.2 V / 300 mAh 5
1 Installation instructions

7 GB/IE
Technical Data
Rechargeable
battery: 1 x rechargeable
Ni-Mh battery / AAA /
1.2 V / 300 mAh
Illuminant: 1 x LED (not replaceable)
Rated power: 0.2 W per LED
Protection type: IP44 (splash-proof)
Solar cell: 50 mA, multicrystalline
Dimensions:
Solar light
(excl. ground spike): approx. 42 x 20 cm (h x Ø)
(on IAN 273025);
approx. 34 x 15 cm (h x Ø)
(on IAN 273026);
approx. 51 x 25 cm (h x Ø)
(on IAN 273027)
Ground spike: 10 cm (h)
Safety instructions
Before using the product, please famil-
iarise yourself with all of the safety
instructions and instructions for
use! when passing this product on
to others, please also include all the
documents!
RISK OF
ACCIDENT AND DANGER
TO LIFE FOR INFANTS AND
CHILDREN!
Keep rechargeable batteries away from chil-
dren. Do not leave the batteries lying around.
There is a danger that these will be swallowed
by children or pets. If they are accidentally
swallowed seek immediate medical attention.
Children or persons lacking knowledge or ex-
perience in handling the device or have limited
physical, sensory or mental abilities, must not
use the device without supervision or instruction
by a person responsible for their safety. Chil-
dren must be supervised at all times to prevent
them from playing with the device.
Never leave children unsupervised with the
packaging material. The packaging material
poses a suffocation hazard. Children frequently
underestimate the dangers. Please always
keep the product out of the reach of children.
This product is not a toy and should be kept
out of the reach of children. Children are not
aware of the dangers associated with handling
electrical products.
Do not use the product if you detect any type
of damage.
DANGER - EXPLOSION
HAZARD! Do not use the solar
light in explosive environments con-
taining flammable vapours, gasses or dusts.

8 GB/IE
Product-specific
safety instructions
Do not expose the solar light to strong vibration
or high mechanical loads.
Make sure the solar cell is free of dirt and free
of snow and ice in winter. Otherwise the per-
formance of the solar panel will be diminished.
Cold temperatures negatively impact the bat-
tery operating time. Clean and store the solar
light in a dry, warm location during extended
periods of non-use, e.g. in winter.
In the event of damage, repairs or other prob-
lems with the solar light, please contact an
electrician. The LEDs cannot be replaced.
DANGER - EXPLOSION
HAZARD! Use only rechargea-
ble batteries of the recommended
type. Other rechargeable or single-use batter-
ies could explode during charging.
DANGER - RISK OF IN-
JURY! When removing the solar
light, be sure to also remove the
base and ground stake to prevent hazards
(e.g. tripping).
DANGER - FIRE HAZARD!
Never switch the solar light on in-
side the packaging.
Safety instructions for
rechargeable batteries
Outdated or used rechargeable batteries may
leak chemicals which will damage the product.
Therefore remove the rechargeable batteries
when not using the solar light for extended
periods.
DANGER - FIRE HAZARD!
Never short-circuit rechargeable
batteries. Otherwise the recharge-
able batteries may overheat, become a fire
hazard or explode.
DANGER - EXPLOSION
HAZARD! Never throw recharge-
able batteries into fire or water.
WARNING - WEAR
SAFETY GLOVES! Leaked or
damaged rechargeable batteries
could cause chemical burns on contact with
the skin; you should therefore wear suitable
protective gloves at all times if such an event
occurs.
DANGER - RISK OF
CHEMICAL BURNS! Leaking
batteries can cause chemical burns.
Be careful not to allow the battery fluid to come
into contact with your skin or your eyes. If this
does happen, immediately try to remove the
battery fluid under cold running water. Seek
medical attention to be safe.

9 GB/IE
Initial use
Mounting the light
Remove the individual parts from the packag-
ing and assemble the solar light as shown in
Figure A. There are two options: the spacer
tube 3 will make the solar light approx.
42 cm (on IAN 273025); approx. 34 cm
(on IAN 273026); approx. 51 cm (on IAN
273027) tall (see Fig. B), the spacer tube 2
will make it approx. 29 cm (on IAN 273025);
approx. 24 cm (on IAN 273026); approx.
34 cm (on IAN 273027) tall (see Fig. C).
Insert the selected spacer tube 2 or 3 into
the designated opening on the solar module
5
(see Fig. A).
T
hen insert the ground stake
1
into the botto
m
of the spacer tube 2 or 3 (see Fig. A).
Installing the light
Note: The solar light can be installed without a
power source.
Only use the solar light with the included
ground stake 1.
Push the assembled solar light far enough into
the ground (lawn, flower bed) so it is stable.
Since the light relies on sunlight, consider and
observe the following points prior to installat
ion.
1. Select a location where the solar module 5
is exposed to direct sunlight during the day.
2. Position the solar light so the solar module 5
is not covered or in the shade (trees, roof
ridge, etc.).
3. Be sure the solar module 5 is not impacted
by another light source, e.g. yard or street
lighting, as this will prevent the light from
switching on at dusk. Remember many light
sources will only switch on due to the time or
movement during the night.
Preparing the light
prior to initial use
Note: The solar light features a twilight sensor
and an On / Off switch 6. When fully charged
the light on time is approx. 6 to 8 hours.
Unscrew the sphere 4 from the solar module
5 counter-clockwise. Set the On / Off switch
6 to the ON position before using it for the
first time.
Screw the sphere 4 clockwise all the way
into the solar module 5 and place the solar
light in the sun.

10 GB/IE
Switching the light on / off
Slide the On / Off switch
6
to the ON posi
tion.
The solar light will automatically switch on at
dusk. At dawn the light will automatically
switch off.
Slide the On / Off switch 6 to the OFF posi-
tion. The solar light is permanently switched off.
Replacing the
rechargeable battery
Note: The rechargeable battery 11 is designed
for prolonged operation. However, it may need to
be replaced after being used for a long time. Re-
chargeable batteries are subject to natural wear
and the output may decrease. For optimal perfor-
mance the batteries should be replaced every
12 months.
Replace the rechargeable battery as shown in
figures D–F.
Unscrew the sphere 4 counter-clockwise.
Slide the On / Off switch 6 on the solar
module 5 to the OFF position.
Remove the solar module 5 from the spacer
tube 2 or 3.
Loosen the two screws 7 on the underside
counter-clockwise using a suitable cross-tip
screwdriver and remove the housing 8 from
the remainder of the module (see Fig. D).
Then also loosen the three screws 9 on the
underside of the cover counter-clockwise us-
ing a suitable cross-tip screwdriver and remove
the cover 10 from the remainder of the module
(see Fig. E).
Remove the battery 11 and replace with a new,
charged rechargeable battery of the same
type (see „Technical Data“). Please note the
polarity (+ / -) when inserting the rechargeable
battery (see Fig. F).
Now reattach the cover 10 to the solar cell 12
and secure clockwise using the three screws 9.
Then reattach the housing 8 and secure
clockwise using the two screws 7.
Reattach the solar module 5 to the spacer
tube 2 or 3.
Slide the On / Off switch 6 to the ON position
again.
Screw the sphere 4 all the way into the solar
module 5, turning clockwise.
Troubleshooting
Note: The device contains sensitive electronic
components. Radio transmitting equipment in the
immediate vicinity may therefore cause interference.
T
hese could be e.g. mobile phones, two-way rad
ios,
CB radios, radio / other remote controls and micro-
waves. If you notice the device is malfunctioning,

11 GB/IE
remove any sources of interference from the area
around the device.
Notice: Electrostatic discharge can lead to mal-
functions. In the event of such malfunctions, briefly
remove and reinsert the rechargeable batteries.
Note: The performance of the rechargeable
battery is better in summer than in winter due to
the weather.
Error Cause Solution
LEDs
don't
light up
Surroundings
are too bright
or light from
other light
sources is hit-
ting the solar
light
Change the location
(away from e.g. y
ard
or street lighting)
Weak
LED light Battery not
fully charged
or defective
Charge the re-
chargeable battery
with a charger or
replace with a new
rechargeable batte
ry
(see “Replacing the
battery”)
LEDs
don't
light up
LEDs defective The LEDs cannot be
replaced. Dispose of
the product properly
(see “Disposal”)
Maintenance / Cleaning
Note: The LEDs cannot be replaced. The solar
light is maintenance-free.
Never use caustic cleaners.
Regularly clean the solar light with a dry, lint-
free cloth. Use a slightly moist cloth to remove
any stubborn dirt.
Replace the rechargeable batteries if the op-
erating time decreases noticeably after some
time despite good sun exposure (see chapter
“Replacing the rechargeable battery“). Only
use the correct size and recommended type
of rechargeable batteries (see section „Tech-
nical data“).
Disposal
The packaging is made of environmen-
tally friendly materials, which may be
disposed of through your local recy-
cling facilities.
Contact your local community or municipal ad-
ministration for more details on how to dispose of
your worn-out product.
To help protect the environment, please
dispose of the product properly, not
without household waste, when it has

12 GB/IE
reached the end of its useful life. Please
contact your local authority for infor-
mation on collection points and their
opening hours.
Defective or used rechargeable batteries must be
recycled according to Directive 2006 / 66 / EC
and its amendments. Return rechargeable batteries
and / or the device to the recycling facilities provided.
Improper disposal of recharge-
able batteries may result in
environmental damage!
Rechargeable batteries may not be disposed with
household waste. They may contain toxic heavy
metals and are subject to hazardous waste regu-
lations. The chemical symbols of the heavy metals
are: Cd = cadmium, Hg = mercury, Pb = lead.
Therefore dispose of used batteries through your
local collection site.
Warranty
The device has been manufactured to strict quality
guidelines and meticulously examined before de-
livery. In the event of product defects you have le-
gal rights against the retailer of this product. Your
legal rights are not limited in any way by our war-
ranty detailed below.
The warranty for this device is 3 years from the
date of purchase. Should this device show any
fault in materials or manufacture within 3 years
from the date of purchase, we will repair or re-
place it – at our choice – free of charge to you.
The warranty period begins on the date of pur-
chase. Please keep the original sales receipt in a
safe location. This document is required as your
proof of purchase. This warranty becomes void if
the device has been damaged or improperly used
or maintained.
The warranty applies to faults in material or manu-
facture. This warranty does not cover product parts
subject to normal wear, thus possibly considered
consumables (e.g. batteries) or for damage to frag-
ile parts, e.g. switches, rechargeable batteries or
glass parts.

13 FI
Tarkoituksenmukainen käyttö ..................................................................................Sivu 14
Osien kuvaus ............................................................................................................................ Sivu 14
Toimituksen sisältö ...............................................................................................................Sivu 14
Tekniset tiedot ..........................................................................................................................Sivu 15
Turvallisuusohjeet .................................................................................................................Sivu 15
Tuotekohtaiset turvallisuusohjeet ..................................................................................................... Sivu 16
Akkuja koskevat turvallisuusohjeet ..................................................................................................Sivu 16
Käyttöönotto
Valaisimen asennus ..........................................................................................................................Sivu 17
Valaisimen sijoittaminen ...................................................................................................................Sivu 17
Valaisimen valmistelu ennen käyttöä .............................................................................................. Sivu 17
Valaisimen päälle- ja poiskytkentä ..................................................................................................Sivu 18
Akun vaihtaminen .............................................................................................................................Sivu 18
Vianmääritys ............................................................................................................................Sivu 18
Huolto / puhdistus ................................................................................................................. Sivu 19
Hävittäminen ............................................................................................................................ Sivu 19
Takuu ...............................................................................................................................................Sivu 20

14 FI
LED-Aurinkokenno-pallovalaisin
Tarkoituksenmukainen käyttö
Aurinkokennovalaisin on tarkoitettu ulkotilojen va-
laisuun. Tuotetta ei ole tarkoitettu ammattimaiseen
käyttöön.
Tuote ei sovellu kodin normaaliin
huonevalaistukseen.
Tuotetta voidaan käyttää äärimmäisissä, alle
-20 °C:n lämpötiloissa.
Tuotteeseen integroitu aurinkokenno muuntaa au-
ringonvalon sähköenergiaksi ja varastoi tämän
NiMH-akkuun. Valo syttyy päivänvalon hämärty-
essä.
Integroidut valodiodit ovat erittäin pitkäikäinen ja
energiaasäästävä valonlähde.
Valaistuksen kesto on riippuvainen auringonsäteilystä,
valon tulokulmasta aurinkokennoon ja lämpötilasta
(akun kapasiteettiin vaikuttaa lämpötila). Parasta
olisi valon pystysuora tulokulma lämpötilan ollessa
jäätymispisteen yläpuolella.
Akut saavuttavat suurimman kapasiteettinsa vasta
muutaman latauksen ja purkauksen jälkeen.
Osien kuvaus
1 Maapiikki
2 Väliputki n. 7 cm
3 Väliputki
n. 20 cm (IAN 273025);
n. 17 cm (IAN 273026);
n. 25 cm (IAN 273027)
4 Pallovarjostin
5 Aurinkopaneeli
6 Virtakytkin
7 Ristipäiset ruuvit (kotelo)
8 Kotelo
9 Ristipäiset ruuvit (kansi)
10 Kansi
11 AAA-akku
12 Aurinkokenno
Toimituksen sisältö
Tarkista välittömästi aina pakkauksen avaamisen
jälkeen toimituksen täydellisyys sekä laitteen moit-
teeton kunto.
1 maapiikki 1
1 väliputki n. 7 cm 2
1 väliputki n. 20 cm (IAN 273025);
n. 17 cm (IAN 273026);
n. 25 cm (IAN 273027) 3
1 pallovarjostin 4

15 FI
1 aurinkopaneeli sis. ledin ja NiMh-akun, AAA /
1,2 V / 300 mAh 5
1 asennusohje
Tekniset tiedot
Akku: 1 NiMh-akku / AAA /
1,2 V / 300 mAh
Valonlähde: 1 LED (ei vaihdettavissa)
Nimellisteho: 0,2 W per LED
IP-luokitus: IP44 (roiskevesisuojattu)
Aurinkokenno: 50 mA, monikiteinen
Mitat:
Aurinkokennovalaisin
(ilman maapiikkiä): n. 42 x 20 cm (K x Ø)
(IAN 273025);
n. 34 x 15 cm (K x Ø)
(IAN 273026);
n. 51 x 25 cm (K x Ø)
(IAN 273027)
Maapiikki: 10 cm (K)
Turvallisuusohjeet
tutustu ennen tuotteen käyttöä
huolellisesti kaikkiin käyttö- ja tur-
vallisuusohjeisiin! liitä kaikki ohjeet
tuotteen mukaan, jos annat sen mui-
den henkilöiden käyttöön!
LAPSIA UH-
KAAVA TAPATURMA- JA
HENGENVAARA!
Pidä akut lasten ulottumattomissa. Älä jätä ak-
kuja ilman valvontaa. Lapset tai lemmikkieläimet
voivat vahingossa nielaista ne. Pariston nielais-
seen henkilön on välittömästi otettava yhteyttä
lääkäriin.
Lapset tai henkilöt, joilla ei ole kokemusta tai
tietoa tuotteen käytöstä tai jotka ovat fyysisesti,
henkisesti tai aisteiltaan rajoittuneita, eivät saa
käyttää tuotetta ilman heidän turvallisuudestaan
vastuussa olevan henkilön valvontaa tai opas-
tusta. Lasten ei saa antaa leikkiä tuotteella.
Älä koskaan jätä lapsia pakkausmateriaalien
läheisyyteen ilman valvontaa. Pakkausmateri-
aali voi aiheuttaa tukehtumisen. Lapset aliarvioi-
vat useimmiten vaaratilanteet. Pidä tuote aina
lasten ulottumattomissa.
Tuotteella ei saa leikkiä. Lapset eivät osaa ar-
vioida vaaroja, jotka uhkaavat sähkölaitteita
käytettäessä.
Älä käytä tuotetta, jos havaitset siinä vaurioita.
RÄJÄHDYSVAARA! Älä
käytä aurinkokennovalaisinta räjäh-
dysalttiissa ympäristössä, jossa on
syttyviä höyryjä, kaasuja tai pölyjä.

16 FI
Tuotekohtaiset
turvallisuusohjeet
Älä altista aurinkokennovalaisinta voimakkaalle
tärinälle tai mekaaniselle kuormitukselle.
Huolehdi siitä, että aurinkokenno ei ole likainen
ja että se ei ole talvella lumen ja jään peitossa.
Nämä heikentävät aurinkokennon tehoa.
Alhaiset lämpötilat vaikuttavat negatiivisesti akun
kestoaikaan. Jos et käytä aurinkokennovalaisinta
pitkään aikaan, esim. talvella, se tulisi puhdistaa
ja säilyttää kuivassa, lämpimässä tilassa.
Käänny sähköalan ammattilaisen puoleen, jos
valaisin on vaurioitunut, se on korjattava tai
siinä on muita ongelmia. LED-valodiodeja ei
voi vaihtaa uusiin.
RÄJÄHDYSVAARA! Käytä
vain suositellun tyyppisiä akkuja.
Muut akut / paristot voivat räjähtää
ladattaessa.
LOUKKAANTUMISVAARA
!
Varmista valaisinta poistettaessa,
että myös pohjalevy ja maapiikki
poistetaan, jotta ne eivät ole vaaraksi (esim.
kompastumisvaara).
TULIPALON VAARA! Au-
rinkokennovalaisinta ei saa kytkeä
päälle sen ollessa pakkauksessa.
Akkuja koskevat
turvallisuusohjeet
Vanhoista tai kuluneista akuista voi vuotaa
kemiallisia aineita, joka vaurioittavat tuotetta.
Poista sen vuoksi akut aurinkokennovalaisimesta,
jos et käytä sitä pitkään aikaan.
TULIPALON VAARA! Akkuja
ei saa oikosulkea. Siitä voi seurata
ylikuumeneminen, tulipalon vaara
tai akkujen halkeaminen.
RÄJÄHDYSVAARA! Älä
koskaan heitä akkuja tuleen tai
veteen.
KÄYTÄ SUOJAKÄSINEITÄ!
Vuotavat tai vaurioituneet akut voi-
vat syövyttää ihoa; käytä siksi eh-
dottomasti aina sopivia suojakäsineitä.
SYÖPYMISVAARA! Vuota-
vat akut voivat aiheuttaa kemiallisia
palovammoja. Pidä huolta, että ak-
kunestettä ei pääse iholle tai silmiin. Jos näin
kuitenkin tapahtuu, yritä poistaa neste välittö-
mästi kylmän juoksevan veden alla. Ota yhteyttä
lääkäriin varmuuden vuoksi.

17 FI
Käyttöönotto
Valaisimen asennus
Ota yksittäiset osat pakkauksesta ja asenna va-
laisin kuvan A osoittamalla tavalla. Voit valita
kahdesta eri vaihtoehdosta: jos käytät väliput-
kea 3 valaisimen korkeus on silloin seuraava:
n. 42 cm (IAN 273025); n. 34 cm (IAN
273026); n. 51 cm (IAN 273027) (kuva B);
jos käytät väliputkea 2 korkeus on silloin: n.
29 cm (IAN 273025); n. 24 cm (IAN 273026);
n. 34 cm (IAN 273027) (kuva C).
Aseta valitsemasi väliputki 2 tai 3 aurinko-
paneelissa 5 olevaan aukkoon (kuva A).
Aseta sitten maapiikki 1 väliputken 2 tai 3
alaosaan (kuva A).
Valaisimen sijoittaminen
Huomautus: valaisimen paikka voidaan valita
virtalähteestä riippumatta.
Käytä aurinkokennovalaisinta vain toimitukseen
sisältyvällä maapiikillä 1.
Pistä asennettu aurinkokennovalaisin niin syvälle
maahan (nurmikkoon, kukkapenkkiin), että se
seisoo tukevasti. Koska valaisin tarvitsee aurin-
koenergiaa toimiakseen, ota huomioon seuraa-
vat kohdat ennen valaisimen sijoittamista:
1. Valitse sellainen paikka, jossa aurinko paistaa
päiväsaikaan suoraan aurinkopaneeliin 5.
2. Sijoita valaisin niin, että aurinkopaneeli 5 ei
ole minkään peitossa tai varjossa (esim. puu
tai katonharja).
3. Varmista, että aurinkopaneeliin 5 ei pääse
vaikuttamaan mikään muu valonlähde kuten
esim. piha- tai katuvalaistus, koska siinä tapa-
uksessa valo ei syty päivän hämärtyessä. Huo-
mioi, että useat valonlähteet kytkeytyvät päälle
vasta keskellä yötä ajasta ja liikkeestä riippuen.
Valaisimen valmistelu
ennen käyttöä
Huomautus: aurinkokennovalaisin on varustettu
hämäräanturilla ja virtakytkimellä 6. Valaisuaika
on n. 6–8 tuntia täyteenladatulla akulla.
Kierrä pallovarjostinta 4 vastapäivään aurin-
kopaneelista 5. Ennen käyttöönottoa aseta
virtakytkin 6 ON-asentoon.
Kierrä pallovarjostin 4 aurinkopaneeliin 5
myötäpäivään vasteeseen asti ja aseta valai-
sin aurinkoon.

18 FI
Valaisimen päälle- ja
poiskytkentä
Aseta virtakytkin 6 ON-asentoon. Päivän hä-
märtyessä valaisin kytkeytyy automaattisesti
päälle. Aamun valjetessa valaisin kytkeytyy
automaattisesti pois päältä.
Aseta virtakytkin 6 OFF-asentoon. Valaisin
on kytketty pysyvästi pois päältä.
Akun vaihtaminen
Huomautus: akku 11 on tarkoitettu pitkäaikaiseen
käyttöön. Pitkän käyttöajan kuluessa voi kuitenkin
olla tarpeen vaihtaa akku uuteen. Akut kuluvat luon-
nollisesti ja teho voi laskea. Jotta teho olisi opti-
maalinen, akut tulisi vaihtaa 12 kuukauden välein.
Vaihda akku kuvien D–F osoittamalla tavalla.
Kierrä pallovarjostinta 4 vastapäivään.
Aseta aurinkopaneelin 5 virtakytkin 6 OFF-
asentoon.
Irrota aurinkopaneeli 5 väliputkesta 2 tai 3.
Kierrä molemmat ruuvit 7 alaosasta ristipäi-
sellä ruuvimeisselillä vastapäivään ja irrota
kotelo 8 paneelista (kuva D).
Kierrä sitten myös loput kolme ruuvia 9 kan-
nen alapinnasta ristipäisellä ruuvimeisselillä
vastapäivään ja irrota kansi 10 paneelista
(kuva E).
Poista akku 11 ja vaihda se uuteen, saman-
tyyppiseen ladattuun akkuun (katso Tekniset
tiedot). Aseta akut sisään oikeinpäin (+ / -)
(kuva F).
Aseta kansi 10 takaisin aurinkokennoon 12 ja
kiinnitä se kolmella ruuvilla 9 myötäpäivään
kiertämällä.
Aseta kotelo 8 päälle ja kiinnitä se molem-
milla ruuveilla 7 myötäpäivään kiertämällä.
Aseta aurinkopaneeli 5 väliputken 2 tai 3
päälle.
Aseta virtakytkin 6 jälleen ON-asentoon.
Kierrä pallovarjostin 4 myötäpäivään aurin-
kopaneelin 5 päälle vasteeseen asti.
Vianmääritys
Huomautus: Laite sisältää herkkiä elektronisia
rakenneosia. Siksi on mahdollista, että välittömässä
läheisyydessä olevat radiolähetinlaitteet häiritsevät
laitetta. Tällaisia voivat olla esim. matkapuhelimet,
radiopuhelimet, CB-radiolaitteet, langattomat kau-
kosäätimet / muut kaukosäätimet ja mikroaaltolaitteet.
Mikäli toteat häiriöitä toiminnassa, poista tällaiset
häiriölähteet laitteen ympäristöstä.
Huomautus: sähköstaattiset purkaukset voivat
aiheuttaa toimintahäiriöitä. Poista tällaisten toimin-
tahäiriöiden esiintyessä akut hetkeksi ja aseta ne
sitten takaisin paikoilleen.

19 FI
Huomautus: akku toimii tehokkaammin kesällä
kuin talvella.
Vika Syy Ratkaisu
Ledit ei-
vät pala Ympäristö on
liian valoisa
tai muista va-
lonlähteistä tu-
leva valo osuu
aurinkokenno-
valaisimeen
Vaihda valaisimen
paikkaa (esim. kau-
emmas piha- tai ka-
tuvalaistuksesta)
Ledit
palavat
heikosti
Akku ei ole
täyteenla-
dattu tai se
on vioittunut
Lataa akku laturissa
tai vaihda se uuteen
akkuun (katso ”Akun
vaihtaminen”)
Ledit ei-
vät pala Ledit ovat
viallisia Ledejä ei voi vaih-
taa uusiin. Hävitä
tuote asianmukai-
sesti (katso ”Hävit-
täminen”)
Huolto / puhdistus
Huomautus: valodiodeja ei voi vaihtaa. Aurin-
kokennovalaisin on huoltovapaa.
Älä missään tapauksessa käytä syövyttäviä
puhdistusaineita.
Puhdista valaisin säännöllisesti kuivalla, nukat-
tomalla liinalla. Käytä puhdistukseen hieman
kostutettua liinaa, jos tuote on erittäin likainen.
Vaihda akut, jos valaisuaika hyvästä auringon-
säteilystä huolimatta vähenee huomattavasti
(katso Akun vaihtaminen). Käytä vain oikean-
kokoisia ja suositellun tyyppisiä akkuja (katso
Tekniset tiedot).
Hävittäminen
Pakkaus on valmistettu ympäristöystä-
vällisistä materiaaleista, jotka voidaan
viedä paikalliseen kierrätyspisteeseen.
Lisätietoja käytettyjen tuotteiden hävittämismah-
dollisuuksista saat kunnan- tai kaupungintalolta.
Älä heitä käytettyä tuotetta kotitalous-
jätteisiin. Hävitä tuote ympäristöystäväl-
lisesti toimittamalla se asianmukaiseen
jätehuoltoon. Lisätietoja keräyspaikoista
ja niiden aukioloajoista saat kuntasi vi-
ranomaisilta.
Vialliset ja käytetyt akut on kierrätettävä direktiivin
2006 / 66 / EY ja siihen tehtyjen muutosten mu-
kaisesti. Hävitä akut ja / tai laite toimittamalla ne
paikalliseen kierrätyspisteeseen.

20 FI
Akkujen vääränlainen
hävittämistapa aiheuttaa
ympäristövahinkoja!
Akkuja ei saa hävittää talousjätteenä. Ne voivat
sisältää myrkyllisiä raskasmetalleja, minkä vuoksi ne
kuuluvat ongelmajätekäsittelyyn. Raskasmetallien
kemialliset merkit ovat seuraavat: Cd = kadmium,
Hg = elohopea, Pb = lyijy. Toimita tästä syystä
käytetyt paristot kunnalliseen keräyspisteeseen.
Takuu
Laite on valmistettu huolellisesti tiukkojen laatudirek-
tiivien mukaan ja tarkistettu huolella ennen toimi-
tusta. Jos tuote on virheellinen, sinulla on ostajana
lakisääteiset oikeudet esittää vaatimuksia tuotteen
myyjää kohtaan. Seuraavassa esitetty takuu ei ra-
joita lakisääteisiä oikeuksiasi.
Laitteelle myönnetty takuu on voimassa 3 vuotta
ostopäivästä lukien. Takuun voimassaolo alkaa
tuotteen ostopäivästä. Säilytä aina alkuperäinen
kassakuitti. Se toimii todisteena tehdystä ostoksesta.
Jos 3 vuoden sisällä tuotteen ostopäivästä alkaen
tuotteesta löytyy materiaali- tai valmistusvirhe, kor-
jaamme tuotteen ilmaiseksi tai toimitamme tilalle
uuden tuotteen harkintamme mukaan. Takuu
raukeaa, jos tuote on vioittunut asiattoman käytön
tai huollon vuoksi.
Takuu koskee materiaali- ja valmistusvirheitä. Takuu
ei kata tuotteen osia, jotka kuluvat normaalissa
käytössä ja siitä syystä pidetään kuluvina osina
(esim. paristot) tai vaurioita särkyvissä osissa esim.
kytkimessä, akuissa tai lasista valmistetuissa osissa.
/