Page is loading ...

Let Us Know
What You Think
We sincerely thank you for your business and are committed to ensuring
your full satisfaction. If you are not entirely satisfied for whatever reason,
please reach out to us and we will do all within our power to make it right.
As a young and growing company, it would mean the world to us if
you could leave an honest online review about our product and
services.
facebook.com/amcrest
twitter.com/amcrestsecurity
Instagram.com/amcresttechnologies
www.instagram.com/amcresttechnologies
www.twitter.com/amcrestsecurity
www.facebook.com/amcrest
© 2019 Amcrest Industries. All rights reserved.
For the most recent version of
this Quick Setup Guide visit:
amcrest.com/doorbell
Quick Setup Guide
Wi-Fi Video Doorbell
If your experience has
been something less
than amazing, please
drop us an email at
support@amcrest.com
or give us a ring at
1-888-212-7538
amcrest.com/videos
amcrest.com/support
www.amcrest.com/videos
www.amcrest.com/support
www.amcrest.com/doorbell

Thank you for purchasing
an Amcrest Wi-Fi Doorbell!
The Amcrest Wi-Fi Doorbell is
designed to provide added
security as well as peace of
mind to your life and connect
you with what matters most
from anywhere using your
smartphone, tablet or computer.
This guide is designed as a reference
tool for the installation and operation
of your Amcrest Wi-Fi doorbell. Here
you can find information about
installation, features and functions, as
well as information to aid in trouble-
shooting.
Installing the Chime Kit
Installing the Wi-Fi Doorbell
Setting up the Wi-Fi Doorbell
Using the Wi-Fi Doorbell
Troubleshooting
01
02
03
04
05
Contents

01
Installing the
Chime Kit
What’s Included?
Chime Kit
Wire Harness
Wire Clip
Connect the
Wire Harness to the Chime Kit
Note: If the wire harness does not come preinstalled with the included wiring. Use
a precision screwdriver to open the terminals on top of the connector and insert
the wiring into the ports. The red and black wires can be placed in any position
inside the connector, and tighten the screws to secure.
The Chime Kit allows the doorbell to
sync with your home’s existing chime
system. If you do not have a chime
system, the chime kit is not necessary
and you can proceed to the physical
installation of your doorbell.

Turn off the Circuit Breaker
for your Doorbell
Since we will be working with electrical
wiring, make sure to shut off the power to
your doorbell at the electrical breakers of
your home to ensure no power is flowing
through the internal doorbell system.
Remove the Cover
for your Existing Chime.
Note: Your existing chime may look different depending on if you have
a digital or mechanical chime.

Locate and Loosen the Screws on Your
Existing Chime
Connecting the Amcrest Chime Kit
Note: Be careful not to detach or remove the existing wiring.
Slide the connecting wires from the Amcrest Chime Kit underneath the
screws, then retighten the screws. It doesn’t mattery which wires connect
to which terminal.
Using the included screwdriver, loosen the screws labeled “FRONT” &
“TRANS”.

Replace Your Chime Cover
02
Installing the
Wi-Fi Doorbell
Everything you need for the
installation of your Amcrest Wi-Fi
doorbell is included in the box.
Wi-Fi Doorbell
4 Mounting
Screws
2 Terminal
Screws
Wire Connector 2 Wire Nuts
2 Faceplates Mounting Bracket
Bracket Screw
4 Wall Anchors
Chime Kit
2 Extra Wires
Screwdriver
2 Wire
Extenders
Wire Harness
Secure the Amcrest Chime Kit using the included adhesive. If you are
using a mechanical chime, ensure any excess wiring is clear of all
moving parts.
Note: You will still need to configure the chime in the Amcrest Smart
Home app to complete the installation.
NOTE
A 15/64 masonry drill bit will be required if installing
on concrete stucco or brick.

3
B Use the included Philips
head screwdriver to remove
the bracket screw from the
doorbell.
A Place your fingers in the
indentations on the sides of
the doorbell, simultaneously
pull away and push the
faceplate out.
Remove the Faceplate and Bracket
B Place the doorbell bracket to fit your existing
doorbell wiring. Then mark the drill holes with a
marker.
C
For Wood, Drywall or Soft Surfaces: Secure the
doorbell bracket to the mounting surface using the
included screwdriver and mounting screws.
For Concrete, Stucco or Brick: Using your previ-
ously marked holes as a guide, drill holes into the
mounting surface using a 15/64 masonry drill bit.
Then, insert wall anchors and secure the mounting
brackets using the included mounting screws.
A Remove your existing doorbell from the wall
and disconnect the wires. These are the wires
we will be using to install your new Amcrest
Wi-Fi Doorbell.
Installing the Mounting Bracket

-
Connect Doorbell to Existing Wiring
Loosen the terminal screws
located on the back of your
Wi-Fi Doorbell using the included
Phillips head screwdriver. Place
your existing doorbell wiring
underneath the terminal screws,
then re-tighten the terminal
screws to secure the wires.
NOTE To attach the wires,
align the ends of the two
wires, place the wire nut
over the exposed wiring
and twist the wire nut
clockwise to tighten.
NOTE If your existing doorbell wiring
is too short, use the included extra
wires and wire nuts to extend your
wiring. Remove the terminal screws
completely then thread the screws
through the extra wire.
Inserting a MicroSD Card
(Optional)
On the side of the device locate the
MicroSD card slot. Raise the MicroSD
card flap and insert the MicroSD
card, gold pins down. Secure the flap
back to the doorbell.
Feed the wiring back into the wall. Then,
secure the doorbell to the mounting bracket
using the included screwdriver.
Mounting the Doorbell
NOTE
Be sure to secure the the doorbell
correctly to the bracket lip, located at the top
at the mounting bracket.
Supports 64GB MicroSD Card (Class
10 or Higher)
64
GB

03
Set Up the
Doorbell in the
Amcrest Smart
Home App
The Amcrest Smart Home app
connects your Amcrest Wi-Fi
doorbell to your Android or
iOS mobile device ensuring you
are always connected to what
matters most.
To get the app, search for “Amcrest
Smart Home” in the Google Play or
App Store and download.
Step 5:
Turn the Breaker Back On
The physical installation is now complete. Turn your breaker back
on and the allow the doorbell to power up. It may take the door-
bell up to 2 minutes to fully power up.
Now it’s time to setup the
Amcrest Smart Home App.
To connect your Amcrest Wi-Fi doorbell to your
Android or iOS mobile device, download the
Amcrest Smart Home app and follow the
instructions in the app setup.
Amcrest
Smart Home

Connecting to the
Smart HomeApp
Open the Amcrest Smart Home app
and tap on “Register” to register an
account. Log in and click on “Add
Device”.
Scan the QR Code on the back of the
doorbell or manually enter the serial
number for the device by tapping
“Manually enter S/N”. The serial number
can be found on the serial tag on the back
of the doorbell or on the side
panel of the
doorbell box..
Scan QR Code

Connect to the Hotspot
Remove the protective plastic casing from the doorbell and press
the reset key on the side of the doorbell to enable the hotspot for
your device. If there is a blue spinning light on the front of the
device, it means that the device hotspot is properly turned on.
Connecting to
the Hotspot
The app will automatically begin to
connect ot the Wi-Fi hotspot of your
doorbell. Please wait while your mobile
device establishes a connection.
Tap “Next” to continue. Tap “Yes” to
verify the hotspot has been properly
enabled.
Note: iOS users, tap on “Join” to allow the
doorbell to join your Wi-Fi network.

Setting a Password for the Doorbell
Once the doorbell has finished connecting to the hotspot the app will display a
device password setup menu which allows you to set the password for the
doorbell. Type in a password you would like to use and confirm it.
Please use a combination of letters, numbers, and symbols between 8 - 32
characters long when setting up a password.
A recovery email address can also be
set if you have forgotten your password.
A password reset link will be sent to this
recovery email address.
Choose Your Wi-Fi Network
Select your Wi-Fi network from the Wi-Fi network list.
Enter the password for your home Wi-Fi network. If
you would like to save this password to the app, tap
on “Save Password”
Tap “OK” to continue
If you have chosen the wrong Wi-Fi
network and would like to select
another Wi-Fi network for the doorbell
to connect with, tap on
“Select other network”.
Tap “Connect”, to connect the Wi-Fi
doorbell to your Wi-Fi network.

Connecting To Your Wi-Fi Network
The Wi-Fi doorbell will now begin connecting to the chosen Wi-Fi network.
Once connected, the LED indicator on the front of the doorbell will turn solid
blue. This may take a few moments but if the LED indicator continues to spin
or the device is reporting “Wi-Fi password is incorrect”.
Tap on “Start Over” to repeat the process.
Once the doorbell has been
successfully connected to your Wi-Fi
network and the indicator LED is
solid blue, tap on “Next” to continue.
Rename your doorbell. A few examples are provided such as;
Front Door, Back Door, Office, and can be selected if needed.
After you have finished naming your device, tap on the save
( ) icon to continue.
Give Your Doorbell a Name

-
.
Chime Settings
Amcrest doorbells can only link up
to one electronic or one mechanical
chime. For more information on
linking a chime, refer to “Linking a
Chime”.
Tap “Next” to continue.
Set the Time and Date
Set “Time Zone” to your current time zone
and set “DST” (Daylight Savings Time)
settings if applicable
Tap “Next” to continue.
Note: The Wi-Fi doorbelol is not successfully
connected! Tap on “Start Live View” to begin
using you device.

Tap on the device you would like to access
to view the live view screen.
CHIME
Quick access to link a chime.
MOTION ALERTS
Enable to recieve notifications when a movement is detected.
DEVICES
Displays connected devices in the app.
EVENTS
Provides quick access to motion events and alerts.
ACCOUNT
Access to manage account settings and information.
04
Using the
Doorbell in the
App
The main screen will be your devices
menu. This is a menu that will display all
connected devices and well as quick
access to certain settings for your doorbell.

SETTINGS
Provides access to settings such as motion detection, doorbell tones,
firmware updates, etc.
MULTIVIEW
View multiple devices on one screen.
TALK
Enables the microphone for two way communication
LISTEN
Enables the speaker for two way communication.
PAN/TILT
Not applicable for WiFi Doorbell devices
FULL SCREEN
View your feed in full screen mode.
SD/HD
Set the device to standard or high definition resolution.
SNAPSHOT
Manually take a photo.
RECORD
Manually record a video.
Getting To Know
the App
The live view screen allows you to
actively view your doorbell as well as
access specific features such as
two-way audio and to access cloud
or microSD card recordings.
Lorem ipsum

Linking A Chime
This is only necessary if you have an existing chime system and have installed the chime kit.
If you do not link the chime to the Amcrest Smart Home app, the doorbell will not link with
your chime.
To link your doorbell to the chime, open the Amcrest Smart Home app and access your
device. Tap on the settings icon ( ) and tap on “Amcrest Chimes”. In the Amcrest Chimes
menu, tap on “Link Electronic/Mechanical Chime”.
Note: Amcrest doorbells can only link up to
one electronic or mechanical chime.
Answering the Door
When someone is at the door, you can use these features:
ACCEPT
Tap accept to talk to
visitors at the door.
MUTE HANG UP
Mute or unmute
the call.
Hang up to end
or ignore the call.
If you are linking the doorbell to a mechanical
chime, tap on ”Mechanical Chime”. If you are
connecting to an electronic or digital chime, tap
on “Electronic Chime”. Tap on the back arrow to
exit.

Amcrest Smart Home Cloud Recording
This is an optional feature that saves recordings of
each event the doorbell captures.
You can access the events from the cloud by registering for a
Amcrest Smart Home cloud plan.
Learn more at:
amcrest.com/smarthomecloud
www.amcrest.com/smarthomecloud
This is a built in feature that saves recordings of each event
the doorbell captures to a microSD card.
You can access the events from the microSD card by tapping on the
“MicroSD Card” option located in the live view interface.
Learn more at:
amcrest.com/doorbellplayback
MicroSD Card Playback

Event Notifications
If your phone is off when the doorbell captures a motion event you will
receive a push notification on your phone.
If your phone has a passcode,
you will need to enter it to
veiw the event.
Motion Detection Zones
To setup motion alerts you must set up motion zones. These are areas or
“zones” that the camera uses to determine when a motion detection is detected
and can range from 0 to 100%.
To setup motion detection, tap on the settings ( ) icon and tap “Motion
Detection”. Select applicable zones, one through three or use the slider to adjust
the motion detect percentage. Tap on the save icon ( ) to save the motion
settings.
You will need at least one active motion zone to receive event notifications.

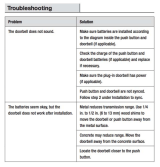
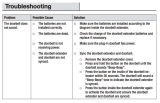
7KH'RRUEHOO,V,QVWDOOHG%XW,W
Will Not Turn On.
Install the Chime Kit
,I\RXKDYHQRWLQVWDOOHGWKHLQFOXGHGFKLPH
kit on your exisitng chime system the
$PFUHVW:L)LGRRUEHOOZLOOQRWZRUN
SURSHUO\)RUPRUHLQIRUPDWLRQRQKRZWR
VHWXSWKH&KLPH.LWUHIHUWRVHFWLRQ
Installing the Chime Kit.
Low Voltage
The Amcrest Wi-Fi doorbell is designed to
ZRUNZLWKWKHPDMRULW\RIVWDQGDUGGRRUEHOO
V\VWHPVVRLWZLOOUHTXLUHDWOHDVWYROWVRI
$&SRZHUWRWXUQRQ,I\RXUGRRUEHOO
V\VWHPUXQVDWDORZHUYROWDJHRUUXQVRQ
'&SRZHUUDWKHUWKDQ$&WKHGRRUEHOOZLOO
QRWZRUNSURSHUO\
,QWKLVFDVH\RXPD\QHHGWRKDYHDQ
HOHFWULFLDQLQVWDOODQHZWUDQVIRUPHUWR
EULQJWKHSRZHURXWSXWRIWKHV\VWHPWRDW
OHDVWYROWV
I Can’t Find the Amcrest Wi-Fi
Doorbell Hotspot on my Device.
,I\RXKDYHSUHVVHGWKHUHVHWEXWWRQRQWKHVLGHRIWKHGRRUEHOODQGWKHKRWVSRWIRU
WKHGHYLFHLVVWLOOQRWVKRZLQJRQ\RXUPRELOHGHYLFHJRWRWKHVHWWLQJVLQ\RXU
PRELOHGHYLFHDQGWXUQRǢ\RXU:L)LFRQQHFWLRQ:DLWDERXWVHFRQGVDQGWXUQ
LWEDFNRQ,IWKHGRRUEHOOƜVQHWZRUNVWLOOIDLOVWRVKRZPDNHVXUHWKHGRRUEHOOLV
FRQQHFWHGWR\RXUH[LVLWQJV\VWHPƜVZLULQJDQGWKDWLWPHHWVWKHQHFFHVVDU\SRZHU
UHTXLUHPHQWVRIYROWV$&a9$
,IQRQHRIWKHDERYHKDVKHOSHGWU\RQHRIWKHIROORZLQJ
7XUQRǢWKHFHOOXODUGDWDDQG%OXHWRRWKRQ\RXUPRELOHGHYLFHDQGWU\DJDLQ
You can turn them back on after the setup process is complete.
5HVHWWKHPRGHPRQ\RXU:L)LQHWZRUN8QSOXJLWDQGZDLWIRUDERXW
VHFRQGVWKHQSOXJLWEDFNLQDQGFRQWLQXHWKHVHWXSSURFHVV
3HUIRUPDKDUGIDFWRU\UHVHWE\KROGLQJGRZQWKHUHVHWEXWWRQRQWKHVLGHRI
WKHGRRUEHOOIRUVHFRQGV:DLWVHFRQGVWKHQUHSHDWWKHVHWXSSURFHVV
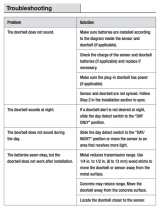
05
Troubleshooting
1
2
3
/