Page is loading ...

FOR DECORATIVE PENDANTS
INSTALLATION INSTRUCTIONS
6 Back off two canopy screws enough to remove mounting plate.
7 Pass building wires through large hole of mounting plate. Securely
attach mounting plate to J-Box using 2 screws.
8 Use aluminum tube to thread pendant cord through the shade.
9 Back off but do not fully remove the set screw in the nipple. Again use
the aluminum tube to help thread the pendant cord through the nipple.
Once a length of cord is through the canopy slide the aluminum tube out
of the canopy completely and slide it down to meet the shade.
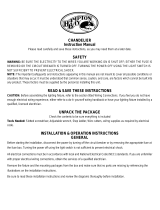
10 Make electrical connections as shown in the illustration. If a building
ground wire is present, connect the canopy’s bare ground wire using
a wire nut. If no building ground wire is present and the building wiring
is grounded using metallic conduit wrap the bare ground wire around
the green grounding screw and tighten screw.
11 Adjust the length of cord coming out of the canopy close to the desired
length. Gently tighten set screw.
12 Neatly coil and stow excess cord inside the canopy. Attach canopy
to mounting plate and tighten 2 screws.
13 Minor adjustment in pendant cord length, up or down, can be made
by backing off set screw. When satisfied with length tighten set screw.
Do not over-tighten as this may short out cable.
14 When using halogen bi-pin capsule lamps the frosted glass safety
capsule (provided, except for PKH328 Disc fixture) must be installed.
Do not touch the lamp with bare fingers as this may lead to early lamp
failure. Grasp lamp using plastic sleeve or clean soft cloth.
© 2009 Juno Lighting, LLC. Rev 9/09 P2799 pg 1 of 1
WARRANTY
Juno Lighting Group warrants that its products are free from defects in material and workmanship for one year from the date of
purchase. Juno Lighting Group’s obligation is expressly limited to repair or replacement, without charge, at Juno Lighting Group’s
factory after prior written return authorization has been granted. This warranty shall not apply to products which have been altered
or repaired outside of Juno Lighting Group’s factory. This warranty is in lieu of all other warranties, expressed or implied, and
without limiting the generality of the foregoing phrase, excludes any implied warranty of merchantability. Also, there are no
warranties which extend beyond the description of the product on the company’s literature setting forth terms of sale.
Product Services Phone (888) 387-2212
1300 South Wolf Road • Des Plaines, IL 60018 • Phone 800-323-5068 • www.junolightinggroup.com
IMPORTANT SAFETY INSTRUCTIONS
1 Read all instructions completely before beginning installation. Keep these
instructions in a safe place for future reference.
2 To reduce the risk of fire and burns, do not install pendant cords where the
exposed conductor can be short circuited or contact any
electrically conductive material.
3 Do not install any shade closer than 6 inches (15.25cm) from curtains
or similar combustible materials.
4 To reduce the risk of over-heating or fire, make sure all connections
are tight.
5 Turn off the electrical power before starting installation, before re-lamping,
or modifying the lighting system in any way.
WARNING
TURN OFF POWER TO THE JUNCTION BOX BEFORE INSTALLATION.
SAVE THESE INSTRUCTIONS
TRANSFORMER
CANOPY
TEMPORARILY
USE ALUMINUM
TUBE HERE TO
THREAD CORD
ALUMINUM TUBE
MOUNTING PLATE
SHADE
LAMP
SAFETY CAPSULE
6
7
9
8
14
13
11
12
10

DE ACCESORIOS DECORATIVOS COLGANTES
INSTRUCCIONES DE INSTALACIÓN
6 Afloje dos tornillos del rosetón lo suficiente para retirar la placa de montaje.
7 Pase los cables del edificio a través del orificio grande de la placa de montaje.
Fije firmemente la placa de montaje a la caja de empalmes con 2 tornillos.
8 Use el tubo de aluminio para pasar el cable del accesorio colgante a través de
la pantalla.
9 Afloje pero no retire totalmente el tornillo de fijación del niple. Use nuevamente
el tubo de aluminio para ayudar a pasar el cable del accesorio colgante por el
niple. Una vez que pasó un tramo del cable a través del rosetón, extraiga
completamente el tubo de aluminio del mismo y deslícelo hacia abajo hasta la
pantalla.
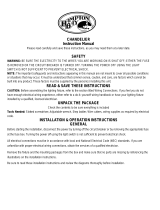
10 Haga las conexiones eléctricas como se indica en la ilustración. Si existe un
cable de tierra de la instalación del edificio, conecte a dicho cable el alambre
desnudo del rosetón con un capuchón de empalme. Si no existe cable de
tierra de la instalación del edificio y la misma está puesta a tierra usando el
conducto metálico, envuelva el alambre desnudo alrededor del tornillo verde
de conexión a tierra y apriete el tornillo.
11 Ajuste la longitud del tramo de cable que sale del rosetón a la longitud
aproximada deseada. Apriete cuidadosamente el tornillo de fijación.
12 Enrolle e introduzca cuidadosamente el exceso de cable en el rosetón. Fije el
rosetón a la placa de montaje y apriete los 2 tornillos.
13 Puede hacerse un ajuste menor de la longitud del cable del accesorio
colgante, hacia arriba o abajo, aflojando el tornillo de fijación. Una vez que
esté satisfecho con la longitud, apriete el tornillo de fijación.
No lo apriete el exceso, puesto que podría cortocircuitar el cable.
14 Si usa lámparas halógenas con cápsula de dos terminales, se debe instalar la
cápsula de seguridad de vidrio esmerilado (provista, excepto para el accesorio
tipo disco PKH328). No toque la lámpara con los dedos desnudos, puesto que
puede causar la falla prematura de la misma. Tome la lámpara usando una
funda plástica o un trozo limpio de tela.
© 2009 Juno Lighting, LLC. Rev 9/09 P2799 pág 1 de 1
GARANTÍA
Juno Lighting Group garantiza que sus productos están libres de defectos de material y mano de obra durante un añ o a partir de la fecha de
compra. La obligación de Juno Lighting Group se limita expresamente a la reparació n o el reemplazo sin cargo, en la fábrica de Juno Lighting
Group, previo otorgamiento de una autorización de devolució n por escrito. Esta garantí a no aplica a productos que hayan sido alterados o
reparados fuera de la planta de Juno Lighting Group. Esta garantí a reemplaza a todas las demás garantí as, expresas o implí citas, y sin
limitar la generalidad de la frase previa, excluye toda garantí a implí cita de comerciabilidad. Además, no existen garantí as que se extiendan
más allá de la descripción del producto en la literatura de la compañ í a que establece los té rminos de venta.
Telé fono de Servicios de productos (888) 387-2212
1300 South Wolf Road • Des Plaines, IL 60018 • TEL. 800-323-5068 • www.junolightinggroup.com
INSTRUCCIONES IMPORTANTES PARA LA SEGURIDAD
1 Lea detenidamente todas las instrucciones antes de comenzar la instalación.
Guarde estas instrucciones en lugar seguro para referencia futura.
2 Para reducir el riesgo de incendio y quemaduras, no instale los cables del
accesorio colgante en lugares en que el conductor expuesto pueda ser
cortocircuitado o estar en contacto con cualquier material conductor.
3 No instale ninguna pantalla a una distancia menor de 6 pulgadas (15 cm) de
cortinas o materiales combustibles similares.
4 Para reducir el riesgo de incendio o recalentamiento, asegúrese de que todas las
conexiones estén apretadas.
5 Desconecte el suministro eléctrico antes de comenzar la instalación, cambiar la
lámpara o modificar el sistema de iluminación de cualquier manera.
ADVERTENCIA
ANTES DE LA INSTALACIÓN, DESCONECTE EL SUMINISTRO ELÉCTRICO
DE LA CAJA DE EMPALMES.
GUARDE ESTAS INSTRUCCIONES
TRANSFORMADOR
ROSETÓN
USE
TEMPORALMENTE
AQUÍ EL TUBO DE
ALUMINIO PARA
PASAR EL CABLE
TUBO DE ALUMINIO
PLACA DE MONTAJE
PANTALLA
LÁMPARA
6
7
9
8
14
13
11
12
10
CÁPSULA DE
SEGURIDAD
/