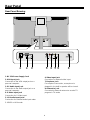
Palsonic TFTV1720D is a versatile device that combines a high-resolution LCD display, a DVD player, and a TV receiver into one compact system. It supports multiple modes, including DVD, TV, AUX, S-VIDEO, and PC, allowing you to enjoy a wide range of media content. The DVD player is compatible with various disc formats, including DVD, DVD+/-R, CD, CD-R, CD-RW, and JPEG, providing you with a vast selection of entertainment options.
Palsonic TFTV1720D is a versatile device that combines a high-resolution LCD display, a DVD player, and a TV receiver into one compact system. It supports multiple modes, including DVD, TV, AUX, S-VIDEO, and PC, allowing you to enjoy a wide range of media content. The DVD player is compatible with various disc formats, including DVD, DVD+/-R, CD, CD-R, CD-RW, and JPEG, providing you with a vast selection of entertainment options.


-
 1
1
-
 2
2
-
 3
3
-
 4
4
-
 5
5
-
 6
6
-
 7
7
-
 8
8
-
 9
9
-
 10
10
-
 11
11
-
 12
12
-
 13
13
-
 14
14
-
 15
15
-
 16
16
-
 17
17
-
 18
18
-
 19
19
-
 20
20
-
 21
21
-
 22
22
-
 23
23
-
 24
24
-
 25
25
-
 26
26
-
 27
27
-
 28
28
-
 29
29
-
 30
30
-
 31
31
-
 32
32
-
 33
33
-
 34
34


Palsonic TFTV1720D is a versatile device that combines a high-resolution LCD display, a DVD player, and a TV receiver into one compact system. It supports multiple modes, including DVD, TV, AUX, S-VIDEO, and PC, allowing you to enjoy a wide range of media content. The DVD player is compatible with various disc formats, including DVD, DVD+/-R, CD, CD-R, CD-RW, and JPEG, providing you with a vast selection of entertainment options.
Ask a question and I''ll find the answer in the document
Finding information in a document is now easier with AI
Related papers
-
Palsonic TFTV1525D Owner's manual
-
-
-
-
-
-
-
-
-
Other documents
-
COBY electronic TF-DVD7107 User manual
-
COBY electronic TF DVD 3299 User manual
-
Curtis DVD Player DVD8078 User manual
-
Akura ACLCD15DVD User manual
-
Polaroid FXM-1911C User manual
-
-
-
-
Logik L17LID648 User manual
-
Sweex TV019 - QUICK_START_GUIDE User manual