Page is loading ...

14" Color Television/DVD Player
TDX-142
20060510

1
C A UTI ON
RISKOFELECTRICSHOCK
DONOTOPEN
This symbol indicates that this product incorporates
double insulation between hazardous mains voltage
and user accessible parts.
When servicing use only identical replacement parts.
Caution: To reduce the risk of electric shock, do not remove cover (or back). No user
serviceable parts inside. Refer servicing to qualified service personnel.
This symbol indicates important
instructions accompanying the
product.
To reduce the risk of fire or electric shock, do not expose this product to rain or moisture.
The apparatus must not be exposed to ripping or splashing. Objects filled with liquids,
such vases or drinking glasses, must never be placed on the apparatus.
1. Read these instructions.
2. Keep these instructions.
3. Heed all warnings.
4. Follow all instructions.
5. Do not use this apparatus near water.
6. Clean only with dry cloth.
7. Do not block any ventilation openings. Install in accordance with the manufacturer's
instructions.
8. Do not install near any heat sources such as radiators, heat registers, stoves, or other
apparatus (including amplifiers) that produce heat.
9. Do not defeat the safety purpose of the polarized or grounding-type plug. A polarized plug
has twoblades with one wider than the other. A grounding type plug has two blades and
a third grounding prong. The wide blade or the third prong is provided for your safety. If
the provided plug does not fit into your outlet, consult an electrician for replacement of
the obsolete outlet.
10. Protect the power cord from being walked on or pinched particularly at plugs,
convenience receptacles, and the point where they exit from the apparatus.
11. Only use attachments/accessories specified by the manufacturer.
This symbol indicates "dangerous voltage"
inside the product that presents a risk of
electric shock or personal injury.
WARNING
IMPORTANT SAFETY INSTRUCTIONS
Important Safeguards
Important safety instructions

2
ANTENNA
ANTENNA
DISCHARGE UNIT
(NEC SECTION 810-21)
GROUNDING CONDUCTORS
GROUND CLAMPS
POWER SERVICE GROUNDING
ELECTRODE SYSTEM
(NEC SECTION 810-21)
(NEC ART 250 PART H)
NEC-NATIONAL ELECTRICAL CODE
ELECTRIC
SERVICE
EQUIPMENT
LEAD IN
WIRE
12. Use only with the cart, stand, tripod, bracket, or table specified by the
manufacturer, or sold with the apparatus. When a cart is used, use
caution when moving the cart/apparatus combination to avoid injury
from tip-over.
13. Unplug this apparatus during lightning storms or when unused for
long periods of time.
14. Refer all servicing to qualified service personnel. Servicing is required when the
apparatus has been damaged in any way, such as power-supply cord or plug is damaged,
liquid has been spilled or objects have fallen into the apparatus, the apparatus has been
exposed to rain or moisture, does not operate normally, or has been dropped.
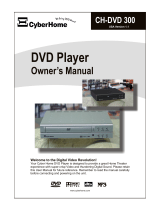
15. If an outside antenna or cable system is connected to the product, be sure the antenna
or cable system is grounded so as to provide some protection against voltage surges
and built-up static charges. Section 810 of the National Electrical Code, ANSI/NF PA No.
70-1984(Section 54 of Canadian Electrical Code, Part 1) provides information with
respect to proper grounding of the mast and supporting structure, grounding of the
lead-in wire to an antenna-discharge unit, size of grounding conductors, location of
antenna-discharge unit, connection to grounding electrode. See following example
16. Mains plug is used as the disconnect device. It shall remain readily operable and should
not be obstructed during intended use
.
.
Important Safeguards
Important safety instructions

3
Table of Contents
Important Safeguards.......................................1
Overview of the function keys..........................4
The Remote Control.........................................5
TV Function Buttons....................................5
DVD Function Buttons.................................6
Using TV Menus
TV Menus.........................................................7
TV Menu Navigation...................................7
The PICTURE Menu...................................7
The SOUND Menu......................................7
The TUNING Menu.....................................8
The FUNCTION Menu................................8
Playing Discs
DVD Basics.....................................................11
Regional Coding.......................................11
Using Different Menus..............................11
Types of Discs Your DVD Will Play...........11
Search Options................................................12
Picture Scan..............................................12
Chapter Advance.......................................12
Playback Options..............................................12
Repeat........................................................12
Zoom...........................................................12
DVD Information................................................13
Display Info........................................................14
DVD Menu System............................................14
DVD Menu Navigation.......................................15
Setup Menus..........................................................15
General Setup Page...........................................15
TV Display.......................................................15
Angle Mark......................................................15
OSD Lang........................................................15
Screen saver....................................................16
Last Memory...................................................16
Speaker Setup Page.........................................16
Downmix........................................................16
Dual Mono.....................................................16
Dynamic.........................................................17
Preference Page...............................................17
PBC...............................................................17
Audio.............................................................17
Subtitle..........................................................17
Disc Menu.....................................................18
Default..........................................................18
Playing Audio CDs..................................................18
Playing Picture CDs...............................................19
Playing CD files (JPEG )........................................19
Other Information
Troubleshooting......................................................20
Recommendations and information
concerning discs.....................................................23
Additional Information.............................................24
External connection................................................25
Specifications.........................................................26
Package Accessories.............................................26
Polaroid Service and Support Information.............27
Table of Contents

Remote Sensor
Play/Pause REV. Button Open/Close Button Menu Button
Power Indicator Stop Button
Power Switch
FWD. Button Input Button Volume Down
Button
Channel Down
Button
Channel Up
Button
Volume Up
Button
Video Input Jack
Audio Input Jack(L)
Audio Input Jack(R)
Headphone
Overview of the function keys

INPUT
TV
MUTE
DISPLAY
PICTURE
SLEEP
RECALL
POWER
VOL. (left and right) buttons
CH (up and down) buttons
MENU
0-9 (Number buttons)
AUDIO
MTS/SAP
Other buttons:
Press it to switch between AV/DVD input and RF
(antenna) input.
PressthebuttontoselecttheremotecontrolintheTVmode.
Press the button to minimize the volume level. Press
again to restore the original volume level.
Press the button to display the channel information
Press the button to display the picture preset.
Pressthebuttontosetthesleeptimer.
Press the button to return the previous channel. If the
unit is in menu mode, press the Go Back button to return previous
menu screen.
PressthebuttontoturnonandturnofftheTV.
Pressthebuttontoincreaseor
decrease the TV volume.
Pressthebuttontoscanupor
down the current channel list. Press once to select the channel
up or down, press and hold to select your desired channel. If
your TV is in standby mode, press these buttons to turn on TV.
In AV mode, press these two buttons to switch to TV mode.
Displays the TV's Main menu.(See page 7 for details.)
Press number buttons to select
channel and to set time setting directly. Press 0-9 to select a
channel for example, to select channel 10, press 1 and 0 (interval
time should be less than 1.5 seconds), the channel will change
after 1.5 seconds. If you input "0" firstly, when input the second
number, the channel will change to this channel number without
waiting, for example, to select channel 8, press 0 and 8, the
channel will change immediately.
Four preset audio settings for you to select (MEMORY
/STANDARD/NEWS/MUSIC)
This button is not activated for this model.
The buttons on the remote control other than
listed above are not available for TV function.
The Remote Control
TV Function Buttons
5
The Remote Control
Arrow buttons for
TV Menu system

DVD Function Buttons
Press the DVD button to select DVD mode.
POWER Press the button to switch on and switch off the power.
Press the buttons to increase
or decrease the TV volume.
Press the button to minimize the volume level. Press again
to restore the original volume level.
PressthebuttontoopenorclosetheDVDdisc
tray.
Press the button to start or pause the disc
playback. Press the button again to resume playback.
Pressthebuttontostopthediscplayback.
Press the button to display the title, chapter and elapsed time
information during disc playback. Press again to hide the display
information.
Press the button to zoom in or zoom out the picture during
DVD disc playback.
Press the TITLE button to display TITLE menu during DVD disc
playback.
Press the button to repeat a chapter or title on DVD or a
track on Audio CDs.
Press the button to skip to the specified chapter/track or
time. See page 16 for details.
Advances to the next chapter or track.
Reverses to the preceding chapter or track.
Same to TV function
Press the button to select a subtitle language.(only if
the loaded disc is encoded with multiple Subtitle languages)
Press the button to select audio soundtrack language. (only
if the loaded disc is encoded with multiple languages)
Press the button to select the camera angle of multiple
screen shot.(only if the loaded disc is encoded with multiple camera
angle)
PressthebuttontoturnthenavigationOFFandthedisc
playback starts directly without entering the menu. Press again to turn
the navigation ON.
Press the button to display the DVD setup menu when the
DVD player is in stop mode.
Press the button to search backward through the disc during
disc playback. Press repeatedly to increase the searching speed.
Press the button to search forward through the disc during
disc playback. Press and hold the button to increase the searching
speed.
Press the buttons to
move through the on-screen menu system.
Press the button to select and highlight the desired item
on the screen display.
The buttons on the remote control other than listed
above are not available for DVD function.
DVD
VOL. (left and right) buttons
MUTE
OPEN/CLOSE
PLAY/PAUSE
STOP
INFO
ZOOM
TITLE
REPEAT
SKIP
MENU
SUBTITLE
AUDIO
ANGLE
PBC
GUIDE
REV
FWD
Arrow buttons(up, down, left, right)
OK button
Other buttons:
The Remote Control
Arrow buttons for
DVD Menu system
The Remote Control

PICTURE
BRIGHTNESS
CONTRAST
COLOR
TINT
SHARPNESS
COLOR TEMP NORMAL
SOUND
VOLUME
TREBLE
BASS
BALANCE
SURROUND
STEREO
The SOUND Menu
The SOUND menu offers different audio options.
VOLUME Decreases/increases sound volume.
TREBLE Decreases/increases high-pitched sound.
BASS Decreases/increases low-pitched sound.
BALANCE Adjusts left/right speaker balance.
SURROUND Turns the surround sound on or off.
STEREO Adjust different kinds of the stereo sound effect.
The PICTURE Menu
The PICTURE menu allows you make adjustments to your
picture settings.
BRIGHTNESS Adjusts the brightness of the picture.
CONTRAST Adjusts the contrast between the light and
dark areas of the picture.
COLOR Adjusts the color intensity or saturation.
SHARPNESS Adjusts the sharpness of the picture.
TINT Adjusts the balance between the red and
green levels.
COLOR TEMP Provides three color adjustments: NORMAL,
COLD(for more blue in the picture), and
WARM (for more red in the picture).
Using TV Menus
TV Menus
TV Menus let you control picture quality and features available for TV viewing. There is a different menu
system for DVD features, described on page 16.
Note: Remember to use the TV arrow buttons when accessing the TV's menu system.
TV Menu Navigation
1. To bring up the TV's menu system, press the MENU button.
2. Press MENU button repeatedly to select PICTURE, SOUND, TUNING or FUNCTION submenu.
3. Press the / buttons on the remote (or CH / on the front of the TV) to select the option.
4. Use the arrow buttons / on the remote (or the VOL / buttons on the front of the TV) to
change the setting of the option.
5. Press the MENU button on the remote to exit the menu system.
pq pq
tu pq
Using TV Menus

The TUNING Menu
The TUNING menu is used to adjust the signal source, channel
setup and reception of the TV.
CHANNEL Use the VOL / buttons on the remote
control (or t
SOURCE Selects AIR or CABLE. Select AIR to receive a
broadcast signal. Select CABLE to receive a
CATV signal.
vw
he VOL / buttons on the
front of the TV) to scroll through the channels
available. You can enter the channel number
directly using the number buttons.
DELETE CH Select YES to remove the channel.
Select NO to enter to the channel.
rs
LABEL
AUTO SEARCH
To add a channel description:
1. Open the OSD and select the TUNING menu.
2. Enter the channel you want to add a description for in the CHANNEL option.
3. Select the LABEL option.
4. Press the VOL button, then enter the first character of your label.You can press the
number button repeatedly in a interval of less than one second to select the character you
want.For example,if you want to input 'L',you can press '5' four times rapidly.When you stop
pressing,the cursor will move to the next character after one second.
5. Enter the rest of characters. After you enter the fifth character, you description is saved. You
must enter the five characters, or the label will not be saved.
6. If you want to erase a description, repeat this task and press VOL button to delete the
characters.
Starts channel search and stores the channels automatically. Use the VOL /
buttons on the remote control to begin the auto search. If you wish to stop the
search before completed, press MENU.
w
v
vw
DELETE CH NO
CHANNEL 8
SOURCE AIR
LABEL AAAAA
AUTO SEARCH
TUNING
Using TV Menus
Using TV Menus

CHILD LOCK Select OFF to turn CHILD LOCK off.
Select ON to activate it. The CHILD LOCK
feature takes effect after the TV is turned
off and back on again. The initial password
is MUTE+999. The initial password is used
to clear the current password and set a new
password, so this password must keep
secret, or else the password will lose
efficacy.
CCD Offers eight closed captioned modes,
including four text modes.
V-CHIP Press VOL button in front of the TV (or
VOL button on the remote control to see
the figure left.
CONFIRM PASSWORD Press four digital buttons on the
remote control. V-CHIP menu can
not be displayed without inputting
the right password. The initial word
is 0358.
V-CHIP Adjusts V-CHIP function on or off.
r
s
LANGUAGE ENGLISH
SCREEN SAVER
CHILD LOCK
CCD OFF
V-CHIP
FUNCTION
V-CHIP
V-CHIP
V-CHIP [ON]
MPAA: [N/R]
TVPG SETTING
RETURN
CONFIRM PASSWORD ----
RETURN
Using TV Menus
Using TV Menus
LANGUAGE ENGLISH
SCREEN SAVER
CHILD LOCK
CCD OFF
V-CHIP
FUNCTION
The FUNCTION Menu
The FUNCTION menu is used to setup specific features of the
TV including language and closed captioning.
LANGUAGE Select the language (ENGLISH,FRANCAIS,
ESPANOL) you want the TV menus to be
displayed in.
SCREEN Turns the screen function on (BLUE BACK-
GROUND and SCREEN SAVER) or off.

TVPG SETTING Press VOL / button on the remote
control to go to TVPG SETTING.
vw
RETURN Return to the previous menu
Hierarchy of Age-Based Ratings
Content Themes
D Sexually explicit dialogue
Fantasy violence
Adult language
Sexual situations
Violence
FV
L
S
V
TV-Y
All Children
TV-Y7
Directed to Children 7 years and older
TV-G
General Audience
TV-PG
Parental Guidance Suggested
TV-14
Parents Strongly Cautioned
TV-MA
Mature Audience Only
Using TV Menus
Using TV Menus
MPAA Select the MPAA ratings. (When select a
movie rating, the system will automatically
block all other movies with higher ratings.
N/R

Playing Discs
Playing Discs
Regional Coding
The DVD player and the discs are coded by region. These regional codes must match in
order for the disc to play.
This unit's code is Region 1. Discs with other regional codes can't be played in this unit.
Using Different Menus
Each disc is programmed with different features. There are two separate menu systems
that you can use to access DVD features: the disc's menu and the DVD player's menu
(separate from the TV's menu system). Remember that a feature only works if the disc was
programmed with that feature. For example, if you choose subtitles, the subtitles only appear
if the disc was created with subtitles. The DVD menu system is explained on page 16.
The Disc menu- The disc menu is part of each disc and is separate from the DVD
player's menu system. The contents of each disc's menu vary according to how the disc
was created and what features are included. Sometimes a disc's menu appears
automatically when you insert the disc, or you can access it by pressing the MENU button.
Types of Discs Your DVD Will Play
DVD discs - Contain video.
Audio discs - Contain musical or sound content only (such as CD, CD-R, CD-RW).
Before you load a disc, make sure that it is compatible with the player. Note that the following
discs CANNOT be used with this player:
Laser disc
CD-I, CD-ROM, DVD-ROM
MiniDisc
CD-G discs play audio only, not graphics
To Load and Play a Disc
1. Press the DVD button on the remote to make sure the unit is in the DVD mode.
2. Press the (OPEN/CLOSE) button on the remote to open the disc tray. Place a disc gently
into the tray with the disc's label facing up (double-sided discs have content on both sides,
so you can place either side up).
3. Press the (OPEN/CLOSE) button again to close the disc tray.
The player reads the disc's table of contents, and then one of following happens depending
on how the disc was programmed:
No disc menu appears, a screen saver is displayed. (Press the DVD button to put the
player in DVD mode.)
The disc menu appears. (Highlight the PLAY option and press OK.)
The disc menu appears on the screen when you press . (Highlight PLAY and press
OK.)
The disc starts playing automatically.
If no picture or screen saver is displayed, press the DVD button to put the player in the DVD
mode.
Playing Discs

Playing Discs
Search Options
You can use the following search features with some discs:
Picture Scan
When you're playing a disc, each time you press (Forward) or (Reverse), your DVD
player scans the disc faster until you reach the fastest scan speed. To resume normal
playback, press .
Chapter Advance
While a DVD is playing, press to advance to the next title or chapter. Press the button
to go to the previous title or chapter.
Playback Options
With some discs, you can access playback features directly from the remote control.
Repeat
For DVD discs, press the REPEAT button on the remote to repeat a chapter. Press once
more to repeat a title.
Press three times to repeat the entire disc disc, and press four times to cancel repeat:
For audio CDs, press REPEAT to repeat a TRACK. Press REPEAT twice to repeat the entire
(ALL) disc, and three times to cancel repeat.
Zoom
1. While you're playing a disc, press ZOOM (the player zooms in on the image). Each time
you press ZOOM, the picture is magnified up to 4X.
2. To see other parts of the picture when you've zoomed in on the image, try pressing the
/ / / buttons to go in corresponding directions.pqtu
Playing Discs

Playing Discs
DVD Information
Title/Chapter
To directly access a title or a chapter:
1. Press SKIP button on the remote control repeatedly. Select Title or Chapter using the /
,
2. Enter a title or chapter number using the numeric buttons.
Note: Many discs only have one title.
Audio
Some discs have several audio tracks used for different languages.
To change the track and language during playback:
1. Press AUDIO button on the remote control repeatedly.
2. Choose a language your desired.
This option is only available if the disc offers a number of dialogue languages.
When you change the dialogue language your choice of language is only applicable to
the disc being played. When you eject the disc or switch off the player, the dialogue
language will revert to the one you selected in the Preferences menu (see page 17)
Subtitles
Subtitles are disabled by default. To enable the subtitle function while the disc is playing;
1. Press SUBTITLE button on the remote control repeatedly.
2. Choose a language your desired.
When you change the language of the subtitles your choice of language only applies for
the disc currently being played. When you eject the disc and switch off the player, the
subtitles will be displayed again in the subtitle language you selected in the Preferences
menu (see page 17)
t
u
Playing Discs

Playing Discs
Angle
Some discs offer different camera angles for specific scenes. To change the camera angle
during playback:
1. Press ANGLE button on the remote control.
2. Press ANGLE button repeatedly to select the angle or enter an angle number using the
numeric buttons.
If the disc was recorded using a single camera angle, this function is not available. There are
very few discs offering more than one angle.
TT Time/CH Time
To directly access a location on the disc which does not correspond to the start of a title or
a chapter:
1. Press SKIP button on the remote control twice.
2. Enter a time with the numeric buttons (format h:mm:ss).
Repeat
To select a playback mode while the disc is playing:
Press REPEAT button on the remote control repeatedly to select a repeat playback mode.
Display Info
Press the INFO button repeatedly during playback to show:
DVD: Title elapsed time, Title remaining time, Chapter elapsed time, Chapter remaining time,
Display Off.
VCD, SVCD and audio CD: Single elapsed time, Single remaining time, Total elapsed time,
Total remaining time, Display Off.
DVD Menu System
The DVD player menu system lets you set up features for your DVD player. There is a
different menu system that controls TV features (see page 7). The DVD setup menu is
accessed with the GUIDE button.
Note: A title or chapter can also be accessed by entering the
number in the on-screen display.
Note: Remember to use the DVD arrow buttons when accessing the
DVD player's menu system.
Playing Discs

Playing Discs
DVD Menu Navigation
1. Make sure the remote is in the DVD mode by pressing DVD button.
2. Press GUIDE. The General Setup Page menu is displayed.
3. Use the and buttons to display the different setup menus.
4. Use the and buttons to highlight a menu or option item. Use button to access the
submenu and the and buttons to highlight your selection. (Use button to go back
the menu).
5. Press the OK button to confirm your selection.
6. Press GUIDE to exit the DVD menu system.
Setup Menus
These menus are used to set up TV screen format for DVD viewing and other DVD functions.
General Setup Page
tu
pq u
pq t
Angle Mark
The ANGLE MARK option is used when DVD discs contain scenes which have been shot
simultaneously from a number of different camera angles.
Note: Currently, very few discs have this feature.
Use the ANGLE button on the remote control to access the Angle Mark.
ON: Select if the DVD disc contains camera angles. An angle symbol appears on the screen.
OFF: Select if the DVD disc does not contain angles.
OSD Lang
The OSD Lang controls the language used to display text in the DVD system menus. The
default setting is English. Language options available are English, French, Italian, Portuguese,
Spanish and Russian.
TV Display
TV Display is used only when the TV/DVD is connected
to another TV. Choose one of the following options:
Normal/PS (Pan Scan): Select this option when the
TV/DVD is connected to a standard 4:3 aspect ratio
TV. A 16:9 wide screen picture is shown with some
of picture partly cut off.
Normal /LB (Letter Box): Select this option when the
TV/DVD is connected to a standard 4:3 aspect ratio
TV. A full 16:9 wide screen picture is shown with black
bars on the top and bottom.
Wide: Select this option when the TV/DVD is connected
to a wide screen TV.
Playing Discs

Playing Discs
Screen Saver
The Screen Saver is a graphic that randomly moves around the screen to guard against
screen burn-in.
ON: Screen saver turned on.
OFF: Screen saver turned off.
Last Memory
The Last Memory feature enables you to resume play at the same point at which you stopped
playback, even if the disc is removed and re-inserted.
ON: Resumes play from where the disc was last stopped.
OFF: Plays from the beginning.
The Speaker Setup Page
Dual Mono
Dual Mono give you a fuller, better balance of audio based on the disc that you are playing.
Stereo: Select this option to output audio from the left and right channels to the left and
right speakers.
L-Mono: Select this option to output audio from the left channel to the two front speakers.
R-Mono: Select this option to output audio on the right channel to the two front speakers.
Mix -Mono: Select this option to hear a mixture of the left and right channels on each of
the two speakers.
Downmix
Downmix allows you to downmix audio to a receiver and
generate a multi-channel or stereo sound.
LT/RT: Select this option when connecting the TV/DVD
to an audio system with Dobly Pro-Logic.
Stereo: Select this option when connecting the TV/DVD
to and audio system that does not have Dolby Pro-Logic.
Playing Discs

Playing Discs
Dynamic
This feature allows you to reduce the range between loud
and low sounds to your p rsonal preference. It increase
the lowest sounds and quiets the loudest sounds. Default
setting is OFF.
Use the arrow buttons to access and change the dynamic
setting and press OK to confirm.
e
PBC (Playback Control)
The Playback Control function turns the Navigate feature
ON or OFF. In the OFF mode, the disc begins playback
without entering the disc's menu. In the ON mode, you
must select play in the disc's menu.
OFF: The disc begins playback without entering the disc's
menu.
ON: You must select Play in the disc's menu.
Audio
Some discs are recorded with different languages. You can select a default language so discs
will play in the language of your choice, if the disc was recorded with multiple tracks. Language
choice are: English, French, German, Spanish, Chinese, Japanese, Korean.
Note: Discs are created differently and not all discs are recorded with multiple languages.
The DVD player cannot override some langauge preferences. If a disc's software was created
to play the movie (title) in a preferred language, the preference you set might be ignored.
Also, if the language isn't available on the movie you're playing, the disc's default language is
chosen.
Subtitle
This option allows you to select a language used to display subtitles (if subtitles are turned on
and are available on the disc). Language choices are: English, French, German, Spanish,
Chinese, Japanese, Korean, Russian.
Note: Not all discs offer subtitles with multiple languages.
Preference Page
Playing Discs

Playing Discs
Disc Menu
This option allows you to select a default language for the disc's menu. Language choices are:
English, French, German, Spanish, Chinese, Japanese, Korean.
Default
The DEFAULT option restores the setup options to the factory settings, with the exception of
password. This option is available only in the stop mode or when the disc tray is open.
Playing Audio CDS
Your DVD player has many of the same features as an audio CD player. This section explains
how to play audio CDs in your TV/DVD player.
Scan Disc
You can scan through the disc when you're playing it by doing the following:
1. Press the (Fast Forward) or (Reverse) button on the remote.
2. Press the button again to scan at a faster speed.
3. Press the PLAY/PAUSE button at any time to resume normal playback.
Track Advance or Reverse
1. Press the or button on the remote when you're playing a disc.
2. Each time you press the button, the CD advances (or reverses) one track.
Pause
1. Press the PLAY/PAUSE button when a disc is playing to pause the disc.
2. Press it again to resume normal playback.
Playing Discs

Playing Discs
Playing Picture CDs
Insert a picture CD into the disc tray. The pictures on the CD are played in a slide show.
1. To stop on a certain picture, press PLAY/PAUSE.
2. Press the arrow keys to rotate the picture.
Playing CD Files (JPEG)
When a CD with JPEG files is inserted, a File Manager window is displayed.
The DVD player automatically begins playback of the files on the disc. Use the arrow buttons
to navigate through the folders and select files for playback.
When displaying JPEG files, press (Fast Forward) repeatedly to change the speed of
the slide show.
.
Playing Discs
/