Harbor Freight Tools 93722 User manual
- Category
- Power tools
- Type
- User manual

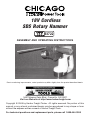
18V Cordless
SDS Rotary Hammer
ASSEMBLY AND OPERATING INSTRUCTIONS
3491 Mission Oaks Blvd., Camarillo, CA 93011
Visit our Web site at http://www.harborfreight.com
Copyright © 2005 by Harbor Freight Tools
®
. All rights reserved. No portion of this
manual or any artwork contained herein may be reproduced in any shape or form
without the express written consent of Harbor Freight Tools.
For technical questions and replacement parts, please call 1-800-444-3353
®
93722
Due to continuing improvements, actual product may differ slightly from the product described herein.

SKU 93722
For technical questions please call 1-800-444-3353
Page 2
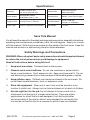
Specifications
Save This Manual
You will need the manual for the safety warnings and precautions, assembly instructions,
operating and maintenance procedures, parts list and diagram. Keep your invoice
with this manual. Write the invoice number on the inside of the front cover. Keep the
manual and invoice in a safe and dry place for future reference.
Safety Warnings and Precautions
WARNING: When using tool, basic safety precautions should always be followed
to reduce the risk of personal injury and damage to equipment.
Read all instructions before using this tool!
1. Keep work area clean. Cluttered areas invite injuries.
2. Observe work area conditions. Do not use machines or power tools in
damp or wet locations. Don’t expose to rain. Keep work area well lit. Do not
use electrically powered tools in the presence of flammable gases or liquids.
3. Keep children away. Children must never be allowed in the work area. Do
not let them handle machines, tools, or extension cords.
4. Store idle equipment. When not in use, tools must be stored in a dry
location to inhibit rust. Always lock up tools and keep out of reach of children.
5. Use the right tool for the job. Do not attempt to force a small tool or
attachment to do the work of a larger industrial tool. There are certain
applications for which this tool was designed. It will do the job better
and more safely at the rate for which it was intended. Do not modify this
tool and do not use this tool for a purpose for which it was not intended.
:snoitcnuF
,llirDremmaHsseldroC
ylnoremmaHroylnollirD
:noitcurtsnoC
htiwgnisuoHcitsalP
stnenopmocleets
:ylp
puSrewoP
CDV81elbaegrahceR
Ha7.1kcaPyrettaBdCiN
:tinUgnigrahCregrahCtsaFruoh1CAV021
:hctiwSreggirTesreveR/d
rawroFgnikcoL:deepSelbairaV
mpr0401-0:llirD
mpb0013-0:remmaH
:epyTkcuhC)metsySevirDlaicepS(sulP-SDS:thgieWt
eN.sbL57.7

SKU 93722
For technical questions please call 1-800-444-3353
Page 3
6. Dress properly. Do not wear loose clothing or jewelry as they can be caught
in moving parts. Protective, electrically nonconductive clothes and nonskid
footwear are recommended when working. Wear restrictive hair covering to
contain long hair.
7. Use eye and ear protection. Always wear ANSI approved impact safety
goggles and full face shield. Wear an ANSI approved dust mask or respirator
when working around metal, wood, and chemical dusts and mists.
8. Do not overreach. Keep proper footing and balance at all times. Do not
reach over or across running machines.
9. Maintain tools with care. Keep tools maintained and clean for better and
safer performance. Follow instructions for lubricating and changing
accessories. Inspect tool cords periodically and, if damaged, have them
repaired by an authorized technician. The handles must be kept clean, dry,
and free from oil and grease at all times.
10. Disconnect power. Unplug Battery Charger when not in use.
11. Remove adjusting keys and wrenches. Check that keys and adjusting
wrenches are removed from the tool or machine work surface before
plugging it in.
12. Avoid unintentional starting. Be sure the switch is in the Off position when
not in use and before plugging in. Do not carry any tool with your finger on
the trigger, whether it is plugged in or not.
13. Stay alert. Watch what you are doing, use common sense. Do not operate
any tool when you are tired.
14. Check for damaged parts. Before using any tool, any part that appears
damaged should be carefully checked to determine that it will operate properly
and perform its intended function. Check for alignment and binding of moving
parts; any broken parts or mounting fixtures; and any other condition that may
affect proper operation. Any part that is damaged should be properly repaired
or replaced by a qualified technician.
15. Always use 2 hands when using this tool.
16. WARNING: Some dust created by power sanding, sawing, grinding, drilling,
and other construction activities, contain chemicals known [to the State of
California] to cause cancer, birth defects or other reproductive harm. Some
examples of these chemicals are:
Lead from lead-based paints
Crystalline silica from bricks and cement or other masonry products
Arsenic and chromium from chemically treated lumber
(California Health & Safety Code § 25249.5,
et seq.
)

SKU 93722
For technical questions please call 1-800-444-3353
Page 4
16. Guard against electric shock. Prevent body contact with grounded surfaces
such as pipes, radiators, ranges, and refrigerator enclosures.
17. Replacement parts and accessories. When servicing, use only identical
replacement parts. Use of any other parts will void the warranty. Only use
accessories intended for use with this tool. Approved accessories are
available from Harbor Freight Tools.
18. Do not operate tool if under the influence of alcohol or drugs. Read
warning labels on prescriptions to determine if your judgment or reflexes are
impaired while taking drugs. If there is any doubt, do not operate the tool.
19. Maintenance. For your safety, service and maintenance should be performed
regularly by a qualified technician.
20. Pacemaker safety warning. People with pacemakers should consult with
their physician(s) before using this product; operation of equipment in close
proximity to a heart pacemaker could cause interference or failure of the
pacemaker.
21. Do not use any bits other than SDS-plus bits designed for hammer
drilling. Use of improper bits may cause bit to fly out or break unexpectedly
possibly causing severe personal or property damage.
22. If bit binds, stop the drill. Never continue drilling if the bit binds, as you
may lose control of the drill, break a bit, or break the drill itself, resulting in
personal injury.
Note: Performance of the charger may vary depending on variations in local line
voltage. Extension cord usage may also affect tool performance.
Warning: The warnings, cautions, and instructions discussed in this instruction
manual cannot cover all possible conditions and situations that may occur. It
must be understood by the operator that common sense and caution are factors
which cannot be built into this product, but must be supplied by the operator.
REV 04/06

SKU 93722
For technical questions please call 1-800-444-3353
Page 5
Unpacking
When unpacking, check to make sure that the product is intact and undamaged,
and all accessories listed below are included.
SDS-plus Cordless Hammer Drill
18V Rechargeable Battery
Auxiliary Handle with Depth Gauge
Quick Charge Battery Recharge Unit
If any parts are missing or broken, please call Harbor Freight Tools at the number
on the cover of this manual.
Using the Battery Charger
NOTE: Battery will not reach full charge the first time they are charged. Allow
several cycles (operation followed by recharging) before the Battery will become
fully charged.
Battery Temperature Warning:
WARNING: Battery explosion may
cause serious personal or property injury
including death. Charge the Battery only
within a 50° to 100° F. temperature range.
Lower temperatures may inhibit charging.
Higher temperatures increase chance of
battery failure, including explosion.
Battery Charger Safety:
1. Charge the Battery only with the
included charger. Use of other
chargers may cause battery
failure including explosion.
2. Ensure that the Battery Charger
is connected only to a 120 VAC,
60 Hz power supply that includes a circuit breaker.
Using the Battery Charger
REV 05/06

SKU 93722
For technical questions please call 1-800-444-3353
Page 6
Working with the Rechargeable Battery
Charging the Battery:
1. Batteries are normally shipped with low or no charge to prevent potential
problems during shipment. Before use, you must charge your new Battery.
Initial charge time is approximately 1 hour. Subsequent recharge time is
approximately 1 hour.
2. Plug the battery charger into a 120 VAC, 60 Hz power outlet.
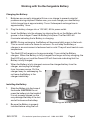
3. Insert the Battery into the charger by aligning the rib on the Battery with the
groove in the charger. Press the Battery into place. The Red LED will
illuminate indicating that a Battery is charging.
4. NOTE: During recharging, the Battery will become slightly warm to the touch.
This is normal and not a cause for concern. Do not keep the Battery or
charger in an environment of extreme heat or cold. They will work best at room
temperature.
5. The Red LED will remain on for approximately 1 hour while the Battery
charges. When the Battery is fully charged the charger will stop charging, the
Red LED will go out, and the Green LED will illuminate indicating that the
Battery is fully charged.
6. When the Battery is fully charged, remove the charged battery from the
charger, and unplug the charger
from its power source. Put the
charger away for safekeeping. Do
not leave the Battery in the
charger indefinitely.
Installing the Battery
1. Slide the Battery into the base of
the handle. CAUTION: Do not
press the battery into the handle if
it is not properly aligned, as this
may damage the body of the tool,
and will not secure the battery.
2. Be sure the Battery is properly
installed before using the tool.
Installing the Battery Pack

SKU 93722
For technical questions please call 1-800-444-3353
Page 7
Using the battery locks and Removing the Battery
1. After placing the Battery in the tool, battery locks on the side of the Battery
engage to prevent the battery from coming out accidentally.
2. To remove the Battery, depress the battery locks and remove the Battery by
pulling straight out.
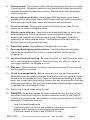
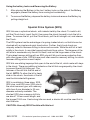
Special Drive System (SDS)
SDS bits use a cylindrical shank, with indents held by the chuck. To install a bit,
pull the Chuck back, insert the bit, then press the chuck forward to lock the bit in
place. To remove the bit, pull the Chuck back, pull the bit straight out, and release
the Chuck.
The SDS system has the advantage of a spring-loaded chuck, so that bits can be
chucked with a simple and quick hand action. Further, the bit and chuck are
uniquely suited to hammer drilling in stone and concrete. While the drill bit is held
solidly in the chuck, it can slide forward and back like a piston. The hammer of the
drill acts to accelerate only the drill bit itself, and not the large mass of the chuck.
That makes hammer drilling with an SDS-plus drill bit much more productive than
with other types of bits. SDS bits are most often used for masonry drilling, for which
hammer drilling action is most helpful.
SDS bits use sliding keyways that open to the end of the bit, which mate with keys
in the chuck. There are additional indents on the bit that are grasped by the chuck
to prevent the drill bit falling out. The
hammer of the drill hits the flat end of
the bit. NOTE: To allow the bit to freely
slide in the chuck, the shank of the bit
must be lubricated with grease.
SDS is available in three sizes, SDS,
SDS-plus, and SDS-max. SDS-plus is
the most common type, with masonry
drills from 5 mm diameter to 30 mm
diameter ordinarily available. The
shortest SDS-plus masonry drill bits
are about 110 mm overall length, and
the longest 1000 mm. If extra long bits are used, a shorter bit must be used first to
start the hole.
CAUTION: Use only SDS-Plus bits with this tool.
SDS-plus chuck operation

SKU 93722
For technical questions please call 1-800-444-3353
Page 8
Operation
For use as a Hammer Drill:
CAUTION: Use only impact grade SDS-Plus bits, designed for SDS-Plus hammer
drills. Standard bits will not be properly held by this Chuck, and may break
under the force created by this tool. SDS-Plus impact grade bits are available
from Harbor Freight Tools.
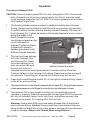
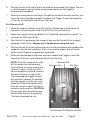
1. The Auxiliary Handle must be installed for additional stability when Hammer
Drilling. Always use both hands to hold this tool during hammer drill operation.
To install Auxiliary Handle, slide the Auxiliary Handle Assembly (32) over the
Front Housing (24). Tighten the screw in the Handle Assemble to lock in place.
Adjust the length of the
Depth Gauge Rod to stop
the drilling process when the
correct hole depth is
reached. Tighten the Depth
Gauge Rod in place by
tightening the screw in the
Auxiliary Handle Assembly.
2. This tool has three settings,
Drill Only, Hammer Only
and Hammer Drill. Select
the proper setting for the
work you will do. Be sure
the tool has come to a
complete stop before moving the selector to another setting. Move the
Function Selector to the Hammer Drill setting. Please see picture on page 9
for reference. This setting will allow the drill to hammer as well as turn.
3. Press the Forward-Reverse Switch (61) to the right for forward drilling, press it
to the left for reverse drilling.
4. The speed of the tool is controlled by squeezing the Trigger (60). Progressively increase
or decrease pressure on the Trigger to make the tool operate faster or slower.
5. The Hammer Drill is best suited for drilling into hard materials such as
concrete or masonry. Select an appropriate size and type SDS-Plus hammer
drill bit (not included). Insert it onto the Chuck and tighten securely. See
instructions on page 7 for inserting SDS-Plus drill bits.
Warning: Always wear ANSI approved safety glasses and full face shield
when hammer drilling. Caution: Always check around and behind the area
being drilled to prevent drilling into wires, pipes or causing other unintentional
property damage. Always use 2 hands when using this tool.
The Hammer Drill with
Auxiliary Handle Assembly
Handle Assembly screw

SKU 93722
For technical questions please call 1-800-444-3353
Page 9
6. Position the drill bit at the place to be drilled and squeeze the Trigger. The tool
is variable speed, and will rotate and hammer faster as the Trigger is
progressively squeezed.
7. When the forward end of the Depth Gauge Rod contacts the work surface, you
know the hole is the desired depth. Release the Trigger to stop the operation
of the tool, and withdraw the bit from the hole.
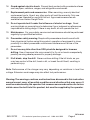
For Use as a Drill:
1. Move the Selector Switch to the Drill setting. Please see picture below for
reference. This setting will allow the drill to turn but not hammer.
2. Select and install an appropriate drill bit. Follow the instructions on page 7 for
installing an SDS-plus drill bit.
3. Start the drill by squeezing the trigger to be sure that the drill bit is properly
centered in the Chuck. Always use 2 hands when using this tool.
4. Position the drill bit at the appropriate point on the workpiece and squeeze the
trigger to start the drill operating. The tool is variable speed, and will rotate
faster as the Trigger is progressively squeezed.
5. When the desired depth has been reached, release the Trigger to stop the
operation of the tool, and withdraw the bit from the hole.
NOTE: This tool is reversible. If the
drill bit does not withdraw easily
from the hole, you may reverse the
rotation to help it come out. With
the tool stopped, move the Forward-
Reverse Switch from right to left.
Then squeeze the trigger, the drill
will operate in reverse. As needed,
stop the operation of the tool, and
press the Forward-Reverse Switch
from left to right to reset the drill in
forward rotation position. CAUTION:
Do not press the Forward-Reverse
Switch while the tool is operating.
This might damage the tool.
The Hammer Drill Selector Switch
Hammer Only
Hammer Drill
Drill Only

SKU 93722
For technical questions please call 1-800-444-3353
Page 10
For Use as a Hammer:
1. Move the Selector Switch to the Hammer setting. Position the bit on the work
material where desired. Squeeze the Trigger to make the tool operate. When
finished, release the Trigger to stop the tool.
NOTE: Always wear ANSI approved glasses and full face shield when
hammering. Keep hands and fingers away from the tool bit area to prevent
injury.
Troubleshooting
Tool will not operate or operates slowly:
1. Battery Pack may be discharged. Replace Battery Pack with a fresh one, or
recharge the Battery Pack.
2. Too great a load is being placed on the tool. Lighten pressure on workpiece.
Battery Pack loses charge quickly:
1. New Battery Pack will not hold a charge as long as older ones. Completely
deplete and recharge Battery Pack several times to extend its charge life.
Drill operates as expected, but hole is not drilled effectively:
1. Sharpen or replace the drill bit. Or select a drill bit more appropriate to the job.
Maintenance
1. Keep your tool clean and dry. Wipe dirt and grease from it if it becomes dirty.
2. Do not allow your tool, Battery Packs or Charger to become wet.
3. Do not leave Battery Pack in Charger unattended for long periods of time.
4. When not in use, remove the Battery Pack and store both tool and Battery
Packs in its case in a dry, secure location.
5. Always dispose of used batteries properly. Contact your local hazardous
waste authority for proper disposal guidelines.

SKU 93722
For technical questions please call 1-800-444-3353
Page 11
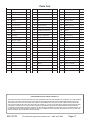
Parts List
traPnoitpircseD.YTQtraPnoitpircseD.YTQtraPnoitpircseD.YTQ
1hsurBgnirpS152etalP,rehsaW494rotceleSnoitcnuF1
2gnirpStnatsis
eR162gnirpS,rehsaW405Z-806,gniraeB1
3telloC17283x4m,wercS415rotatoR1
4gnirpS182niP125Z-806,gniraeB1
5Z4096gniraeB192gnirpS13502x4TS,we
rcS31
6gniRtnatsiseR103gnihsuBpmalC145resserPrebbuR2
7gniRtnatsiseR113daeHrebbuR155eldnaH1
8gnirpS123y'ssAeldnaHyraillixuA165yre
ttaB2
9raeG133llaBleetS275eriW2
01llaBleetS143901170KH,gniraeB185gnisuoHkcaB1
11gnihsuBpmuP153rehsaW195eriW1
21rebbuR,rehsaW163raeG106reg
girT2
31kcolBnoitcirtseR173hctulC116hctiwSesreveR-drawroF1
41rebbuR,gniR183sixA126pmalC1
51eloPtcapmI193niP136etalPemaNtfeL1
61rebb
uR,gniR204evaW,gniraeB146etalPemaNthgiR1
71gniRtnatsiseR114rehsaW156hsurB2
81rehsaW224raeG166gnisuoHhsurB2
91niPpmuP134Z-706,gnirae
B176redloHhsurB2
02pmuP144eloP186rotatS1
12notsiP154gnirpS19605x53TS,wercS2
22rebbuR,gniR164eloP107elcriC,pirtSrehtaeW1
32gnihsuB174gnirp
S117gnisuoHelddiM1
42gnisuoHtnorF184rebbuR,gniR127wercS1
PLEASE READ THE FOLLOWING CAREFULLY
THE MANUFACTURER AND/OR DISTRIBUTOR HAS PROVIDED THE PARTS DIAGRAM IN THIS MANUAL AS A REFERENCE
TOOL ONLY. NEITHER THE MANUFACTURER NOR DISTRIBUTOR MAKES ANY REPRESENTATION OR WARRANTY OF
ANY KIND TO THE BUYER THAT HE OR SHE IS QUALIFIED TO MAKE ANY REPAIRS TO THE PRODUCT OR THAT HE OR
SHE IS QUALIFIED TO REPLACE ANY PARTS OF THE PRODUCT. IN FACT, THE MANUFACTURER AND/OR DISTRIBUTOR
EXPRESSLY STATES THAT ALL REPAIRS AND PARTS REPLACEMENTS SHOULD BE UNDERTAKEN BY CERTIFIED AND
LICENSED TECHNICIANS AND NOT BY THE BUYER. THE BUYER ASSUMES ALL RISK AND LIABILITY ARISING OUT OF HIS
OR HER REPAIRS TO THE ORIGINAL PRODUCT OR REPLACEMENT PARTS THERETO, OR ARISING OUT OF HIS OR HER
INSTALLATION OF REPLACEMENT PARTS THERETO.

SKU 93722
For technical questions please call 1-800-444-3353
Page 12
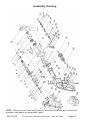
Assembly Drawing
NOTE: Some parts are listed and shown for illustration purposes only and are not
available individually as replacement parts.
-
 1
1
-
 2
2
-
 3
3
-
 4
4
-
 5
5
-
 6
6
-
 7
7
-
 8
8
-
 9
9
-
 10
10
-
 11
11
-
 12
12


Harbor Freight Tools 93722 User manual
- Category
- Power tools
- Type
- User manual
Ask a question and I''ll find the answer in the document
Finding information in a document is now easier with AI
Related papers
-
Drill Master 94371 User manual
-
Harbor Freight Tools 2439 User manual
-
Chicago Electric 94434 User manual
-
-
-
-
-
-
-
Other documents
-
Ryobi SDS65 User manual
-
-
Greenworks HMD401 User manual
-
-
-
 Drill Masters Eldorado Tool 4285 User manual
-
Nordic POBA2350 User manual
-
-
-
Central Pneumatic 2439 User manual
