Greenlee CMP-200 User manual

Type
User manual

This manual is also suitable for

999 3282.2 © 2000 Greenlee Textron IM 1417 REV 1 3/00
CMP-200
DIGITAL CLAMP-ON
METER
MEDIDOR DIGITAL
CON PINZA
COMPTEUR
NUMERIQUE A
PINCES
INSTRUCTION MANUAL
MANUAL DE INSTRUCCIONES
MANUEL D’INSTRUCTIONS
Read and understand all of the instructions and safety
information in this manual before operating or servicing this tool.
Lea y entienda todas las instrucciones y la información sobre
seguridad que aparecen en este manual, antes de manejar estas
herramientas o darles mantenimiento.
Lire attentivement et bien comprendre toutes les instructions et
les informations sur la sécurité de ce manuel avant d’utiliser ou de
procéder à l’entretien de cet outil.
2
Description
The Greenlee CMP-200 is a Digital Clamp-on Meter intended to measure true power (watts),
apparent power (volt-amps), reactive power (volt-amps reactive) and power factor in single-
phase and three-phase circuits. It also measures voltage, current and frequency.
Safety
Safety is essential in the use and maintenance of Greenlee tools and equipment. This
instruction manual and any markings on the tool provide information for avoiding hazards and
unsafe practices related to the use of this tool. Observe all of the safety information provided.
Purpose
This instruction manual is intended to familiarize all personnel with the safe operation and
maintenance procedures for the Greenlee CMP-200.
Keep this manual available to all personnel.
Replacement manuals are available upon request at no charge.
and are registered trademarks of Greenlee Textron.
KEEP THIS MANUAL
CMP-200
3
Important Safety Information
This symbol is used to call your attention to hazards or unsafe practices which could
result in an injury or property damage. The signal word, defined below, indicates the
severity of the hazard. The message after the signal word provides information for
preventing or avoiding the hazard.
SAFETY ALERT SYMBOL
Immediate hazards which, if not avoided, WILL result in severe injury or death.
Hazards which, if not avoided, COULD result in severe injury or death.
Hazards or unsafe practices which, if not avoided, MAY result in injury or property
damage.
Read and understand this material before operating or servicing
this equipment. Failure to understand how to safely operate this
tool can result in an accident causing serious injury or death.
4
Important Safety Information
Electric shock hazard:
Do not use the unit if it is wet or damaged.
Use test leads or accessories that are appropriate for the application. See the
category and voltage rating of the test lead or accessory.
Inspect the test leads or accessory before use. They must be clean and dry, and the
insulation must be in good condition.
Failure to observe these warnings can result in severe injury or death.
Electric shock hazard:
Contact with live circuits can result in severe injury or death.
Electric shock hazard:
Do not apply more than the rated voltage between any two input terminals, or
between any input terminal and earth ground.
Do not contact the test lead tips or any uninsulated portion of the accessory.
Failure to observe these warnings can result in severe injury or death.
CMP-200
5
Important Safety Information
Do not change the measurement function while the test leads are connected to a
component or circuit.
Failure to observe this precaution can result in injury and can damage the unit.
Do not attempt to repair this unit. It contains no user-serviceable parts.
Do not expose the unit to extremes in temperature or high humidity.
See Specifications.
Failure to observe these precautions can result in injury and can damage the unit.
Do not operate with the case open.
Before opening the case, remove the test leads (or jaw) from the circuit and shut off
the unit.
Failure to observe these warnings can result in severe injury or death.
Using this unit near equipment that generates electromagnetic interference can result
in unstable or inaccurate readings.
6
Glossary
PF Power Factor
Ø Phase
W Wire
W Watts (True Power)
VA Volt-Amps (Apparent Power)
VAR Volt-Amps Reactive (Reactive Power)
Identification
1. Lever
2. Jaw
3. Hold Button
4. Selector
5. Display
6. READ NEXT Button
7. 3Ø KVAR KVA Button
8. REC Button
9. DC A/W ZERO Button
10. + Terminal
11. COM Terminal
11 10
31
2
4
5
6
78
9
CMP-200
7
Display Icons
12. AC Alternating Current
13. Polarity Indicator
14. Low Battery
15. 3Ø4W Three-Phase Four-Wire Circuits
16. 3Ø3W Three-Phase Three-Wire Circuits
17. PF Power Factor
18. H Hold
19. REC Indicates that data is stored in memory
20. REC NO. Indicates that stored data is on the display
(1, 2, 3 or 4)
21. 0.0.0.0 Numeric Display
22. Hz Frequency (in Hertz or cycles per second)
23. K Kilo (10
3
)
24. V Volts
25. A Amps
26. R First Phase
27. S Second Phase
28. T Third Phase
29. KW Kilowatt
30. K Kilo (10
3
)
31. V Volts
32. A Amps
OL Overload (not shown)
Symbols on the Unit
Read the instruction manual.
Double Insulation
Battery
17
16
15
14
13
12
22
2328
29
3032
18 13
21
1920
8
Using the Features
HOLD Press momentarily to hold the present value on the display and store it in the
memory. Press again to exit this mode.
DC A/W ZERO Button Sets the meter to zero to eliminate the effects of residual magnetism
when measuring DC current, power and power factor.
REC Button Press to store data in memory; the CMP-200 has four memory locations. FULL
indicates that all memory locations are in use. Shut the meter off to clear all of the
memories.
3Ø KVAR KVA After the 3ø3W or 3ø4W function has finished calculations, press this button
to toggle between power factor (PF)/true power (W) display and reactive power (VAR)/
apparent power (VA) display.
READ NEXT Button When taking current and voltage measurements from 3Ø3W or 3Ø4W
circuits, use this button for storing data and performing calculations.
When measuring any other value, use this button to recall data stored in the four memory
locations. REC NO. 1 will appear momentarily on the display, followed by the value stored in
the first memory. Change the selector to any position to exit the READ mode.
CMP-200
9
*The crest factor is the ratio of the peak value to the RMS value; it is represented by the
Greek letter ξ.
mrofevaW
eulaVSMR 001001001001
eulaVegarevA 090017846
*rotcaFtserC
(ξ)
414.1137.12
AC Measurement
AC measurements are usually displayed as RMS
(root mean squared)
values. Two methods of
AC measurement are
average-responding RMS calibrated
and
true RMS-reading.
The average-responding RMS calibrated method takes the average value of the input signal,
multiplies it by 1.11, and displays the result. This method is accurate if the input signal is a
pure sine wave.
The true RMS-reading method uses internal circuitry to read the true RMS value. This method
is accurate, within the specified crest factor limitations, whether the input signal is a pure sine
wave, a square wave, sawtooth, half wave or signal with harmonics. The ability to read true
RMS provides much more measurement versatility. The Greenlee CMP-200 is a true RMS
meter.
The Waveforms and Crest Factors table shows some typical AC signals and their RMS values.
Waveforms and Crest Factors
10
Operation
Electric shock hazard:
Contact with live circuits can result in severe injury or death.
1. See the Settings Tables. Set the selector to the proper setting and connect the test leads
to the meter.
2. See the appropriate section for specific measurement instructions and illustrations.
3. Test the unit on a known functioning circuit or component.
If the unit does not function as expected on a known functioning circuit, replace the
battery and/or fuse.
If the unit still does not function as expected, send the unit to Greenlee for repair.
4. Take the reading from the circuit or component to be tested.
Measurements on Single-Phase Circuits
Single-Phase Two-Wire Circuits: Settings Table
*A positive (+) PF indicates an inductive load. A negative () PF indicates a capacitive load.
If the PF is greater than 0.91 (a phase shift of less than 25°), set the selector to 3Ø3W for a
more accurate reading of KVA and KVAR.
Measurement
Selector Icons Red Lead Black Lead Clamp
Setting Displayed Connection Connection Location
Voltage or
Hz V Hz and V
hot or hot or
N/A
Frequency neutral neutral
Watts and PF KW
Power Factor* and press PF and KW hot neutral hot
(W and PF) DCA/W ZERO
Apparent and KVAR KVA
KVAR
Reactive Power and press
and KVA
hot neutral hot
(KVA and KVAR) DCA/W ZERO
Current or Voltage VA V and A hot neutral hot
CMP-200
11
Single-Phase Two-Wire Circuits:
Voltage or Frequency Measurement
Measurements on Single-Phase Circuits (contd)
Single-Phase Two-Wire Circuits: True Power, Power Factor, Apparent Power and
Reactive Power Measurement or Current and Voltage Measurement
1ø2W A
1ø
Load
W1ø
12
*A positive (+) PF indicates an inductive load. A negative (–) PF indicates a capacitive load.
Power factor value is correct for balanced loads only.
**Jaw should be closed and removed from circuit whenever DCA/W ZERO is pressed.
Note: The + sign on the jaw must face the power source.
Measurements on Single-Phase Circuits (contd)
Single-Phase Three-Wire Circuits: Settings Table
Instructions
Red Lead Black Lead Clamp
Connection Connection Location
R will flash on the display. Press DCA/W ZERO**.
Connect the leads and position the clamp as shown L1 Neutral L1
to take the first measurement (W
RS
/ KVAR
RS
).
After the measurement stabilizes, press READ NEXT.
T will flash on the display. Remove clamp from wire.
Press DCA/W ZERO** and connect the leads and L2 Neutral L2
position the clamp as shown to take the final
measurement (W
TS
/ KVAR
TS
).
Measurement: True Power, Power Factor*, Apparent Power and Reactive Power
(W, PF, KVA, KVAR)
Type of Circuit: 1ø3W
Selector Setting: 3ø3W
After the final measurement stabilizes, press READ NEXT. The CMP-200 will calculate and
display the power factor (PF) and true power (W). Press 3ø KVAR KVA to display the
reactive power (KVAR) and apparent power (KVA).
CMP-200
13
Measurements on Single-Phase Circuits (contd)
Single-Phase Three-Wire Circuits: Voltage or Frequency Measurement
14
Measurements on Single-Phase Circuits (contd)
Single-Phase Three-Wire Circuits:
True Power, Power Factor, Apparent Power and Reactive Power Measurement
L1
1ø3W
N
L2
A
1ø
Load
1ø
Load
L1N = 110V
L2N = 110V
L1L2 = 220V
W
L1 (
W
RS)
L1
1ø3W
N
L2
A
1ø
Load
1ø
Load
L1N = 110V
L2N = 110V
L1L2 = 220V
W
L2 (
W
TS)
CMP-200
15
Measurements on Three-Phase Circuits
The branches or legs of three phase electrical circuits are typically labeled in any of the
following conventions:
A, B and C
L1, L2 and L3
R, S, and T
They are referred to as R, S and T in this manual and on the meter.
Three-Phase Circuits: Settings Table for Voltage and Frequency
Measurement
Type of Selector Icons Red Lead Black Lead Clamp
Circuit Setting Displayed Connection Connection Location
any other
Voltage or 3ø3W or
Hz V Hz and V R, S or T
phase (or
N/A
Frequency 3ø4W neutral on
3ø4W only)
Three-Phase Circuits: Voltage or Frequency Measurement
16
Measurements on Three-Phase Circuits (contd)
Three-Phase Three-Wire Circuits: Settings Table for Power Measurements
*A positive (+) PF indicates an inductive load. A negative () PF indicates a capacitive load.
Power factor value is correct for balanced loads only.
**Jaw should be closed and removed from circuit whenever DCA/W ZERO is pressed.
Notes:
The + sign on the jaw must face the power source.
COM connection (black lead) should remain connected to the same phase during both
measurements.
Both power measurements may be positive, or one may be negative. Make sure all
connections are correct to obtain proper measurements.
Measurement: True Power, Power Factor*, Apparent Power and Reactive Power
(W, PF, KVA and KVAR)
Type of Circuit: 3ø3W
Selector Setting: 3ø3W
Instructions
Red Lead Black Lead Clamp
Connection Connection Location
R will flash on the display. Press DCA/W ZERO**.
Connect the leads and position the clamp as shown R S R
to take the first measurement (W
RS
/ KVAR
RS
).
After the measurement stabilizes, press READ NEXT.
T will flash on the display. Remove clamp from wire.
Press DCA/W ZERO** and connect the leads and T S T
position the clamp as shown to take the final
measurement (W
TS
/ KVAR
TS
).
After the final measurement stabilizes, press READ NEXT. The CMP-200 will calculate and
display the power factor (PF) and true power (W). Press 3ø KVAR KVA to display the
reactive power (KVAR) and apparent power (KVA).
CMP-200
17
Measurements on Three-Phase Circuits (contd)
Three-Phase Three-Wire Measurements:
True Power, Power Factor, Apparent Power and Reactive Power Measurement
R (L1)
3ø3W
S (L2)
T (L3)
A
3ø
Load
W
RS
R (L1)
3ø3W
S (L2)
T (L3)
A
3ø
Load
W
TS
18
Measurements on Three-Phase Circuits (cont’d)
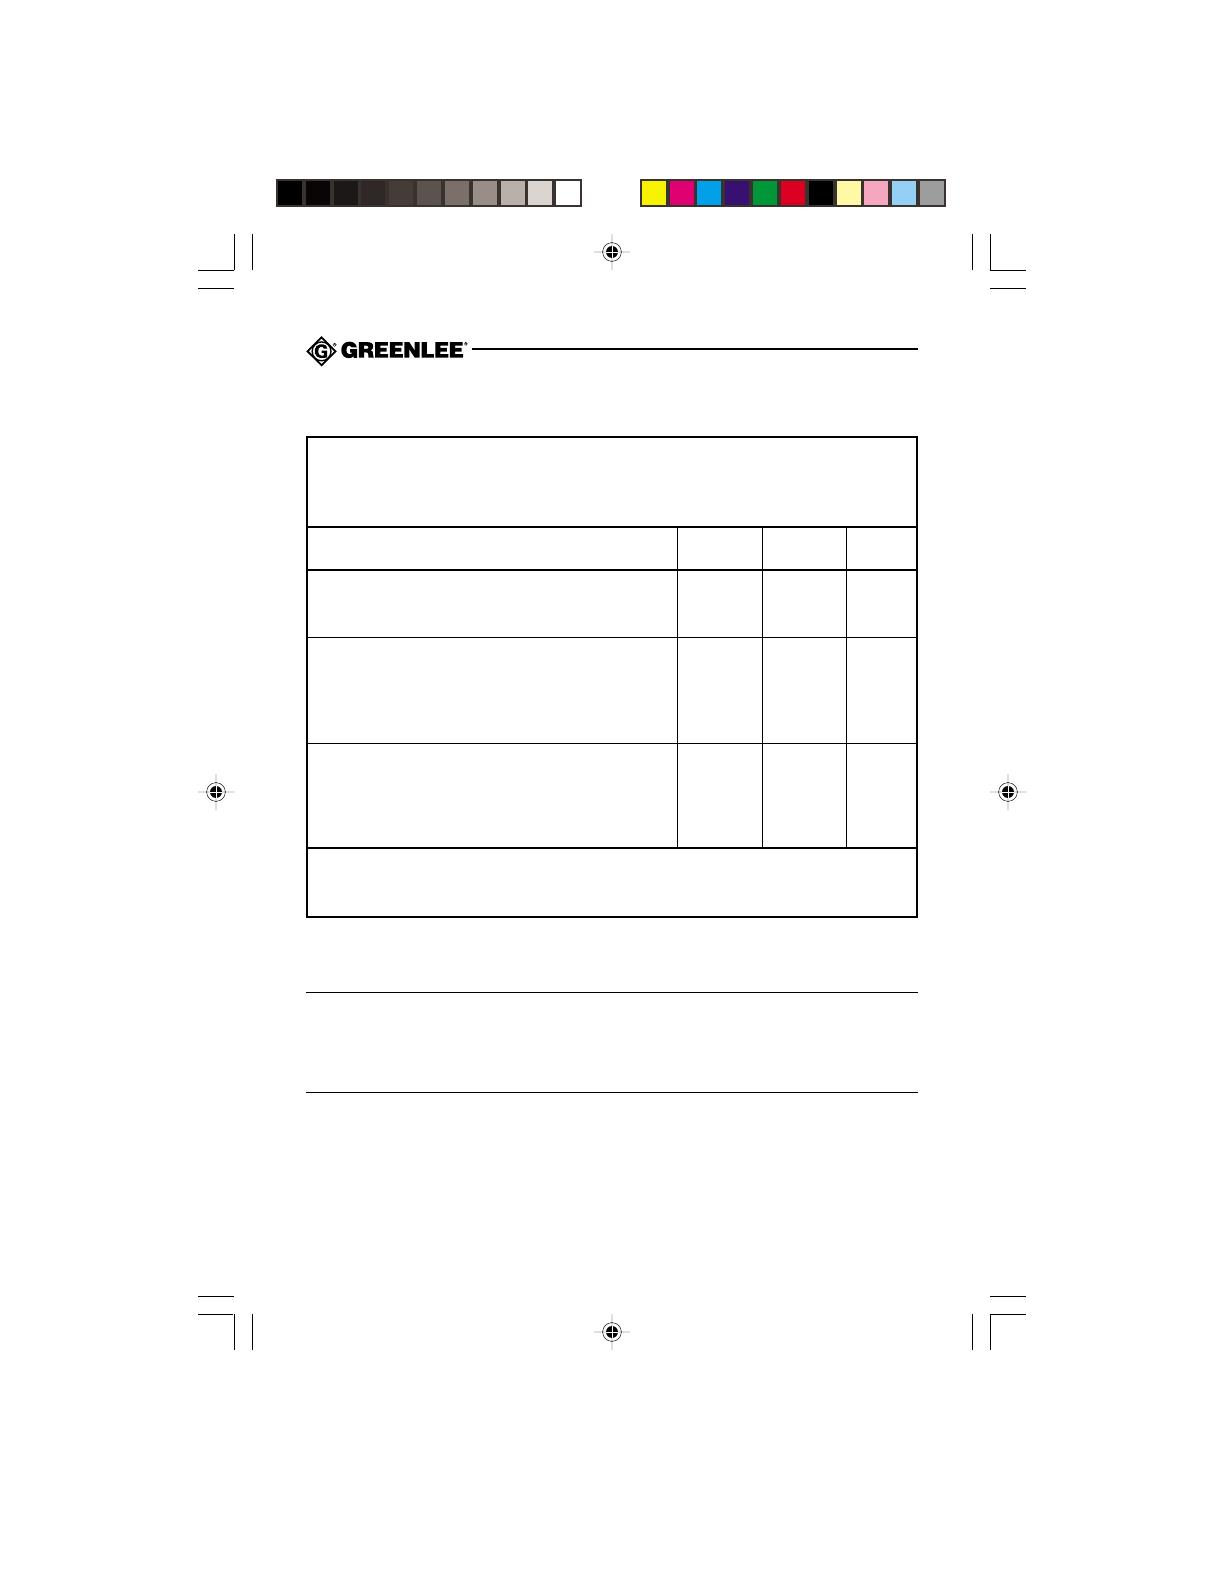
Three-Phase Four-Wire Circuits: Settings Table
*A positive (+) PF indicates an inductive load. A negative (–) PF indicates a capacitive load.
Power factor value is correct for balanced loads only.
**Jaw should be closed and removed from circuit whenever DCA/W ZERO is pressed.
Notes:
The + sign on the jaw must face the power source.
All three power measurements (W
R
, W
S
and W
T
) should be positive. Check test lead
connection and clamping of jaw if any power measurement is negative.
Measurement: True Power, Power Factor*, Apparent Power and Reactive Power
(W, PF, KVA and KVAR)
Type of Circuit: 3ø4W
Selector Setting: 3ø4W
Instructions
Red Lead Black Lead Clamp
Connection Connection Location
R will flash on the display. Press DCA/W ZERO**.
Connect the leads and position the clamp as shown R N R
to take the first measurement (W
R
/ PF
R
).
After the measurement stabilizes, press READ NEXT.
S will flash on the display. Remove clamp from wire.
Press DCA/W ZERO** and connect the leads and S N S
position the clamp as shown to take the final
measurement (W
S
/ PF
S
).
After the measurement stabilizes, press READ NEXT.
T will flash on the display. Remove clamp from wire.
Press DCA/W ZERO** and connect the leads and T N T
position the clamp as shown to take the final
measurement (W
T
/ PF
T
).
After the final measurement stabilizes, press READ NEXT. The CMP-200 will calculate and
display the power factor (PF) and true power (W). Press 3ø KVAR KVA to display the
reactive power (KVAR) and apparent power (KVA).
CMP-200
19
R (L1)
3ø4W
S (L2)
T (L3)
N
A
3ø
Load
W
R (L1)
R (L1)
3ø4W
S (L2)
T (L3)
N
A
3ø
Load
WS (L2)
Measurements on Three-Phase Circuits (contd)
Three-Phase Four-Wire Measurements: True Power, Power Factor,
Apparent Power and Reactive Power Measurement
20
Measurements on Three-Phase Circuits (contd)
R (L1)
3ø4W
S (L2)
T (L3)
N
A
3ø
Load
WT (L3)
Calculations
When using the 3ø3W and 3ø4W functions of the CMP-200, the unit automatically performs
the following calculations:
Single-Phase
W
1Ø3W
=W
L1L2N
=W
L1N
+ W
L2N
Three-Phase Three-Wire
W
3Ø3W
=W
RS
+ W
TS
KVAR
3Ø3W
=KVAR
RS
+ KVAR
TS
KVA
3Ø3W
= [KW
3Ø3W
]
2
+ [KVAR
3Ø3W
]
2
PF
3Ø3W
=KW
3Ø3W
KVA
3Ø3W
Three-Phase Four-Wire
W
3Ø4W
=W
R
+ W
S
+ W
T
KVAR
3Ø4W
=KVAR
R
+ KVAR
S
+ KVAR
T
KVA
3Ø4W
= [KW
3Ø4W
]
2
+ [KVAR
3Ø4W
]
2
PF
3Ø4W
=KW
3Ø4W
KVA
3Ø4W
  • Page 1 1
  • Page 2 2
  • Page 3 3
  • Page 4 4
  • Page 5 5
  • Page 6 6
  • Page 7 7
  • Page 8 8
  • Page 9 9
  • Page 10 10
  • Page 11 11
  • Page 12 12
  • Page 13 13
  • Page 14 14
  • Page 15 15
  • Page 16 16
  • Page 17 17
  • Page 18 18
  • Page 19 19
  • Page 20 20
  • Page 21 21
  • Page 22 22
  • Page 23 23
  • Page 24 24
  • Page 25 25
  • Page 26 26
  • Page 27 27
  • Page 28 28
  • Page 29 29
  • Page 30 30
  • Page 31 31
  • Page 32 32
  • Page 33 33
  • Page 34 34
  • Page 35 35
  • Page 36 36
  • Page 37 37
  • Page 38 38
  • Page 39 39
  • Page 40 40
  • Page 41 41
  • Page 42 42
  • Page 43 43
  • Page 44 44
  • Page 45 45
  • Page 46 46
  • Page 47 47
  • Page 48 48
  • Page 49 49
  • Page 50 50
  • Page 51 51
  • Page 52 52
  • Page 53 53
  • Page 54 54
  • Page 55 55
  • Page 56 56
  • Page 57 57
  • Page 58 58
  • Page 59 59
  • Page 60 60
  • Page 61 61
  • Page 62 62
  • Page 63 63
  • Page 64 64
  • Page 65 65
  • Page 66 66
  • Page 67 67
  • Page 68 68

Greenlee CMP-200 User manual

Type
User manual
This manual is also suitable for

Ask a question and I''ll find the answer in the document

Finding information in a document is now easier with AI