Mackie Spike User manual
- Category
- Recording Equipment
- Type
- User manual
This manual is also suitable for


User’s
Guide
2
1. Read these instructions.
2. Keep these instructions.
3. Heed all warnings.
4. Follow all instructions.
5. Do not use this apparatus near water.
6. Clean only with dry cloth.
7. Do not block any ventilation openings. Install in accordance with the
manufacturer’s instructions.
8. Do not install near any heat sources such as radiators, heat regis-
ters, stoves, or other apparatus (including amplifi ers) that produce
heat.
9. Do not defeat the safety purpose of the polarized or grounding-type
plug. A polarized plug has two blades with one wider than the
other. A grounding type plug has two blades and a third grounding
prong. The wide blade or the third prong are provided for your
safety. If the provided plug does not fi t into your outlet, consult an
electrician for replacement of the obsolete outlet.
10. Protect the power cord from being walked on or pinched particularly
at plugs, convenience receptacles, and the point where they exit
from the apparatus.
11. Only use attachments/accessories specifi ed by the manufacturer.
12. Unplug this apparatus during lightning storms or when unused for
long periods of time.
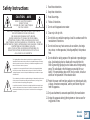
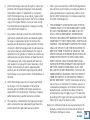
Safety Instructions
The lightning fl ash with arrowhead symbol within an equilateral triangle is
intended to alert the user to the presence of uninsulated “dangerous voltage”
within the product’s enclosure, that may be of suffi cient magnitude to consti-
tute a risk of electric shock to persons.
Le symbole éclair avec point de fl èche à l’intérieur d’un triangle équilatéral
est utilisé pour alerter l’utilisateur de la présence à l’intérieur du coffret de
“voltage dangereux” non isolé d’ampleur suffi sante pour constituer un risque
d’éléctrocution.
The exclamation point within an equilateral triangle is intended to alert the user
of the presence of important operating and maintenance (servicing) instruc-
tions in the literature accompanying the appliance.
Le point d’exclamation à l’intérieur d’un triangle équilatéral est employé pour
alerter les utilisateurs de la présence d’instructions importantes pour le fonc-
tionnement et l’entretien (service) dans le livret d’instruction accompagnant
l’appareil.
CAUTION: TO REDUCE THE RISK OF ELECTRIC SHOCK
DO NOT REMOVE COVER (OR BACK)
NO USER-SERVICEABLE PARTS INSIDE.
REFER SERVICING TO QUALIFIED PERSONNEL
ATTENTION: POUR EVITER LES RISQUES DE CHOC
ELECTRIQUE, NE PAS ENLEVER LE COUVERCLE. AUCUN
ENTRETIEN DE PIECES INTERIEURES PAR L’USAGER. CONFIER
L’ENTRETIEN AU PERSONNEL QUALIFIE.
AVIS: POUR EVITER LES RISQUES D’INCENDIE OU
D’ELECTROCUTION, N’EXPOSEZ PAS CET ARTICLE
A LA PLUIE OU A L’HUMIDITE.
RISK OF ELECTRIC SHOCK
DO NOT OPEN
RISQUE DE CHOC ELECTRIQUE
NE PAS OUVRIR
CAUTION AVIS

User’s
Guide
3
13. Refer all servicing to qualifi ed service personnel. Servicing is
required when the apparatus has been damaged in any way, such
as power-supply cord or plug is damaged, liquid has been spilled
or objects have fallen into the apparatus, the apparatus has been
exposed to rain or moisture, does not operate normally, or has
been dropped.
WARNING — To reduce the risk of fi re or
electric shock, do not expose this appliance to
rain or moisture.
FCC Information
NOTE: This equipment has been tested and found to comply with
the limits for Class B digital devices, pursuant to Part 15 of the FCC
Rules. These limits are designed to provide reasonable protection
against harmful interference when the equipment is operated in
a commercial installation. This equipment generates, uses, and
can radiate radio frequency energy and, if not installed and used
in accordance with the instruction manual, may cause harmful
interference to radio communications. Operation of this equip-
ment in a residential area is likely to cause harmful interference
in which case the user will be required to correct the interference
at his own expense.

User’s
Guide
4
Mackie Software License
Please read this license carefully before using the accompanying Software. By loading and using the Software,
you are agreeing to be bound by the terms of this license. Software as used herein means all computer code (both
source and object) including, but not limited to, all interfaces, navigational devices, search engines, databases,
menus, menu structures or arrangements, drivers, development tools, icons, operational instructions, scripts,
commands, and syntax, whether created, or licensed from third parties by LOUD Technologies Inc., including all
associated documentation.
1. Software License. Any Software whether on disk, in read-only memory, or on any other media, and related
documents are licensed to you by LOUD Technologies Inc. You own the disk(s) on which the Software is re-
corded but LOUD Technologies and/or LOUD Technologies’ Licensor(s) retain all rights, title, and interest to the
Software and related documentation. This License allows you to use the Software on a single computer and make
one copy of the Software in machine-readable form for backup purposes only. You must reproduce on such copy
LOUD Technologies’ copyright notice and any other proprietary legend on the original copy of the Software.
2. Restrictions on Software Use. The Software contains copyrighted material, trade secrets and other propri-
etary material and in order to protect them you may not decompile, reverse engineer, disassemble or otherwise
reduce the Software to human-perceivable form, or in any way analyze or utilize in a manner inconsistent with
this license, or allow a third party to do so. You may not modify, network, rent, lease, loan, distribute, create
derivative works, or use the Software to create a compilation based upon the Software in whole or in part. You
may not electronically transmit the Software from one computer to another over a network or other means of
transmission.
3. Support. You acknowledge and agree that LOUD Technologies Inc. may not offer any technical support in the
use of the Software.
4. Termination. This License is effective until terminated. You may terminate this License at any time by de-
stroying the Software and related documentation and all copies thereof. This License will terminate immediately

User’s
Guide
5
without notice from LOUD Technologies if you fail to comply with any provisions of this License. Upon termina-
tion you must destroy the Software and related documentation and all copies thereof.
5. Export Law Assurances. You agree and certify that neither the Software nor any other technical data re-
ceived from LOUD Technologies, nor the direct product thereof, will be exported outside the United States except
as authorized and as permitted by the laws and regulations of the United States and with LOUD Technologies’
express permission.
6. Government End Users. If you are acquiring the Software on behalf of any unit or agency of the United States
Government, the following provisions apply. The Government agrees:
(i) if the Software is supplied to the Department of Defense (DOD), the Software is classifi ed as “Commercial
Computer Software” and the Government is acquiring only “restricted rights” in the Software and its documenta-
tion as that term is defi ned in Clause 252.227-701(c)(1) of the DFARS; and
(ii) if the Software is supplied to any unit or agency of the United States Government other than DOD, the
Government’s rights in the Software and its documentation will be defi ned in Clause 52.227-19(c)(2) of the FAR
or, in the case of NASA, in clause 18-52.227-86(d) of the NASA supplement to the FAR.
7. Limited Warranty on Software Media (if provided on disks). LOUD Technologies warrants the disks on
which the Software is recorded to be free from defects in materials and workmanship under normal use for a pe-
riod of ninety (90) days from the date of purchase as evidenced by a copy of the purchase receipt. LOUD Technol-
ogies’ entire liability and your exclusive remedy will be the replacement of the defective disk when it is returned
postage prepaid to LOUD Technologies at the address below or a LOUD Technologies’ authorized representative
with a copy of the purchase receipt. LOUD Technologies will have no responsibility to replace a disk damaged by
accident, abuse or misapplication. THIS WARRANTY SPECIFICALLY EXCLUDES ANY OTHER WARRANTY RE-
LATED TO SOFTWARE MEDIA, INCLUDING, BUT NOT LIMITED TO, ANY IMPLIED WARRANTIES ON THE
DISKS, SUCH AS THE IMPLIED WARRANTIES OF MERCHANTABILITY OR FITNESS FOR A PARTICULAR
PURPOSE OR USE. THIS WARRANTY GIVES YOU SPECIFIC LEGAL RIGHTS, AND YOU MAY ALSO HAVE
OTHER RIGHTS, WHICH VARY FROM STATE TO STATE AND FROM COUNTRY TO COUNTRY.

User’s
Guide
6
8. Disclaimer of Warranty on Software. You expressly acknowledge and agree that use of the Software is at
your sole risk. The Software and related documentation are provided “AS IS” and without warranty of any kind.
LOUD TECHNOLOGIES EXPRESSLY DISCLAIMS ALL WARRANTIES, EXPRESS OR IMPLIED, INCLUDING,
BUT NOT LIMITED TO, THE IMPLIED WARRANTIES OF MERCHANTABILITY AND FITNESS FOR A PARTIC-
ULAR PURPOSE OR USE. LOUD TECHNOLOGIES DOES NOT WARRANT THAT THE FUNCTIONS CONTAINED
IN THE SOFTWARE WILL MEET YOUR REQUIREMENTS, OR THAT THE OPERATION OF THE SOFTWARE
WILL BE UNINTERRUPTED OR ERROR-FREE, OR THAT DEFECTS IN THE SOFTWARE WILL BE CORRECT-
ED. FURTHERMORE, LOUD TECHNOLOGIES DOES NOT WARRANT OR MAKE ANY REPRESENTATIONS
REGARDING THE USE OR THE RESULTS OF THE USE OF THE SOFTWARE OR RELATED DOCUMENTATION
IN TERMS OF THEIR CORRECTNESS, ACCURACY, RELIABILITY, OR OTHERWISE. NO ORAL OR WRITTEN
INFORMATION OR ADVICE GIVEN BY LOUD TECHNOLOGIES OR A LOUD TECHNOLOGIES AUTHORIZED
REPRESENTATIVE SHALL CREATE A WARRANTY OR IN ANY WAY INCREASE THE SCOPE OF THIS WAR-
RANTY. SHOULD THE SOFTWARE PROVE DEFECTIVE, YOU (AND NOT LOUD TECHNOLOGIES OR ANY
LOUD TECHNOLOGIES AUTHORIZED REPRESENTATIVE) ASSUME THE ENTIRE COST OF ALL NECESSARY
SERVICING, REPAIR OR CORRECTION. SOME STATES DO NOT ALLOW THE EXCLUSION OF IMPLIED WAR-
RANTIES, SO THE ABOVE EXCLUSION MAY NOT APPLY TO YOU.
9. Limitation of Liability. UNDER NO CIRCUMSTANCES INCLUDING NEGLIGENCE, SHALL LOUD TECHNOL-
OGIES BE LIABLE FOR ANY INCIDENTAL, SPECIAL OR CONSEQUENTIAL DAMAGES INCLUDING, BUT NOT
LIMITED TO, LOST PROFITS OR EARNINGS, DAMAGE TO PROPERTY OR PERSON, OR ATTORNEYS’ FEES
THAT RESULT FROM THE USE OR INABILITY TO USE THE SOFTWARE OR RELATED DOCUMENTATION,
EVEN IF LOUD TECHNOLOGIES OR A LOUD TECHNOLOGIES AUTHORIZED REPRESENTATIVE HAS BEEN
ADVISED OF THE POSSIBILITY OF SUCH DAMAGES. SOME STATES DO NOT ALLOW THE LIMITATION OR
EXCLUSION OF LIABILITY FOR INCIDENTAL OR CONSEQUENTIAL DAMAGES SO THE ABOVE LIMITATION
OR EXCLUSION MAY NOT APPLY TO YOU. IN NO EVENT SHALL LOUD TECHNOLOGIES’ TOTAL LIABILITY
TO YOU FOR ALL DAMAGES, LOSSES, AND CAUSES OF ACTION (WHETHER IN CONTACT, TORT (INCLUD-
ING NEGLIGENCE) OR OTHERWISE) EXCEED THE AMOUNT PAID BY YOU FOR THE SOFTWARE.

User’s
Guide
7
10. Controlling Law and Severability. This License shall be governed by and construed in accordance with the
laws of the United States and the State of Washington, as applied to agreements entered into and to be performed
entirely within Washington between Washington residents. If for any reason a court of competent jurisdiction
fi nds any provision of this License, or portion thereof, to be unenforceable, that provision of the License shall be
enforced to the maximum extent permissible so as to effect the intent of the parties, and the remainder of the
License shall continue in full force and effect.
11. Complete Agreement. This License constitutes the entire agreement between the parties with respect to the
use of the Software and related documentation, and supersedes all prior or contemporaneous understandings or
agreements, written or oral, regarding such subject matter. No amendment to or modifi cation of this License will
be binding unless in writing and signed by a duly authorized representative of LOUD Technologies Inc.
Phew!
LOUD Technologies Inc. • 16220 Wood-Red Road NE • Woodinville • WA 98072 • USA
© 2004 LOUD Technologies Inc. All Rights Reserved.

User’s
Guide
8
Iconography
This icon will lead you to some further explanations of features and practical tips.
This icon marks information that is very important, so make sure you have a read.
This icon does not appear in this guide.
About this Guide
This guide describes the XD-2 USB interface, the XD-2 software, and includes a short overview of the
Tracktion software and the offside rule.
For details of the bundled software, please refer to the help documentation included within the soft-
ware itself, or included on the Spike software installer CD-ROM.
“Mackie,” “Spike,” and the “Running Man” fi gure are trademarks or registered trademarks of LOUD
Technologies Inc. All other brand names mentioned are trademarks or registered trademarks of their
respective holders, and are hereby acknowledged.
Thinking of a vacation this year? Then come to sunny Edmonds, WA, and enjoy the scenic splendor
of the Pacifi c Northwest, where the snow-capped mountains rise majestically above the Puget Sound.
Ask for Gary.
Manual Part No. SW0078 Rev.
C 07/2004
© 2004 LOUD Technologies Inc. All Rights Reserved.
OCEAN
LINER

User’s
Guide
9
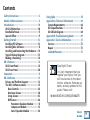
Contents
Safety Instructions-----------------------------------2
Mackie Software License -------------------------- 4
Introduction----------------------------------------- 10
XD-2 USB Interface------------------------------ 10
Bundled Software -------------------------------- 11
Special Offers -------------------------------------11
Getting Started --------------------------------------12
Installing PC Software---------------------------12
Installing Mac Software-------------------------13
Installing and Connecting the Hardware --- 14
Typical Hookup Diagram------------------------15
Making a Recording ----------------------------- 16
XD-2 Features --------------------------------------- 25
XD-2 Front Panel--------------------------------- 25
XD-2 Rear Panel---------------------------------- 28
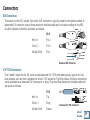
Connectors -------------------------------------------31
XD-2 Software -------------------------------------- 33
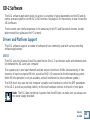
Drivers and Platform Support ---------------- 33
The XD-2 Software screens -------------------- 35
Basic Controls -------------------------------- 36
Overview Screen----------------------------- 38
Setup Screen---------------------------------- 43
DSP Screen ------------------------------------46
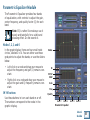
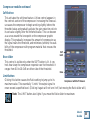
Parametric Equalizer Module---------51
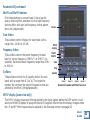
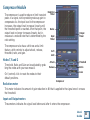
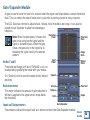
Compressor Module------------------- 53
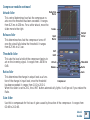
Gate/Expander Module -------------- 56
Using Spike ------------------------------------------ 59
Appendix A: Technical Information ------------64
System Requirements---------------------------64
XD-2 Specifi cations------------------------------ 65
XD-2 Block Diagram-----------------------------68
Appendix B: Troubleshooting Guide------------69
Appendix C: Service Information --------------- 73
Service --------------------------------------------- 73
Repair --------------------------------------------- 73
Limited Warranty-------------------------------- 75
Stop Right There!
It is very important that you
register your Spike, then you
will have access to the latest
drivers, software, fi rmware up-
dates, and any updates to this
guide. Please visit:
www.mackie.com/spikeauth

User’s
Guide
10
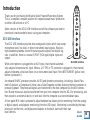
Introduction
Thank you for purchasing the Mackie Spike Powered Recording System.
This is a complete, compact solution for computer-based music production
on either a Macintosh or a PC.
Spike consists of the XD-2 USB Interface and all the software you need to
record and create wonderful music using your computer.
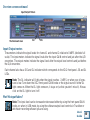
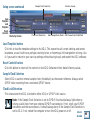
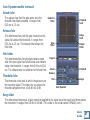
XD-2 USB Interface
The XD-2 USB interface provides two analog audio inputs which can accept
microphone level, line level, or direct instrument input signals. Mackie's
high-headroom preamps convert the analog audio signals into digital sig-
nals. In addition, there is a coaxial S/PDIF (RCA-type) digital input and
output.
When a microphone is plugged into an XLR input, that channel automati-
cally adjusts to become a mic input. When a 1/4" TRS or TS connector is plugged in, that channel
adjusts to become a line-level input (or an instrument-level input if the INSTRUMENT (guitar icon)
button is pressed in).
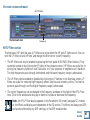
An onboard SHARC processor provides full EQ and dynamics processing, including a 4-band Para-
metric Equalizer, a Compressor/Limiter, and a Gate/Expander, without draining the host computer of
processing power. The processed signals are transferred to the host computer via the USB connec-
tion. Master mixes can also be transferred from your host computer into the XD-2 for processing, and
then output to an external device, or sent back into the computer as a stereo mixdown pass.
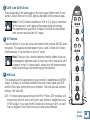
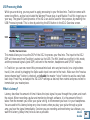
A front panel MIX knob is provided to adjust between low-latency direct monitoring (from the analog
or digital inputs) and playback monitoring (from the USB input). Monitoring is provided by the head-
phone jack on the front, and by balanced outputs on the back, each with their own
level controls.
XD-2 USB Interface
MIN MAX
PHONES
MIN MAX
MONITOR
MIN MAX
GAIN 2
MIN MAX
GAIN 1
DIR USB
MIX
OL
-30 0
48V
OL
-30 0

User’s
Guide
11
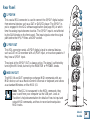
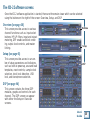
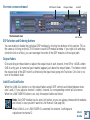
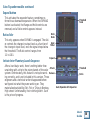
Bundled Spikeware
Spike comes with some incredibly powerful software to get you started with your own desktop multi-
track audio recording music production studio.
The XD-2 software application provides all the control you need
for the XD-2 USB interface. Any adjustments you make to the EQ,
Compressor/Limiter, and Gate/Expander, will be recorded as part of
the audio signal. Each dynamics setting can be saved, recalled, cop-
ied, and pasted as needed. In addition, all the parameter settings can
be saved as a single preset fi le for later recall.
Tracktion is an easy-to-use multitrack audio recording and
MIDI sequencing software application, capable of unlimited
track count, VST support, automation, and much more.
Warmer Phaser is a VST plug-in by Nomad Factory specifi cally designed for Spike to
give a warmer tube sound to the digital recording process.
Mackie Final Mix VST (PC only, for Tracktion) is a powerful stereo mastering
suite with two 5-band parametric EQs on either side of a multi-band compressor.
Special Offers
As you purchased Spike, you are entitled to discounts for a number of plug-ins including
Nomad
Factory Blue Tubes and Liquid Bundle, and Antares plug-ins.
Note: The software titles and offers included with Spike are subject to change without
notice.
XD-2 Software Main Screen

User’s
Guide
12
Getting Started
Use this section to get your Spike recording system set up quickly.
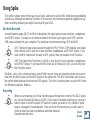
Installing the Software
• The Spike CD contains an installer which will help you install the various software applications,
plug-ins and drivers.
• Visit www.mackie.com/spikeauth to register your Spike, and download any updates to the soft-
ware and fi rmware.
• Your computer must meet the minimum system requirements (shown on page 64).
• The XD-2 software application does not need authorization in order to run.
• Tracktion authorizes the fi rst time it detects the XD-2 hardware attached to your computer.
Mackie Final Mix authorizes with the Tracktion PC version.
• Other software bundled with Spike will need authorization. You will need Internet access, but it
does not have to be from the same machine you install the software on.
To install the software on a PC:
1. Turn off any (non-essential) applications.
2. Insert the Spike CD into your PC’s CD drive.
3. The CD should begin automatically, bringing up an installer (StartHere.html). If not, click Start in
the task bar, then click Run. Type: <drive>:StartHere.html (where <drive> is the letter assigned
to your CD drive).

User’s
Guide
13
4. Follow the instructions in the installer to load and authorize the various software applica-
tions and plug-ins. A basic installation would be to install the XD-2 application, its drivers, and
Tracktion. This will get you going fairly nicely.
5. If you want, go ahead and install Warmer Phaser (and other plug-ins from Nomad Factory), and
Antares plug-ins.
6. You can accept the default directories, or specify different locations. We recommend that you use
the default settings.
Note: Be sure to install the plug-ins into the Tracktion plug-ins folder, so they are accessi-
ble to Tracktion. If you have already installed plug-ins, you can direct Tracktion to scan for
these folders as well. Tracktion will default to scan both the "C:/Program fi les/Tracktion/
plugins/" and "C:/Program fi les/Steinberg/VSTplugins/" folders.
To install the software on a Macintosh:
1. Turn off any (non-essential) applications.
2. Insert the Spike CD into your Macintosh’s CD drive.
3. Open the disk icon on your desktop.
4. StartHere.html contains the latest instructions for installing the software. Some software is drag
and drop, and some use installers. Follow all instructions for authorizing the software.
Note: For plug-ins, be sure to install them into the "/Library/Audio/Plug-ins/VST" folder,
so they are accessible to Tracktion. If you have already installed plug-ins, you can di-
rect Tracktion to scan for these folders as well. Tracktion will default to scan both the
"/Library/Audio/Plug-ins/VST" and "Users/<your login name>/Library/Audio/Plug-ins/VST"
folders.

User’s
Guide
14
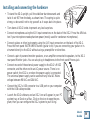
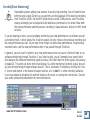
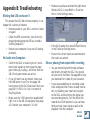
Installing and connecting the hardware
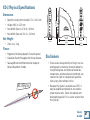
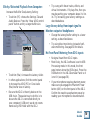
• To stand the XD-2 upright, pull the stabilizer bar downwards and
twist it out 90˚ from the body, as shown here. The spring is quite
strong, so be careful not to nip yourself as it snaps back into place.
• Turn down all XD-2 knobs to prevent any loud surprises.
• Connect microphones using the XLR input connectors on the back of the XD-2. Press the 48V but-
ton if your microphone needs phantom power (mostly used for condenser microphones).
• Connect guitars or other instruments using the 1/4" input connectors on the back of the XD-2.
Press the front panel INSTRUMENT button (guitar icon) if you are connecting your guitar or in-
strument directly to the XD-2 without using a preamplifi er or direct box.
• Connect a pair of powered monitor speakers, or an amplifi er connected to speakers, to the XD-2
rear panel Monitor jacks. You can also plug in headphones to the front panel Phones jack.
• Connect one end of the external power supply to the XD-2's 9 VDC
connector, and the other end to an AC power source. There is no
power switch; the XD-2 is on when the power supply is connected.
The universal power supply can be used with any local AC Mains
voltage between 90 VAC and 264 VAC.
• Connect the XD-2's USB connector to a USB port on your computer
with the USB cable provided.
• Launch the XD-2 software, and an XD-2 icon will appear in your PC
system tray, or Dock on a Mac. Click on the icon to open the pro-
gram, then you can confi gure the XD-2 system to your liking.

User’s
Guide
15
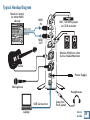
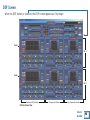
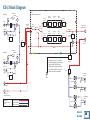
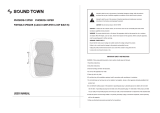
MONITOR
L / R
USB
9V DC
750mA
INPUT 1
INPUT 2
IN
OUT
OUT
MIDI
Power Suppl
y
Mackie Control
(or other MIDI
device)
MIDI
OUT
MIDI
IN
USB Connection
Laptop
Guitar
Microphone
Mackie HR624 or other
Active Studio Monitors
Headphones
(plug into
front panel)
SPDIF
IN
DAT, CD/DVD player
or CD-R recorder
MIDI OUT
MIDI IN
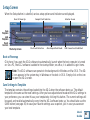
Typical Hookup Diagram

User’s
Guide
16
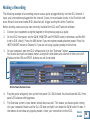
Making a Recording
The following example of a recording session uses a guitar plugged directly into the XD-2 channel 1
input, and a microphone plugged into the channel 2 input, to record audio tracks in the Tracktion soft-
ware. We will also record some MIDI data that will trigger a softsynth within Tracktion.
Before starting, make sure you have correctly installed the XD-2 and Tracktion software.
1. Connect your equipment using the diagram on the previous page as a guide.
2. On the XD-2 front panel, set the GAIN, MONITOR and PHONES knobs to minimum, and the MIX
knob to DIR (direct). Press the 48V button if your microphone needs phantom power. Press the
INSTRUMENT button on Channel 1 if you are not using a guitar preamp or direct box.
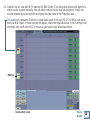
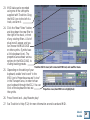
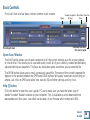
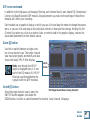
3. On your computer, open the XD-2 software and click the “Overview” button.
You should see input and output meters, along with slide faders and a bunch of other cool stuff.
Make sure the USB and SPDIF buttons are not illuminated.
4. Play the guitar and gently turn up the front panel Ch.1 GAIN knob. You should see the XD-2 front
panel LEDs dance with happiness.
5. The Overview screen's input meters should dance as well. This means you have signals coming
into your computer. Make sure the OL LED does not light; turn down the GAIN knob if it does. If
the meters do not show any signals present, check your connections to the XD-2.
XD-2 Software Overview Screen

User’s
Guide
17
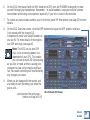
6. On the XD-2 front panel (with the MIX knob set to DIR) turn the PHONES knob gently to hear
yourself through your headphones. Remember – to avoid feedback, keep your monitor volume
turned down while using a microphone, especially if your mic is close to the monitors.
7. To reduce any low-end bass rumble, push in the front panel HP fi lter button (see page 25 for more
details.
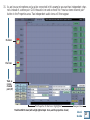
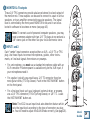
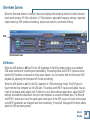
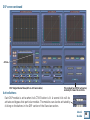
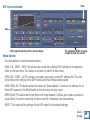
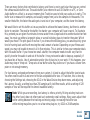
8. On the XD-2 Overview screen, click the DSP button to bring up the DSP graphic interface.
Fool around with the channel EQ,
Compressor/Limiter, and Gate/Expander as
you see fi t. For more details of the mysteri-
ous DSP workings, see page 46.
Note: The XD-2 has its own DSP
chip, so its processing power is in-
dependent of your CPU. This means
you can use as much XD-2 processing
as you like, or need, without causing your
computer to slow, so be creative and have
fun. Your audio recording will be affected by
any changes you make.
9. When you are happy with the sounds and
are ready to start recording, put down the
guitar and....
...continued on the next page...
(rather exciting isn't it?)
XD-2 Software DSP Screen

User’s
Guide
18
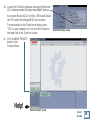
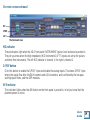
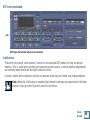
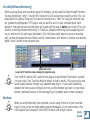
10. Launch the Tracktion software and select the Mackie
XD-2 hardware under Settings menu/WAVE devices.
Also select Mackie XD-2 (for Mac), USB Audio Device
(for PC) under the Settings/MIDI devices menu.
For more details of the Tracktion software, press
"F12" on your keyboard, or click the HELP button in
the lower left of the Tracktion screen.
11. Click the NEW PROJECT
button in the
Projects Menu.
Tracktion Project screen
Help!
Tracktion Settings screen

User’s
Guide
19
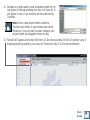
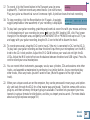
12. Navigate to a good location, enter a wonderful name for the
new project in the pop-up dialog box, then click Save. All of
this project's tracks, clips and edits will be saved here by
Tracktion.
Note: Do not create project folders inside the
Tracktion main folder, or any software main folder.
Otherwise, if you un-install/re-install software, your
project folders will disappear (mine sure did).
13. “New edit #1” appears at the top of the Item List. Do not be alarmed. An Edit is Tracktion's way of
keeping everything related to your song. See Tracktion's Help (F12) for more information.

User’s
Guide
20
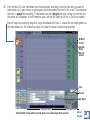
Tracktion Edit Screen
14. Double click on “new edit #1” to open up the Edit Screen. This new project starts with eight hori-
zontal tracks, stacked vertically. You can add or remove tracks once you get going. Tracks can
also be renamed by selecting them and typing the new name in the Properties area.
The audio icon represents Tracktion's stereo audio input (from your XD-2). The MIDI icon repre-
sents its MIDI input. If these icons do not appear, check the input selections in the "Settings" tab,
and make sure the Mackie XD-2 is chosen as your audio input and output device.
MIDI Icon
INPUT 1 + 2
MACKIE XD2
Page is loading ...
Page is loading ...
Page is loading ...
Page is loading ...
Page is loading ...
Page is loading ...
Page is loading ...
Page is loading ...
Page is loading ...
Page is loading ...
Page is loading ...
Page is loading ...
Page is loading ...
Page is loading ...
Page is loading ...
Page is loading ...
Page is loading ...
Page is loading ...
Page is loading ...
Page is loading ...
Page is loading ...
Page is loading ...
Page is loading ...
Page is loading ...
Page is loading ...
Page is loading ...
Page is loading ...
Page is loading ...
Page is loading ...
Page is loading ...
Page is loading ...
Page is loading ...
Page is loading ...
Page is loading ...
Page is loading ...
Page is loading ...
Page is loading ...
Page is loading ...
Page is loading ...
Page is loading ...
Page is loading ...
Page is loading ...
Page is loading ...
Page is loading ...
Page is loading ...
Page is loading ...
Page is loading ...
Page is loading ...
Page is loading ...
Page is loading ...
Page is loading ...
Page is loading ...
Page is loading ...
Page is loading ...
Page is loading ...
Page is loading ...
Page is loading ...
-
 1
1
-
 2
2
-
 3
3
-
 4
4
-
 5
5
-
 6
6
-
 7
7
-
 8
8
-
 9
9
-
 10
10
-
 11
11
-
 12
12
-
 13
13
-
 14
14
-
 15
15
-
 16
16
-
 17
17
-
 18
18
-
 19
19
-
 20
20
-
 21
21
-
 22
22
-
 23
23
-
 24
24
-
 25
25
-
 26
26
-
 27
27
-
 28
28
-
 29
29
-
 30
30
-
 31
31
-
 32
32
-
 33
33
-
 34
34
-
 35
35
-
 36
36
-
 37
37
-
 38
38
-
 39
39
-
 40
40
-
 41
41
-
 42
42
-
 43
43
-
 44
44
-
 45
45
-
 46
46
-
 47
47
-
 48
48
-
 49
49
-
 50
50
-
 51
51
-
 52
52
-
 53
53
-
 54
54
-
 55
55
-
 56
56
-
 57
57
-
 58
58
-
 59
59
-
 60
60
-
 61
61
-
 62
62
-
 63
63
-
 64
64
-
 65
65
-
 66
66
-
 67
67
-
 68
68
-
 69
69
-
 70
70
-
 71
71
-
 72
72
-
 73
73
-
 74
74
-
 75
75
-
 76
76
-
 77
77


Mackie Spike User manual
- Category
- Recording Equipment
- Type
- User manual
- This manual is also suitable for
Ask a question and I''ll find the answer in the document
Finding information in a document is now easier with AI
Related papers
-
Mackie XD-2 User manual
-
-
-
Mackie HM-4 User manual
-
-
-
-
Mackie MK-BIG-KNOB-S Installation guide
-
-
Other documents
-
Midiplus miniEngine USB Installation guide
-
Scandyna BIGPW10701 Datasheet
-
Zoom U-24 Operating instructions
-
 Sound Town PHOBOS-12PSD User manual
-
Art Tube MP PS Owner's manual
-
Roland Rubix24 User manual
-
M-Audio Fast Track Pro User manual
-
M-Audio Fast Track Pro User manual
-
Creative SoundBlaster X3 Function Manual
-
Zoom LiveTrak L-20R User manual
