Axiohm A794-D100 User manual
- Category
- Print & Scan
- Type
- User manual
This manual is also suitable for

A794 Thermal Receipt Printer
Owner's Guide
A794-D100
TM

December 1999 i
Legal Notices
Disclaimer
Information in this document is subject to change without notice. Consult your Axiohm sales
representative for information that is applicable and current. Axiohm reserves the right to
improve products as new technology, components, software, and firmware become available.
No part of this document may be reproduced or transmitted in any form or by any means,
electronic or mechanical, for any purpose without the express written permission of Axiohm.
Copyright
Copyright © 1999 by AXIOHM
Ithaca, New York USA
All rights reserved
Printed in USA
Confidential, Unpublished
Property of AXIOHM
Trademarks
AXIOHM is a trademark. Other trademarks and registered trademarks are the property of their
respective holders.
Federal Communications Commission (FCC)
Radio Frequency Interference Statement
Warning
Changes or modifications to this unit not expressly approved by the party responsible for
compliance could void the user’s authority to operate the equipment.
Note
This equipment has been tested and found to comply with the limits for a Class A digital device,
pursuant to Part 15 of the FCC Rules. These limits are designed to provide reasonable protection
against harmful interference when the equipment is operated in a commercial environment. This
equipment generates, uses, and can radiate radio frequency energy and, if not installed and used
in accordance with the instruction manual, may cause harmful interference to radio
communications. Operation of this equipment in a residential area is likely to cause harmful
interference in which case the user will be required to correct the interference at his own expense.
Information to the User
This equipment must be installed and used in strict accordance with the manufacturer's
instructions. However, there is no guarantee that interference to radio communications will not
occur in a particular commercial installation. If this equipment does cause interference, which can
be determined by turning the equipment off and on, the user is encouraged to contact Axiohm
immediately.
Axiohm is not responsible for any radio or television interference caused by unauthorized
modification of this equipment or the substitution or attachment of connecting cables and
equipment other than those specified by Axiohm. The correction of interferences caused by such
unauthorized modification, substitution or attachment will be the responsibility of the user.

December 1999ii
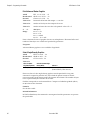
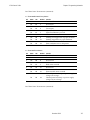
In order to ensure compliance with the Product Safety, FCC and CE marking requirements, you
must use the power supply, power cord, and interface cable which were shipped with this
product or which meet the following parameters:
Power Supply
UL Listed (QQGQ), Class 2 power supply with SELV (Secondary Extra Low Voltage), non-energy
hazard output, limited energy source, input rated 100-240 Vac, 1.5/0.8 A, 50/60 Hz, output rated
24 Vdc, 2.3 A.
Use of this product with a power supply other than the Axiohm power supply will require you to
test the power supply and Axiohm printer for FCC and CE mark certification.
Communication Interface Cable
A shielded (360-degree) interface cable must be used with this product. The shield must be
connected to the frame or earth ground connection or earth ground reference at EACH end of the
cable.
Use of a cable other than described here will require that you test the cable with the Axiohm
printer and your system for FCC and CE mark certification.
Power Cord
A UL listed, detachable power cord must be used. For applications where the power supply
module may be mounted on the floor, a power cord with Type SJT marking must be used. For
applications outside the US, power cords that meet the particular country’s certification and
application requirements should be used.
Use of a power cord other than described here may result in a violation of safety certifications
that are in force in the country of use.
Industry Canada (IC)
Radio Frequency Interference Statement
This Class A digital apparatus meets all requirements of the Canadian Interference-Causing
Equipment Regulations.
Cet appareil numérique de la classe A respecte toutes les exigences du Règlement sur le matériel brouilleur
du Canada.
Voluntary Control Council for Interference (VCCI)
Radio Frequency Interference Statement
This is a Class A product based on the standard of the Voluntary Control Council for Interference
by Information Technology Equipment (VCCI). If this equipment is used in a domestic
environment, radio disturbance may arise. When such trouble occurs, the user may be required
to take corrective actions.

A794 Owner’s Guide Contents
December 1999
iii
Contents
Chapter 1: About the Printer..............................................................1
Description of Printer ....................................................................2
Models Available ...........................................................................3
Model Identification ...............................................................3
Communication Interfaces..................................................... 3
Features ...........................................................................................4
Options ............................................................................................4
Chapter 2: Using the Printer...............................................................5
Unpack the Printer.........................................................................6
Remove the Starter Paper Roll Supports ............................. 7
Choose a Location .......................................................................... 8
On a Flat Surface..................................................................... 8
On a Wall .................................................................................8
Connect the Cables......................................................................... 9
Communication Cable............................................................9
Cash Drawer Cables ............................................................... 10
Power Supply Cable ...............................................................10
Printer Controls..............................................................................11
Loading Receipt Paper ..................................................................13
Configuring the Printer .................................................................16
Troubleshooting the Printer.......................................................... 18
Printer Tone and Green LED.................................................18
Printing Problems ...................................................................19
Printer Does Not Function.....................................................19
Chapter 3: Media and Supplies Guide.............................................21
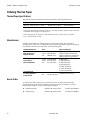
Ordering Thermal Paper...............................................................22
Thermal Paper Specifications................................................22
Manufacturers .........................................................................22
How to Order ..........................................................................22
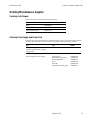
Ordering Miscellaneous Supplies................................................ 23
Ordering Cash Drawers ......................................................... 23
Ordering Power Supply and Power Cord........................... 23
Ordering Communication Cables......................................... 24
Wall-Mount Kit .......................................................................24
Chapter 4: Print Specifications ..........................................................25
Characters .......................................................................................26
Print Modes .............................................................................26
Size............................................................................................26
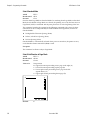
Paper Specifications....................................................................... 27
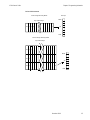
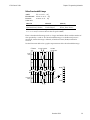
Print Zones......................................................................................27
Print Zones for 80 mm Paper................................................. 27
Print Zones for 82.5 mm Paper.............................................. 29
Print Density and Density of Receipt Print Lines ......................30
Duty Cycle Restrictions (Printing Solid Blocks).........................31
Character Sets................................................................................. 32
Code Page 437 .........................................................................32
Code Page 850 .........................................................................33

Contents A794 Owner’s Guide
December 1999
iv
Code Page 852 .........................................................................34
Code Page 858 .........................................................................35
Code Page 860 .........................................................................36
Code Page 863 .........................................................................37
Code Page 865 .........................................................................38
Code Page 866 .........................................................................39
Code Page 1252 .......................................................................40
Chapter 5: Communication Interface ...............................................41
Communication Overview............................................................42
Interface....................................................................................42
Sending Commands................................................................42
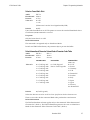
RS-232C Interface ...........................................................................43
Print Speed and Timing .........................................................43
XON/XOFF Protocol ..............................................................44
DTR/DSR Protocol .................................................................45
RS-232C Technical Specifications..........................................45
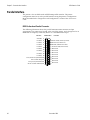
Parallel Interface.............................................................................48
Chapter 6: Programming Information ..............................................49
Command Conventions.................................................................50
List of Commands and Location ..................................................51
By Command Code.................................................................51
By Function..............................................................................55
Comparisons...................................................................................60
Command Descriptions.................................................................61
Printer Function Commands .................................................61
Vertical Positioning and Print Commands ..........................68
Horizontal Positioning Commands ......................................72
Print Characteristics Commands ..........................................79
Graphics Commands ..............................................................92
Status Commands ...................................................................101
Bar Code Commands..............................................................121
Page Mode Commands ..........................................................124
Macro Commands...................................................................130
User Data Storage Commands ..............................................132
Flash Download Commands .................................................135
Index ................................................................................................139

Chapter 1: About the Printer
♦
Description of Printer
♦
Models Available
Model Identification
Communication Interfaces
♦
Features
♦
Options

Chapter 1: About the Printer A794 Owner’s Guide
December 19992
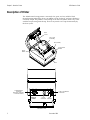
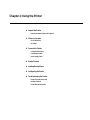
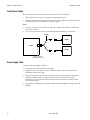
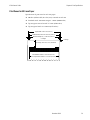
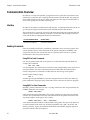
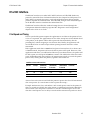
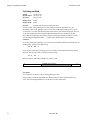
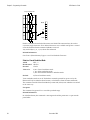
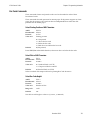
Description of Printer
The A794 thermal receipt printer is extremely fast, quiet, and very reliable. With
thermal printing technology, there is no ribbon cassette to change, and paper loading is
extremely simple. The printer is small enough to fit almost anywhere and is easy to use
with the receipt exiting from the top. There is no journal as it is kept electronically by
the host system.
Paper Feed
Button
LED (Green)
Reset
Button
Back of
Printer
Communication
Connector
(RS-232C 9-pin DB-9
Connector shown)
Power
Connector
DIP
Switches
6-pin Cash Drawer
Connector
Base
Top Cover
Assembly
Rear
Cover
Connector Cover

A794 Owner’s Guide Chapter 1: About the Printer
December 1999 3
Models Available
There are several models of the printer depending on the communication interface and
the combination of options selected.
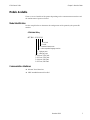
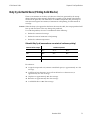
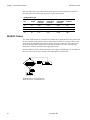
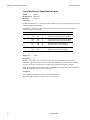
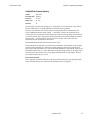
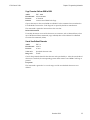
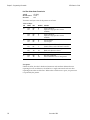
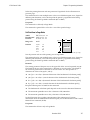
Model Identification
See the sample below to determine the configuration of the printer by the printer ID
number.
A794 Model ID Key
A 7 9 4 - X X X X
1 = no knife
5 = knife
0 = standard character sets
n = other expanded language versions
1 = light gray case
2 = dark gray case
2 = 80.0 mm, 512K Flash
3 = 82.5 mm, 512K Flash
5 = 80.0 mm, 1MB Flash
6 = 82.5 mm, 1MB Flash
Communication Interfaces
♦
RS-232C Serial Interface
♦
IEEE 1284 Bi-Directional Parallel

Chapter 1: About the Printer A794 Owner’s Guide
December 19994
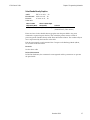
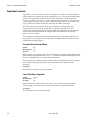
Features
Interfaces
RS-232C, Parallel
Memory/Firmware
512K Flash Memory, History EEROM, 4K Buffer (see “Options”
for additional memory.)
Resident Character
Sets
PC Code Page 437 (US), PC Code Page 850 (Multilingual), PC
Code Page 852; Code Pages 865, 858, 860, 863, 866, and 1252.
Integrated Bar Codes
Code 39, UPC-A, UPC-E, JAN8 (EAN), JAN13 (EAN), Interleaved
2 of 5, Codabar, Code 128, EAN 128, PDF-417 (two-dimensional).
Print
Host-selectable 44 or 56 columns of print on 80 mm wide thermal
paper.
Print Resolution
8 dots/mm
Speed
Up to 130 mm/second throughput.
Human Interface
Speaker for software-generated tone. Drop-in paper loading.
Configuration Menu for easy configuration.
Cash Drawer Driver
Connector for one or two cash drawers (use a “Y” cord for two
drawers.)
Options
♦
Knife (Cutter)
♦
Wall Mount Kit
♦
Power Supply: 55 Watt/75 Watt
♦
Power Cords: US, SEV, UK AC Cord, and Australia AC Cord
♦
1MB memory
♦
Paper Low Sensor
♦
Paper Width
♦
82.5 mm
♦
80 mm
♦
Interface Boards
♦
RS 232C
♦
IEEE Bi-Directional Parallel

Chapter 2: Using the Printer
♦
Unpack the Printer
Remove the Starter Paper Roll Supports
♦
Choose a Location
On a Flat Surface
On a Wall
♦
Connect the Cables
Communication Cable
Cash Drawer Cables
Power Supply Cable
♦
Printer Controls
♦
Loading Receipt Paper
♦
Configuring the Printer
♦
Troubleshooting the Printer
Printer Tone and Green LED
Printing Problems
Printer Does Not Function

Chapter 2: Using the Printer A794 Owner’s Guide
December 19996
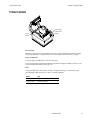
Unpack the Printer
Save all packing materials for use if printer needs to be repacked. Check that all items
listed were shipped. For a single pack (multi-packs differ in packing configuration):
♦
Printer enclosed in a plastic bag with foam packing material
♦
Thermal starter paper roll (inside receipt bucket of printer)
♦
Test printout protecting the printhead (inside receipt bucket of printer)
♦
Power supply with cable (optional)
♦
Installation report card (please complete this form and return to Axiohm)
♦
A794 Thermal Receipt Printer: Setup Guide
♦
Communication cable, (from host computer to printer, optional)
Setup Guide
(in Plastic Bag)
Power Supply
and Cord
(Optional)
Communication
Cable (Optional)
Cardboard
Sleeve
Cardboard
Sleeve
A794 Printer with
Starter Paper Roll
inside printer
(in Plastic Bag)
Foam
Packing
Shipping
Carton
Foam
Packing
To report any missing items, or to report a printer that was damaged during shipping,
call your supplier or call an Axiohm representative at 1-(877) 209-0156.

A794 Owner’s Guide Chapter 2: Using the Printer
December 1999 7
Remove the Starter Paper Roll Supports
Starter Roll
Thermal Paper
Paper Roll
Supports
Test
Printout
1.
Open the Rear Cover by pushing up on each side of the cover until it unsnaps.
Remove the Test Printout.
2.
Lift the Starter Paper Roll out of the paper bucket and slide the two Paper Roll
Supports off.
3.
Remove all tape on the leading edge of the roll.
4.
Place the Starter Paper Roll back into the bucket so that it unrolls from the bottom.
5.
Close the Rear Cover.

Chapter 2: Using the Printer A794 Owner’s Guide
December 19998
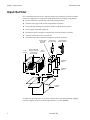
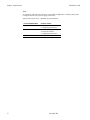
Choose a Location
You can install the printer three ways: flat on a level surface, set vertically on a level
surface, or mounted on a wall using the optional wall-mount kit. Always be sure to
leave room to open the cover and access the cables.
Note: Position printer in a location that allows access to the cables, room to open the
cover and away from traffic areas to limit the chance of being knocked or damaged.
For more information about See this document
Setting up the printer A794 Setup Guide
On a Flat Surface
Horizonta
l
Vertical
Note: For vertical placement on a flat surface, space must be provided for the cables at
the back of the unit, either by an elevated platform or holes in the surface.
On a Wall
Requires optional wall-mount kit A794-K260.

A794 Owner’s Guide Chapter 2: Using the Printer
December 1999 9
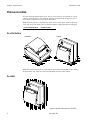
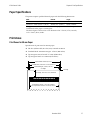
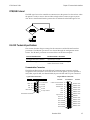
Connect the Cables
Caution: Connect the cables to the printer before plugging in the power supply. If
power is received from the host computer, turn it off before connecting any cables.
Back of
Printer
Communication
Connector
(RS-232C 9-pin DB-9
Connector shown)
Power
Connector
6-pin Cash Drawer
Connector
Connector
Cover
Note: Depending on your printer configuration, the connector panel may vary from the
above illustration.
Communication Cable
The communication cable connects the printer to the host computer. To install the
communication cable:
1.
Turn off the host computer.
2.
Open the Connector Cover at the rear of the printer.
3.
Attach the Communication Cable to the connector shown on the back of the printer
above. Tighten the screws to secure the cable.
4.
Connect the cable to the host computer.

Chapter 2: Using the Printer A794 Owner’s Guide
December 199910
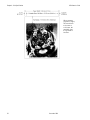
Cash Drawer Cables
The Cash Drawer Cable connects the printer to one or two cash drawers.
1.
Open Connector Cover at rear of printer if not previously open.
2.
Plug the cable into the Cash Drawer Connector (standard phone jack) located at the
rear of the printer (see illustration on previous page.)
Note:
a.
If your system has two cash drawers, attach a Y-cable to the printer’s Cash Drawer
Connector as shown.
b.
Leave some slack in the cord to route through the Strain Relief at a later time.
Printer
Y-Cable
Drawer
Drawer
Printer Connector
(Standard Phone Jack)
Power Supply Cable
Connect the Power Supply Cable last.
1.
Plug the Power Cord into the Power Supply.
2.
Plug the Power Cord into the Power Connector located at the rear of printer (see
illustration on previous page.)
3.
Snap the Connector Cover closed, ensuring that the Communication, Cash Drawer
and Power Supply Cables are aligned with the slots provided for each in the
Connector Cover. Verify that the strain relief on the Connector Cover aligns with
Power Supply Cable.
4.
Plug the Power Supply into a grounded outlet. The Green LED on the top cover will
light up.

A794 Owner’s Guide Chapter 2: Using the Printer
December 1999 11
Printer Controls
Paper Feed
Button
LED (Green)
Reset
Button
Reset Button
Should a paper jam or fault condition occur, press the Reset Button to reset the printer.
The printer performs a startup routine, as if having been turned off, then on again.
Paper Feed Button
Press the Paper Feed Button to advance the paper.
Used in conjunction with the Reset Button to print the Diagnostic Mode or allow access
to the Configuration Menu. (See page 16.)
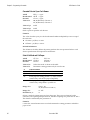
LED
The green LED shows the printer status by shining or flashing. A continuous green
(non-flashing) LED represents an “ON”, no-fault condition.
Status LED
Paper Is Low Flashes Slowly
Paper Is Out Flashes Quickly
Knife Jam Flashes Quickly then Slowly

Chapter 2: Using the Printer A794 Owner’s Guide
December 199912
Tone
A single beep indicates the printer has successfully completed its startup routine (after
having been reset or the power supply turned on).
If the printer beeps twice, a problem may be indicated.
For more information about See these “sections”
Paper Feed Button “Testing the Printer”
“Configuring the Printer”
Reset Button “Troubleshooting the Printer”
“Testing the Printer”
“Configuring the Printer”
LED “Troubleshooting the Printer”
Tone “Troubleshooting the Printer”

A794 Owner’s Guide Chapter 2: Using the Printer
December 1999 13
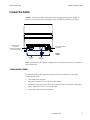
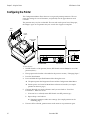
Loading Receipt Paper
Change the paper when any of the following conditions occurs:
♦
Colored stripe appears on the receipt paper indicating the paper is low.
Change the paper as soon as possible to avoid running out of paper part way
through a transaction.
♦
Green LED flashes (slow flash) indicating the paper is low.
Change the paper as soon as possible to avoid running out of paper part way
through a transaction.
♦
Green LED flashes (quick flash) indicating the paper is out.
Change the paper immediately or data may be lost.
Caution: Do not operate the printer or host computer if the printer runs out of paper.
The printer will not operate without paper, but it may continue to accept data
from the host computer. Because the printer cannot print that additional data,
it may be lost.
To Load the Paper:
1.
Open the Rear Cover by lifting up on each side of the cover until it unsnaps.

Chapter 2: Using the Printer A794 Owner’s Guide
December 199914
2.
Remove the used paper roll.
3.
Tear off the end of the new roll so that the edge is loose.

A794 Owner’s Guide Chapter 2: Using the Printer
December 1999 15
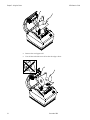
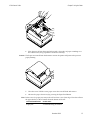
4.
Place the new roll into the paper bucket with a few inches of paper extending over
the cabinet front (or top, if printer is mounted vertically).
Caution: The Paper must unroll from the bottom to ensure the printer will print and to prevent
paper jamming.
5.
Close the cover. Pull the excess paper across the tear-off blade and remove.
6.
Advance the paper if necessary by pressing the Paper Feed Button.
Note: In the event of a paper jam, remove the roll and tear a new clean edge. Place the roll into
the paper bucket, so that it unrolls from the bottom of the roll.
For more information about See this section
Paper jams “Troubleshooting the Printer”
Page is loading ...
Page is loading ...
Page is loading ...
Page is loading ...
Page is loading ...
Page is loading ...
Page is loading ...
Page is loading ...
Page is loading ...
Page is loading ...
Page is loading ...
Page is loading ...
Page is loading ...
Page is loading ...
Page is loading ...
Page is loading ...
Page is loading ...
Page is loading ...
Page is loading ...
Page is loading ...
Page is loading ...
Page is loading ...
Page is loading ...
Page is loading ...
Page is loading ...
Page is loading ...
Page is loading ...
Page is loading ...
Page is loading ...
Page is loading ...
Page is loading ...
Page is loading ...
Page is loading ...
Page is loading ...
Page is loading ...
Page is loading ...
Page is loading ...
Page is loading ...
Page is loading ...
Page is loading ...
Page is loading ...
Page is loading ...
Page is loading ...
Page is loading ...
Page is loading ...
Page is loading ...
Page is loading ...
Page is loading ...
Page is loading ...
Page is loading ...
Page is loading ...
Page is loading ...
Page is loading ...
Page is loading ...
Page is loading ...
Page is loading ...
Page is loading ...
Page is loading ...
Page is loading ...
Page is loading ...
Page is loading ...
Page is loading ...
Page is loading ...
Page is loading ...
Page is loading ...
Page is loading ...
Page is loading ...
Page is loading ...
Page is loading ...
Page is loading ...
Page is loading ...
Page is loading ...
Page is loading ...
Page is loading ...
Page is loading ...
Page is loading ...
Page is loading ...
Page is loading ...
Page is loading ...
Page is loading ...
Page is loading ...
Page is loading ...
Page is loading ...
Page is loading ...
Page is loading ...
Page is loading ...
Page is loading ...
Page is loading ...
Page is loading ...
Page is loading ...
Page is loading ...
Page is loading ...
Page is loading ...
Page is loading ...
Page is loading ...
Page is loading ...
Page is loading ...
Page is loading ...
Page is loading ...
Page is loading ...
Page is loading ...
Page is loading ...
Page is loading ...
Page is loading ...
Page is loading ...
Page is loading ...
Page is loading ...
Page is loading ...
Page is loading ...
Page is loading ...
Page is loading ...
Page is loading ...
Page is loading ...
Page is loading ...
Page is loading ...
Page is loading ...
Page is loading ...
Page is loading ...
Page is loading ...
Page is loading ...
Page is loading ...
Page is loading ...
Page is loading ...
Page is loading ...
Page is loading ...
Page is loading ...
Page is loading ...
-
 1
1
-
 2
2
-
 3
3
-
 4
4
-
 5
5
-
 6
6
-
 7
7
-
 8
8
-
 9
9
-
 10
10
-
 11
11
-
 12
12
-
 13
13
-
 14
14
-
 15
15
-
 16
16
-
 17
17
-
 18
18
-
 19
19
-
 20
20
-
 21
21
-
 22
22
-
 23
23
-
 24
24
-
 25
25
-
 26
26
-
 27
27
-
 28
28
-
 29
29
-
 30
30
-
 31
31
-
 32
32
-
 33
33
-
 34
34
-
 35
35
-
 36
36
-
 37
37
-
 38
38
-
 39
39
-
 40
40
-
 41
41
-
 42
42
-
 43
43
-
 44
44
-
 45
45
-
 46
46
-
 47
47
-
 48
48
-
 49
49
-
 50
50
-
 51
51
-
 52
52
-
 53
53
-
 54
54
-
 55
55
-
 56
56
-
 57
57
-
 58
58
-
 59
59
-
 60
60
-
 61
61
-
 62
62
-
 63
63
-
 64
64
-
 65
65
-
 66
66
-
 67
67
-
 68
68
-
 69
69
-
 70
70
-
 71
71
-
 72
72
-
 73
73
-
 74
74
-
 75
75
-
 76
76
-
 77
77
-
 78
78
-
 79
79
-
 80
80
-
 81
81
-
 82
82
-
 83
83
-
 84
84
-
 85
85
-
 86
86
-
 87
87
-
 88
88
-
 89
89
-
 90
90
-
 91
91
-
 92
92
-
 93
93
-
 94
94
-
 95
95
-
 96
96
-
 97
97
-
 98
98
-
 99
99
-
 100
100
-
 101
101
-
 102
102
-
 103
103
-
 104
104
-
 105
105
-
 106
106
-
 107
107
-
 108
108
-
 109
109
-
 110
110
-
 111
111
-
 112
112
-
 113
113
-
 114
114
-
 115
115
-
 116
116
-
 117
117
-
 118
118
-
 119
119
-
 120
120
-
 121
121
-
 122
122
-
 123
123
-
 124
124
-
 125
125
-
 126
126
-
 127
127
-
 128
128
-
 129
129
-
 130
130
-
 131
131
-
 132
132
-
 133
133
-
 134
134
-
 135
135
-
 136
136
-
 137
137
-
 138
138
-
 139
139
-
 140
140
-
 141
141
-
 142
142
-
 143
143
-
 144
144
-
 145
145
-
 146
146
-
 147
147


Axiohm A794-D100 User manual
- Category
- Print & Scan
- Type
- User manual
- This manual is also suitable for
Ask a question and I''ll find the answer in the document
Finding information in a document is now easier with AI
Related papers


Other documents
-
Epson A794-D100 User manual
-
 SEWOO LK-P41 Command Manual
-
HP Engage One W Serial USB Thermal Printer User guide
-
HP Value Serial/USB Receipt Printer II User guide
-
-
Star Micronics Line Thermal Printer User manual
-
-
Star Micronics TSP700 User manual
-
 Fidelity Electronics SP-POS88IV SERIES Operating instructions
-
 TVS electronic RP-3180 User manual


