Page is loading ...

Model No. 191/192
User’s Guide for
iBlaster
TM
256/512 MP3/WMA
Digital Music Player
191/192 (MA) MP3DigitalMusicPlayer 2006/5/24 11:50 AM Page 1

2
C
ongratulations on your purchase of the MP3 Digital Music
Player from Excalibur Electronics, Inc. This MP3 player is
a new generation digital music player boasting functions like music
(MP3 and WMA) playing and recording features. It also can be used
as a radio receiver and FM line-in recorder mode. The MP3 Digital
Music Player has powerful functions such as:
Supports MP3, WMA and WAV file formats
Multi-language support
Supports TXT E-book
Supports ID3 metadata tags
High-quality voice recorder with built-in microphone
Built-in FM Tuner with manual/auto scanning and 30 preset channels
Sharp OLED display (128*64) and screen saver power-saving mode
Can be used as an external USB drive.
Can be used to store and transfer any type of file format.
Includes firmware upgrade utility.
Works on any compuer that supports a USB interface.
Additional functions and features:
6 Preset EQ modes: Standard, rock, jazz, classical, pop and bass
6 play modes: Normal, signal repeat, full repeat, random repeat, random
play, random play repeat, and browse play
Power off preset
Your MP3 Digital Music Player is easy to use but be sure to use
it safely. Before starting, please read this manual thoroughly, especially
noting safety, care and battery information. Keep this manual for reference.
TABLE OF CONTENTS
Specifications . . . . . . . . . . . . . . . . . . . . . . . . .page 4
Installing Batteries . . . . . . . . . . . . . . . . . . . . . page 4
What’s Included . . . . . . . . . . . . . . . . . . . . . . . page 5
Layout of the MP3 Player . . . . . . . . . . . . . . . page 6
Setting Up Your MP3 Player . . . . . . . . . . . . . . page 7
Functions of Buttons. . . . . . . . . . . . . . . . . . . . page 7
How to Use . . . . . . . . . . . . . . . . . . . . . . . . . . page 8
Basic Operation . . . . . . . . . . . . . . . . . . . . . page 8
How to Play Music . . . . . . . . . . . . . . . . . . . page 8
File Navigation . . . . . . . . . . . . . . . . . . . . . .page 10
Voice Mode . . . . . . . . . . . . . . . . . . . . . . . . page 12
FM Receiver . . . . . . . . . . . . . . . . . . . . . . . page 13
FM Recording . . . . . . . . . . . . . . . . . . . . . . page 14
Menu Setup Mode . . . . . . . . . . . . . . . . . . . .page 15
Firmware/File Upload/Download . . . . . . . . . page 20
PC Requirements .. . . . . . . . . . . . . . . . . . . . page 21
FAQ . . . . . . . . . . . . . . . . . . . . . . . . . . . . . . page 25
Precautions . . . . . . . . . . . . . . . . . . . . . . . . . . page 28
Special Care & Handling. . . . . . . . . . . . . . . . . page 29
Battery Information. . . . . . . . . . . . . . . . . . . . . page 30
Limited 90-Day Warranty. . . . . . . . . . . . . . . . page 31
3
The legendary King Arthur brandished a
magic sword, Excalibur, from which we take
our company name. With this unique weapon
in his hand, he could not be vanquished.
Although Excalibur Electronics can’t claim
the magical secrets of Merlin, King Arthur’s
court wizard, sometimes our patented
technology may make it seem as if we could.
We make you think.
191/192 (MA) MP3DigitalMusicPlayer 2006/5/24 11:50 AM Page 2

45
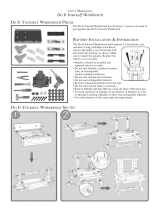
Your MP3 Digital Music
Player requires one AAA bat-
tery, included. To install the
batteries, carefully turn the
MP3 Digital Player over so
that the unit is face-down on a
soft surface. Find the battery
compartment on the back of
the unit. Install the batteries,
making sure to match polarity
(+ and -). Place the tabs of the
battery compartment lid in its
slot and slid the compartment
door into place.
Installing Batteries
OLED display with scratch-resistant surface:
Recording: Adopts DPCM professional recording sample method
FM Reception: FM stereo receiver (87.5-108MHz), manual/automatic
scanning, 30 channels preset
Can be used as an external USB memory drive. Also can be used as
storage for any type of file formats and on any computer that supports
USB.
Repeat function: A-B repeat
FM line-in recorder
Built-in USB jack for PC connection
Includes one AAA alkaline battery
Dimensions: 72.2 mm x 38.5 mm x 14 mm
Weight: 24.2 g (excludes battery)
OS Supported: Windows98/ME/2K/2003/XP
(no driver is required for Windows ME/2K/2003/XP)
SNR (signal to noise ratio): >90db
Frequency Range: 20Hz to 20KHz
The above specifications may be subject to change without notification.
Specifications Whats Included
Figure 3: Drive CD
Included CD is a mini-CD.
This CD cannot be used in
slot-loading CD or DVD drives.
Figure 1: Users Manual
Figure 2:
MP3
Digital
Music
Player
Figure 5:
Line In Cable
Figure 6:
42 inch USB A male to
USB mini male cable
Figure 4:
iBlaster Retractable
Earphones
191/192 (MA) MP3DigitalMusicPlayer 2006/5/24 11:50 AM Page 4

67
MENU: Press MENU button to
enter main menu. Also press
MENU button to enter music
playback mode
+/- BUTTON: Press + button to
increase the volume and - button
to decrease the volume.
NEXT /PREVIOUS :
Press or button to
select next or previous music.
Press and hold or but-
ton to fast forward and back-
ward.
BUTTON: While playing,
press and hold button for
approximately one second to
cycle through each EQ mode.
Under the play status, press
button to enable A-B repeat
function.
Functions of Buttons
Setting up your
MP3 Digital Music Player
LCD DISPLAY
BUTTON
+
BUTTON
- BUTTON
Setting up your
MP3 Digital Music Player
Step 1. Unpack the unit
carefully. Read this instruc-
tion sheet completely. We
recommend that you save the
carton and packing materials
to store the unit, in case you
ever need to return it for serv-
ice.
Step 2. Install batteries cor-
rectly. Close the battery cabi-
net.
Step 3. Position your
iBlaster 256/512 MP3 Digital
Music Player correctly.
Step 4. Connect iBlaster
256/512 MP3 Digital Music
Player with earphones. Turn
on the power for playback.
BUTTON
MENU BUTTON
191/192 (MA) MP3DigitalMusicPlayer 2006/5/24 11:50 AM Page 6

89
Basic Operation
Lock Function
Move the HOLD button
toward lock status. “BUTTON
LOCKED” appears on the
LCD.
Move the
HOLD button in
reverse to unlock.
How to Use
Note: Under “LOCK” sta-
tus, all buttons will be un-
available for use.
Press MENU button to enter
main menu. Press button
to exit menu function. Select
“MUSIC” icon in the main
menu mode, press
MENU but-
ton to enter music playback
mode, as in the figure 1 (top
of next column).
How to Play
Music
Press button to power
on the player. It will automat-
ically play the MP3 music.
Insert the earphone into the
earphone jack of the digital
music player.
Press + button to increase
the volume and - button to
decrease the volume.
Press or button to
select next or previous music.
Press and hold or
button to fast forward and
backward.
Using Your
MP3 Digital Music Player
While playing, press and hold button for approximately
one second to cycle through each EQ mode.
Display Instruction
Under the play status, press
button to enable A-B repeat
function.
Repeat function: Press
to
set start point “
A”, and press
again to set the end point
“
B”. When the “A-B” displays
on the screen, it will repeat
between start point and end
point, press
again to cancel
“
A-B” repeat.
Lyric
Synchronizing
Search for lyric:
The iBlaster MP3/WMA
player supports text lyrics for
music only if you have the
appropriate *.LRC file for
that song.
In using the lyric files:
The lyric file must be the
same name as the music file.
191/192 (MA) MP3DigitalMusicPlayer 2006/5/24 11:50 AM Page 8

Note: The lyric file should be
renamed before download-
ing. The lyric file name can-
not be changed after down-
loading; you can only change
the music name.
For example, if the music
name is: You are My Only
MP3, the lyric file name
should be You are My Only
MP3 lrc. Copy the two files
together into the player and
you will see the lyrics when
playing the related music.
File Navigation
Mode
Select the “NAVIGATION”
icon under the main menu
mode, and press
MENU button
to enter the navigation play
mode, see figure below:
To navigate up, down and
through the lines in each
mode–press the
MENU button
left and right respectively.
How to Navigate in
Play Folder Mode
Press MENU button to enter
the Play Folder mode direct-
ly. The tree file (below)
appears on the screen.
Press button to select
music downward.
Press button to select
music upward.
Press button to play
the currently selected MP3
music.
How to Navigate in
Favorite Mode
Under FILE NAVIGATION
mode, press
MENU button to
enter the MY FAVORITE mode
directly and the following
screen appears:
Press or button to
select going downward or
upward your favorite music,
and press again to con-
firm with a black dot appear-
ing in the box (see Figure 2)
to finish editing your music,
after which press
MENU but-
ton to play the edited music.
Do the same operation for
editing additional music and
so on.
Note 1: The music edit
method is only applicable for
MP3 or WMA music, not for
WAV files.
Note 2: When editing the
music, it will generate the
serial number by sequence,
for example, when editing
the first music, it will auto-
matically generate 01, the
second, 02, etc. At most 30
music files can be edited at
one time.
10 11
Figure 1
Figure 2
191/192 (MA) MP3DigitalMusicPlayer 2006/5/24 11:50 AM Page 10

Voice Mode
Select the “VOICE” icon
under the main menu mode;
press
MENU button to enter
voice mode as in the follow-
ing:
How to Utilize
Play Voice File
If some recorded voice
files of FM files have already
been downloaded under the
voice mode, you can press
button to play directly.
Press or to select
the voice file to be played.
Note: The file name begin-
ning with “V” is the recorded
voice file.
How to Utilize
Record Voice File
Press button to record
voice signal with built-in
microphone.
Continuously press
button to pause and continue
recording.
Press
button to stop
recording.
Press
button under stop
status and voice mode to
record directly.
During recording, all but-
tons will be unavailable
except
and .
FM Receiver
Operation
Select the “FM” icon under
the main menu mode; press
MENU button to enter FM
receiver mode as in the fol-
lowing (See Figure below):
FM Receiver
When the player is under
radio receiver status, if there
is no preset broadcasting sta-
tions, the player will auto-
matically start the scanning
and saving function, then
start searching between
87.5MHZ and 108MHZ, sav-
ing the strongest signals in
the 30 preset channels by
sequence.
When LCD displays
“RADIO”, press or
button to select upward and
downward the preset channel
and listen.
When the player is under
receiving status, press
MENU
button to switch from receiv-
ing to scanning status. When
“SCAN” appears, then press
or scan by 0.1MHZ
stepping. Press and hold
or button to enable
downward (or upward) auto-
matic scanning function. The
scanning will be stopped if
the signal in this frequency is
strong enough. Press
MENU
button again and “STORE”
appears. Press or
button to change the storage
number and press button
again and “YES” appears,
indicating that the station has
been saved. While in
SCAN
mode, press button to
automatically activate scan-
ning saving function to
search between 87.5MHZ
and 108MHZ and save the
strong signals in the 30 preset
channels by sequence.
Press the
MENU button to
display “EXIT” and then
button to exit FM play mode
and return to MP3 play
mode.
12 13
191/192 (MA) MP3DigitalMusicPlayer 2006/5/24 11:50 AM Page 12

14 15
FM Recording
Under FM playing status,
press
button to start record-
ing, The following screen
appears:
Press
button to stop
recording.
To play the recorded FM
PROGRAMS, please enter the
voice and then press but-
ton to play (file names begin-
ning with “F” are recorded
FM files).
Note: This player uses the
earphone as the receiving
antennae, when recording FM
programs, the earphone must
be inserted into the earphone
jack to receive and record a
strong FM signal.
E-Book Operation
Select “TEXT FILE” icon
under the main menu mode,
and press
MENU button to
enter the E-BOOK mode. The
following screen appears:
Download E-Book
Please refer to page 20
“File Upload and Down-
load” on how to copy the
TXT files from PC to the
player.
Read E-Book
Select the E-BOOK mode.
The E-BOOK folder will
appear if some E-BOOKS are
downloaded to the player.
Press
MENU button to enter
and read.
Press button or to
read upward and downward.
Press
button to exit E-
BOOK mode.
Menu Setup Mode
Select “SETTINGS” icon
under the main menu mode,
press
MENU button to enter
the menu setup mode, the fol-
lowing screen appears:
Enter the MENU SETUP
mode, press to
select forward and backward
the different setup functions.
For details, please see the fig-
ure below:
Player Mode Setup
Press MENU button to enter the EQ mode to select a different
EQ setting:
191/192 (MA) MP3DigitalMusicPlayer 2006/5/24 11:50 AM Page 14

Press MENU button to enter the play mode to select different
play sequence.
Screen Saver Setup
The screen saver time can be 5 to 50 seconds to extend the
battery life.
Menu Setup Mode (Continued)
Power Off Setup
Set the POWER OFF time
when not playing or recording.
Select either 2, 5, or 10 min-
utes.
Recording Setup
Enter the recording para-
meter setup, press or
button to select the sound
source, sample frequency and
codes. Press MENU button to
adjust the selected parameter.
Different sample frequency
may obtain different recording
quality or time.
Language Selection
You may select traditional
Chinese, simplified Chinese
and English fonts, which are
also used to display the corre-
sponding lyrics, ID3 (i.e.
music and singer) information
according to the file informa-
tion.
Exit Function
Exit this screen.
16 17
191/192 (MA) MP3DigitalMusicPlayer 2006/5/24 11:50 AM Page 16

Line-In Mode
Select “LINE IN” icon under
the main menu mode, press
MENU button to enter the
menu LINE IN mode, the fol-
lowing screen appears:
Line-In MP3
Line-Out Recording
Press button to record
external sound source signal
(connect the external sound
source with Line-In cable).
Press button continu-
ously to pause and continue
recording.
Press
to stop recording.
During recording, all the
buttons will be unavailable
except , , + and -.
Play Voice File
If some voice files or FM
files have already been
recorded, press button
to play directly.
Press or to select
the music file to be played.
The file names beginning
with “L” are LINE IN record-
ing files.
Delete Operation
Select “DELETE” icon under
the
MAIN MENU mode, press
MENU button to enter selected
file function, and the follow-
ing screen appears:
Enter the delete file mode,
and press or button
to select different delete
function, and the following
screen appears:
Delete Music File
Press MENU button to enter
selected music file menu
mode.
Press or button to
select the music file to be
deleted.
Press
button to select
“YES”, and press button
to confirm delete.
4. The Deleting process is
completed.
Delete a Voice File
Press MENU button to select
“VOICE” icon. The delete
method is the same as the
music file.
Press
MENU button to select
“EXIT” icon, and press
MENU
button to exit delete function.
18 19
191/192 (MA) MP3DigitalMusicPlayer 2006/5/24 11:50 AM Page 18

Note: You can only delete
the files in the folder by
delete option in the player;
the folder can only be deleted
in the PC and corruption.
File
Upload/Download
Connect one end of the
USB cable to the MP3 player
(See Figure 3 below). The
“USB CONNECTION” signal
appears on the screen of the
player.
Double click the “MY
COMPUTER” icon o the desk-
top; a new disk label appears
in MY COMPUTER indicating
your MP3 player.
To download MP3 files
from PC to MP3 player, you
need only drag the files to
your MP3 player, and also
transmit files to PC from
MP3 in the same manner.
The MP3 player can be
used to store both music files
and other file formats.
Note: Never unplug the
USB cable when exchanging
data between MP3 and PC to
avoid data loss and corrup-
tion.
PC Requirements
& Connections
Minimum
PC Configuration
OS: Windows 98, 2000,
XP, ME
CPU: Pentium II 233
Mhz or above
RAM: 32 MB or above
USB 2.0 or USB 1.1
Software upgrade is used to
enhance and optimize the
performance of MP3 player.
The normal operation of the
player will not be affected
even without software
upgrade.
Improper software upgrade
may cause the machine to
malfunction! Please read the
User’s Manual carefully
before upgrading, suitable for
customers with PC knowl-
edge.
The firmware upgrade soft-
ware is only applicable for
designated MP3 player.
The Operation Steps of
Firmware Upgrade
Download the latest
upgrade software bale (files
of compacted format) from
www.samesay.com
Figure 3
20 21
191/192 (MA) MP3DigitalMusicPlayer 2006/5/24 11:50 AM Page 20

FAQ
Function Operation
Related Questions
What if all of the buttons
are unavailable?
Check to see if it is set on
HOLD enabled status (set).
What happens if power
suddenly goes off during FM
play or music play?
The battery may be low,
leading to system power
OFF.
Check the battery life indica-
tor on the LCD.
File Upload and
Download Related
Questions
Why can’t my PC find my
MP3?
The USB port of the PC is
malfunctioning (mechanical
damage of insufficient power
supply). Please restart the
computer or reinstall the sys-
tem software, or driver instal-
lation fails to recognize the
MP3.
Why does my PC indicate
failure to connect to the play-
er, but the player clearly indi-
cates READY?
This is always caused by
the USB cable not properly
plugged in to the player. The
USB control circuit of the
player checks the 4.5V-5.0V
voltage for connection to
indicate player is normally
connected. The difference
between port length of data
cable and USB serial cable
also causes the data not to
exchange.
Why does my MP3 player
lock-up?
Once the USB cable is
unplugged during copying
music files or formatting the
MP3, the buttons will be
locked. When copying music
files, the copying progress
22 23
displayed on the LCD of
player is the actual progress.
When the notes of the player
stop dancing, it indicates that
copy is complete. Before
unplugging the USB cable
from the PC, please ensure
that the movable disc has
been safely ejected (Eject).
Click the Safely Remove
Hardware icon at the right
bottom of the desktop to
ensure safe removal of the
hardware, or enter Windows
Explorer and find the mov-
able hard disk generated by
the detecting device, click the
right key of the mouse and
select Eject.
Solution for System
Power on Failure
If an accident occurs or the
system is halted (such as
power off) during copying
files or formatting the MP3,
please remove the battery,
and press and hold the
“
PLAY” button. The PC nor-
mally will find the MP3
hardware and install the soft-
ware automatically, and then
upgrade the firmware.
Music Playback
Questions
Debugging Method for
the Music Play Sequence:
After copying the music
files, please assign serial
numbers before the music
name (for example, 01, 02,
03 … 10 … 99), the MP3
will play files according to
the assigned serial number.
Please do not use 1 or 2 to
replace 01 or 02 etc.
Otherwise the system will
play these files last.
Why can’t I play certain
WMA files downloaded
from the internet?
The WMA files are copy-
right protected. It is recom-
mended that you make WMA
files yourself. When making
WMA files with Windows
Media Player
TM
files, please
191/192 (MA) MP3DigitalMusicPlayer 2006/5/24 11:50 AM Page 22

24 25
select only those files that are
copyright-protected.
Battery-Power Supply
Related Questions
Please do not use poor-
quality batteries for the play-
er. Poor-quality batteries may
also lead to automatic system
power off or system halting
when adjusting volume,
selecting songs or recording.
Precautions
• To keep the player performing well, please avoid use in the
following environments:
• Humid places
• High-temperature environments such as heaters
and heating devices
• Low-temperature environments
• Dusty environments
• Please do not disassemble or change any component
of the player.
• Please do not short-circuit, disassemble, or place the
battery near heat or fire.
• Please remove the battery when unit is not in use for
awhile to avoid any corruption to the internal
components from battery electrolytes.
• Avoid dropping the player or undue pressure
against the LCD display that may result in damage.
• Excalibur assumes no responsibility for any loss of
personal data caused by accident or misuse of software
or poor product maintenance.
• Excalibur reserves the right to modify the product
specifications and design without any further notification.
This device complies with Part 15 of the FCC Rules. Operation is subject to the following
two conditions: (1) this device may not cause harmful interference, and (2) this device must
accept any interference received, including interference that may cause undesired operation.
NOTE: This equipment has been tested and found to comply with the limits for a Class B digital
device, pursuant to Part 15 of the FCC Rules. These limits are designed to provide reasonable l
interference in a residential installation. This equipment generates, uses and can radiate radio
frequency energy and, if not installed and used in accordance with the instructions, may cause
harmful interference to radio communications. However, there is no guarantee that interference
will not occur in a particular installation. If this equipment does cause harmful interference to
radio or television reception, which can be determined by turning the equipment off and on,
the user is encouraged to try to correct the interference by one or more
of the following measures:
• Reorient or relocate the receiving antenna.
• Increase the separation between the equipment and receiver.
• Connect the equipment into an outlet on a circuit different from that to which the
receiver is connected.
• Consult the dealer or an experienced radio/TV technician for help.
191/192 (MA) MP3DigitalMusicPlayer 2006/5/24 11:50 AM Page 24

Special Care and Handling
• Avoid rough handling such as bumping or dropping.
• Avoid moisture and extreme temperatures. For best results,
use between the temperatures of 39º F and 100º F
(4º C and 38º C).
• Clean using only a slightly damp cloth. Do not use cleaners
with chemical agents.
• To avoid damaging the unit, never place it near radiators, in
front of heating vents, in direct sunlight, or near water.
Battery Information
• Batteries should be installed and replaced only by an adult.
• The MP3 Digital Music Player uses 1 AAA batteries, included.
• Do not mix alkaline, standard (carbon-zinc) or rechargeable
(nickel-cadmium) batteries.
• Do not mix old and new batteries.
• Do not use rechargeable batteries.
• Remove exhausted batteries from the unit.
• Do not short circuit battery terminals.
• Remove batteries and store them in a cool,
dry place when not in use.
• To avoid explosion or leakage, do not dispose of batteries
in a fire or attempt to recharge alkaline or other
non-rechargeable batteries.
• Install batteries so that the polarity (+ and -) matches the
diagrams in the battery compartment.
• Use only batteries of the same type and equivalency.
EXCALIBUR ELECTRONICS, INC.,
warrants to the original consumer that
its products are free from any electrical
or mechanical defects for a period of 90
DAYS from the date of purchase. If any
such defect is discovered within the
warranty period, EXCALIBUR ELEC-
TRONICS, INC., will repair or replace
the unit free of charge upon receipt of
the unit, shipped postage prepaid and
insured to the factory address shown at
right.
The warranty covers normal consumer
use and does not cover damage that
occurs in shipment or failure that results
from alterations, accident, misuse,
abuse, neglect, wear and tear, inade-
quate maintenance, commercial use, or
unreasonable use of the unit. Removal
of the top panel voids all warranties.
This warranty does not cover cost of
repairs made or attempted outside of the
factory.
Any applicable implied warranties,
including warranties of merchantability
and fitness, are hereby limited to 90
DAYS from the date of purchase.
Consequential or incidental
damages resulting from a
breach of any applicable
express or implied war-
ranties are hereby exclud-
ed. Some states do not
allow limitations on the
duration of implied
warranties and do not
allow exclusion of
incidental or consequential damages, so
the above limitations and exclusions in
these instances may not apply. The only
authorized service center in the United
States is:
Excalibur Electronics, Inc.
13755 SW 119th Ave
Miami, Florida 33186 U.S.A.
Phone: 305.477.8080
Fax: 305.477.9516
www.ExcaliburElectronics.com
Ship the unit carefully packed, prefer-
ably in the original carton, and send it
prepaid, and adequately insured. Include
a letter, detailing the complaint and
including your daytime telephone num-
ber, inside the shipping carton. If your
warranty has expired and you want an
estimated fee for service, write to the
above address, specifying the model and
the problem.
PLEASE DO NOT SEND
YOUR UNIT WITHOUT
RECEIVING
AN ESTIMATE
FOR SERVICING.
WE CANNOT
STORE YOUR UNIT!
LIMITED 90-DAY WARRANTY
Excalibur Electronics reserves the right to make technical changes
without notice in the interest of progress.
26 27
191/192 (MA) MP3DigitalMusicPlayer 2006/5/24 11:51 AM Page 26

E
XCALIBUR
E
LECTRONICS
, I
NC
.
13755 SW 119
TH
A
VENUE
M
IAMI
, F
LORIDA
33186 U.S.A.
P
HONE
: 305.477.8080
F
AX
: 305.477.9516
Play games
live at:
www.ExcaliburElectronics.com
191/192 (MA) MP3 Digital Music Player 052306 V4
191/192 (MA) MP3DigitalMusicPlayer 2006/5/24 11:51 AM Page 28
/