Page is loading ...

Saab 9-3
900 Installation instructions
SCdefault
MONTERINGSANVISNING
·
INSTALLATION INSTRUCTIONS
MONTAGEANLEITUNG
·
INSTRUCTIONS DE MONTAGE
SITdefault
Saab 9-3
Parking assistance (SPA)
4D, see page 2-13
5D, see page 14-30
CV, see page 31-42
Accessories Part No. Group Date Instruction Part No. Replaces
32 025 902
32 025 903
32 025 904
32 026 045 9:40-08 May 07 32 025 940 32 025 940 Oct 06
F930A042

2 32 025 940
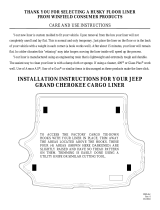
Saab 9-3
4D
1 SPA control module
2 M03-07: Holder (x4)
3 M03-07: Seal (x4)
4 M03-07: Distance sensor (x4)
5 M03-07: Decor strip, bumper
6 Wiring harness, distance sensor
7 SPA wiring harness
8 Dust cover
9 Cable tie (x8)
10 M08: Tape
The following parts must be ordered separately
M08: Hole-punching tool
M08: Distance sensor (x4)
M08: Holder (x4)
F930A626
1
9
5
7
6
2
3
4
8
10

32 025 940 3
Saab 9-3
1 Open the boot lid.
2 Turn the ignition key to the OFF position and
remove the key. Raise the car.
3 Remove the two nuts holding the rear bumper
air shield against the body and the two bolts
holding the bumper shell against the wheel
housings.
4 Lower the car.
5 M03-07: Remove the decor strip from the rear
bumper.
F930A627
3
3 3
5

4 32 025 940
Saab 9-3
6 M03-07: Raise and fold aside the luggage com-
partment floor and remove the luggage com-
partment scuff plate.
7 Remove the panel in the luggage compartment
side trim.
8 M03-07: Remove the side scuff plates.
9 Remove the clips and fold aside the side trims
on the left and right-hand sides.
10 Remove the rear lamp clusters.
F930A628
8
10
9
9
10
6
6

32 025 940 5
Saab 9-3
11 M03-07: Remove the bolts for the bumper shell
which are located under the rear lamp clusters.
12 Remove the bumper bolts at the wheel hous-
ings.
13 M08: Release the bumper's upper mounting by
the rear lamp clusters.
14 Remove the bumper shell by pulling the sides
outwards and then pulling the bumper shell rear-
wards.
Important
Place the bumper on a soft, clean surface.
F930A629
11
14
12
13

6 32 025 940
Saab 9-3
15 Remove the console in which such equipment
as a CD changer/amplifier may be fitted. Dis-
connect the connections to any equipment in the
console.
16 Remove the connector for the rear harness
(blue) from the fuse box. Unplug connector A1
from the blue connector. Remove the lock.
17 Fit the kit's wiring harness. Fit the red cable to
connector A1 in position 1. Fit the green cable to
connector A1 in position 4.
18 Fit the lock. Plug connector A1 into the blue con-
nector.
WARNING
Certain cars: The visible red light is a class 1
laser. Do not look directly into the optical fibre or
the control module connector at close range. A
distance of less than 20 mm between your eyes
and the light source may cause eye injury.
F930A630
17
16,18
16
16,18

32 025 940 7
Saab 9-3
19 Remove the rubber plug from under the left-
hand rear lamp cluster.
20 Connect the ground cable.
21 Connect the control module and fit it into the
slots on the rear fuse box.
22 Position the wiring harness and secure with
cable ties.
F930A631
19
22
22
22
22
21
20

8 32 025 940
Saab 9-3
23 Remove the support from the bumper shell.
24 M03-07: Align the bumper shell's decor strip
using the guide tab and press in the hooks start-
ing in the centre and then continuing out to the
sides.
25 M03-07: Fit the seals on the sensors.
26 M03-07: Fit the distance sensors and holders
together.
27 M03-07: Fit the distance sensors into the decor
strip mountings.
28 M03-07: Fit the wiring harness for the sensors in
the bumper shell groove.
29 M03-07: Fit the support to the bumper shell.
Important
The connector sockets for the distance sensors
should point towards the right-hand side of the car.
F930A632
25
26
27
23,29
28
28
28

32 025 940 9
Saab 9-3
30 M08: Drill 8 mm holes (from the inside of the
bumper shell) in the centre of each marking
(x 4).
Position the hole-punching tool from the outside
of the bumper. Grip on the outside, at the same
time tighten the nut from the inside until the
hole-punching tool is pressed through the whole
of the bumper shell. Carry out the hole-making
procedure for all four holes.
Fit the tape and holders for the sensors in
accordance with the markings in the bumper
shell.
Important
The connector sockets for the distance sensors
should point towards the right-hand side of the car.
F930A633

10 32 025 940
Saab 9-3
31 M08: Fit the wiring harness in the support for the
bumper shell.
32 M08: Fit the support to the bumper shell.
WARNING
Check that the wiring harness is not pinched.
Incorrect fitting can damage the wiring harness
and cause a short-circuit/fire.
F930A634
31
32

32 025 940 11
Saab 9-3
33 Lift up the bumper shell and thread the wiring
harness through the hole under the left-hand
rear lamp cluster. Fit the grommet.
34 Fit in the two tabs of the bumper shell under the
holders and the outer corners between the wing
liner and the mounting points at the wheel hous-
ings. Press the bumper shell into place.
35 Connect the wiring harness for the bumper to
the kit's wiring harness. Fit the connector into
the hole beside the left-hand rear lamp cluster.
Fasten the wiring harness for the distance sen-
sors with a cable tie.
36 M03-07: Fit the bolts for the bumper shell which
are located under the rear lamp clusters.
37 Fit and connect the rear lamp clusters. Check
the fit against the boot lid moulding.
WARNING
Check that the wiring harness is not pinched.
Incorrect fitting can damage the wiring harness
and cause a short-circuit/fire.
F930A051
37
37
37
34
34
35
33
F930A635
35

12 32 025 940
Saab 9-3
38 Fit the console in which such equipment as a
CD changer/amplifier may be fitted. Plug in the
connections to any equipment in the console.
39 Fit the side trims.
40 M03-07: Fit the side scuff plates.
41 Fit the panels and the clips in the luggage com-
partment's side trims.
42 M03-07: Fit the scuff plate and lower the lug-
gage compartment floor.
WARNING
Certain cars: The visible red light is a class 1
laser. Do not look directly into the optical fibre or
the control module connector at close range. A
distance of less than 20 mm between your eyes
and the light source may cause eye injury.
F930A636
42
39
39
40
41
42
42

32 025 940 13
Saab 9-3
43 Raise the car.
44 Fit the bumper bolts at the wheel housings.
45 Fit the two nuts holding the rear bumper air
shield against the body.
46 Lower the car.
47 Close the boot lid.
48 Check the fit of the bumper. Adjust as neces-
sary.
49 Connect the diagnostic tool, select car and
model year, select “All”, select “Add/Remove”,
select the accessory and then “Add”.
50 With the ignition key in the ON position and
reverse gear engaged, check that the system
warns against objects in the rear by using tones.
The first tone is given when an object is at a dis-
tance of 1.8 metres. The signal then has a fre-
quency of 2 tones per second, but the number of
tones per second increases the closer the object
becomes to the vehicle and changes as follows:
· 1.8 - 1.3 m: 2 tones/second
· 1.3 - 0.9 m: 3 tones/second
· 0.9 - 0.3 m: from 5 to 12 tones/second in
close stages
· 0.3 m: continuous tone
Note
The diagnostic tool will, on some occasions, need
to retrieve a security code in TIS. Information on
what to do will be displayed on the diagnostic tool
display.
F930A637
45 45
44
44

14 32 025 940
Saab 9-3
5D
1 SPA control module
2 M06-07: Holder (x4)
3 M06-07: Seal (x4)
4 M06-07: Distance sensor (x4)
5 M06-07: Protective shell, bumper
6 Wiring harness, distance sensor
7 Wiring harness, rear harness
8 Cable tie (x8)
9Bracket
10 M08: Tape
The following parts must be ordered separately
M08: Hole-punching tool
M08: Distance sensor (x4)
M08: Holder (x4)
F930A639
1
5
7
6
2
3
4
8
9
10

32 025 940 15
Saab 9-3
1 Turn the ignition key to the OFF position and
remove the key.
2 Raise the car.
3 Remove the spoiler's centre nuts.
4 Remove the screws to the wheel housing.
5 Lower the car and open the tailgate.
6 Insert a screwdriver in the hole to reach under
the catch for the bumper shell. Bend up using
the screwdriver to release the catch.
F930A405
3 3
6
4
4

16 32 025 940
Saab 9-3
7 Pull the bumper shell away from the holders.
8 Release the catches using a screwdriver.
Detach the shell from the moulding.
9 Lift off the bumper shell.
Important
Place the bumper on a soft, clean surface.
F930A406
8
9
7

32 025 940 17
Saab 9-3
10 Pull the cellular block from the bumper shell
lugs.
11 M06-07: Remove the corner protective mould-
ings and the protective shell by inserting tool
82 93 474 under the shell to release the clips.
F930A407
11
10
1111 11

18 32 025 940
Saab 9-3
12 M08: Drill 8 mm holes (from the inside of the
bumper shell) in the centre of each marking
(x 4).
Position the hole-punching tool from the outside
of the bumper. Grip on the outside, at the same
time tighten the nut from the inside until the
hole-punching tool is pressed through the whole
of the bumper shell. Carry out the hole-making
procedure for all four holes.
Fit the tape and holders for the sensors in
accordance with the markings in the bumper
shell.
Important
The connector sockets for the distance sensors
should point towards the right-hand side of the car.
F930A633

32 025 940 19
Saab 9-3
13 M08: Fit the wiring harness in the support for the
bumper shell.
14 M08: Fit the support to the bumper shell.
WARNING
Check that the wiring harness is not pinched.
Incorrect fitting can damage the wiring harness
and cause a short-circuit/fire.
F930A640
13
14

20 32 025 940
Saab 9-3
15 M06-07: Fit the seals on the sensors.
16 M06-07: Fit the distance sensors and holders
together.
17 M06-07: Fit the distance sensors into the
bumper shell.
18 M06-07: Connect the kit's wiring harness to the
sensors and route it along the shell. The con-
nector should appear out towards the left-hand
lamp cluster.
Important
The connector sockets for the distance sensors
should point towards the right-hand side of the car.
WARNING
Check that the wiring harness is not pinched.
Incorrect fitting can damage the wiring harness
and cause a short-circuit/fire.
F930A641
15
16
18
18
18
17 17
17 17
/