Page is loading ...

QUICKSTART GUIDE (ENGLISH)
7-51-0342-A
Thank you for purchasing the Analog Custom Shop Drive3 Distortion!
Please read the important notes in this Quickstart Guide to ensure the best possible experience
with your new pedal.
A few notes about power:
Battery:
• To install the included 9V battery, remove the battery cover on the bottom panel of the pedal. Snap
the terminal connector's onto the battery's terminals. Replace the cover, and you're ready to play!
• When using battery power, disconnect your cable from the pedal's input jack when you are not
playing. (The input jack works like an on/off switch for battery power.)
• If you are not going to use your pedal for an extended period, disconnect and remove the battery.
Over long periods of time, batteries can sometimes leak, and their acid or other residue can damage
the pedal. Damage caused by battery leakage is not covered under warranty.
Power adapter (optional):
• To power the pedal with a power adapter, we recommend purchasing the Akai MP9-P6 (9V DC, 300
mA [200 mA minimum], center-negative).
Description: The Drive3 Distortion is one of the most versatile distortion pedals out there. It has two
distinct circuits – an LED distortion and a diode distortion – allowing you to get many of the classic sounds
of other pedals on the market. We've also added a third mode, which is a combination of both circuits,
allowing for a new type of sound, combining it with the more traditional distortion. Whether you're playing
blistering leads or thick chords, this pedal boasts superior tone and clarity. We're sure you'll find
y
ou
r
sound with the Drive3 Distortion!
Suggested settings:
The Drive3 Distortion can give you a wide spectrum of distorted sounds – from a light distortion to full-on
fuzz. Adjust the TONE knob to try out the amount of "cut" or "boost" that's ideal for your sound. Also
experiment with the different settings of the DRIVE3 SWITCH.
Here are a few suggested settings to get you started:
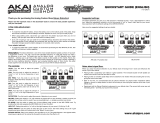
The controls:
LEVEL: Turn this knob to adjust the pedal's output
volume.
TONE: Turn this knob to adjust the brightness or
darkness of the sound.
DISTORTION: Turn this knob to adjust the amount of
distortion in your sound.
DRIVE3 SWITCH: Use this switch to select the type
of drive circuit. The three settings vary a bit in gain
structure and tone, which you'll notice most in the
"attack" of your sound.
BYPASS SWITCH: Step on this switch to turn the
effect on or off. This pedal features a true bypas
s
switch, meaning your signal won't be colored by the
pedal's circuitry when the effect is off.
Notes about signal flow:
Where you place the Drive3 Distortion in your effects chain will change how it works and influences the
sound of your other effects.
• Placing it after a compressor can make for a great sustainer. The increased sustain of both pedals can
create some smooth tones that are ideal for solos.
• Placing it after an overdrive pedal helps drive its distortion even harder while also boosting the low end,
giving the sound more depth.
• Most of the time, it's recommended that the Drive3 Distortion be placed before modulation effects
(flanger or chorus) or delay effects, but don't let that stop you from trying the distortion at the end of you
r
effects chain.
• Experiment with the Drive3 Distortion's placement in your effects chain. Play around with some new and
interesting tones – and find your sound in the process!
Deep metal Classic alternative roc
k
www.akaipro.com
/