Page is loading ...

QUICKSTART GUIDE (ENGLISH)
7-51-0343-A
Thank you for purchasing the Analog Custom Shop Analog Delay!
Please read the important notes in this Quickstart Guide to ensure the best possible experience
with your new pedal.
A few notes about power:
Battery:
• To install the included 9V battery, remove the battery cover on the bottom panel of the pedal. Snap
the terminal connector's onto the battery's terminals. Replace the cover, and you're ready to play!
• When using battery power, disconnect your cable from the pedal's input jack when you are not
playing. (The input jack works like an on/off switch for battery power.)
• If you are not going to use your pedal for an extended period, disconnect and remove the battery.
Over long periods of time, batteries can sometimes leak, and their acid or other residue can damage
the pedal. Damage caused by battery leakage is not covered under warranty.
Power adapter (optional):
• To power the pedal with a power adapter, we recommend purchasing the Akai MP9-P6 (9V DC, 300
mA [200 mA minimum], center-negative).
Description:
Analog delay is an effect that creates repeated echoes of the input signal. The Analog Custom Shop
Analog Delay is – as the name suggests – pure analog. Analog delays have a very particular warmth and
character that digital delays can only imitate and never truly replicate. Consequently, a pedal like this is a
must-have for any guitarist who wants a natural, organic echo sound. We're sure you'll find your sound with
the Analog Delay!
Suggested settings:
The Analog Delay can give your sound a wide range of depth and nuance.
To start, we suggest setting it for a relatively fast delay with few repeats (Figure 1). From there, try turning
the TIME knob clockwise to hear the delays further apart. Switch the TIME SWITCH to increase the delay
time even more. Make the signal "wetter" by turning the MIX and REPEAT knobs counterclockwise. Just be
careful about turning the REPEAT knob too far towards its maximum position – this can cause some loud
feedback.
Here are a few more to get you started:
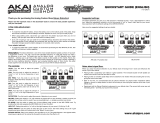
The controls:
MIX: Turn this knob to adjust the balance of the "dry"
(unaffected) signal and the "wet" (delay) signal.
TIME: Turn this knob to adjust the amount of time (in
milliseconds) between repeats of the signal. The
range of this knob is controlled by the TIME SWITCH.
REPEAT: Turn this knob to adjust how many echoes
of the original signal you will hear. This control is
called "Feedback" on other delays because the signal
is fed back into the input, mixing the echoes back into
the sound. Turning this knob to its higher settings can
generate some loud feedback, so use it with caution.
TIME SWITCH: Use this switch to set the range of the
TIME knob: 0-600 ms (milliseconds) or 0-1200 ms.
When set to 0-1200 ms and with the TIME knob at its
maximum, this creates a 1.2 second delay time,
which is very long for an analog delay.
BYPASS SWITCH: Step on this switch to turn the
effect on or off. This pedal features a true bypas
s
switch, meaning your signal won't be colored by the
pedal's circuitry when the effect is off.
Notes about signal flow:
Where you place the Analog Delay in your audio chain will change how it works and influences the sound of
your other effects.
Most of the time, it's recommended that the Analog Delay be placed at the end of your effects chain. This
allows you to tailor your sound with your distortion, filter, and tone pedals first, before feeding that whole
sound into the delay pedal, allowing for a more natural delay sound. But don't let that stop you from
experimenting with its placement in your effects chain. Play around with some new and interesting tones –
and find your sound in the process!
Figure 1
Rockabilly / "slapback"
Rhythmic echoe
s
/