Page is loading ...

©2012 Shure Incorporated
27A16156 (Rev. 3)
Printed in U.S.A.
UR3 Plug-on Transmitter
Émetteur plug-on UR3
Handsender UR3
Trasmettitore plug-on UR3
Transmisor de mano UR3
Transmissor Portátil UR3
Носимый передатчик UR3


3
General Description
The UR3 is compatible with any wired XLR microphone and is an essential component for professional field
and media production applications. It is comfortable to hold, features a back-lit display, and the audio level
and power indicator LEDs are discreetly hidden.
Features
• UHF-R Audio Reference Companding
• Wide-band tuning (region specific)
• Smart, ergonomic industrial design
• Selectable +12V/+48V phantom power
• Sweepable high-pass filter
• Programmable preset list with copy/paste to other UR3s
• Selectable mic/line input
• 10/50 mW RF power (region specific)
• Discretely located audio and battery life indicators
• IR sync
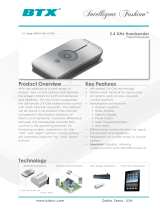
UR3 Plug-on Transmitter
① Joystick
Enter, exit and scroll using the joystick
② XLR Connection
Connects to any XLR wired microphone or
device output
③ Power LED
Tri-colored LED, green, amber and red
④ Audio LED
Tri color LED for audio settings, red is peak
⑤ IR Window
For transmitting settings from receiver to
transmitter
⑥ Battery Compartment and Battery
Cap Retainer
Requires 2 AA batteries. Turn cover counter-
clockwise to open
⑦ Power Switch
Press on, press and hold to turn off

4
sens/gain
phantom
radio
utilities
HPF
sens/gain
mic
PRESET
SaVED
exit
enter sync scan
exit
enter sync scan
Audio ABJ 779-810 MHz NavigateRF
OL OL
Audio ABJ 779-810 MHz NavigateRF
®
UR4D+
Wireless Receiver
with Audio Reference
Companding
sync
Control
Monitor
Power
sync
Monitor Clip
ENTER
EXIT
push
1
2
Audio ABJRF
OL
®
Wireless Receiver
with Audio Reference
Companding
sync
radio
audio
UTILITIES
radio
audio
UTILITIES
ABJ 779-810 MHz Navigate
OL
Audio ABJ 779-810 MHz NavigateRF
UR4D+
Wireless Receiver
with Audio Reference
Companding
sync
Control
Monitor
Power
sync
Monitor Clip
ENTER
EXIT
push
1
2
Audio ABJRF
OL
®
AudioRF
OL
radio
audio
UTILITIES
radio
audio
UTILITIES
Setup
1. Install batteries and turn power on.
2. Select the appropriate level, mic or line, to match the audio signal source: AUDIO > SENS/GAIN > SENS
3. Plug into an XLR microphone or the output of an audio device.
4. Perform a sound check: Adjust the gain until the audio LED peaks red and flickers amber:
AUDIO > SENS/GAIN > GAIN
Syncing with a UHF-R Receiver
Align IR windows with a UHF-R receiver and press sync on the receiver. The transmitter displays
SYNC SUCCESS.
sens/gain
phantom
radio
utilities
HPF
sens/gain
mic
PRESET
SaVED
sens/gain
phantom
radio
utilities
HPF
sens/gain
mic
PRESET
SaVED

5
Joystick
Use the joystick for navigating and setting values.
ENTER: Access a menu or
save the selected value
UP/DOWN: Scroll through
menus or change a value
EXIT: Exit or go back
RF Settings
Use the RADIO menu to adjust the following RF settings:
RADIO Menu
SET FREQ: Adjusts group, channel or frequency.
RF PWR LVL: Selects 10 mW or 50 mW power level (region specific)
DISABLE RF: Disables RF transmission. RF OFF appears on home screen.
ENABLE RF (if disabled): Enables RF transmission
SHURE
606.125MHz
MIC
Audio Settings
AUDIO Menu
SENS/GAIN > SENS: Adjusts input level to match audio signal source.
MIC: For microphones or mic-level outputs
LINE: For line-level outputs.
SENS/GAIN > GAIN: Adjusts audio input to the transmitter.
PHANTOM: Adds phantom power for condenser microphones. Select 12V or 48V as required for the
microphone.
HPF (LOW-CUT): High-pass filter. Scroll up to turn on the filter and set the low-frequency rolloff in Hz. (Scroll
all the way down to turn off.)
Utility Menu
UTILITIES Menu
LOCK: Locks the transmitter to prevent changes to settings.
MIC PRESET: Accesses the preset list.
DISPLAY: Changes the home screen display format.
BATTERY: Sets battery type for more accurate battery life metering.
CONTRAST: Adjusts display contrast (press up/down).
RESTORE: Restores the factory default settings.

6
Locking and Unlocking the Transmitter
To lock the transmitter, select UTILITIES > LOCK.
To unlock the transmitter:
1. From the home screen, hold ENTER to the right for 5 seconds or until UNLOCK? appears.
2. Push ENTER again.
An on-screen key appears showing the joystick sequence to unlock the transmitter.
3. Follow the pattern to unlock the transmitter (up, down, left, right).
Power On Shortcuts
RF Off
Use this to turn on the transmitter without transmitting RF. This allows you to change frequency settings on
the transmitter without accidentally interfering with a frequency being used by another transmitter.
1. Hold the joystick to the left (EXIT), power on the transmitter.
The home screen displays RF OFF.
2. Change and save your frequency settings as you normally would – the transmitter will not broadcast.
3. To transmit RF, power the transmitter off or turn the RF on thru the main menu, MAIN MENU > RADIO >
ENABLE RF.
Lock
Use this shortcut to power on the transmitter with the interface locked. This prevents accidental changes to
transmitter settings.
1. While holding the joystick to the right (ENTER), power on the transmitter.
The home screen displays the lock icon.
2. To unlock the transmitter, hold the joystick to the right (ENTER) for 5 seconds and follow the on-screen
instructions.
SHURE
606.125MHz
MIC

7
Microphone Presets Menu
The transmitter holds up to 10 microphone presets. Use this menu to access a list, add, delete presets, or to
copy and paste a preset list. Use the list submenu to set, modify or delete selected presets.
Note: The UR3 is shipped with an empty preset list.
Access the preset menu: UTILITIES > MIC PRESET
Accessing Microphone Presets
Access the preset list: UTILITIES > MIC PRESET > LIST
1. Scroll down to select a preset.
2. Press ENTER to access the menu for selected preset.
List Submenu
Use the list submenu to set, modify, or delete presets.
1. Access the preset list:
UTILITIES > MIC PRESET > LIST
2. Scroll down to select a preset.
3. ENTER to access the menu for the selected preset.
SET: Activates the selected preset.
MODIFY: Modify the selected preset.
DELETE: Deletes the selected preset.
Modify Presets
To change or modify the presets, you must enter the microphone preset submenu: UTILITIES > MIC PRESET
> LIST and select a preset. From the sub-menu you can set, modify, or delete the setting.
Use the joystick to edit values:
ENTER: move to the next value.
UP/DOWN: edit the selected value.
EXIT: exit the preset.
To exit and save: Continue to scroll right, through all fields, until PRESET SAVED appears.
To edit the eight-character name:
1. Highlight the preset name and press the joystick down.
2. Scroll up/down to change the character.
3. Scroll right to move to the next character.
4. To exit, continue to scroll right past the last character.
Copy and Paste Preset List
Use COPY/PASTE to transfer the mic preset list from one plug-on transmitter to another. This function can be
used between different transmitter frequency bands.
1. Highlight COPY/PASTE from the mic preset menu on both transmitters. (UTILITIES > MIC PRESET)
Important: COPY/PASTE must be highlighted on both transmitters.
2. Align the transmitter IR windows and press ENTER on the source transmitter (the transmitter you want to
copy from).
3. The display shows SUCCESS on both transmitters after transferring the list.
LIST: Enters the LIST submenu.
ADD: Add a new preset.
DELETEALL: Deletes all presets.
COPY/PASTE: Copy and paste the entire preset list to another UR3.

8
Modulation FM (45 kHz max. deviation)
Frequency Range 470 – 952 MHz*
Tuning Bandwidth up to 80 kHz*
Antenna Type Dipole
Note: UR3 and attached microphone act as the antenna
Carrier Frequencies up to 3200, tunable increments: 25 kHz*
RF Output Power Selectable: 10 mW, 50 mW max.*
Power Requirements 2 LR6 AA batteries, 1.5 V, alkaline
Battery Life
typical, alkaline
without phantom power,
10 mW:
10 hours
with phantom power, 50 mW: 3 to 4 hours
frequency band dependent
Sensitivity Settings mic, line
Gain Adjustment Range −10to+20dB
Tonekey 32 kHz
Frequency Stability ±0.0015%
Spurious Radiation
below carrier, typical
75dB
Equivalent Input Noise −127.0dBVA-Weighted(audiofrontend)
Maximum Audio Input
Level
at0dBgainsetting
LINE setting: +24dBV
MIC setting:
−21dBV
Differential Input
Impedance
LINE setting: 6kΩ
MIC setting: 3kΩ
Frequency Response
+1.5dB,−3dB,througha
UR4 receiver
35 Hz–17 kHz
Overall system frequency response depends on microphone element
and receiver.
High Pass Filter Two-pole(12dBperoctave),cutofffrequencyselectablefrom40to
240 Hz
THD+N
1kHzsinewaveat6dB
below clip, through a UR4
receiver
<0.3%
System Dynamic Range
A-weighted, typical
through a UR4 receiver: LINE setting: 107dB
MIC setting: 105dB
through a UR5 receiver:
LINE setting: 102dB
MIC setting: 100dB
Audio Input Female XLR Connector, 1=ground, 2=hot, 3=cold
Phantom Power
Selectable
+48 V: 48 V (±4 V) , 7 mA max.
+12 V:
12 V (±1 V) , 7 mA max.
Weight 196 g (6.9 oz.), with batteries
Dimensions 117 mm x 36 mm x 44 mm (H x W x D)
*varies by region
Specifications

9
Frequency Range and Transmitter Output Power
BAND FREQ (MHz) Nominal Output Power (mW)*
G1 470-530 10/50
G1E 470-530 10/50
H4 518-578 10/50
H4HK 518-565 10
H4E 518-578 10/50
J5 578-638 10/50
J5E 578-638 10/50
J5HK 578-638 10
K4E 606-666 10/50
L3 638-698 10/50
L3E 638-698 10/50
M5E 694-758 10/50
P8 710-790 10/50
P9 710-787 10/50
Q5 740-814 10/50
MA24 779-806 10
R16 794-806 10/50
R18 794-806 10
R9 790-865 10/50**
MJBX 806-810 10
X2 925-932 10
X1 944-952 10/50
* conductive into 50 ohms
**10mW only from 863-865 MHz
NOTE: This Radio equipment is intended for use in musical professional entertainment and similar applica-
tions. This Radio apparatus may be capable of operating on some frequencies not authorized in your region.
Please contact your national authority to obtain information on authorized frequencies and RF power levels for
wireless microphone products.

10
WARNING: Danger of explosion if battery incorrectly replaced. Operate only with Shure compatible
batteries.
WARNING: Batterypacksshallnotbeexposedtoexcessiveheatsuchassunshine,fire,orthelike.
LICENSING INFORMATION
Licensing: A ministerial license to operate this equipment may be required in certain areas. Consult your
national authority for possible requirements. Changes or modifications not expressly approved by Shure
Incorporated could void your authority to operate the equipment. Licensing of Shure wireless microphone
equipment is the user’s responsibility, and licensability depends on the user’s classification and application,
and on the selected frequency. Shure strongly urges the user to contact the appropriate telecommunications
authority concerning proper licensing, and before choosing and ordering frequencies.
Information to the user
ThisequipmenthasbeentestedandfoundtocomplywiththelimitsforaClassBdigitaldevice,pursuantto
Part 15 of the FCC Rules. These limits are designed to provide reasonable protection against harmful inter-
ference in a residential installation. This equipment generates uses and can radiate radio frequency energy
and, if not installed and used in accordance with the instructions, may cause harmful interference to radio
communications. However, there is no guarantee that interference will not occur in a particular installation. If
this equipment does cause harmful interference to radio or television reception, which can be determined by
turning the equipment off and on, the user is encouraged to try to correct the interference by one or more of
the following measures:
• Reorient or relocate the receiving antenna.
• Increase the separation between the equipment and the receiver.
• Connect the equipment to an outlet on a circuit different from that to which the receiver is connected.
• Consult the dealer or an experienced radio/TV technician for help.
Certifications
Meets requirements of the following standards: EN 300 422 Parts 1 and 2, EN 301 489 Parts 1 and 9,
EN60065.
Certified under FCC Part 74.
Certified by IC in Canada under RSS-123 and RSS-102.
This device complies with Industry Canada licence-exempt RSS standard(s). Operation of this device is sub-
ject to the following two conditions: (1) this device may not cause interference, and (2) this device must accept
any interference, including interference that may cause undesired operation of the device.
Le présent appareil est conforme aux CNR d'Industrie Canada applicables aux appareils radio exempts de li-
cence. L'exploitation est autorisée aux deux conditions suivantes : (1) l'appareil ne doit pas produire de brouil-
lage, et (2) l'utilisateur de l'appareil doit accepter tout brouillage radioélectrique subi, même si le brouillage est
susceptible d'en compromettre le fonctionnement.
The CE Declaration of Conformity can be obtained from Shure Incorporated or any of its European represen-
tatives. For contact information please visit www.shure.com
The CE Declaration of Conformity can be obtained from: www.shure.com/europe/compliance
Authorized European representative:
Shure Europe GmbH
Headquarters Europe, Middle East & Africa
Department: EMEA Approval
Jakob-Dieffenbacher-Str. 12
75031 Eppingen, Germany
Phone: 49-7262-92 49 0
Fax: 49-7262-92 49 11 4
Email: [email protected]
Note: EMC conformance testing is based on the use of supplied and recommended cable types. The use of
other cable types may degrade EMC performance.
Changes or modifications not expressly approved by the manufacturer could void the user’s authority
to operate the equipment.

AUDIO
HPF
SENS/GAIN
PHANTOM
UTILITIES
LOCK
LIST
ADD
DELETE ALL
COPY/PASTE
MIC PRESET
DISPLAY
BATTERY
CONTRAST
SET FREQ
DISABLE/ENABLE RF
RF PWR LVL
RADIO
radio
audio
UTILITIES
radio
audio
UTILITIES
RESTORE
S E T
MODIFY
DELETE

SHURE Incorporated http://www.shure.com
United States, Canada, Latin America, Caribbean:
5800 W. Touhy Avenue, Niles, IL 60714-4608, U.S.A.
Phone: 847-600-2000 U.S. Fax: 847-600-1212 Int’l Fax: 847-600-6446
Europe, Middle East, Africa:
Shure Europe GmbH, Phone: 49-7262-9249-0 Fax: 49-7262-924911-4
Asia, Pacific:
Shure Asia Limited, Phone: 852-2893-4290 Fax: 852-2893-4055
/