Sharp MX-2300N User manual

Category
Copiers
Type
User manual

This manual is also suitable for

NCE
HZZ
MX-2300N
MX-2700N
MODEL:
DIGITAL FULL COLOUR MULTIFUNCTIONAL SYSTEM
Quick Start Guide
Quick Start Guide
Quick Start Guide
General information
Functions of the machine and
procedures for placing originals and
loading paper.
Copying
Using the copy function.
Printing
Using the printer function.
Scanning
Using the scan function.
Document filing
Storing jobs as files on the hard
drive.
System settings
Configuring settings to make the
machine easier to use.
Keep this manual close at hand for reference
whenever needed.
MANUALS PROVIDED WITH THE MACHINE
Printed manuals and manuals in PDF format are provided with the machine. The manuals in PDF format are
stored on the hard drive in the machine.
The printed manuals contain information that you should know before using the machine, including the basic
procedures for operating the machine. Please read these manuals well.
The manuals in PDF format provide detailed explanations of the functions of the machine. When the machine is
used in a network environment, the PDF manuals can be viewed at any time by simply downloading them using a
Web browser.
Printed manuals
Quick Start Guide (this manual)
This manual is intended to help you get started using the many basic and convenient
functions of the machine.
When you are ready to learn about the machine in more detail, see the manuals in
PDF format described on the next page.
Troubleshooting
This manual explains how to remove paper misfeeds and provides answers to
frequently asked questions regarding the operation of the machine in each mode.
Refer to this manual when you have difficulty using the machine.
Safety Guide
This manual contains instructions for using the machine safely and lists the
specifications of the machine and its peripheral devices.
Software Setup Guide
This manual explains how to install the software and configure settings to use the
machine as a printer or scanner.
Facsimile Quick Reference Guide
This manual explains the basic procedures for using the fax function of the machine,
and provides an overview of the features of the fax function, troubleshooting
procedures, and specifications.
For detailed information on using the fax function and the system settings for fax, see
the "Facsimile Guide" in PDF format.
1
Manuals in PDF format
Manuals in PDF format can be downloaded from the Web server* in the machine.
The manuals contain detailed explanations of the procedures for using the machine. To download the PDF
manuals, see "How to download the manuals in PDF format" (page 3).
* You will need the IP address of the machine in order to access the Web server in the machine. The IP address
is configured in the Network Settings menu in the system settings.
This manual provides information, such as basic operation procedures, how to load paper, and machine
maintenance.
This manual provides detailed explanations of the procedures for using the copy function.
This manual provides detailed explanations of the procedures for using the printer function.
This manual provides detailed explanations of the procedures for using the scanner function and the Internet fax
function.
This manual provides detailed explanations of the procedures for using the document filing function. The
document filing function allows you to save the document data of a copy or fax job, or the data of a print job, as
a file on the machine's hard drive. The file can be called up as needed.
This manual explains the "System Settings", which are used to configure a variety of parameters to suit the
aims and the needs of your workplace. Current settings can be displayed or printed out from the "System
Settings".
User's Guide
Copier Guide
Printer Guide
Scanner Guide
Document Filing Guide
System Settings Guide
This manual provides detailed explanations of the procedures for using the fax function and the "System
Settings" that are related to fax.
Facsimile Guide
2
ACCESSING THE WEB SERVER IN THE MACHINE
When the machine is connected to a network, the machine's built-in Web server can be accessed from a Web
browser on your computer.
Opening the Web pages
Checking the IP address
To check the IP address of the machine, print out the all custom setting list in the system settings.
Access the Web server in the machine to
open the Web pages.
Start a Web browser on a computer that
is connected to the same network as the
machine and enter the IP address of the
machine.
Recommended Web browsers
Internet Explorer: 6.0 or higher (Windows
®
)
Netscape Navigator: 7.0 or higher
Safari: 1.2 or higher
The Web page will appear.
The machine settings may require that user
authentication be performed in order to open
the Web page. Please ask the administrator of
the machine for the password that is required
for user authentication.
1
Press the [SYSTEM SETTINGS] key.
2
Select the all custom setting list in the
touch panel.
(1) Touch the [List Print (User)] key.
(2) Touch the [All Custom Setting List] key.
The IP address is shown in the list that is
printed.
SYSTEM
SETTINGS
System Settings
Total Count Default Settings
List Print
(User)
Address Control
Fax Data
Receive/Forward
Document Filing
Control
USB-Device Check
Paper Tray
Settings
Printer Condition
Settings
Admin Password
Exit
System Settings
List Print (User)
All Custom Setting List
Printer Test Page
Sending Address List
OK
1/2
(1)
(2)
3
How to download the manuals in PDF format
Manuals containing detailed information on the machine can be downloaded from the Web pages.
Download a manual in PDF format.
(1) Click [Operation Manual Download] in
the menu of the Web page.
(2) Select the desired language.
(3) Select the manual that you wish to
download.
(4) Click the [Download] button.
The selected manual is downloaded.
(4)
(3)
(2)
(1)
4
TABLE OF CONTENTS
PART NAMES AND FUNCTIONS . . . . . . . . . . . . . . . . . . . . . . . . . . . . . . . . . . . . . . . . . . . . . . . . . . .8
OPERATION PANEL . . . . . . . . . . . . . . . . . . . . . . . . . . . . . . . . . . . . . . . . . . . . . . . . . . . . . . . . . . . .10
USING THE TOUCH PANEL . . . . . . . . . . . . . . . . . . . . . . . . . . . . . . . . . . . . . . . . . . . . . . . . . . . . . .12
USER AUTHENTICATION . . . . . . . . . . . . . . . . . . . . . . . . . . . . . . . . . . . . . . . . . . . . . . . . . . . . . . . .13
PLACING ORIGINALS . . . . . . . . . . . . . . . . . . . . . . . . . . . . . . . . . . . . . . . . . . . . . . . . . . . . . . . . . . .14
CHANGING PAPER IN A TRAY . . . . . . . . . . . . . . . . . . . . . . . . . . . . . . . . . . . . . . . . . . . . . . . . . . . .15
MAKING COPIES . . . . . . . . . . . . . . . . . . . . . . . . . . . . . . . . . . . . . . . . . . . . . . . . . . . . . . . . . . . . . . .20
2-SIDED COPYING (Automatic Document Feeder). . . . . . . . . . . . . . . . . . . . . . . . . . . . . . . . . . . .21
COPYING ON SPECIAL PAPER (Bypass Copy) . . . . . . . . . . . . . . . . . . . . . . . . . . . . . . . . . . . . . .22
SELECTING THE EXPOSURE MODE . . . . . . . . . . . . . . . . . . . . . . . . . . . . . . . . . . . . . . . . . . . . . . .24
FITTING THE COPY IMAGE TO THE PAPER (Automatic Ratio Selection) . . . . . . . . . . . . . . . . .25
ENLARGEMENT/REDUCTION (Preset Ratios / Zoom) . . . . . . . . . . . . . . . . . . . . . . . . . . . . . . . . .27
INTERRUPTING A COPY RUN (Interrupt Copy) . . . . . . . . . . . . . . . . . . . . . . . . . . . . . . . . . . . . . .29
STORING COPY OPERATIONS (Job Programs). . . . . . . . . . . . . . . . . . . . . . . . . . . . . . . . . . . . . .30
SPECIAL MODES . . . . . . . . . . . . . . . . . . . . . . . . . . . . . . . . . . . . . . . . . . . . . . . . . . . . . . . . . . . . . . .33
SELECTING A SPECIAL MODE . . . . . . . . . . . . . . . . . . . . . . . . . . . . . . . . . . . . . . . . . . . . . . . . . . .34
CONVENIENT COPY FUNCTIONS . . . . . . . . . . . . . . . . . . . . . . . . . . . . . . . . . . . . . . . . . . . . . . . . .35
PRINTING . . . . . . . . . . . . . . . . . . . . . . . . . . . . . . . . . . . . . . . . . . . . . . . . . . . . . . . . . . . . . . . . . . . . .44
CANCELLING A PRINT JOB . . . . . . . . . . . . . . . . . . . . . . . . . . . . . . . . . . . . . . . . . . . . . . . . . . . . . .46
USING PRINTER DRIVER HELP . . . . . . . . . . . . . . . . . . . . . . . . . . . . . . . . . . . . . . . . . . . . . . . . . . .47
PRINTER DRIVERS . . . . . . . . . . . . . . . . . . . . . . . . . . . . . . . . . . . . . . . . . . . . . . . . . . . . . . . . . . . . .48
SELECTING PRINTER DRIVER SETTINGS . . . . . . . . . . . . . . . . . . . . . . . . . . . . . . . . . . . . . . . . . .49
CONVENIENT PRINTER FUNCTIONS. . . . . . . . . . . . . . . . . . . . . . . . . . . . . . . . . . . . . . . . . . . . . . .50
PRINTING FROM A MACINTOSH . . . . . . . . . . . . . . . . . . . . . . . . . . . . . . . . . . . . . . . . . . . . . . . . . .52
General information
Copying
Printing
5
NETWORK SCANNER FUNCTION . . . . . . . . . . . . . . . . . . . . . . . . . . . . . . . . . . . . . . . . . . . . . . . . .56
SCANNING AN ORIGINAL. . . . . . . . . . . . . . . . . . . . . . . . . . . . . . . . . . . . . . . . . . . . . . . . . . . . . . . .57
CHANGING THE RESOLUTION. . . . . . . . . . . . . . . . . . . . . . . . . . . . . . . . . . . . . . . . . . . . . . . . . . . .59
SELECTING THE EXPOSURE AND EXPOSURE MODE . . . . . . . . . . . . . . . . . . . . . . . . . . . . . . . .60
CHANGING THE FILE FORMAT . . . . . . . . . . . . . . . . . . . . . . . . . . . . . . . . . . . . . . . . . . . . . . . . . . .61
STORING A DESTINATION . . . . . . . . . . . . . . . . . . . . . . . . . . . . . . . . . . . . . . . . . . . . . . . . . . . . . . .62
SENDING THE SAME IMAGE TO MULTIPLE DESTINATIONS (Broadcast Transmission) . . . .65
CONVENIENT TRANSMISSION METHODS . . . . . . . . . . . . . . . . . . . . . . . . . . . . . . . . . . . . . . . . . .66
SPECIAL SCAN MODES . . . . . . . . . . . . . . . . . . . . . . . . . . . . . . . . . . . . . . . . . . . . . . . . . . . . . . . . .68
SELECTING SPECIAL MODES FOR THE SCANNER FUNCTION . . . . . . . . . . . . . . . . . . . . . . . .69
CONVENIENT SCANNER FUNCTIONS. . . . . . . . . . . . . . . . . . . . . . . . . . . . . . . . . . . . . . . . . . . . . .71
DOCUMENT FILING . . . . . . . . . . . . . . . . . . . . . . . . . . . . . . . . . . . . . . . . . . . . . . . . . . . . . . . . . . . . .74
QUICKLY SAVING DOCUMENT DATA (Quick File). . . . . . . . . . . . . . . . . . . . . . . . . . . . . . . . . . . .76
APPENDING INFORMATION WHEN STORING A FILE (File) . . . . . . . . . . . . . . . . . . . . . . . . . . . .77
ONLY SAVING DOCUMENT DATA (Scan to HDD) . . . . . . . . . . . . . . . . . . . . . . . . . . . . . . . . . . . .79
PRINTING A SAVED FILE . . . . . . . . . . . . . . . . . . . . . . . . . . . . . . . . . . . . . . . . . . . . . . . . . . . . . . . .80
SYSTEM SETTINGS . . . . . . . . . . . . . . . . . . . . . . . . . . . . . . . . . . . . . . . . . . . . . . . . . . . . . . . . . . . . .82
Scanning
Document filing
System settings
General information
General information
7
This section provides general information about the machine, including the
names and functions of the parts of the machine and its peripheral devices,
and the procedures for placing originals and loading paper.
X PART NAMES AND FUNCTIONS . . . . . . . . . . . . . . . . . . 8
X OPERATION PANEL . . . . . . . . . . . . . . . . . . . . . . . . . . . 10
X USING THE TOUCH PANEL . . . . . . . . . . . . . . . . . . . . . 12
X USER AUTHENTICATION . . . . . . . . . . . . . . . . . . . . . . . 13
X PLACING ORIGINALS. . . . . . . . . . . . . . . . . . . . . . . . . . 14
X CHANGING PAPER IN A TRAY . . . . . . . . . . . . . . . . . . 15
8
PART NAMES AND FUNCTIONS
Exterior
(1) Automatic document feeder
This automatically feeds and scans multiple originals.
Both sides of 2-sided originals can be scanned at
once.
(2) Document feeder tray
Place the originals in this tray when using the
automatic document feeder.
(3) Document glass
This is used to scan books and other originals that
cannot be scanned using the automatic document
feeder.
(4) Front cover
Open to replace a toner cartridge.
(5) Operation panel
(6) Exit tray unit (right tray)
When installed, output can be delivered to this tray.
(7) Output tray (centre tray)
Copy jobs and print jobs are delivered to this tray.
(8) Saddle Stitch Finisher
This can be used to staple output. The saddle stitch
finisher can automatically staple output at the centre
line and fold the pages to create a pamphlet. A punch
module can be installed to punch holes in output.
(9) Tray 1
This holds paper. Up to 500 sheets of paper can be
loaded.
(10) Tray 2
This holds paper. Up to 500 sheets of paper can be
loaded.
(11) Tray 3 (when a stand/1 x 500 sheet paper drawer
or stand/2 x 500 sheet paper drawer is installed)
This holds paper. Up to 500 sheets of paper can be
loaded.
(12) Tray 4 (when a stand/2 x 500 sheet paper drawer
is installed)
This holds paper. Up to 500 sheets of paper can be
loaded.
(13) Tray 5 (when a large capacity tray is installed)
This holds paper. Up to 3500 sheets of paper can be
loaded. When a stand/1 x 500 sheet paper drawer is
installed, this is tray 4.
(14) Finisher
This can be used to staple output. A punch module
can be installed to punch holes in output.
(1)
(2)
(5) (6)(4)
(8) (10)(9) (13)
(3)
(7)
(11) (12)
(14)
9
Interior
(15) Main power switch
This is used to power on the machine.
When using the fax function or Internet fax function,
always keep this switch in the "ON" position.
(16) Bypass tray
Special types of paper can be fed from the bypass
tray.
Peripheral devices
The following are some of the peripheral devices that are available. For information on the other peripheral
devices, see "4. PERIPHERAL DEVICES" in the User's Guide.
PS3 expansion kit (MX-PKX1)
This kit enables the machine to be used as a PostScript 3 compatible printer.
Facsimile expansion kit (MX-FXX1)
This kit enables the fax function of the machine to be used.
Internet fax expansion kit (MX-FWX1)
This kit enables Internet fax to be used on the machine.
(15) (16)
10
OPERATION PANEL
DOCUMENT
FILING
IMAGE SEND
COPY
JOB STATUS
SYSTEM
SETTINGS
PRINT
READY
DATA
LINE
DATA
Ready to scan for copy.
Full Colour
Colour Mode
Auto
Exposure
100%
Copy Ratio
Job Detail
Settings
2-Sided Copy
Original
0
Output
Special Modes
File
Quick File
2.
3.
4.
1.
A4
A3
A4
B4
A4R
A4
Plain
Touch panel
Messages and keys appear in the
LCD display.
Operations are performed by
directly touching the displayed
keys with your fingers.
When a key is touched, a beep
sounds and the selected item is
highlighted. This lets you check an
operation as you perform it.
[JOB STATUS] key
Press this key to view the job
status screen. You can check
the status of jobs and cancel
jobs in the job status screen.
Print mode indicators
READY indicator
Print data can be received when this indicator is lit.
DATA indicator
This blinks while print data is being received and lights
steadily while printing is taking place.
[SYSTEM SETTINGS] key
Mode select keys
Use these keys to change the mode displayed in the touch panel.
The indicator of the selected key lights up.
[DOCUMENT FILING] key
When you wish to print or send a file stored on the hard drive, press this key to
select document filing mode.
[IMAGE SEND] key
When you wish to use the scan or fax functions, press this key to select network
scanner / fax mode.
·
LINE indicator
This lights up during transmission or reception in fax mode. The indicator also
lights up during transmission in scan mode.
·
DATA indicator
When a received fax cannot be printed because of a problem such as out of
paper, the indicator blinks. The indicator lights steadily when there is data that is
waiting to be transmitted.
[COPY] key
When you wish to use the copy function, press this key to select copy mode. You can
hold down the [COPY] key to check the total page count and how much toner remains.
Press this key to display the system settings screen.
The system settings can be adjusted to make the
machine easier to use, such as configuring paper tray
settings and storing addresses.
11
LOGOUT
Main power
indicator
[CLEAR ALL] key
Press this key to redo an operation
from the beginning.
All settings will be cleared and
operation will return to the initial state.
Numeric keys
These are used to enter the number of
copies, fax numbers, and other numbers.
[LOGOUT] key ( )
When user authentication is enabled,
press this key to log out after using the
machine. When using the fax function,
this key can be pressed to send tone
signals on a pulse dial line.
[#/P] key ( )
Press this key to use a job program
when using the copier function. When
using the fax function, press this key to
dial using a program.
[BLACK & WHITE START] key
Use this key to copy or scan an original
in black and white. This key is also used
to send a fax in fax mode.
Use this key to activate power save mode. The
[POWER SAVE] key blinks when the machine
is in power save mode. This key is also used
to deactivate power save mode.
[COLOUR START] key
Use this key to copy or scan an original in
colour.
This indicator lights
when the main power
is switched on.
[POWER] key
Use this key to turn the
machine power on and
off.
[POWER SAVE] key
[CLEAR] key
Press this key to return settings such as the
number of copies to "0".
[STOP] key
Press this key to stop a copy job or scanning of
an original.
12
USING THE TOUCH PANEL
The touch keys that appear in the touch panel are grouped for easy operation. The layout and functions of the
touch keys are explained below.
Using general keys
(1) When the displayed screen is one of two or more screens, use the keys to switch through the
screens.
(2) When a checkbox is touched, a checkmark will appear to indicate that the setting is enabled.
(3) The keys can be used to increase or decrease a value. To make a value change quickly, keep your
finger on the key.
Ready to scan for copy.
Full
C
olou
r
C
o
l
our Mo
de
A
uto
Ex
p
osur
e
1
00%
Co
py
Rati
o
Job
D
eta
i
l
Settin
Job Queue
Sets / Progress
Status
S
p
oo
l
Com
p
let
e
D
eta
i
l
Priorit
y
Sto
p
/Delet
e
In
te
rn
et
F
ax
F
a
x
Job
Sca
n
to
Prin
t
Job
Job
Q
ueu
e
Co
py
020
/
00
1
Co
py
in
g
Co
py
020
/
00
0
Waitin
g
Com
p
uter0
1
020
/
00
0
Waitin
g
03
12
3
4
56
7
8
1
2
3
4
002
/
00
0
Waitin
g
1
/1
-
Sided Co
py
Ori
g
ina
l
0
Out
p
u
t
S
p
ecial Mode
s
Fil
e
Q
uick Fil
e
3.
1
.
A
3
A4
A
A4
P
l
B4
Settin
g
s related to the
ori
g
inal are
g
enerally
g
rouped to
g
ether on the
l
e
ft
s
i
de
of th
e
base
sc
r
ee
n
.
This indicates that an ori
g
inal has
been
p
laced in the automatic
d
o
cu
m
e
nt f
eede
r
.
The size of the ori
g
inal appears
automaticall
y.
This a
pp
ears when one or more
s
p
ecial modes are selected
.
To
uc
h th
e
i
c
on to
c
h
ec
k wh
a
t
mo
des
a
r
e
se
l
ec
t
ed.
Advanced settin
g
s are
g
rouped here
.
You can have frequentl
y
used touch
ke
y
s displa
y
ed as shortcuts in this
p
osition.
Settin
g
s related to output are
g
enerally
g
rouped to
g
ether on the top ri
g
ht side
of th
e
base
sc
r
ee
n
.
A selected job can be
g
iven priority and
run ahead of other
j
obs, or a
j
ob
waitin
g
in the queue can be cancelled
.
Jobs are displa
y
ed as a list of touch
ke
y
s. The job ke
y
s appear in the order
that the
y
will be run. A job ke
y
can be
to
uc
h
ed
to
se
l
ec
t it.
The job status screen normally appears behind the base screen of the currently selected mode. Only the left ed
g
e of
the job status screen appears, and this can be touched to brin
g
the screen to the front
.
A4
This shows the status of the paper tra
y
s on the machine.
Yo
u
ca
n
check the paper size, paper type and amount of paper remaining.
The currently selected tray is hi
g
hli
g
hted
.
Special Modes
OK
2/4
Covers/Inserts
Book Copy Tab Copy Card Shot
Transparency
Inserts
Multi Shot
(1)
System Settings
Auto Clear Setting
Set the time for auto clear.
60
OK
Cancel Timer
(10~240)
sec.
(2)
(3)
13
USER AUTHENTICATION
When user authentication is enabled in the system settings, you must log in before using the machine. User
authentication is initially disabled.
When you have finished using the machine, log out.
User authentication methods
There are two methods for performing user authentication: login by user number and login by login name and
password. Please ask the administrator of the machine for the information that is required to log in.
For more information on user authentication, see "USER AUTHENTICATION" in the User's Guide.
Login by user number
Login by login name and password
Logout
When you have finished using the machine, log out. Logging out prevents unauthorised use of the machine.
How to log out
You can log out from all modes of the machine by pressing the [LOGOUT] key ( ). However, note that the
[LOGOUT] key ( ) cannot be used to log out when a fax number is being entered in fax mode, as the [LOGOUT]
key ( ) functions as a numeric key at this time.
If a preset duration of time elapses after the machine is last used, the auto clear function will activate. When auto
clear activates, logout automatically takes place.
This method requires that you log in by entering your
user number (5 to 8 digits), which is stored in the
system settings of the machine.
This method requires that you log in by entering your
login name, password, and the login destination,
which are stored in the system settings of the
machine. Depending on how the machine
administrator has configured the system settings, an
e-mail address may also be used for authentication.
Admin Login
Enter your user number.
OK
Please enter your login name /
password.
User Authentication
Login Name
User Name
Login Locally
Password
Auth to:
OK
14
PLACING ORIGINALS
The automatic document feeder can be used to automatically scan many originals at once. This saves you the
trouble of manually feeding each original.
For originals that cannot be scanned using the automatic document feeder, such as a book or a document with
notes attached, use the document glass.
Using the automatic document feeder
When using the automatic document feeder, place the originals in the document feeder tray.
Using the document glass
Adjust the original guides to
the width of the originals.
Place the originals face up with the edges aligned
evenly.
The indicator line indicates approximately
100 originals.
The placed originals must not be higher than this line.
Place the original face down. Align
the top left corner of the original
with the tip of the mark in the
far left corner of the glass.
Place the original
face down.
To place a thick original such as a
book with many pages, push up the
far edge of the automatic document
feeder and then close the automatic
document feeder slowly.
15
CHANGING PAPER IN A TRAY
To change the paper in a tray, you must load the desired paper in the tray and then change the tray settings in the
machine to specify the loaded paper. As an example, this section explains how to change the paper in tray 1 from
B4 (8-1/2" x 14") plain paper to A4 (8-1/2" x 11") size recycled paper.
Loading paper in a tray
Pull out the paper tray.
If paper remains in the tray, remove it.
Move the two guides on the tray to change the
size from B4 (8-1/2" x 14") to A4 (8-1/2" x 11").
When using letter head paper or pre-
printed paper, insert the paper with the
print side face down. If "Disabling of
Duplex" is enabled in the system
settings, insert the paper with the print
side face up.
Gently push the tray into the machine.
Insert the paper with the print side face up.
Fan the paper well before inserting it.
Otherwise, multiple sheets may feed at
once and cause a misfeed.
Indicator line
The indicator line indicates the maximum
height of the paper that can be loaded in
the tray. When loading paper, make sure
that the stack is not higher than the
indicator line.
16
Changing the tray settings
When you change the paper in a tray, the tray settings in the system settings must also be changed.
1
Press the [SYSTEM SETTINGS] key.
2
Configure the tray settings in the touch
panel.
Some of the settings only appear when you have
administrator rights.
(1) Touch the [Paper Tray Settings] key.
(2) Touch the [Tray Settings] key.
(3) Touch the [Tray 1] key.
(4) Touch the [Recycled] key.
(5) Touch the key of desired paper size.
(6) Touch the [OK] key.
The above steps change the paper settings for
tray 1 to A4 (8-1/2" x 11") recycled paper.
DOCUMENT
FILING
IMAGE SEND
COPY
JOB STATUS
SYSTEM
SETTINGS
LOGOUT
PRINT
READY
DATA
LINE
DATA
System Settings
Total Count
Paper Tray
Settings
Printer Condition
Settings
Default Settings
Address Control
Document Filing
Control
Fax Data
Receive/Forward
List Print
(User)
USB-Device Check
Exit
System Settings
Paper Tray Settings
Auto Tray Switching
Tray Settings
Paper Type Registration
OK
System Settings
Paper Tray Settings
Tray 1
Print Copy Fax
I-Fax
Doc.
Filing
Type / Size
Plain / B4
OK
1/6
Fixed Paper Side
Disable Duplex
Disable Staple
Disable Punch
System Settings
Tray 1 Type/Size Setting
Type Size
Recycled
OKType
1/3
2/2
A3
System Settings
Tray 1 Type/Size Setting
Select the paper type.
Plain
Pre-Printed
Recycled
Letter Head
Pre-Punched
Colour
Cancel
1/2
1/2
2/2
A5R
B5R 216x330(8 x13)
A4
A4R
B4
B5
Admin Password
1
/
2
(1)
(2)
(3)
(6)
(4)
(5)
17
Names of the trays
Paper that can be loaded in each tray
Tray1/Tray2
Type
Plain Paper, Pre-Printed, Recycled Paper, Letter Head, Pre-Punched, Colour
Acceptable
paper sizes
AB
A3, B4, A4, A4R, B5, B5R, A5R, 216 mm x 330 mm (8-1/2" x 13"), (8K,
16K, 16KR)
Inch
11" x 17", 8-1/2" x 14", 8-1/2" x 11", 8-1/2" x 11"R, 7-1/4" x 10-1/2"R,
5-1/2" x 8-1/2"R, (8K, 16K, 16KR)
Tray3/Tray4
Type
Plain Paper, Pre-Printed, Recycled Paper, Letter Head, Pre-Punched, Colour
Acceptable
paper sizes
AB
A3, B4, A4, A4R, B5, B5R, 216 mm x 330 mm (8-1/2" x 13"), (8K,
16K, 16KR)
Inch
11" x 17", 8-1/2" x 14", 8-1/2" x 11", 8-1/2" x 11"R, 7-1/4" x 10-1/2"R,
(8K, 16K, 16KR)
Tray5
(large capacity
tray)
Type
Plain Paper, Pre-Printed, Recycled Paper, Letter Head, Pre-Punched, Colour
Acceptable
paper sizes
AB
A4, B5, 8-1/2" x 11"
Inch
8-1/2" x 11", A4
Bypass tray
Type
Plain Paper, Pre-Printed, Recycled Paper, Letter Head,
Pre-Punched, Colour, Thin Paper, Heavy Paper
Acceptable
paper sizes
AB
A3W, A3, B4, A4, A4R, B5, B5R, A5R, 11" x 17", 216 mm x 330 mm
(8-1/2" x 13"), 8-1/2" x 11", (8K, 16K, 16KR)
Inch
12" x 18", 11" x 17", 8-1/2" x 14", 8-1/2" x 11", 8-1/2" x 11"R,
7-1/4" x 10-1/2"R, 5-1/2" x 8-1/2"R, A3, B4, A4, B5, (8K, 16K, 16KR)
Type
Labels
Acceptable
paper sizes
AB
A4, A4R, B5, B5R
Inch
8-1/2" x 11", 8-1/2" x 11"R
Type
Transparency Film
Acceptable
paper sizes
AB
A4, A4R
Inch
8-1/2" x 11", 8-1/2" x 11"R
Type
Tab Paper
Acceptable
paper sizes
AB
A4
Inch
8-1/2" x 11"
Type
Envelope
Acceptable paper sizes
Monarch, Com-10, DL, C5
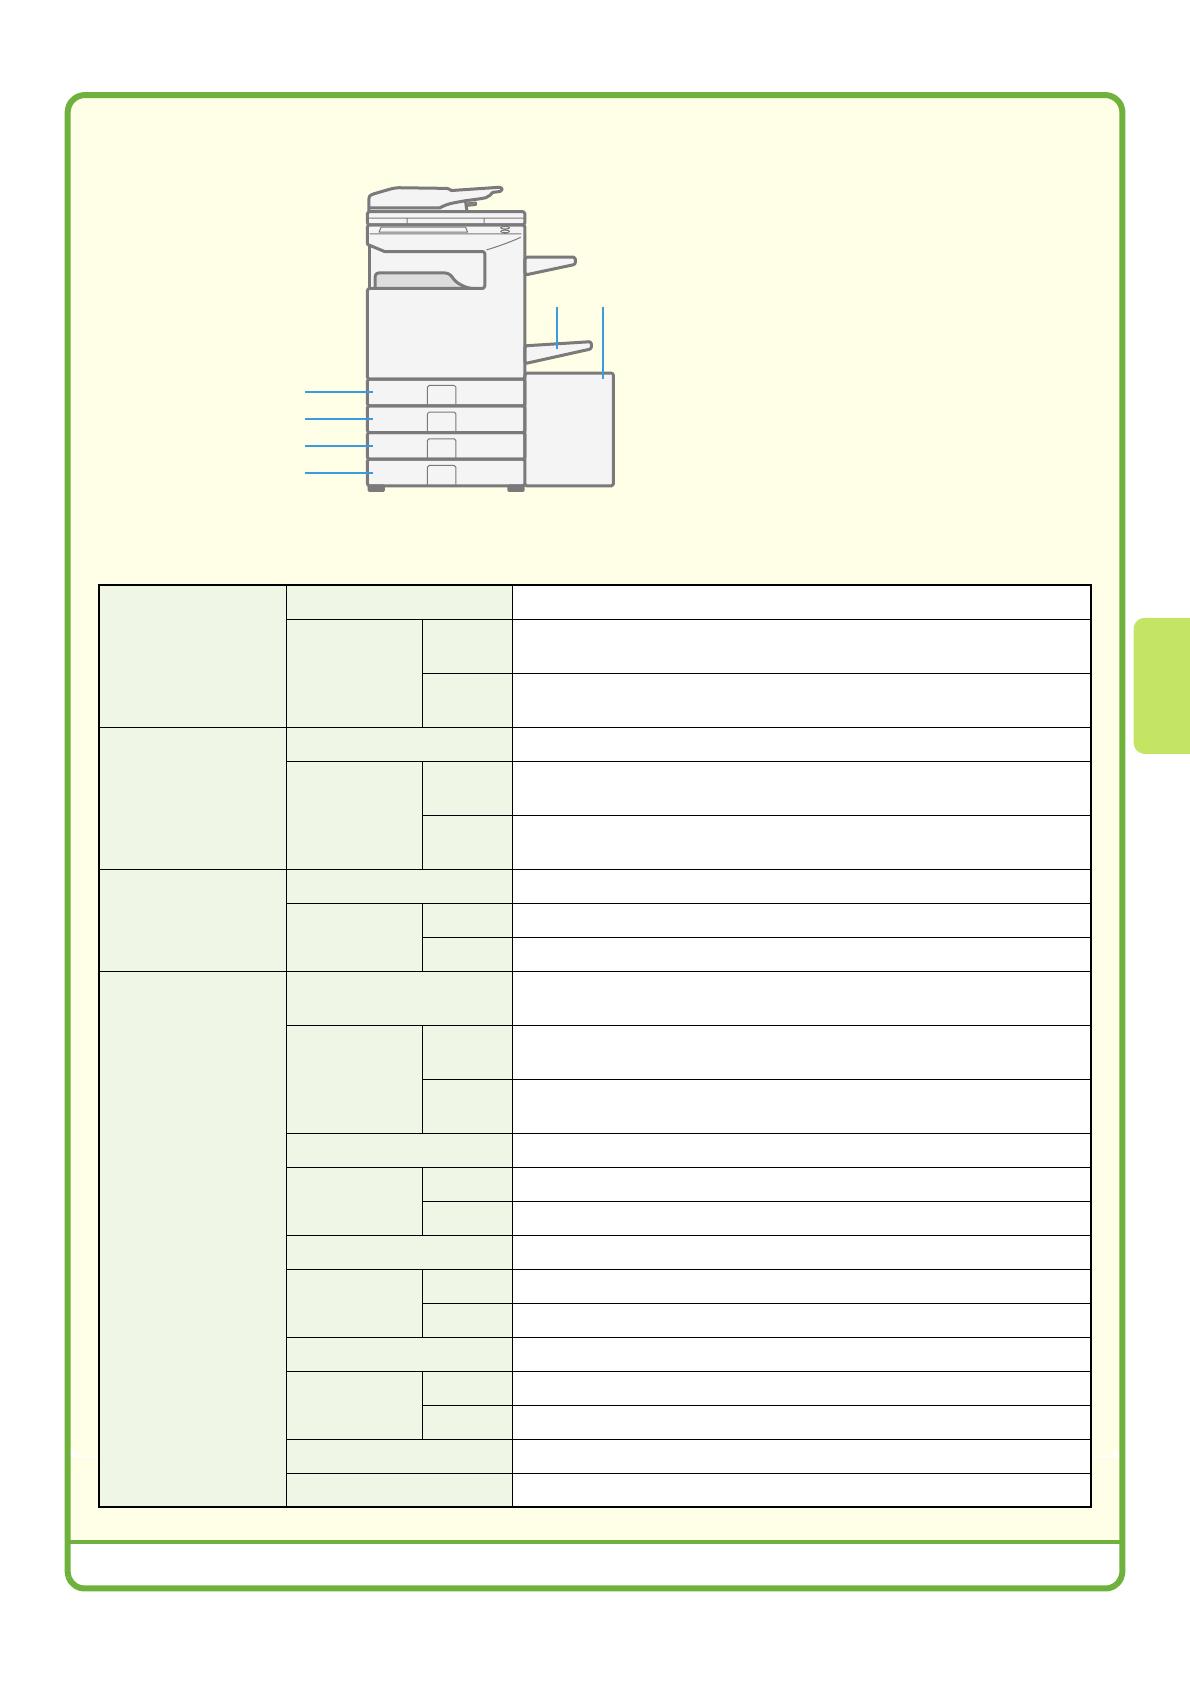
(6)
(1)
(2)
(3)
(4)
(5)
(1) Tray 1
(2) Tray 2
(3) Tray 3
(4) Tray 4
(5) Tray 5 (large capacity tray)
(6) Bypass tray
18
Other trays
Bypass tray
Loading special paper
Loading postcards Loading envelopes
Large capacity tray
For detailed information on the bypass tray, see "LOADING PAPER IN THE BYPASS TRAY" in the User's Guide.
When loading A3W, A3 or B4 size paper, pull out the
tray extension.
The maximum number of sheets that can be loaded in
the bypass tray is approximately 100 for plain paper
and approximately 20 for postcards.
Special types of paper that cannot be loaded in other trays can be loaded in the bypass tray.
The side to be copied on
must be face down!
Place postcards face down in the indicated
orientation.
Only the address side of envelopes can be printed on.
Place envelopes with the address side face down.
Load paper in the large capacity tray as shown.
The size of paper used in the large capacity tray
can only be changed by a service technician.
  • Page 1 1
  • Page 2 2
  • Page 3 3
  • Page 4 4
  • Page 5 5
  • Page 6 6
  • Page 7 7
  • Page 8 8
  • Page 9 9
  • Page 10 10
  • Page 11 11
  • Page 12 12
  • Page 13 13
  • Page 14 14
  • Page 15 15
  • Page 16 16
  • Page 17 17
  • Page 18 18
  • Page 19 19
  • Page 20 20
  • Page 21 21
  • Page 22 22
  • Page 23 23
  • Page 24 24
  • Page 25 25
  • Page 26 26
  • Page 27 27
  • Page 28 28
  • Page 29 29
  • Page 30 30
  • Page 31 31
  • Page 32 32
  • Page 33 33
  • Page 34 34
  • Page 35 35
  • Page 36 36
  • Page 37 37
  • Page 38 38
  • Page 39 39
  • Page 40 40
  • Page 41 41
  • Page 42 42
  • Page 43 43
  • Page 44 44
  • Page 45 45
  • Page 46 46
  • Page 47 47
  • Page 48 48
  • Page 49 49
  • Page 50 50
  • Page 51 51
  • Page 52 52
  • Page 53 53
  • Page 54 54
  • Page 55 55
  • Page 56 56
  • Page 57 57
  • Page 58 58
  • Page 59 59
  • Page 60 60
  • Page 61 61
  • Page 62 62
  • Page 63 63
  • Page 64 64
  • Page 65 65
  • Page 66 66
  • Page 67 67
  • Page 68 68
  • Page 69 69
  • Page 70 70
  • Page 71 71
  • Page 72 72
  • Page 73 73
  • Page 74 74
  • Page 75 75
  • Page 76 76
  • Page 77 77
  • Page 78 78
  • Page 79 79
  • Page 80 80
  • Page 81 81
  • Page 82 82
  • Page 83 83
  • Page 84 84
  • Page 85 85
  • Page 86 86
  • Page 87 87
  • Page 88 88

Sharp MX-2300N User manual

Category
Copiers
Type
User manual
This manual is also suitable for

Ask a question and I''ll find the answer in the document

Finding information in a document is now easier with AI