Page is loading ...

CORNER SHOWER INSTALLATION (2 WALLS)
INSTALLATION DOUCHE EN COIN (2 MURS)
INSTALACIÓN DE DUCHA EN ESQUINA (2 MUROS)
Serial numbers • Numéros de série • Números de serie
Voir Vidéo d'installation - Balayer
QR code avec un dispositif mobile
View Installation Video - Scan
QR code with a mobile device
INSTALLATION INSTRUCTIONS
GUIDE D’INSTALLATION
GUÍA DE INSTALACIÓN
Read all instructions carefully before proceeding.
SAVE THIS GUIDE FOR FUTURE REFERENCE.
Lire toutes les instructions attentivement avant de
commencer l’installation.
CONSERVER POUR UN USAGE ULTÉRIEUR.
Leer detenidamente todas las instrucciones antes de
comenzar la instalación
CONSERVAR ESTE MANUAL COMO REFERENCIA.
A two person installation is required.
Une installation par deux
personnes est requise.
Se recomienda realizar la
instalación entre dos personas
HARDWARE INCLUDED
IN BOXES
QUINCAILLERIE INCLUSE
DANS LES BOÎTES
ACCESORIOS INCLUIDOS
EN LAS CAJAS
OPEN ALL BOXES
BEFORE YOU START
OUVREZ TOUTES LES
BOÎTES AVANT DE
COMMENCER
ABRIR TODAS LAS CAJAS
ANTES DE EMPEZAR
IMPORTANT • Record the serial numbers
IMPORTANT • Noter les numéros de série
IMPORTANTE • Registre el número de serie

Tabla de contenido: Página
Herramientas y materiales.............................................................................................................................. 3
Piezas y componentes....................................................................................................................................4
1. Construcción de la estructura..................................................................................................................... 40
2. Instalación de la base................................................................................................................................. 41
2. Instalación de la base (Olympia)................................................................................................................ 42
2. Instalación de la base (B3)......................................................................................................................... 43
2. Instalación de la base (Distinct / Zone square)........................................................................................... 44
3. Instalación del sistema Ulok sobre los muros............................................................................................ 47
4. Instalación temporal del muro posterior..................................................................................................... 48
5. Instalación temporal de los muros laterales............................................................................................... 49
6. Instalación nal del muro posterior............................................................................................................. 51
7. Instalación nal de los muros laterales....................................................................................................... 52
8. Marcado y perforación de agujeros para la repisa..................................................................................... 53
9. Silicona........................................................................................................................................................53
10. Instalación de la repisa..............................................................................................................................54
11. Acabado del muro..................................................................................................................................... 55
12. Consejos de mantenimiento..................................................................................................................... 56
13. Garantía.................................................................................................................................................... 60
Para las etapas en ESPAÑOL ir a la pagina 40
Table of contents: Page
Tools and supplies.......................................................................................................................................... 3
Parts and components.................................................................................................................................... 4
1. Building the structure.................................................................................................................................. 6
2. Installing the base....................................................................................................................................... 7
2. Installing the base (Olympia)...................................................................................................................... 8
2. Installing the base (B3)............................................................................................................................... 9
2. Installing the base (Distinct / Zone square)................................................................................................ 10
3. Installing Ulok system on the walls............................................................................................................. 13
4. Temporary installation of back wall............................................................................................................. 14
5. Temporary installation of side wall.............................................................................................................. 15
6. Final installation of back wall...................................................................................................................... 17
7. Final installation of side wall....................................................................................................................... 18
8. Marking and drilling the glass shelf holes................................................................................................... 19
9. Silicone........................................................................................................................................................19
10. Glass shelf installation...............................................................................................................................20
11. Wall nish.................................................................................................................................................. 21
12. Maintenance tips....................................................................................................................................... 22
13. Warranty.................................................................................................................................................... 60
Table de matières: Page
Outils et materiaux.......................................................................................................................................... 3
Pièces et composantes...................................................................................................................................4
1. Construction de la structure........................................................................................................................ 23
2. Installation de la base................................................................................................................................. 24
2. Installation de la base (Olympia)................................................................................................................ 25
2. Installation de la base (B3)......................................................................................................................... 26
2. Installation de la base (Distinct / Zone square)........................................................................................... 27
3. Installation du système Ulok sur les murs.................................................................................................. 30
4. Installation temporaire du mur arrière......................................................................................................... 31
5. Installation temporaire du mur de côté....................................................................................................... 32
6. Installation nale du mur arrière................................................................................................................. 34
7. Installation nale du mur de côté................................................................................................................ 35
8. Marquage et perçage des trous pour la tablette......................................................................................... 36
9. Silicone........................................................................................................................................................36
10. Installation de la tablette............................................................................................................................37
11. Finition du mur........................................................................................................................................... 38
12. Conseils d'entretien.................................................................................................................................. 39
13. Garantie.................................................................................................................................................... 60
For installation steps in ENGLISH go to page 6
Pour les étapes d'installation en FRANÇAIS aller à la page 23

3
Hole saw
Scie-cloche
Sierra de
perforación
Screwdriver
Tournevis
Destornillador
24" level min.
Niveau de 24po. min.
Nivel de 24" min.
Pencil
Crayon
Lápiz
Measuring tape
Ruban à mesurer
Cinta métrica
18" square min.
Équerre de 18po. min.
Escuadra de 18" min.
Utility knife
Couteau à lame
rétractable
Cuchillo multiuso
Safety equipment
Équipement de sécurité
Equipamiento de
seguridad
1/8" drill bits
Mèches de 1/8
Box of #8x1¾"flathead screws
Boîte de vis #8x1¾"
à tête plate
Caja de tornillos #8x1¾"
de cabeza plana
Wood shims
Cales en bois
Cuñas de madera
50
Electric drill
Perçeuse électrique
Taladro eléctrico
TOOLS
REQUIRED
OUTILS
REQUIS
HERRAMIENTAS
NECESARIAS
SUPPLIES
SOLD SEPARATELY
MATÉRIAUX
VENDUS SÉPARÉMENT
MATERIALES
VENDIDOS POR SEPARADO
Clear silicone sealant
Silicone claire
Sellador de silicona
transparente
Self levening cement
Ciment auto-nivelant
Cemento
autonivelante
Shower drain
Drain de douche
Desagüe de ducha
*
* Drain required for the Distinct shower base
* Drain requis pour la base de douche Distinct
* Desagüe requerido para la base de ducha Distinct
Cement
Ciment
Cemento

4
6
1
43
2
109
8
5
11
7
# Part Nom de la pièce Pieza Qty/Qté Code
5 Glass shelf Tablette en verre Repisa 1
10060011
6 Bracket Support Soporte de repisa 2
7 #10 x 2’’ screws Vis #10 x 2’’ Tornillos #10 x 1½’’ (repisa) 2
8 Plastic washer Rondelle en plastique Arandela en plástico para repisa 2
9 Support cap Capuchon Tapa de la jación de repisa 2
10 #10 x ½ screws Vis #10 x ½ Tornillos #10 x ½ (para repisa) 2
11 Allen key Clé Allen Llave allen 1
12 Template Gabarit Plantilla de perforación 1
# Part Nom de la pièce Pieza Qt Code
13 Base Base Base 1 *
13a
Drain cover (with
Distinct base only)
Couvercle du drain lineaire (inclus
avec la base Distinct seulement)
Cubierta del desagüe (incluido
con la base Distinct únicamente)
1 10037090
14 Back wall Mur arrière Muro posterior 1 *
15 Side wall Mur de côté Muro lateral 1 *
16
Drain (included with Zone square
and B3Square base only)
Drain (inclus avec la base Zone
square et B3Square seulement)
Desagüe (incluido con la base Zone
square y B3Square únicamente )
1 10028619
PARTS INCLUDED IN PARTS PACK | PIÈCES COMPRISES DANS L'EMBALLAGE DES PIÈCES
| PIEZAS INCLUIDAS EN PAQUETE DE PIEZAS
PARTS INCLUDED IN SHELF PACK | PIÈCES COMPRISES DANS LA BOÎTE DE LA TABLETTE
| PIEZAS INCLUIDAS EN LA CAJA DE LA REPISA
12
Inside the sidewall box
À l'intérieur de la boîte
du mur de côté
En el interior de la caja
del muro lateral
Inside the backwall box
À l'intérieur de la boîte
du mur arrière
En el interior de la caja
del muro posterior
www.maax.com
10060303 – ULOK Skin pack for Utile - 1 junction
3
1
2
4
1
2
BACK WALL
MUR ARRIÈRE
MURO POSTERIOR
INSIDE VIEW
VUE INTÉRIEURE
VISTA INTERIOR
SIDE WALL
MUR DE CÔTÉ
MURO LATERAL
3
4
INSIDE VIEW
VUE INTÉRIEURE
VISTA INTERIOR
by/par
MAAX
* Extra parts are included in this pack in case of loss or damage
* Des pièces supplémentaires sont incluses en cas de perte ou bris
* Piezas extras están incluidas en este empaque en caso de perdida o daño
# Part Nom de la pièce Pieza Qty/Qté Code
1 X fastener Fixation en forme de X Sujetador en forma de X 4
10060303
2
#8 x 1¼’’ Screw
(for X fastener)
Vis #8 x 1¼’’ (Pour
xation en X)
Tornillos #8 x 1¼’’
(Para sujetador en X)
4
3 Retraction pin Cheville d'ancrage Pasador de retracción 4
4
#8 x ⅜ Screw (for
retraction pin)
Vis #8 x ⅜ (pour
cheville d'ancrage)
Tornillos #8 x ⅜ (para
pasador de retracción)
4
PARTS PIÈCES PIEZAS
COMPONENTS COMPOSANTES COMPONENTES

5
13
15
14
4
14
3
INSIDE VIEW
VUE INTÉRIEURE
VISTA INTERIOR
5
9
10
8
7
6
1
2
13
INSIDE VIEW
VUE INTÉRIEURE
VISTA INTERIOR
OVERVIEW VUE D'ENSEMBLE
VISTA GENERAL

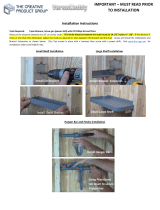
6
Build a structure based on the dimensions in the chart
below.
IF STRUCTURE IS ALREADY BUILD CHECK THAT
IT RESPECTS THE DIMENSIONS BELOW
Verify the walls are square, plumb and the ooring is
perfectly level.
6"
6"
C
For a worry free installation follow
all instructions and check them off
as you go.
A
B
C
D
6"
A
B
C
D
6"
A
B
C
D
6"
A
B
C
D
Top view of structure
1.1
Check me!
1.2
Check me!
1.3
Check me!
D
Cut out an approximate 6" x 6" opening around
the drain center outlined by measurements C and
D. See image to the right and the chart above. We
recommend that a plumber completes the drain pipe
connection.
1
STEP Building the structure
Before starting make sure to have all
parts and components refer to page 4.
COMPATIBLE BASES No. A B C D
Olympia square 4832 106011
Between
48"- 48 1/4"
33 1/2"
16" 24"
Olympia square 6032 106012
Between
60"- 60 1/4"
16" 8 1/2"
B3 Square 4832 420001-5XX
Between
48"- 48 1/4"
33 1/2" 16"
24"
B3 Round 4832 410001-5XX
B3 Square 4836 420003-5XX
37 1/2" 18"
B3 Round 4836 410003-5XX
B3 Square 6032 420005-5XX
Between
60"- 60 1/4"
33 1/2" 16"
11 3/4"
B3 Round 6032 410005-5XX
B3 Square 6036 420006-5XX
37 1/2" 18"
B3 Round 6036 410006-5XX
Distinct 4832 106350 48" - 48 1/4" 33 1/2" 4 1/2" 24"
Zone Square 4832 106351 48" - 48 1/4" 33 1/2" 16" 24"
Zone Square 6032 106352 - 106353 60" - 60 1/4" 33 1/2" 16" 11 3/4"
View of 48" shower
Respect front and inside corner studs position, others may vary.
Leveling the oor is critical for a properly aligned
installation. Auto leveling cement can be used to level
oor. Be careful not to block the drain hole position.
FINAL VISUAL INSPECTION
Note: Not doing so could void your warranty
After removing the protective lm and prior to
completing the installation, perform a visual
inspection. If defects are visible, INTERRUPT
THE INSTALLATION and communicate with our
customer service: 1-877-438-6229

7
2
STEP Installing the base
B3 / Olympia / Zone Square / Distinct
Apply silicone around the edge of the drain hole in
the base (surface between the top part of the drain
and the base). Assemble as shown.
HAND TIGHTEN ONLY !
VERIFY THE MAAX LOGO ON THE DRAIN COVER
IS FACING THE RIGHT WAY
REMOVE SILICONE EXCESS!
Install the base (13) pushing it completely against the
studs.
Top view
2.1
Check me!
2.2
Check me!
Cardboard
Rubber
13
Top view
Flush
Studs
Flush
Remove the clear plastic lm from around the drain hole
and threshold before applying silicone. Keep the lm on
the base oor as protection untilinstallation is complete.
Drain assembly (included with Zone square and B3Square, required for the Distinct base)
Threshold
Drain position varies according to base model

8
If needed use wooden shims between the studs and
the fastening ange to maintain the position of the
base.
FOR OLYMPIA BASES DO NOT USE SHIMS UNDER
THE BASE TO LEVEL!
DOING SO WILL VOID THE MAAX WARRANTY!
With a 1/8" bit, drill holes in the fastening ange then
secure the base to all the wall studs with #8 x 1¾ "
screws (not included). Only pre-drill the flange not
the studs.
HAND TIGHTEN ONLY !
THE BOTTOM OF ALL HOLES IN THE FLANGE
HAVE TO BE AT LEAST 8MM (3/8") ABOVE THE
BASE THRESHOLD! HOLES MUST BE FILLED WITH
SILICONE BEFORE SCREWING
CUT THE EXCESS PART OF SHIMS
2
STEP Installing the base (cont'd)
Olympia
2.4
Check me!
2.5
Check me!
Ø 1/8"
3/8" (8 mm)
13
13
13
Verify that the base is completely level on all sides. Conrm
that the drain pipe is centered in the drain head.
We recommend a plumber to complete the drain pipe
connection.
2.3
Check me!
Leveling the base is critical
for wall alignment
COMPATIBLE BASES No.
Olympia square 4832 106011
Olympia square 6032 106012

Shims and cement
Cales et ciment
Cuñas y cemento
9
If needed use wooden shims between the studs and
the fastening ange to maintain the position of the
base.
FOR B3 BASES YOU MAY USE SHIMS UNDER
THE BASE TO LEVEL (UNDER THE BASE LEGS
IDEALLY)
With a 1/8" bit, drill holes in the fastening ange then
secure the base to all the wall studs with #8 x 1¾ "
screws (not included). Only pre-drill the flange not
the studs.
HAND TIGHTEN ONLY !
THE BOTTOM OF ALL HOLES IN THE FLANGE
HAVE TO BE AT LEAST 8MM (3/8") ABOVE THE
BASE THRESHOLD! HOLES MUST BE FILLED WITH
SILICONE BEFORE SCREWING
CUT THE EXCESS PART OF SHIMS
2
STEP Installing the base (cont'd)
B3
2.4
Check me!
2.5
Check me!
Ø 1/8"
3/8" (8 mm)
13
13
13
Lift the base. Place cement or wood shims under all legs to
support the shower base oor. Lower the shower base and
validate leveling and stability of the base on the oor. If needed,
use additional wood shims or cement.
We recommend that a plumber completes the drain pipe
connection.
2.3
Check me!
Leveling the base is critical
for wall alignment
COMPATIBLE BASES No.
B3 Square 4832 420001-5XX
B3 Round 4832 410001-5XX
B3 Square 4836 420003-5XX
B3 Round 4836 410003-5XX
B3 Square 6032 410005-5XX
B3 Round 6032 410005-5XX
B3 Square 6036 410006-5XX
B3 Round 6036 410006-5XX
Shims and
cement under
to level B3
bases

10
Lift the base. Insert wood shims on the oor around the
outline of the base on the previously marked spots to
compensate leveling.
Lower the base and validate leveling and the stability of
the base on the oor. If needed, use additional shims.
2
STEP Installing the base (cont'd)
Distinct / Zone Square
2.4
Check me!
COMPATIBLE BASES No.
Distinct 4832 106350
Zone square 4832 106351
Zone square 6032 106352 - 106353
Leveling the base is critical
for wall alignment
Verify the base leveling. Mark the studs and the oor
where shims will be required to perfectly level the base.
If the base is completely leveled go to step 2.5
2.3
Check me!
13

11
If needed use wood shims between the studs and the
fastening ange to maintain the position of the base.
2
STEP Installing the base (cont'd)
Distinct / Zone Square
2.6
Check me!
Lift the base. Place cement or wood shims under all legs
to support the shower base oor. Lower the shower base
and validate leveling and stability of the base on the
oor. If needed, use additional wood shims or cement.
We recommend that a plumber completes the drain
pipe connection.
2.5
Check me!
13

13
12
Insert the drain cover (13a) as shown.
2
STEP Installing the base (cont'd)
Distinct / Zone Square
2.8
Check me!
With a 1/8" drill bit, drill holes in the base ange then
secure the base to all the wall studs with #8 x 1¾"
at-head screws (not included). Pre-drill the flange
only and not the studs.
HAND TIGHTEN ONLY!
THE BOTTOM OF ALL HOLES IN THE FLANGE
MUST BE AT LEAST 8MM (3/8") ABOVE THE BASE
THRESHOLD! HOLES MUST BE FILLED WITH
SILICONE BEFORE SCREWING
CUT THE EXCESS PART OF SHIMS
2.7
Check me!
Distinct 48 drain cover installation
13a
Ø 1/8"
3/8" (8 mm)
Tiling ange

13
3
STEP Installing Ulok system
on the walls
Install three X fasteners (1) on the side of the back wall
(14) that will be assembled with the side wall, in the pre
drilled holes using the screws provided (2).
Quick tip
14
Back wall
1
14
2
14
This side
down
4
3
The side wall is interchangeable.
For wall to the left, install the pins
on the right side, for wall to the right
install the pins on the left side.
Quick tip
Side wall
15
Fastening ange
3.1
Check me!
3.2
Check me!
This side down
There is a positioning pin on X
fastener so they can only be
installed one way.
Positioning
pin
Fasten 3 retraction pins per side wall in the pre drilled
holes with the screws provided (4) to the left-hand or right-
hand fastening ange of the side walls (15) depending on
which side the wall will be installed on.
The Ulok system parts are in the
side wall boxes. (1 pack per box)
www.maax.com
10060303 – ULOK Skin pack for Utile - 1 junction
3
1
2
4
1
2
BACK WALL
MUR ARRIÈRE
MURO POSTERIOR
INSIDE VIEW
VUE INTÉRIEURE
VISTA INTERIOR
SIDE WALL
MUR DE CÔTÉ
MURO LATERAL
3
4
INSIDE VIEW
VUE INTÉRIEURE
VISTA INTERIOR
by/par
MAAX
* Extra parts are included in this pack in case of loss or damage
* Des pièces supplémentaires sont incluses en cas de perte ou bris
* Piezas extras están incluidas en este empaque en caso de perdida o daño

14
4
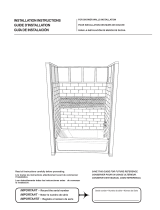
STEP Temporary installation of the back
wall
Quick tip
Installing the walls temporarily will
ensure proper wall alignment before
permanent installation.
Make sure the wall is plumb and
centered on the base.
With a 1/8" bit, drill holes in the back wall fastening
flange (14) at the top aligned with each stud. Only pre-
drill the flange not the studs. Then, secure the back
wall (14) with one #8 x 1¾" screw (not included) in one
of the pre-drilled holes.
IMPORTANT: HAND TIGHTEN ONLY. TEMPORARY
INSTALLATION.
Quick tip
Push the bottom of the back wall
with your foot when fastening in
place.
Plumbing the back wall is
critical for alignment of the
side wall
14
Cut view
Base threshold
Back wall
Position and level the back wall (14) by sitting it on the
threshold at the back of the base.
4.1
Check me!
4.2
Check me!
4.3
Check me!
Pull back the protective lm on the walls (14-15) at least
3" away from all edges. Keep the remaining protective
lm on the walls and base.
min.3/16"
max.3/8"
Stud
X fastener

15
Measure the distance between the front face of the back
wall (14) and the center of the faucet. Then measure the
distance from the top of the base threshold to the center
of the faucet.
Quick tip
Hole saws can be rented at your
local hardware store or any tool
rental location.
Faucet
center
Using those two measurements mark the position of the
faucet hole on the remaining side wall. Measure from the
side and bottom of the side wall.
Repeat this process for all required faucet holes.
5.2
Check me!
5.1
Check me!
5.3
Check me!
Base
threshold
Front cut
view
Back
wall
Top view
5
STEP Temporary installation of the side wall
For safe hole saw usage always
pre-drill a hole and wear safety
glasses when drilling.
Drill a hole from front for the faucets at the previously
marked positions. Pre-drill the hole with the ⅛'' drill bit.
The hole saw size is determined by the faucet type; refer
to the faucet installation manual for hole saw size.
Measure twice, drill once !
Record measures below.

16
Install the side wall (15). Lift the wall approximately 3"
above the threshold of the base, push it completely
against the back wall then lower the side wall into
position.
Quick tip
With a 1/8" bit, drill holes in the side wall fastening flange
(15) at the top aligned with each stud. Only pre-drill
the flange not the studs. Then, secure the side wall
(15) with one #8 x 1¾" screw (not included) in one of the
pre-drilled holes.
IMPORTANT: HAND TIGHTEN ONLY. TEMPORARY
INSTALLATION.
3
1
Side wall
Back wall
It is critical that all 3 retraction pins
engage with the X fasteners. There
should be no gap between the walls.
Quick tip
Place a level vertically
on the side wall. If the
wall is not straight,
make sure that the
retraction pins are
properly inserted in
the X fasteners.
5.4
Check me!
5.5
Check me!
15
5
STEP Temporary installation of the
side walls (Cont'd)
Base
Side wall
The side wall should now line up
with the front of the base. If it does
not, remove the walls and shim
the back ange of base.

17
6
STEP Final installation of back wall
Quick tip
Hold the bottom of the back wall
with your foot when fastening in
place.
13
5
⅜"
Base
Back
wall
14
⅜"
⅜"
min.3/16"
max.3/8"
Stud
X fastener
It is critical for the side wall
installation for there to be at least
⅛'' and no more than ⅜" between
the stud and the X fastener.
6.1
Check me!
6.3
Check me!
6.4
Check me!
Remove all walls from the structure.
Clean the shower base and apply a bead of silicone on
the threshold at 3/8" from the back fastening flange. Run
the bead of silicone the entire length of the base and 1''
on the side wall will be installed on as well.
6.2
Check me!
Lift and place back wall (14) directly over the silicone wi-
thout sliding. Verify that the back wall (14) is plumb, shim
if needed. Then, secure the back wall to the wall studs at
top with #8 x 1¾" screws (not included) in the previously
drilled holes.
IMPORTANT: HAND TIGHTEN ONLY. DO NOT
OVER-TIGHTEN THE SCREWS.
Apply a bead of silicone on both sides of base (13) thres-
hold at 3/8" from the base side fastening flanges.
Apply silicone on both side of the back wall (14) just
before the wall side radius. The silicone applied on the
base and vertically on the back wall must overlap.
1"

18
Install the side wall (15). Lift the wall approximately
3 inches above the threshold of the base, push it
completely against the back wall then slide the side
wall into position.
WIPE OFF EXCESS SILICONE
3
1
Side wall
Back wall
7
STEP Final installation of side wall
7.1
Check me!
7.2
Check me!
Secure the wall to the wall studs with #8 x 1¾ "
screws (not included) in the previously drilled holes.
Also, secure the wall by the fastening anges on the
side of the wall. Use the pre-dilled holes.
If needed, use shims to keep wall plumb, square
and leveled. (Cut shim excess)
IMPORTANT: HAND TIGHTEN ONLY. DO NOT
OVER-TIGHTEN THE SCREWS.
Base
Side wall
THE SIDE WALL SHOULD LINE UP WITH
THE BASE
Quick tip
7.3
Check me!
BEFORE CONTINUING,
VALIDATE THAT ALL
THE WALLS ARE LEVEL,
PLUMB AND SQUARE

19
Check me!
Place the template in the corner of the shower where
you want to install your shelf.
Slide the template up until the points on the left and
right-hand side of the template are at the height you
want your shelf.
Use a pencil, marker or wax pencil to mark the spots
where the holes for the shelf will be drilled.
Drill the holes using a 9/64" drill bit.
8
STEP Marking and drilling the
glass shelf holes
Fold here
Drilling positions
?
?
?
?
90°
Quick tip
Apply masking tape on both sides
of the joint where you will run a
bead of silicone. Apply the silicone,
smooth with a wet nger then
remove the masking tape.
Check me!
Apply a bead of silicone all along the wall to wall
and wall to base joints. For a smooth nish you can
remove the silicone excess with a damp rag or wet
nger.
9
STEP Silicone
All faucets installed on the walls
must be sealed with silicone.
Remove protective lm from walls

20
Apply silicone in the previously drilled holes on the side
and back walls. Apply silicone to the rear of the shelf
brackets (6).
Fasten the brackets in place using the screws (7).
10
STEP Glass shelf installation
7
6
6
10.1
Check me!
Clean the top rubber part of the brackets with a damp
cloth, then place the glass shelf (5) over the brackets (6).
5
6
6
Quick tip
If you can read the MAAX logo, the
shelf is installed on the right side.
10.2
Check me!
When installing the faucet
faceplate or any other
component, be sure to
silicone the outer edge.
/