Garmin StreetPilot i2 User manual

Category
Car navigation systems
Type
User manual
StreetPilot
®
i2/i3
Set up and go!
StreetPilot i3
Configurez et prenez la route !
E
N
– 3 –
Getting Started
Insert Batteries
1. Press down on the tab and pull to remove the battery door.
2. Insert two AA batteries
(not included).
3. Press down on the battery door as you slide it back into place.
Tab
Note: For prolonged audio performance on battery power, we recommend using
high-capacity NiMH batteries (2300+ mAh).
Keep batteries installed in your i2/i3 so it can find satellites quickly.
Setup
DVD-ROM
Unlock sheet
USB cable
Vehicle adapter cable
i2/i3 and mount
E
N
– 4 –
Set Up the i2/i3
Press and hold the Power button
to turn
on the i2/i3. Follow the instructions on the
screen to select your language and set up
the i2/i3. Roll the Wheel up and down to
highlight options. Press in to select options.
Install Software and Load Maps
Do not connect your i2/i3 to your computer until you are told to do so!
1. Insert the Setup DVD-ROM into your computer’s DVD-ROM drive.
If the welcome screen does not automatically appear, click
Start and
then Run on your personal computer. Type the letter of your DVD-
ROM drive followed by setup.exe (example: D:\setup.exe). Then
press Enter.
2. Follow the instructions on the screen to install software and load
maps to your i2/i3.
3. When MapInstall opens, click the map to select the regions you
want to load to your i2/i3. Selected maps are shaded pink.
PowerWheel
E
N
– 5 –
Mount the i2/i3
1. Place the suction cup mount on your windshield with the lever pulled
toward you, as shown above.
2. Press the lever toward the windshield.
3. Plug one end of the vehicle adapter into the USB port on the i2/i3.
Plug the other end into a receptacle in your vehicle.
Windshield
USB port
Lever
WARNING: For use in vehicles, it is the sole responsibility of the owner/operator of a vehicle with the i2/i3 installed to place and
secure the device so it will not interfere with the vehicle operating controls and safety devices, obstruct the driver’s view of driving
conditions, or cause personal injury in the event of an accident.
E
N
– 6 –
Find a Place and Go!
Tip: To narrow your search, select the <Spell> field and enter letters in the name
of the place you are searching for.
Select Start Navigating.
Select a category.
Select Food, Hotels,
and More.
Enjoy the route!
Select a destination.
Select Where To?
E
N
– 7 –
Following Your Route
Follow the route to your destination using the map. The position icon shows your
current location.
Your position
Distance to the
next turn
Time you will arrive at
your destination
Press to return to
main page
Roll to zoom in
and out
Text directions
A checkered flag marks
your destination.
Follow the arrows as
you take turns.
Your route is marked
with a red line.
E
N
– 8 –
Finding an Address
Select Where To? > Address to begin.
Enter the house number.
Then press .
Enter the street name.
Press and select
the correct street from
the list.
Select a country.
Select the correct
address.
Select Start
Navigating.
Select a city or postal
code. Press and
select the correct item
from the list.
E
N
– 9 –
Setting a Home Location
You can set a Home location for the place you return to most often. Then, select
Where To? > Go Home to go Home.
From the main page,
select Where To? > Go
Home.
Press the Wheel to
acknowledge the
message.
Select an option.
Adjusting Volume and Screen Brightness
From the main page, select Settings. Then select Set Volume or Set Brightness.
Roll the Wheel up or down to change the setting.
More Information
For more information about your i2/i3, refer to the Owner’s Manual located on the
Setup DVD-ROM. You can also view it online at http://www.garmin.com/products/
spi3 or spi2. Click the Manuals link and then select Download.
F
R
– 11 –
Mise en route
Insertion des piles
1. Appuyez sur la languette et tirez pour retirer le volet du compartiment des piles.
2. Insérez deux piles AA
(non fournies).
3. Appuyez sur le volet du compartiment des piles lorsque vous le remettez en place.
Languette
Remarque : Pour une performance audio prolongée sur l’alimentation par piles,
nous recommandons l’utilisation de piles NiMH haute capacité (2 300 mAh et plus).
Laissez les piles dans votre i2/i3 afin que celui-ci
puisse trouver rapidement les satellites.
DVD-ROM
d’installation
certificat de
déverrouillage
câble USB
câble adaptateur pour véhicule
i2/i3 et son support
F
R
– 12 –
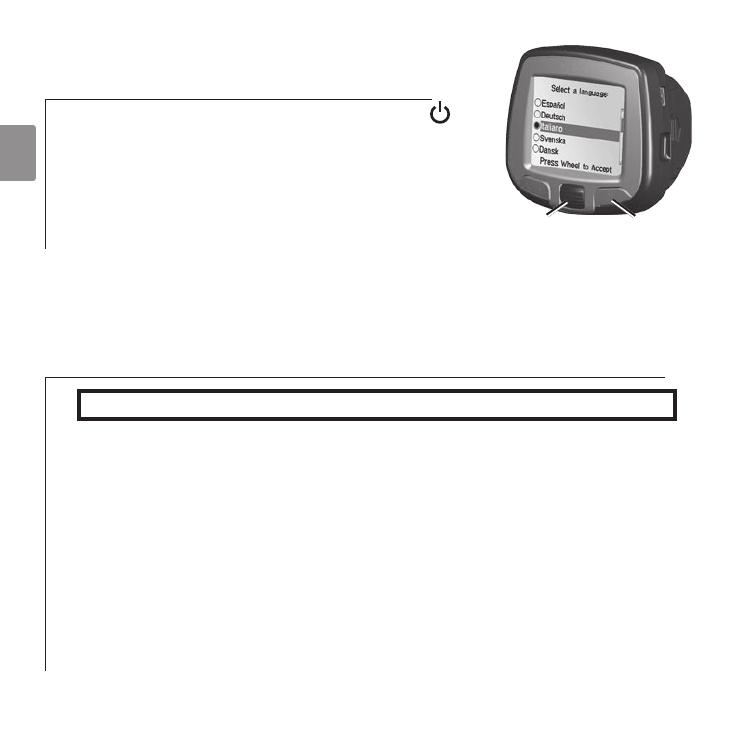
Configuration du i2/i3
Appuyez sans relâche sur le bouton Marche
pour
mettre le i2/i3 sous tension. Suivez les instructions
qui s’affichent pour sélectionner votre langue et
configurer le i2/i3. Roulez la
molette vers le haut et
vers le bas pour afficher les différentes options en
surbrillance. Appuyez sur la molette pour sélectionner
les options en surbrillance.
Installation des logiciels et chargement
des cartes
Ne connectez pas à votre PC tant que vous n’êtes pas invité à le faire.
1. Insérez le DVD-ROM d’installation dans le lecteur de DVD-ROM de l’ordinateur.
Si l’écran d’accueil n’apparaît pas automatiquement, cliquez sur
Start (Démarrer),
puis sur Run (Exécuter) sur votre ordinateur. Saisissez la lettre correspondant
au lecteur de DVD-ROM, suivie de setup.exe (exemple : D:\setup.exe). Appuyez
ensuite sur Enter (Entrée).
2. Suivez les instructions affichées à l’écran pour installer des logiciels et chargement
des cartes sur votre i2/i3.
3. Sélectionnez les régions que vous souhaitez charger dans le périphérique iQue
M3. Les régions sélectionnées de la carte sont colorées en rose.
MarcheMolette
F
R
– 13 –
Installation du i2/i3 dans le véhicule
1. Placez le support à ventouse sur votre pare-brise avec le levier tiré vers vous,
comme indiqué ci-dessus.
2. Poussez le levier vers le pare-brise.
3. Branchez une extrémité de l’adaptateur pour véhicule sur le port USB du i2/i3.
Branchez l’autre extrémité sur une prise de votre véhicule.
AVERTISSEMENT : Pour une utilisation dans des véhicules, il incombe exclusivement au propriétaire/conducteur du véhicule
d’installer et de fixer le i2/i3 de manière à ce qu’il n’interfère pas avec les commandes et les dispositifs de sécurité du véhicule,
qu’il n’obstrue pas la vue du conducteur et qu’il ne cause aucun blessure en cas d’accident.
Pare-brise
Port USB
Levier
F
R
– 14 –
Trouvez un endroit et roulez !
Sélectionnez Start Navigating
(Démarrer la navigation).
Sélectionnez une catégorie.
Sélectionnez Food, Hotels,
and More (Restaurants,
hôtels et plus).
Profitez bien de la route !
Sélectionnez une destination.
Sélectionnez Where To?
(Destination)
Conseil : Pour réduire votre champ de recherche, sélectionnez le champ <Spell> (Epeler) et
entrez des lettres du nom de l’endroit de votre recherche.
F
R
– 15 –
Suivez votre itinéraire
Suivez l’itinéraire jusqu’à votre destination en utilisant la carte. L’icône de position indique
votre position actuelle.
Votre position
Distance jusqu’au
prochain tournant
Heure prévue d’arrivée
à destination
Appuyez pour retourner
à la page principale
Roulez pour faire un
zoom avant ou arrière
Indications (texte)
Le drapeau à carreaux
indique votre destination.
Suivez les flèches lorsque
vous tournez.
Votre itinéraire est indiqué
par un trait rouge.
F
R
– 16 –
Localisation d’une adresse
Sélectionnez Where To? (Destination) > Address (Adresse) pour commencer.
Entrez le numéro du domicile.
Ensuite, appuyez sur .
Entrez le nom de la rue.
Appuyez sur et
sélectionnez la rue correcte
sur la liste.
Sélectionnez un pays.
Sélectionnez l’adresse
correcte.
Sélectionnez
Start Navigating
(Démarrer la navigation).
Sélectionnez une ville ou
un code postal. Appuyez
sur et sélectionnez
l’option correcte sur la liste.
F
R
– 17 –
Enregistrement de la position de votre domicile
Vous pouvez enregistrer la position de votre domicile ou de l’endroit où vous retournez le plus
souvent. Ensuite, sélectionnez Where To? (Destination) > Go Home (Rentrer à la maison) pour
rentrer chez vous.
Sur la page principale,
lectionnez Where To?
(Destination) > Go Home
(Rentrer à la maison).
Appuyez sur la molette
pour accuser réception du
message.
Sélectionnez une option.
Réglage du volume et du contraste de l’écran
Sur la page principale, sélectionnez Settings (Paramètres). Ensuite, sélectionnez Set Volume
(Régler le volume) ou Set Brightness (Régler le contraste). Roulez la molette vers le haut et
vers le bas pour modifier le paramètre.
Informations supplémentaires
Pour plus d’informations sur votre navigateur i2/i3, reportez-vous au manuel d’utilisation sur le
DVD-ROM d’installation ou visitez le site Web : http://www.garmin.com/products/spi3 ou spi2.
Cliquez sur le lien Manuals (Manuels), puis sélectionnez Download (Télécharger).
For the latest free software updates (excluding map data) throughout the
life of your Garmin products, visit the Garmin Web site at www.garmin.com.
© Copyright 2005 Garmin Ltd. or its subsidiaries
Garmin International, Inc.
1200 East 151
st
Street, Olathe, Kansas 66062, U.S.A.
Garmin (Europe) Ltd.
Unit 5, The Quadrangle, Abbey Park Industrial Estate, Romsey, SO51 9DL, U.K.
Garmin Corporation
No. 68, Jangshu 2
nd
Road, Shijr, Taipei County, Taiwan
www.garmin.com
Part Number 190-00613-90 Rev. A
F
R
E
N
E
N
F
R
  • Page 1 1
  • Page 2 2
  • Page 3 3
  • Page 4 4
  • Page 5 5
  • Page 6 6
  • Page 7 7
  • Page 8 8
  • Page 9 9
  • Page 10 10
  • Page 11 11
  • Page 12 12
  • Page 13 13
  • Page 14 14
  • Page 15 15
  • Page 16 16
  • Page 17 17
  • Page 18 18

Garmin StreetPilot i2 User manual

Category
Car navigation systems
Type
User manual

Ask a question and I''ll find the answer in the document

Finding information in a document is now easier with AI

in other languages