Page is loading ...

Integrated Control Solutions & Energy Savings
NO POWER
& SIGNAL
CABLES
TOGETHER
READ CAREFULLY IN THE TEXT!
MPXPRO
User manual
Electronic controller


3
ENG
MPXPRO - + 0300055EN rel. 1.1 30/08/10
WARNINGS
CAREL bases the development of its products on decades of experience
in HVAC, on the continuous investments in technological innovations
to products, procedures and strict quality processes with in-circuit and
functional testing on 100% of its products, and on the most innovative
production technology available on the market. CAREL and its subsidiaries
nonetheless cannot guarantee that all the aspects of the product and the
software included with the product respond to the requirements of the nal
application, despite the product being developed according to start-of-the-
art techniques. The customer (manufacturer, developer or installer of the nal
equipment) accepts all liability and risk relating to the con guration of the
product in order to reach the expected results in relation to the speci c nal
installation and/or equipment. CAREL may, based on speci c agreements, acts
as a consultant for the positive commissioning of the nal unit/application,
however in no case does it accept liability for the correct operation of the nal
equipment/system.
The CAREL product is a state-of-the-art product, whose operation is speci ed
in the technical documentation supplied with the product or can be
downloaded, even prior to purchase, from the website www.carel.com.
Each CAREL product, in relation to its advanced level of technology, requires
setup/con guration/programming/commissioning to be able to operate in
the best possible way for the speci c application. The failure to complete such
operations, which are required/indicated in the user manual, may cause the
nal product to malfunction; CAREL accepts no liability in such cases.
Only quali ed personnel may install or carry out technical service on the
product.
The customer must only use the product in the manner described in the
documentation relating to the product.
In addition to observing any further warnings described in this manual, the
following warnings must be heeded for all CAREL products:
• prevent the electronic circuits from getting wet. Rain, humidity and all
types of liquids or condensate contain corrosive minerals that may damage
the electronic circuits. In any case, the product should be used or stored
in environments that comply with the temperature and humidity limits
speci ed in the manual.
• do not install the device in particularly hot environments. Too high
temperatures may reduce the life of electronic devices, damage them and
deform or melt the plastic parts. In any case, the product should be used
or stored in environments that comply with the temperature and humidity
limits speci ed in the manual.
• do not attempt to open the device in any way other than described in the
manual.
• do not drop, hit or shake the device, as the internal circuits and mechanisms
may be irreparably damaged.
• do not use corrosive chemicals, solvents or aggressive detergents to clean
the device.
• do not use the product for applications other than those speci ed in the
technical manual.
All of the above suggestions likewise apply to the controllers, serial boards,
programming keys or any other accessory in the CAREL product portfolio.
CAREL adopts a policy of continual development. Consequently, CAREL
reserves the right to make changes and improvements to any product
described in this document without prior warning.
The technical speci cations shown in the manual may be changed without
prior warning.
The liability of CAREL in relation to its products is speci ed in the CAREL general
contract conditions, available on the website www.carel.com and/or by
speci c agreements with customers; speci cally, to the extent where allowed
by applicable legislation, in no case will CAREL, its employees or subsidiaries
be liable for any lost earnings or sales, losses of data and information, costs of
replacement goods or services, damage to things or people, downtime or any
direct, indirect, incidental, actual, punitive, exemplary, special or consequential
damage of any kind whatsoever, whether contractual, extra-contractual or
due to negligence, or any other liabilities deriving from the installation, use or
impossibility to use the product, even if CAREL or its subsidiaries are warned
of the possibility of such damage.
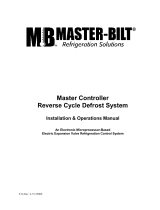
IMPORTANT
NO POWER
& SIGNAL
CABLES
TOGETHER
READ CAREFULLY IN THE TEXT!
Separate as much as possible the probe and digital input cables from
the cables carrying inductive loads and power cables to avoid possible
electromagnetic disturbance.
Never run power cables (including the electrical panel cables) and signal
cables in the same conduits.
DISPOSAL
INFORMATION FOR USERS ON THE CORRECT HANDLING OF WASTE
ELECTRICAL AND ELECTRONIC EQUIPMENT (WEEE)
In reference to European Union directive 2002/96/EC issued on 27 January
2003 and the related national legislation, please note that:
• WEEE cannot be disposed of as municipal waste and such waste must be
collected and disposed of separately;
• the public or private waste collection systems de ned by local legislation
must be used. In addition, the equipment can be returned to the distributor
at the end of its working life when buying new equipment;
• the equipment may contain hazardous substances: the improper use or
incorrect disposal of such may have negative e ects on human health and
on the environment;
• the symbol (crossed-out wheeled bin) shown on the product or on the
packaging and on the instruction sheet indicates that the equipment has
been introduced onto the market after 13 August 2005 and that it must be
disposed of separately;
• in the event of illegal disposal of electrical and electronic waste, the
penalties are speci ed by local waste disposal legislation.
Warranty on materials: 2 years (from the date of production, excluding the
consumable parts.
Certi cation: the quality and safety of CAREL S.p.A. products are guaranteed
by the ISO 9001 certi ed design and production system.


5
ENG
MPXPRO - + 0300055EN rel. 1.1 30/08/10
Content
1. INTRODUCTION 7
1.1 Models ........................................................................................................................7
2. INSTALLATION 11
2.1 MPXPRO: DIN rail assembly and dimensions ..................................11
2.2 Main board: description of the terminals .........................................12
2.3 E
2
V driver expansion board (MX3OPSTP**): terminals and
connections ..................................................................................................................13
2.4 PWM driver expansion board (MX3OPPWM**): terminals and
connections ..................................................................................................................13
2.5 Expansion board 0 to 10 Vdc output (MX3OPA1002): terminals
and connections ........................................................................................................13
2.6 Functional diagrams ......................................................................................14
2.7 Connecting the MCHRTF**** module ................................................14
2.8 General connection diagram ..................................................................15
2.9 Installation ............................................................................................................16
2.10 Programming key (copy set-up) ..........................................................16
2.11 Commissioning tool (VPM- Visual Parameter Manager) .......17
2.12 Setting the default parameters/loading the parameter sets 18
3. USER INTERFACE 19
3.1 User terminal and remote display .........................................................19
3.2 Keypad ...................................................................................................................20
3.3 Programming .....................................................................................................21
3.4 Example: setting current date/time and day/night time bands
22
3.5 Display Slave controller status from the Master user terminal
(virtual console) ..........................................................................................................22
3.6 Copy parameters from Master to Slave (Upload) .........................23
3.7 Maximum and minimum temperature monitoring (parame-
ters r5,rt,rH,rL) ..............................................................................................................23
3.8 Using the remote control (accessory) .................................................23
4. COMMISSIONING 26
4.1 Con guration .....................................................................................................26
4.2 Recommended initial con guration ...................................................26
4.3 Guided commissioning procedure (user terminal/remote
display) .............................................................................................................................27
4.4 Checks after commissioning.....................................................................29
5. BASIC FUNCTIONS 30
5.1 Probes (analogue inputs) ............................................................................30
5.2 Digital inputs .....................................................................................................32
5.3 Analogue outputs ...........................................................................................33
5.4 Digital outputs ...................................................................................................33
5.5 Control ....................................................................................................................34
5.6 Defrost ....................................................................................................................36
5.7 Evaporator fans..................................................................................................39
5.8 Electronic valve .................................................................................................40
6. ADVANCED FUNCTIONS 41
6.1 Probes (analogue inputs) ............................................................................41
6.2 Digital inputs.......................................................................................................42
6.3 Analogue outputs ...........................................................................................42
6.4 Digital outputs ...................................................................................................43
6.5 Control ....................................................................................................................44
6.6 Compressor .........................................................................................................46
6.7 Defrost ....................................................................................................................47
6.8 Evaporator fans..................................................................................................49
6.9 Electronic valve ................................................................................................49
6.10 Protectors ..........................................................................................................52
7. OPTIONAL CONFIGURATIONS 55
7.1 Other con guration parameters ............................................................55
8. TABLE OF PARAMETERS 57
9. ALARMS AND SIGNALS 63
9.1 Signals .....................................................................................................................63
9.2 Alarms .....................................................................................................................63
9.3 Display alarm log ..............................................................................................63
9.4 HACCP alarms and display .........................................................................63
9.5 Alarm parameters ............................................................................................65
9.6 HACCP alarm parameters and activating monitoring ..............66
10. TECHNICAL SPECIFICATIONS 67
10.1 Cleaning the terminal .................................................................................68
10.2 Purchase codes ...............................................................................................68


7
ENG
MPXPRO - + 0300055EN rel. 1.1 30/08/10
1. INTRODUCTION
MPXPRO is an electronic controller for the for the complete and advanced
management of stand-alone or multiplexed showcases or cold rooms,
with or without built-in electronic expansion valve driver. It is designed for
DIN rail assembly and comes with plug-in screw terminals. The controller
can manage a local Master-Slave network with a at maximum of 6 units
(1 Master and 5 Slaves). Each controller can have its own display (read
only) and/or user terminal (display plus keypad for programming), or
alternatively the user terminal can be connected to the Master controller
which then displays the parameters for all controllers connected in the
network. The platform includes a wide range of models, di ering in
terms of type of controller (Master or Slave), the number of relay outputs
available (3 or 5 on the Slave controller), the type of probes that can be
connected (NTC only and 0 to 5 V ratiometric or NTC/PTC/PT1000/NTC
L243, 0 to 5 V ratiometric and active 4 to 20 mA, 0 to 10 V), the type of
built-in driver (for CAREL stepper or PWM electronic expansion valve),
whether or not there are two PWM outputs on the main board, and
whether or not there is a 0 to 10 Vdc output on the driver board. See the
table below.
Main features:
• compact structure, with built-in driver for CAREL stepper or PWM valve;
• Ultracap technology for emergency closing in the event of mains
power failure (no solenoid valve is required if the EEV valve is
installed in direct way and the size is smaller than E3V45)
• Built-in switching power supply for stepper valve option (external
transformer no longer required)
• Valve cable length extended to max 50m
• Display and master/slave network cable length extended to max 100m
• advanced superheat control with protection for low superheat
(LowSH), low evaporation temperature (LOP), high evaporation
temperature (MOP), low suction temperature (LSA);
• defrost activated from the keypad, digital input, network control from
Master, supervisor;
• management of various types of defrost, on one or two evaporators:
heater, natural (stop compressor), hot gas;
• smart defrost functions;
• coordinated network defrosts;
• light and showcase curtain management;
• anti-sweat heater modulation;
• evaporator fan speed modulation;
• remote control (accessory) for commissioning and programming;
• VPM program (Visual Parameter Manager), installed on a personal
computer, for managing parameters and testing the controller;
• possibility to display and set the Slave parameters from the Master;
• propagation of digital input from Master to Slave;
• display Slave alarms on the Master;
• sharing of one or more network probes (e.g. network pressure probe);
• management of network or local solenoid valve;
• remote management of Master light and AUX outputs on Slave;
• upload parameters from Master to Slaves;
• Master as gateway to supervisor for all Slaves;
• management of HACCP alarms.
Installation in direct way:
1.1 Models
The LIGHT version is supplied without the plastic side cover, it is not
possible to install the driver board for expansion valves and it is available
only in multiple packages without connector kit.
The following table shows the models and the main features, also see
paragraph 10.2:
Light Version
Model Code Features
Master/
Slave
rel. Type of relay RS485
& RTC
Board
Probe usable 2 PWM
output
E
2
V driver
& 0…10
Vdc output
PWM driver
& 0…10 Vdc
output
0…10 Vdc
output
NTC PTC,
Pt1000,
NTC L243
Ratiometric
probe
0…5 Vdc
Active probe
0…10 Vdc
4…20 mA
LIGHT
MX10M00EI11 Master 5 8A-2HP-16A-8A-8A Y(*) YES NO YES NO NO NO NO NO
MX10S00EI11 Slave 5 8A-2HP-16A-8A-8A I YES NO YES NO NO NO NO NO
MX10S10EI11 Slave 3 8A-0-16A-0-8A I YES NO YES NO NO NO NO NO
Tab. 1.a
Standard Version
Model Code Features
Master/
Slave
rel. Type of relay RS485
& RTC
Board
Probe usable 2 PWM
output
E
2
V driver
& 0…10
Vdc output
PWM driver
& 0…10 Vdc
output
0…10 Vdc
output
NTC PTC,
Pt1000,
NTC L243
Ratiometric
probe
0…5 Vdc
Active probe
0…10 Vdc
4…20 mA
FULL
MX30M21HO0 Master 5 8A-2HP-16A-8A-8A Y(*) YES YES YES YES Y I I I
MX30S21HO0 Slave 5 8A-2HP-16A-8A-8A I YES YES YES YES Y I I I
MX30S31HO0 Slave 3 8A-0-16A-0-8A I YES YES YES YES Y I I I
FULL + E
2
V
MX30M25HO0 Master 5 8A-2HP-16A-8A-8A Y(*) YES YES YES YES Y Y I NO
MX30S25HO0 Slave 5 8A-2HP-16A-8A-8A I YES YES YES YES Y Y I NO
FULL + PWM
MX30M24HO0 Master 5 8A-2HP-16A-8A-8A Y(*) YES YES YES YES Y I Y NO
MX30S24HO0 Slave 5 8A-2HP-16A-8A-8A I YES YES YES YES Y I Y NO
Tab. 1.b
(Y: tted, I: can be tted)
(*) The Master controllers have the clock (RTC) and the RS485 interface already
tted, the Slave controllers can become Masters by tting the MX3OP48500 card
(accessory) and setting a parameter (In). A Master controller can become a Slave
controller by simply setting the parameter (In).
The code identi es the type of controller and outputs:
• the fth letter, M or S, represents a Master or Slave controller
respectively;
• the seventh letter:
– 0= main board, driver board not pre-installed, NTC and 0 to 5 Vdc
ratiometric probe only;
– 1= full optional board with 2 PWM outputs, 12 Vdc (max 20 mA),
driver board not pre-installed, possibility to connect, as desired, NTC,
PTC, PT1000, NTC L243 probes, 0 to 5 Vdc ratiometric probes, 0 to 10
Vdc or 4 to 20 mA active probes
– 4= full optional board with 2 PWM outputs, 12 Vdc (max 20 mA),
PWM driver board pre-installed and including the 0 to 10 Vdc
output, all types of probes can be connected;
– 5= full optional board with 2 PWM outputs, 12 Vdc (max 20 mA), E
2
V
driver board pre-installed and including the 0 to 10 Vdc output, all
types of probes can be connected.
refrigerant outlet
refrigerant inlet

8
ENG
MPXPRO - + 0300055EN rel. 1.0 30/08/10
1.2 Functions and main characteristics
MPXPRO has been designed to o er maximum installation exibility
and signi cant energy saving when tted with the CAREL E2V or PWM
electronic expansion valve driver. It features 7 analogue inputs for
probes and 5 digital inputs, con gurable by parameter. The following
probes can be used: saturated evaporation pressure and superheated
gas temperature probe, required for superheat control, outlet, intake
and defrost probe for showcase temperature control, defrost probe
for the second evaporator, two auxiliary monitoring probes, ambient
temperature probe, glass temperature sensor and humidity probe to
prevent the showcase windows from misting. In the later case the PWM
outputs can be used either to control the glass heaters or the evaporator
fans for air circulation. If the stepper expansion valve is not used, a
second defrost probe can be installed to manage the defrost on a second
evaporator. The 5 digital outputs (relays) can control the compressor/
solenoid valve, evaporator fans, defrost, light and alarm. The digital inputs
can be used for switching between day and night, including from light
sensor, for the defrost calls, for the door or curtain switch or to activate
alarms. By creating a Master/Slave network, a series of functions can be
coordinated, such as defrosts, network solenoid valve management,
sharing of the pressure probe, and sharing of control status.
Example of application on vertical showcase:
SV (opzionale)
Sm E
Sr
Sd
EEV
Fig. 1.a
Sm
Sr
Sd
Fig. 1.b
Key:
Sm Outlet probe Sr Intake probe
Sd Defrost probe E evaporator
SV Solenoid valve EEV electronic expansion valve
Below is a description of the series of components and accessories in the
MPXPRO range:
Master board (MX30M*****)
Fitted with clock (RTC) and RS485 card, this can independently manage a
refrigeration unit, synchronise events over a LAN and connect to a CAREL
or Modbus® supervisory network. Plastic spacers are provided for tting
the for electronic valve driver (EEV) expansion board or the 0 to 10 Vdc
output expansion board.
Fig. 1.c
Slave board (MX30S*****)
Without clock (RTC) and RS485 card, these can manage a refrigeration
unit without the supervisor and clock functions. Slave boards can be
converted into Master boards by tting in place (see photo) the RTC and
RS485 interface card (MX3OP48500) and setting a parameter (In). Plastic
spacers are provided for tting the EEV driver expansion board or the 0 to
10 Vdc output board.
Fig. 1.d
Master/Slave boards (MX30*25HO0)
With 2 PWM outputs and E2V driver board with 0 to 10 Vdc output
incorporated.
Fig. 1.e
Important:
no solenoid valve is
required if the EEV
valve is installed in direct way
and the size is smaller than
E3V45.
Connector for
MX30P48500

9
ENG
MPXPRO - + 0300055EN rel. 1.1 30/08/10
Master/Slave boards (MX30*24HO0)
With 2 PWM outputs and PWM driver board with 0 to 10 Vdc output
incorporated.
Fig. 1.f
Stepper EEV expansion board (MX3OPST***).
Optional board for controlling a CAREL E
2
V electronic expansion valve
driven by stepper motor. Model MX3OPSTP0* also has a 0 to 10 V
modulating output for controlling the evaporator fans and anti-sweat
heaters.
Available in version with ultracap technology to ensure the electronic
valve closing in the event of power failure to avoid the installation of
liquid solenoid valve.
Fig. 1.g
PWM (Pulse-Width Modulation) EEV expansion board
(MX3OPPWM**)
Optional board for controlling an AC or DC PWM electronic expansion
valve. Model MX3OPPWM0* also has a 0 to 10 V modulating output for
controlling the evaporator fans and anti-sweat heaters.
Fig. 1.h
0 to 10 Vdc expansion board (MX3OPA1002)
Optional board used to manage the evaporator fans and anti-sweat
heaters with a 0 to 10 Vdc control signal.
Fig. 1.i
RTC and RS485 interface card (MX3OP48500)
Optional card that adds the clock (RTC) and RS485 interface (CAREL and
Modbus® protocol) functions to the MPXPRO Slave controllers, making
them MPXPRO Master controllers.
Fig. 1.j
User terminal (IR00UG*300) and remote display
(IR00XG*300)
The user terminal includes the display and the keypad, featuring 4
buttons that, pressed alone or in combination, are used to program the
controller. The remote display is used to show system variables. Both
devices are available in two versions, with or without infrared receiver
and commissioning port.
user terminal remote display
Fig. 1.k Fig. 1.l
USB/RS485 converter (CVSTDUMOR0)
The USB/RS485 converter is an electronic device that is used to interface
an RS485 network to a personal computer using the USB port.
Fig. 1.m
Important:
no solenoid valve is
required if the EEV
valve is installed in direct way
and the size is smaller than
E3V45.

10
ENG
MPXPRO - + 0300055EN rel. 1.0 30/08/10
USB/tLAN converter (IROPZTLN00)
Converter used to connect a personal computer to an MPXPRO controller
using the special connection available on the user terminals or remote
display and, with the VPM program (Visual Parameter Manager), to
complete the con guration and commissioning operations.
Fig. 1.n
USB/I2C converter (IROPZPRG00)
Converter used to connect a personal computer to an MXOPZKEYA0
programming key, so as, using the VPM program (Visual Parameter
Manager), to read, edit and write the parameters. In turn the programming
key can be used to program other controllers or read the parameters, for
example to copy the parameter settings entered on the keypad of other
controllers.
Fig. 1.o
Programming key (MXOPZKEYA0/IROPZKEYA0)
Fitted with interchangeable connectors, the MXOPZKEYA0 programming
key for MPXPRO is used to copy the complete set of parameters, storing
up to six di erent control parameter con gurations. Below is the table of
compatibility with MPXPRO rmware versions.
Fig. 1.p
Programming key
MPXPRO rmware
version
Sets of parameters
available
MXOPZKEYA0 ≥ 2.1 6
IROPZKEYA0 ≤ 1.2 2
Tab. 1.b
VPM programming tool (Visual Parameter Manager)
The program can be downloaded from http://ksa.carel.com. Once
running on the computer the tool can be used to commission the
controller, edit the parameters and update the rmware. The USB/tLAN
converter is required.
Fig. 1.r
Remote control (IRTRMPX000)
The remote control is used for programming and commissioning the
MPXPRO. See the chapter on User interface.
Fig. 1.s

11
ENG
MPXPRO - + 0300055EN rel. 1.1 30/08/10
2. INSTALLATION
2.1 MPXPRO: DIN rail assembly and
dimensions
PUSH
137
111
81 109
MPXPRO
High
voltage
Fig. 2.a
Accessing the terminal block
Fig. 2.b
To remove the cover:
1. press the sides;
2. remove the cover.
Fig. 2.c
To remove the covers:
1. press the sides of the cover at the points of coupling;
2. remove the cover.
MPXPRO optional connections
Fig. 2.d
1. Press the cover to remove it;
Fig. 2.e
2. Plug the MXOPZKEYA0/IROPZKEYA0 key into the connector provided.
Note: for models with rmware version ≤ 1.2 only use the
IROPZKEYA0 key.
2
1

12
ENG
MPXPRO - + 0300055EN rel. 1.0 30/08/10
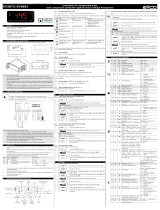
2.2 Main board: description of the terminals
Below is the wiring diagram for the MPXPRO main board in the version
with 5 relays. The connectors are screen printed to simplify the electrical
connections.
Terminal Description
34 GND
NTC/PTC/PT1000/NTCL243 probes
35 S3
36 S2
37 S1
Note:
• Depending on the model, the main board may have two open
collector/PWM analogue outputs for connecting:
1. PWM1: phase-cutting controllers (e.g. MCHRTF****) for inductive
loads (e.g. evaporator fans with inductive motors for optically-
isolated control);
2. PWM2: SSR relay for the anti-sweat heaters on the display cases;
• The devices with 4 to 20 mA or 0 to 10 Vdc output connected to input
S7 cannot be powered directly from the MPXPRO. They therefore
require an appropriate external power supply.
Important:
• The type of input connected to each probe in the same group can be
con gured by just one parameter. For each group 1(S1,S2,S3)-2(S4,S5)-
3(S6)-4(S7), there is just one parameter that de nes the type of input,
and consequently this must be the same for all the probes in the same
group. For group 2, S4 and S5 can be con gured as probes yet operate
as digital inputs.
• All the contacts should be galvanically insulated by adding further relays
for each contact. The digital inputs must not be connected in parallel,
otherwise the board may be damaged.
Note: before performing any operations on the control board,
disconnect the main power supply by turning the main switch in
the electrical panel OFF.
5Vdc
S7/
DI4
GND VLGNDDI5 GND
M.S.N.
Tx/Rx
T.U.I.
Tx/Rx
Tx/Rx+ Tx/Rx-
S6/
DI3
S5/
DI2
AC 115-230 V
200 mA max
(*) = R2 and R4 only for 5 relays models
MX30P485**
6 (4) A N.O.
6 (4) A N.C.
6 (4) A N.O.
6 (4) A N.C.
EN60730-1
R1
R1
R5
10 (10) A N.O.
R2
R2 (*)
8 (2) A N.O.
8 (2) A N.C.
R3
R3
6 (4) A N.O.
R4
R4 (*)
R5
LN
8 9
NO NC C
10 11 12
NO C
13 14 15
NCNO C
16
36
S2S1 S3
35
1718
12 VPWM1PWM2
19
324
NO NC CNL
67
CNO
51
37
33
S4/
DI1
GND
3234 30 2931 25 24262728 2223 2021
-10T50
MX30**H**
Power Supply
AC 115-230 V
200 mA max
Expansion board:
- 0 to10 Vdc Analog output MX3OPA10**
- PWM driver MX3OPPWM**
- E
2
V driver MX3OPSTP**
PROG. KEY
CLOCK and
SERIAL INT.
Mounted on
MX30S*****
Maximum currents with removable vertical connectors cod. MX30***(C,I,O)**.
For more details, please refer to the technical leaets.
MXOPZKEYA0 (with rel. 2.x)
IROPZKEYA0 (with rel. 1.x)
To be used only with
control switch o
(no Power Supply)
MX3OP48500
(only for slave models MX30S*****)
Fig. 2.f
Terminal Description
1 L Power supply:
230 Vac, 50mA max. (mod. MX30***E**)
115 Vac, 100mA max. (mod. MX30***A**)
2N
3NO
Relay 1: EN60730-1: 6(4)A N.O.,6(4)A N.C.
UL873: 6A 2 FLA 12 LRA
4NC
5C
6 NO Relay 2: EN60730-1: 8(10)A N.O.
UL873: 8A 8 FLA 72 LRA
only models
with 5 relays
7C
8NO
Relay 3: EN60730-1: 8(2)A N.O.,8(2)A N.C.
UL873: 8A 5 FLA 30 LRA
9NC
10 C
11 Not used
12 NO Relay 4: EN60730-1: 6(4)A N.O.
UL873: 6A 2 FLA 12 LRA
only models
with 5 relays
13 C
14 NO
Relay 5: EN60730-1: 6(4)A N.O., 6(4)A N.C.
UL873: 6A 2 FLA 12 LRA
15 NC
16 C
17 +12V Power supply
18 PWM1 Open collector output PWM1: 12Vdc, 20mA MAX
19 PWM2 Open collector output PWM2: 12Vdc, 20mA MAX
20 Tx/Rx- Connection to RS485 network supervisory
- CAREL and Modbus® protocol - for Master
controller only (use shielded cable)
21 Tx/Rx+
22 GND
23 M.S.N Tx/Rx Connection to Master/Slave tLAN (Master Slave
Network). Use shielded cable.
26 GND
24 Tx/Rx
tLAN connection for user terminals and remote
display
25 VL
26 GND
26 GND
Multifunction digital input
27 DI5
28 DC 5 V Multifunction analogue/digital input
• NTC, PTC, PT1000, NTCL243 probe
• 0 to 5 Vdc ratiometric probe
• 0 to 10 Vdc analogue input
• 4 to 20 mA analogue input
• Multifunction digital input
29 S7/DI4
30 GND
28 DC 5 V Multifunction analogue/digital input
• NTC, PTC, PT1000, NTCL243 probe
• 0 to 5 Vdc ratiometric probe
• Multifunction digital input
30 GND
31 S6/DI3
30 GND Multifunction analogue/digital input
• NTC, PTC, PT1000, NTCL243 probe
• Multifunction digital input
32 S5/DI2
33 S4/DI1

13
ENG
MPXPRO - + 0300055EN rel. 1.1 30/08/10
2.3 E
2
V driver expansion board
(MX3OPSTP**): terminals and connections
75
GND
CAREL E2VCABS*
E
2
V Driver
MX3OPST(H,U)*
73 74
8182 808384
13245
10
Vdc
GND
GR BR YE WH
Shield
L < 10m AWG22
L < 30m AWG20
L < 50m AWG18
Valve cable lenght without solenoid
do not connect to
any “GND” Terminal
Earth
0 to10 Vdc
Analogic
output only for
MX3OPST(H,U)0*
The input of the load 0 to 10 Vdc must
feature reinforced insulation with
reference to its internal power supply
Tight screw and nut after
installing connector/cable and E
2
V.
Unique correct
connection view
(no other possible
connections).
E2VCON* not suitable
for refrigeration
application.
Shield 80
White 81
Yellow/Black 82
Brown/Red 83
Green 84
E
2
V Driver
connection cable
CAREL E
2
V
For further information, please refere to the “EEV system guide”
(code +030220810) available in the web site www.carel.com, in the
literature section.
Cable Lenght
Valve cable lenght without solenoid
Fig. 2.g
Terminal Description
73
0 to 10 Vdc output,
4.5 mA MAX
Control signal for modulating actuators:
Maximum error 2% f.s., maximum load 2.2 KΩ
74 GND
75 Functional earth
80 Shield
Connection to CAREL
E
2
V valve with shielded cable
E2VCABS600
81 White
82 Yellow/black
83 Brown/red
84 Green
Tab. 2.a
Important:
• To connect the valve, use a CAREL shielded cable code E2VCABS*00
(AWG22) or an alternative suitably sized 4-wire shielded cable:
- reverse valve or valve size > = E3V45 -> solenoid required with
AWG22 shielded cable
- direct valve and valve size < E3V45 -> if the solenoid is installed
AWG22 shielded cable, if the solenoid is not installed, for the size of
the cables see the table to the side.
• the input of the 0 to 10 Vdc modulating actuator load must have
reinforced insulation, based on its internal power supply.
2.4 PWM driver expansion board
(MX3OPPWM**): terminals and connections
L
N
PWM
ac
PWM
dc
N L
+
–
GND
PWM Driver
MX2OPPWM*
64 6562 6360 61
6768 66
PWM
+
DC
-
PWM
N
AC
L
LN
10
Vdc
GND
0 to 10 Vdc
Fuse 0.25 AT
POWER SUPPLY
115-230 Vac
25 W max
Use
PWMac or PWMdc
valves alternatively
DC/AC output
Analogic
output only for
MX2OPPWM0*
The output 0 to 10 Vdc must feature
reinforced insulation with reference
to its internal power supply
PWM valve
115-230 Vac
20 W max 5 W min
PWM valve
115 Vdc RMS-230 Vdc RMS
20 W max 5 W min
Fig. 2.h
Terminal Description
60 L Power supply:
115 to 230 Vac, 50/60 Hz, 25 VA MAX
61 N
62 N Power supply PWM valve Vac:
115 to 230 Vac, 50/60 Hz, 5 W MIN, 20 W MAX
63 L
64 + Power supply PWM valve Vdc:
105 to 230 Vdc RMS, 5 W MIN, 20 W MAX
65 -
66 Not used
67 0 to 10 Vdc output Control signal for modulating actuators:
Maximum error 2% f.s., maximum load 2.2 KΩ.
68 GND
Tab. 2.b
Note:
• use either AC or DC PWM valves;
• the input of the 0 to 10 Vdc modulating actuator load must have
reinforced insulation, based on its internal power supply.
Important: do not use PWM valves with recti ed 230 Vac power
supply.
2.5 Expansion board 0 to 10 Vdc output
(MX3OPA1002): terminals and connections
GND
MX2OPA1002
4142 40
10
Vdc
GND
Analog
output
0 to 10 Vdc
The output 0 to 10 Vdc must feature
reinforced insulation with reference
to its internal power supply.
Analog 0 to 10 Vdc
Fig. 2.i
Terminal Description
40 Not used
41 0 to 10 Vdc output
Control signal for modulating actuators: Maximum
error 2% f.s., maximum load 2.2 KΩ.
42 GND
Tab. 2.c
Note: the input of the 0 to 10 Vdc modulating actuator load must
have reinforced insulation, based on its internal power supply.

14
ENG
MPXPRO - + 0300055EN rel. 1.0 30/08/10
2.6 Functional diagrams
The MPXPRO controllers are systems that manage refrigeration units (for
example, one or a series of multiplexed showcases). These systems are
made up of control boards connected together in Master-Slave mode;
each Master board can manage up to 5 Slaves. The functional diagrams
below show some examples of typical applications:
1. 1. Stand alone con guration and optional cards
available
AUXAUX
master
MX2OPSTP**
MX2OPPWM**
MX2OPA1002
MX2OP48500
(only for MX20S*****)
tLAN
IR00XG*300 IR00UG*300
3
RS485
3
MPXPRO
High
voltage
Fig. 2.j
For the electrical connections see the general connection diagram in par.
2.8.
The Master controller can be supplied without the driver board
(MX30M00E00), with the driver board for E2V valve (MX30*25E00) or with
PWM driver board (MX30*24E00).
Available options:
• 0 to 10 Vdc expansion board (MX3OPA1002). If installed, the drivers
cannot be tted: in this case the driver board with the 0 to 10 Vdc
output incorporated;
• on MPXPRO Slave boards (MX30S*****) the RTC and RS485 serial
interface accessory (MX3OP48500) can be added)
2. Master/ Slave network with user terminals and
remote display
The Master controller, connected to the supervisor network, acts as
the gateway and coordinates the functions of the 5 Slave controllers
connected in the tLAN. Each controller has its own user terminal and
remote display.
AUX
AUX
AUX
AUX
slave 1
master
slave 2 slave 3 slave 4
AUX
AUX
AUX
AUX
AUX
AUX
tLAN 2
MPXPRO
High
voltage
MPXPRO
High
voltage
MPXPRO
High
voltage
MPXPRO
High
voltage
MPXPRO
High
voltage
slave 5
AUX
AUX
MPXPRO
High
voltage
RS485
PlantVisorPRO/
PlantWatchPRO
per supervisione/
for supervision
tLAN 3
3
tLAN 3 tLAN 3 tLAN 3 tLAN 3 tLAN 3
Fig. 2.k
For the electrical connections see the general connection diagram in par.
2.8.
3. Master/Slave network with shared user terminal and
local remote display.
AUXAUXAUXAUXAUX
slave 1
master
slave 2 slave 3 slave 4
tLAN 2
MPXPRO
High
voltage
MPXPRO
High
voltage
MPXPRO
High
voltage
MPXPRO
High
voltage
MPXPRO
High
voltage
slave 5
AUX
MPXPRO
High
voltage
RS485
PlantVisorPRO/
PlantWatchPRO
per supervisione/
for supervision
tLAN 3
3
tLAN 3 tLAN 3 tLAN 3 tLAN 3 tLAN 3
Fig. 2.l
For the electrical connections see the general connection diagram in par.
2.8
4. RS485 supervisor network
The maximum number of Master controllers that can be connected in
the network also depends on the number of Slaves connected to each
Master; the maximum total is 199 controllers (CAREL and Modbus®
protocol).
MPXPRO
High
voltage
MPXPRO
High
voltage
MPXPRO
High
voltage
PlantVisorPRO/
PlantWatchPRO
per supervisione/
for supervision
master 1 master 2 master n
RS485
3
Fig. 2.m
For the electrical connections see the general connection diagram in par.
2.8.
2.7 Connecting the MCHRTF**** module
The connection of the MCHRTF**** single-phase speed controller for
evaporator fans requires a resistor in series, as shown in the following
gure:
4 A
R=470Ω
12 V
PWM
control
signal
230 Vac
50 Hz
MCHRF module
PWM1
PWM2
LN
M
LOAD
19 18 17
Fig. 2.n

15
ENG
MPXPRO - + 0300055EN rel. 1.1 30/08/10
2.8 General connection diagram
5Vdc
S7/
DI4
GND VL
VL (25)
GND
GND (26)
DI5 GND
M.S.N.
Tx/Rx
T.U.I.
Tx/Rx
T.U.I.
Tx/Rx (24)
Tx/Rx+ Tx/Rx-
S6/
DI3
S5/
DI2
L
N
AC 115-230 V
200 mA max
LOAD 1
LOAD 2
AUX3
AUX1
AUX2
(
(
((
((
MX30P485**
6 (4) A N.O.
6 (4) A N.C.
6 (4) A N.O.
6 (4) A N.C.
EN60730-1
R1
R1
R5
10 (10) A N.O.
R2
R2
8 (2) A N.O.
8 (2) A N.C.
R3
R3
6 (4) A N.O.
R4
R4
R5
LN
8 9
NO NC C
10 11 12
NO C
13 14 15
NCNO C
16
36
S2S1 S3
35
1718
12 VPWM1PWM2
19
324
NO NC CNL
67
CNO
51
37
33
S4/
DI1
GND
3234 30 2931 25 24262728 2223 2021
-10T50
MX30**H**
AUX
AUX
IR*U* IR*X*
2930
S7/
DI4
GND
2930
S7/
DI4
GND
282930
31
5Vdc
S7/
DI4
GND
S6/
DI3
NTC NTC NTC NTC
1 2 3
0T50
Power
Supply
Rx/Tx
Gnd
36
S2S1 S3
3537 33
S4/
DI1
GND
34
5Vdc
S7/
DI4
GND
S6/
DI3
S5/
DI2
32 30 2931 28
Power Supply
Rx/Tx
GND
GND
SSR1
MCHRTF
R=
470 Ω
2930
S7/
DI4
GND
NTC
out
+G
NTC
out
M
-G0
out
H
AC 24 V
AC 230 V
50 Hz
AUX4
VL (25) GND (26)
T.U.I.
Tx/Rx (24)
Power Supply
AC 115-230 V
200 mA max
PWM modulating fans
20 mA max totally
Trim heater
Expansion board:
- 0 to10 Vdc Analog output MX3OPA10**
- PWM driver MX3OPPWM**
- E
2
V driver MX3OPSTP**
PROG. KEY
CLOCK
and
SERIAL INT.
Mounted on
MX30S*****
Maximum currents with removable vertical connectors cod. MX30***(C,I,O)**.
For more details, please refer to the technical leaets.
To be used only with
control switch o
(no Power Supply) and
disconnected from the RS485
supervisory serial line
MX3OP48500
(only for slave models MX30S*****)
Only “Master units”
to be connected
on RS485
Master/Slave network: max. cable lenght 100 m with a section not less then AWG20
Supervisor
RS485
Terminal/user interface: max. cable lenght 100 m with a section not less then AWG20
tLAN
Connection: (see the technical
leaets +050000135)
IR*U* IR*X*
Slave 1 Slave 2 Slave 4 Slave 5
Ratiometric
pressure
probe 0 to 5 Vdc
Analogic input
0 to 10 Vdc
(external power
supply)
0 to 10 Vdc
NTC /PTC/Pt1000
AIR OFF TEMPERATURE
PROBE (Sm)
DEFROST TEMPERATURE
PROBE (Sd)
AIR ON TEMPERATURE
PROBE (Sr)
SUPERHEATED GAS
PROBE (tGS)
SATURATED EVAPORATION
PRESSURE/TEMPERATURE
PROBE (PEu/tEu)
Analogic input
4 to 20 mA
(external power
supply)
4 to 20 mA
Slave 3
Pressure probe connection:
Black
White
Green
White
Use only one pressure probe
OR
probe ref. probe ref.
NTC NTC NTC NTC RATIOMETRIC
Shield
Shield
Default connection:
Possible connection:
The contemporary operation of both
outputs is not granted with any
actuator. Please refer to the technical
features.
Humidity probe
DPWC111000
remote infrared
IRTRMPX000
Warning: Before making any operation on
the control board, turn o the supply mains
turning o the main switch of the
electrical panel.
tLan
MXOPZKEYA0 (with rel. 2.x)
IROPZKEYA0 (with rel. 1.x)
Fig. 2.o
Important:
• the board must not be installed on surfaces that exceed 70
°C at 50 °C ambient and 80 °C with 60°C ambient;
• use an external disconnect switch positioned near the
appliance that is compliant with the IEC60947-1 and
IEC60947-3 standards;
• use cables rated to 90°C, if the temperature of the terminals
exceeds 85 °C, use cables rated to 105 °C;
• the connection cables must guarantee insulation up to 90
°C and if necessary up to 105 °C, when the temperature of
the terminals and relays exceeds 85 °C;
• if the appliance is used in a way that is not described by the
manufacturer, the speci ed level of protection may be a ected;
• if the current is higher than 6 amperes on R1, R2, R3, R4, R5, only
use cables with a cross-section of 2.5 mm
2
(14 AWG);
• the board must not be accessible to unauthorised personnel.
Connection with CAREL cable
SPKC002310 or SPKC005310
connection with
terminal colour
28 5 Vdc black
29 S7/D14 white
30 GND green
31 S6/D13 white
CAREL electronic pressure probe
CAREL code
range (barg)
ref. probe
min max
SPKT0053R0 -1.0 4.2 2CP5-52
SPKT0013R0 -1.0 9.3 2CP5-46
SPKT0043R0 0.0 17.3 52CP36-01 / 2CP5-66
SPKT0033R0 0.0 34.5 2CP5-47
SPKT00B6R0 0.0 45.0 2CP50-1

16
ENG
MPXPRO - + 0300055EN rel. 1.0 30/08/10
2.9 Installation
For installation proceed as follows, with reference to the wiring diagrams:
1. before performing any operations on the control board, disconnect
the main power supply by turning the main switch in the electrical
panel OFF. Then remove the plastic side cover and/or the covers to
make the electrical connections;
2. avoid touching the control board, as electrostatic discharges may
damage the electronic components;
3. the index of protection required for the application must be ensured
by the manufacturer of the display case or by suitable assembly of
the controller;
4. connect any digital inputs, Lmax=10m;
5. connect the power cable to the valve motor: to nd the section or
cable lenght, see “terminals and connections” section.
6. connect the actuators: the actuators should only be connected after
having programmed the controller. Carefully evaluate the maximum
ratings of the relay outputs as indicated in “Technical speci cations”;
7. program the controller: see the chapter “User interface”.
8. for the tLAN connection of the Master/Slave network and user
interfaces, use shielded cable and make sure:
• the maximum distance between a controller and its user terminal/
remote display is 100 m (with section of cable not less than AWG22);
• the maximum distance between the controllers and the maximum
length of the cable between one controller and another is 100 m
(with section of cable not less than AWG22).
Important: avoid installing the controllers in environments with
the following characteristics:
• relative humidity greater than the 90% or condensing;
• strong vibrations or knocks;
• exposure to continuous water sprays;
• exposure to aggressive and polluting atmospheres (e.g.: sulphur
and ammonia fumes, saline mist, smoke) to avoid corrosion and/or
oxidation;
• strong magnetic and/or radio frequency interference (avoid installing
the controllers near transmitting antennae);
• exposure of the controllers to direct sunlight and to the elements in
general.
Important: when connecting the controllers, the following
warnings must be observed:
• incorrect connection to the power supply may seriously damage the
controller;
• use cable ends suitable for the corresponding terminals. Loosen each
screw and insert the cable ends, then tighten the screws and lightly
tug the cables to check correct tightness;
• separate as much as possible the probe and digital input cables from
the power cables to the loads so as to avoid possible electromagnetic
disturbance. Never lay power cables and probe cables in the same
conduits (including those in the electrical panels);
• avoid installing the probe cables in the immediate vicinity of power
devices (contactors, circuit breakers, etc.). Reduce the path of the
probe cables as much as possible and avoid enclosing power devices.
Note: when connecting the RS485 serial network:
• connect the shield to the GND terminals on all controllers;
• do not connect the shield to the earth on the electrical panel;
• use a twisted pair shielded cable (e.g. Belden 8762 – AWG 20 or BELDEN
8761-AWG 22);
• connect a 120 Ω terminal resistor between the Tx/Rx+ and Tx/Rx-
terminals on the last MPXPRO controller.
2.10 Programming key (copy set-up)
Important: the key must be used with the controller o and with
the RS485 serial line disconnected from the MPXPRO. The
MXOPZKEYA0/IROPZKEYA0 programming key is used to copy the
complete set of MPXPRO parameters. The key must be plugged into the
connector (4 pin AMP) on the controllers (with the controller powered
down).
Note: MXOPZKEYA0 can only be used on MPXPRO with rmware
versions >= 2.1 (with max. 6 sets of parameters); IROPZKEYA0 can
only be used on MPXPRO with rmware versions <=1.2 (with max. 2 sets
of parameters).
The rmware version of the MPXPRO can be identi ed as follows:
1. on the label applied to the rear of the instrument. The second part of
the revision number represents the rmware version (e.g. Rev. 1.326
means rmware revision 2.6). This info is valid only if the MPXPRO has
never been updated by the user;
2. on the terminal display. When powering up the MPXPRO, the terminal
displays the rmware revision (e.g. r 2.6) for a couple of seconds;
3. using the VPM or from the supervisor (Integer variable 11: Firmware
release). O cial versions available are 1.0, 1.1, 1.2 - 2.1, 2.2, 2.6, 2.8.
By setting the two dipswitches (accessible when removing the cover),
the programming key can run the following functions:
• UPLOAD. Load the parameters from a controller to the key (see Fig. 2.p):
the key acquires all the parameters available on the controller;
• DOWNLOAD. Copy from the key to a controller (see Fig.2.q): the key
only transfers the operating parameters to the connected controller;
• EXTENDED DOWNLOAD. Extended copy from the key to a controller
(see Fig.2.r): the key transfers all the parameters (operating and unit) to
the connected controller.
Important: the copy and extended copy of parameters can only
be performed between compatible instruments, that is, with the
same or higher rmware revision (e.g. copy from 2.2 to 2.4, not
vice-versa).
The UPLOAD, DOWNLOAD and EXTENDED DOWNLOAD functions are
performed as follows:
a. open the rear cover of the key and set the two dipswitches based on
the desired operation;
b. close the cover, power up the key and plug the key into the connector
on the controller;
c. press and hold the button until the red LED ashed brie y, after around
5-10 s (the button can still be held). When the button is released, the
LED stays on red until the end of the operation, which may last up to
a maximum of 45 sec. The operation is completed successfully when
the green LED comes on. With the button released, the green LED
goes o after around 2 seconds. Other signals or ashing of the LEDs
indicate that problems have occurred: see the corresponding table;
d. remove the key from the controller.
upload download extended download
Fig. 2.p Fig. 2.q Fig. 2.r

17
ENG
MPXPRO - + 0300055EN rel. 1.1 30/08/10
LED signal Cause Meaning Solution
Orange ashing
Controller not
compatible
The parameters
cannot be
copied due to
incompatibility
of the rmware
versions
Check
compatibility
of the rmware
versions (see notes
above)
Red ashing
Incorrect use of
the key
The button on
the key has been
released too early
Repeat the
procedure
following the
instructions in
point c.
Orange steady Data copy error
The data on the
controller or the
key may be corrupt
Repeat the
operation or
contact service
O
Key not powered
or fault
--
Check that the
key is powered or
contact service
Tab. 2.d
The key can be programmed not only from the MPXPRO controller,
but also directly from a PC, using the special USB/I2C converter
(IRPOPZPRGO0) and the VPM program. Using this connection, the PC can
completely program the key. Speci cally, the following operations are
possible: set the values of the parameters (both unit and operating), set
the visibility and upload attribute, write and read the parameters to/from
a le, and check the parameters.
2.11 Commissioning tool (VPM- Visual
Parameter Manager)
MPXPRO can communicate directly with a PC using the “commissioning”
port. This connection can be used to program and check the operation
of an MPXPRO controller from the PC when installing and rst starting the
system. The commissioning connection can be used to:
• set value, visibility and download attributes of all the parameters from
Master to Slave, including unit parameters;
• completely program a key;
• at start-up, monitor and manually control all the inputs/outputs;
• update the rmware.
A PC can access the commissioning connection via the special port
available on some user terminals code IR00UGC300 and remote display
code IR00XGC300 or in supervisory RS485 network.
The commissioning software can also be used to program the key.
Further information on the operation of the commissioning software is
available in the online manual for the VPM program, downloadable from
http://ksa.carel.com.
Commissioning via terminal/display (with IROPZTLN00
converter).
This is used to connect a supervisor PC, running the special software, to
an MPXPRO controller via a user terminal (IR00UGC300) or remote display
(IR00XGC300) tted with commissioning port. Identify the connection
port located under the keypad.
Terminal
IR00UGC300
IR00XGC300
IROPZTLN00
USB/tLAN
converter
CBA
PC
Fig. 2.s
Connect the USB ports on the converter and the PC using a USB cable.
If the PC is connected to a Master controller, the software can access
the unit and operating parameters and status variables relating to the
Master controller, as well as the Slave controllers in the subnetwork. If the
connection is made to the terminal on a slave, only the parameters (unit
and operating) and status variables of that Slave can be accessed.
Commissioning via the RS485 supervisor port (with
CVSTDUMOR0 converter)
As well as the connection via the terminal, MPXPRO can also be
connected to a PC via the RS485 supervisory network. In this case, the PC
will only be connected to the Master controller. Access to the parameters
(unit and operating) and status variables relating to the Slaves connected
to the Master will be available via the Master controller.
To use this commissioning connection:
• connect a Master controller (board terminals 20, 21, 22) to the RS485
output on the CVSTDUMOR0 converter, using an RS485 connection
cable;
• connect the USB ports on the converter and the PC using a USB cable.
Note: To manage the Slave controllers in the subnetwork from the
PC, make sure that these are correctly connected to the Master via
the tLAN.
MASTER SLAVE
USB
RS485
CVSTDUMOR0
tLAN
PC
Fig. 2.t

18
ENG
MPXPRO - + 0300055EN rel. 1.0 30/08/10
2.12 Setting the default parameters/loading
the parameter sets
Introduction
Seven di erent sets of parameters are saved in the MPXPRO memory.
Set 0, called the working set, contains the set of parameters used by
MPXPRO during normal operation. This set is loaded whenever MPXPRO
is started, and the parameters can be modi ed at any time from the
terminal, supervisor, remote control, VPM and programming key.
The other six sets of parameters, numbered 1 to 6, contain other lists of
parameters, preloaded by CAREL during production, which can be copied
as desired to the working set (Set 0). These sets of parameters, unlike Set
0, can only be modi ed using the programming key and the VPM. The
sets of parameters, once di erentiated by the manufacturer of the unit,
can be loaded so as to rapidly set a list of parameters, with corresponding
values, to control the refrigeration system.
Parameter sets from 1 to 6 can be modi ed as follows:
1. copy the parameters from MPXPRO to the programming key
MXOPZKEYA0 (UPLOAD);
2. read the parameters saved on the programming key using VPM;
3. select the set and modify the parameters using VPM. For each
parameter, the value, visibility, enabling to copy from Master to Slave,
and con gurability at rst start-up can all be set;
4. write the parameters to the programming key using VPM;
5. copy the parameters from the programming key to MPXPRO
(DOWNLOAD). See paragraph 2.10.
Note:
• when copying the parameters from the key to MPXPRO and vice-versa,
MPXPRO must not be powered;
• to read/write the parameters on the key using VPM, the converter code
IROPZPRG00 is required.
Important: modifying the set of parameters saved in the MPXPRO
memory using the key permanently overwrites the parameters
set by CAREL. The set of default parameters is never overwritten,
being stored in a non-modi able area of memory.
Procedure for setting the default parameters / loading
the parameter sets
Procedure:
1. power down the controller;
2. press the Prg/mute button;
3. power up the controller again while holding Prg/mute: at the end, the
number 0 is displayed, which represents set 0;
4. to load the default parameters, press the SET button to con rm set 0,
otherwise see step 5;
5. press UP/DOWN to choose the set of parameters (from 1 to 6) to be
loaded as the working set, and con rm by pressing SET;
6. at the end of the procedure, the display will show the message “Std”,,
indicating that the procedure has ended;
7. if required, run the guided commissioning procedure (see par. 4.3)
Note: the procedure loads a set of parameters as desired, from 1 to
6. The maximum number of parameter sets that can be loaded is limited
by the value of parameter Hdn, not visible on the keypad and only
modi able using VPM or the programming key. For example, if Hdn=3,
during the procedure only parameter sets from 1 to 3 can be loaded on
the controller.
Par. Description Def. Min Max U.O:M.
Hdn Number of default parameter sets
available
006 -
tab. 2.e

19
ENG
MPXPRO - + 0300055EN rel. 1.1 30/08/10
3. USER INTERFACE
The front panel of the user terminal (IR00UG****) includes the display and
the keypad, featuring 4 buttons that, pressed alone or in combination, are
used to program the controller. The remote display (IR00XG****) is only
used to show the values of system variables.
3.1 User terminal and remote display
The display shows measurements in the range –50 and +150 °C, according
to the type of probe used. The measurement is displayed with resolution
to one tenth between –19.9 and + 19.9 °C. For 0 to 5 V ratiometric and
active 0 to 10 V or 4 to 20 mA probes the unit of measure is de ned by
the type of probe used. The decimal point can be disabled by setting a
parameter (/6).
User terminal Remote display
AUX
MPXPRO
MPXPRO
Fig. 3.a Fig. 3.b
Icon Function
Icon / function statuse
Note
OFF FLASH
Compressor/
Solenoid
Active Not active Request Flashes when activation is delayed or stopped by protection times.
Evaporator fans Active Not active Request Flashes when activation is prevented due to external disabling or procedures in progress.
Defrost Active Not active Request Flashes when activation is prevented due to external disabling or procedures in progress.
Auxiliary output Active Not active - Comes on with activation of the auxiliary output selected as local or network auxiliary.
Alarm
Pre-activation
of the delayed
external digital
alarm
-
Alarm in
progress
Flashes in the event of alarms during normal operation (e.g. high/low temperature) or alarms
from external digital input, immediate or delayed, on both Master and Slave controllers.
Clock
Night-time
operation
- Clock alarm On power-up the icon indicates the Real Time Clock (RTC) is tted.
Light (local or
network)
Active Not active -
Service
On the Master
indicates Upload
parameters to
Slaves
-
System error in
progress
During commissioning, indicates that the parameter has not been set; during the connection to
the remote control indicates override in progress.
HACCP
HACCP function
enabled
-
HACCP alarm
saved
During the HACCP alarm HA and/or HF is shown on the display.
Continuous cycle
Continuous
cycle function
activated
- Request
Flashes when activation is prevented due to external disabling or procedures in progress (e.g.
minimum compressor OFF time)
Tab. 3.a
Note:
• with the alarm, clock, service and HACCP icons active, ashing has
priority over ON. For example, in night-time operation (clock icon on),
the icon will ash if there is a clock alarm;
• the value to be displayed on the user terminal can be con gured by
setting parameter /t1, and on the remote display by setting parameter
/t2.

20
ENG
MPXPRO - + 0300055EN rel. 1.0 30/08/10
3.2 Keypad
Setting Function
Front keypad controls Display when setting / notes
Duration
Set point Temperature set point
Value on display ashing
/
Set value
Save set point and return to standard display
Access the parameters
(programming level)
Type F parameters
(frequent)
5 s The rst type F parameter is displayed
Type C (con guration) or A
(advanced) parameters
&
5 s
/
Enter password (22 for con guration level and 33 for advanced level)
Con rm the password, the rst type C or A parameter is displayed
Output from the livello
programming
5 s The changes are saved
Defrost
Local defrost
5 s dFb : activate defrost dFE : deactivate defrost
Multiplexed defrost (Master
only)
&
5 s dFb : activate defrost dFE : deactivate defrost
Auxiliary functions
Continuous cycle
&
5 s
ccb : activate continuous cycle (see paragraph 6.6)
ccE : deactivate continuous cycle
AUX output
Activate/deactivate auxiliary output
Network functions (only for
Master)
Copy parameters from
Master to Slave
&
5 s
/
Enter password (default 66)
See paragraph 3.6 : “Copy parameters from Master to Slave”
Display network unit status
from Master
& &
Select Slave: see paragraph 3.5 : “Display Slave controller status from
Master terminal”
Set the default parameters
(restore parameters)
Set default parameters (*)
on power-up
If 0 is displayed press set to continue
Alarms
Display alarm log
&
5 s
/
Enter password (default 44)
See paragraph 9.3: “Display alarm log”
Manual alarm reset
&
5 s “rES” indicates the alarm has been reset
Mute buzzer and disable
alarm relay
HACCP HACCP menu
&
See par. 9.4 “HACCP alarms and display”
Tab. 3.b
(*) The default parameters, or any of the sets of parameters loaded inside MPXPRO,
only have e ect on the parameters visible from the user terminal, based on the
list of parameters. The parameters that are not visible on the user terminal are not
a ected by this procedure.
/