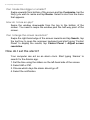
Acer TravelMate X313-E User manual
- Category
- Notebooks
- Type
- User manual
This manual is also suitable for

- 1
TravelMate X313
User’s Manual

2 -
© 2014. All Rights Reserved.
TravelMate X313
Covers: TravelMate X313-E / X313-M
This revision: May 2014
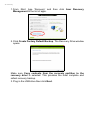
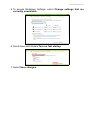
Sign up for an Acer ID and enable Acer Remote Files
Open the Acer Portal from the Start screen to sign up for an
Acer ID or sign in if you already have an Acer ID.
There are three great reason for you to get an Acer ID:
• Remotely access your PC from your other devices with our
free Acer Remote Files app
• Get the latest offers and product information
• Register your device for warranty service
For more information please visit the AcerCloud website:
www.acer.com/acercloud
Model number: _________________________________
Serial number: _________________________________
Date of purchase: ______________________________
Place of purchase: ______________________________

Table of contents - 3
TABLE OF CONTENTS
First things first 6
Your guides ............................................. 6
Basic care and tips for using your
computer.................................................. 6
Turning your computer on and off............... 6
Taking care of your computer ..................... 7
Taking care of your AC adapter .................. 7
Cleaning and servicing................................ 8
Your Acer computer tour 9
Computer................................................. 9
Front view .................................................. 9
Back view ................................................. 10
Top view .................................................. 10
Bottom view ............................................. 11
Left/right views ........................................ 11
LED Indicators .......................................... 12
Environment.............................................. 13
Keyboard cover (optional) ..................... 13
Keyboard front view ................................. 13
Hotkeys ..................................................... 14
Inserting the computer into the keyboard
cover ......................................................... 15
Removing the computer from the keyboard
cover ......................................................... 17
Using the keyboard ................................... 17
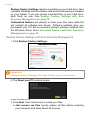
Pairing with the X313 ................................ 18
Charging the keyboard.............................. 19
Troubleshooting ........................................ 19
Cradle (optional) .................................... 20
Front view ................................................ 20
Back view (stand not shown) ................... 21
Left view (stand not shown) ...................... 22
Connecting the computer to the cradle.. 23
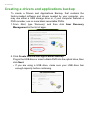
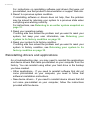
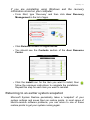
Recovery 25
Creating a recovery backup................... 25
Creating a drivers and applications
backup................................................... 28
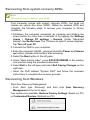
Recovering your system ........................ 29
Reinstalling drivers and applications......... 30
Returning to an earlier system snapshot .. 31
Returning your system to its factory
condition.................................................... 32
Recovering from system recovery DVDs .. 33
Recovering from Windows ........................ 33
Connecting to the Internet 36
Connecting with a cable ........................ 36
Built-in network feature ............................. 36
Connecting wirelessly............................ 37
Connecting to a wireless LAN................... 37
Connecting to a 3G network ..................... 38
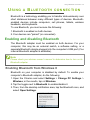
Using a Bluetooth connection 39
Enabling and disabling Bluetooth .......... 39
Enabling Bluetooth from Windows 8......... 39
Adding a Bluetooth device ..................... 40
BIOS utility 43
Boot sequence....................................... 43
Setting passwords ................................. 43
Acer ProShield 45
Overview................................................ 45
Setting up Acer ProShield...................... 45
Personal Secure Drive .............................. 47
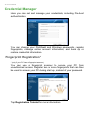
Credential Manager ............................... 48
Fingerprint Registration* ........................... 48
Data Protection ...................................... 49
Data Removal ........................................ 49
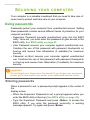
Securing your computer 50
Using passwords ................................... 50
Entering passwords .................................. 50
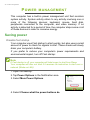
Power management 52
Saving power ......................................... 52
Battery pack 54
Battery pack characteristics................... 54
Optimizing battery life ............................... 55
Checking the battery level......................... 56
Battery-low warning .................................. 56
Memory card reader 58
Connectivity options............................... 58
Video and audio connectors 60
HDMI Micro 61
Universal Serial Bus (USB) 62
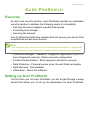
Frequently asked questions 64
Requesting service ................................ 65
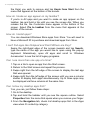
Tips and hints for using Windows 8.1 .... 67
How do I get to Start? ............................... 67
What are "Charms?" ................................. 67
Can I boot directly to the desktop? ........... 68
How do I jump between apps?.................. 68
How do I turn off my computer?................ 68
How do I unlock my computer?................. 68
How do I set the alarm? ............................ 70
Where are my apps?................................. 71
What is a Microsoft ID (account)?............. 73
How do I add a favorite to Internet
Explorer?................................................... 73
How do I check for Windows updates?..... 73
Where can I get more information?........... 73
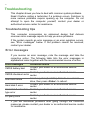
Troubleshooting ..................................... 74
Troubleshooting tips.................................. 74
Error messages......................................... 74

4 - Table of contents
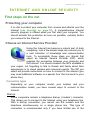
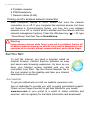
Internet and online security 75
First steps on the net ............................. 75
Protecting your computer.......................... 75
Choose an Internet Service Provider........ 75
Network connections................................. 76
Surf the Net!.............................................. 78
Security ..................................................... 79

- 5
Getting started...
In this section you will find:
• Useful information on caring for your computer and your health
• Where to find the power button, ports and connectors
• Tips and tricks for using the touchpad and keyboard
• How to create recovery backups
• Guidelines for connecting to a network and using Bluetooth
• Information on using Acer’s bundled software

6 - First things first
FIRST THINGS FIRST
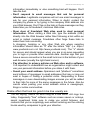
We would like to thank you for making this Acer comptuer your choice
for meeting your mobile computing needs.
Your guides
To help you use your Acer computer, we have designed a set of
guides:
First off, the Setup Guide helps you get started with setting up your
computer.
The Quick Guide introduces you to the basic features and functions
of your new computer. For more on how your computer can help you
to be more productive, please refer to the User’s Manual. This guide
contains detailed information on such subjects as system utilities, data
recovery, expansion options and troubleshooting. In addition it
contains general regulations and safety notices for your computer. It is
available in Apps (swipe upwards from the bottom of the screen and
tap All apps then tap Acer User’s Manual from the list). Alternatively,
swipe the right-hand edge of the screen inwards and tap Search, tap
the text box to open the onscreen keyboard and start typing 'User’s
Manual' to display the results; tap Acer User’s Manual.
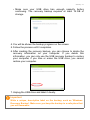
Basic care and tips for using your computer
Turning your computer on and off
To turn the power off, do the following:
• Tap the Settings charm > Power > Shut down.
To turn the power off (to get into BIOS upon reboot), do the following:
• Tap the Settings charm > Change PC settings > General. Under
"Advanced startup", tap Restart now. The "Choose an option"
screen displays. Tap Turn off your PC.
Note
See "BIOS utility" on page 43 for more information.

First things first - 7
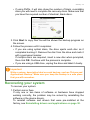
If you need to power down the computer for a short while, but don’t
want to completely shut it down, you can put it into Sleep mode by:
• Pressing the power button.
- OR -
• Tapping the Settings charm > Power > Sleep.
Taking care of your computer
Your computer will serve you well if you take care of it.
• Do not expose the computer to direct sunlight. Do not place it near
sources of heat, such as a radiator.
• Do not expose the computer to temperatures below 0º C (32º F) or
above 50º C (122º F).
• Do not subject the computer to magnetic fields.
• Do not expose the computer to rain or moisture.
• Do not spill water or any liquid on the computer.
• Do not subject the computer to heavy shock or vibration.
• Do not expose the computer to dust or dirt.
• Never place objects on top of the computer.
• Do not slam the computer display when you close it.
• Never place the computer on uneven surfaces.
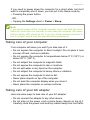
Taking care of your AC adapter
Here are some ways to take care of your AC adapter:
• Do not connect the adapter to any other device.
• Do not step on the power cord or place heavy objects on top of it.
Carefully route the power cord and any cables away from foot traffic.
Note
If you cannot power off the computer normally, press and hold the power
button for more than four seconds to shut down the computer (the power
button’s battery LED should be off). If you turn off the computer and want to
turn it on again, wait at least two seconds before powering up.

8 - First things first
• When unplugging the power cord, do not pull on the cord itself but
pull on the plug.
• The total ampere ratings of the equipment plugged in should not
exceed the ampere rating of the cord if you are using an extension
cord. Also, the total current rating of all equipment plugged into a
single wall outlet should not exceed the fuse rating.
Cleaning and servicing
When cleaning the computer, follow these steps:
1. Turn off the computer.
2. Disconnect the AC adapter.
3. Use a soft, moist cloth. Do not use liquid or aerosol cleaners.
If either of the following occurs:
• The computer has been dropped or the body has been damaged;
• The computer does not operate normally.
Please refer to Frequently asked questions on page 64.

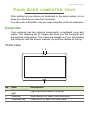
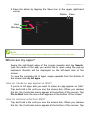
Your Acer computer tour - 9
YOUR ACER COMPUTER TOUR
After setting up your device as illustrated in the setup poster, let us
show you around your new Acer computer.
You can enter information into you new computer via the touchscreen.
Computer
Your computer has two optional components: a keyboard cover and
cradle. The following set of images will show you the computer and
the optional components. The views are labeled as if you are holding
the computer with the screen towards you and the camera at the top.
Front view
3
1
2
No. Item Description
1
Camera indicator
lig
ht
Lights up when camera is active.
2 Webcam Web camera for video communication.
3 Windows key Press once to open the Start menu.

10 - Your Acer computer tour
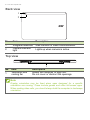
Back view
No. Item Description
1 Integrated webcam Web camera for video communication.
2
Camera indicator
light
Lights up when camera is active.
1
2
Top view
1
No. Item Description
1
Ventilation and
co
oling fan
Allows the computer to stay cool.
Do not cover or obstruct the openings.
Note
Display orientation may be fixed when apps designed for a specific
orientation are running. These include games and other full-screen apps.
When making video calls, you should always hold the computer in landscape
orientation.

Your Acer computer tour - 11
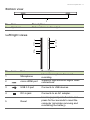
Bottom view
1
No. Item Description
1 Speakers Deliver stereo audio output.
Left/right views
2
3
4
6
7
8
1
5
No. Icon Item Description
1 Microphone
Internal microphone for sound
recording.
2
micro HDMI port
Supports high-definition digital video
conn
ections.
3
USB 3.0 port Connects to USB devices.
4
DC-in jack Connects to an AC adapter.
5 Reset
Insert a paperclip into the hole and
press for fo
ur seconds to reset the
computer (simulates removing and
reinstalling the battery).

12 - Your Acer computer tour
Information on USB 3.0
• USB 3.0 compatible ports are blue.
• Compatible with USB 3.0 and earlier USB devices.
• For optimal performance, use USB 3.0-certified devices.
• Defined by the USB 3.0 (SuperSpeed USB) specification.
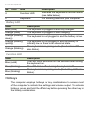
LED Indicators
LED color State Description
Blue Steady The computer is fully charged and plugged in.
Blue On briefly
The computer is fully charged and running on
ba
ttery power.
After pressing the power button, the blue LED
st
ays lit for a few seconds before turning off.
Amber Steady The computer is charging and plugged in.
Amber On briefly
The computer is not fully charged and running on
ba
ttery power.
After pressing the power button, the amber LED
st
ays lit for a few seconds before turning off.
Amber Blinking
The battery is critically low or abnormal battery
situat
ion.
Off The computer is off.
6
Headset/speaker
jack
Connects to audio devices
(e.g., speakers, headphones) or a
headset with
microphone.
7
Power button
Press to turn the computer on; press
again
to place the computer in Sleep
mode. Press and hold to turn the
computer off.
Battery LED
Indicates the computer's battery status.
Se
e table below.
8
+ / -
Volume key
Press to increase or decrease volume.
No. Icon Item Description

Your Acer computer tour - 13
Environment
• Temperature:
• Operating: 5 °C to 35 °C
• Non-operating: -20 °C to 65 °C
• Humidity (non-condensing):
• Operating: 20% to 80%
• Non-operating: 20% to 80%
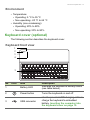
Keyboard cover (optional)
The following section describes the keyboard cover.
Keyboard front view
2
3
5
1
4
No. Icon Item Description
1 Battery LED
Indicates the keyboard’s battery status
(see t
able below).
2
Power button Turns the keyboard on and off.
3
USB connector
Use the provided USB charging cable to
charge
the keyboard’s embedded
battery. Inserting the computer into
the keyboard cover on page 15.

14 - Your Acer computer tour
Battery LED
State Description
Blue (solid) The keyboard is plugged in and fully charged.
Orange (solid) The keyboard is plugged in and charging.
Orange (blinking
sl
owly)
The keyboard is not plugged in and the battery is low.
Orange (blinking
quickly)
The keyboard is not plugged in and the battery is
critically low or the
re is an abnormal state.
Orange (blinking)
The keyboard is in pairing mode (the function LED
al
so blinks).
Function LED
State Description
Blue (solid)
The LED turns solid blue for five seconds after turning
th
e keyboard on.
Blue (blinking) The LED blinks after turning the keyboard off.
Blue (blinking)
The keyboard is in pairing mode (the battery LED also
blinks).
Hotkeys
The computer employs hotkeys or key combinations to access most
of the computer's controls like settings and volume output. To activate
hotkeys, press and hold the <Fn> key before pressing the other key in
the hotkey combination.
4 Function LED
Indicates the keyboard’s function status
(see t
able below).
5 Keyboard For entering data into your computer.
No. Icon Item Description

Your Acer computer tour - 15
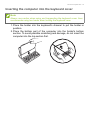
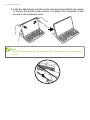
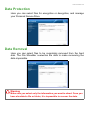
Inserting the computer into the keyboard cover
1. Place the holder into the keyboard's channel to put the holder in
position.
2. Place the bottom part of the computer into the holder's bottom
section. To avoid possible scratching and damage, do not insert the
computer into the top section first.
Note
Always use caution when using and transporting the keyboard cover. Acer
recommends using two hands when holding the keyboard case.

16 - Your Acer computer tour
3. Lean the tablet back into the holder and press the tablet's top edges
to ensure the holder’s tabs secure it in place.The computer is now
secure in the keyboard cover.
Note
To avoid possible damage, do not carry the holder with the computer facing
outside.

Your Acer computer tour - 17
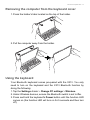
Removing the computer from the keyboard cover
1. Press the holder’s tabs located on the top of the holder.
2. Pull the computer away from the holder.
Using the keyboard
Your Bluetooth keyboard comes pre-paired with the X313. You only
need to turn on the keyboard and the X313 Bluetooth function by
doing the following:
1. Tap the Settings charm > Change PC settings > Wireless.
2. Under Wireless devices, ensure the Bluetooth switch is set to On.
3. Press and hold the keyboard's Power button until the function LED
comes on (the function LED will turn on for 5 seconds and then turn
off).

18 - Your Acer computer tour
4. To turn off the keyboard, press and hold the keyboard's Power
button until the function LED blinks. Release the Power button.
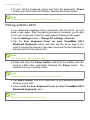
Pairing with the X313
If your Bluetooth keyboard loses connection with the X313, you will
need to pair again. After the pairing process is complete, you're able
to turn your keyboard off and on again without having to pair again.
1. Tap the Settings charm > Change PC settings > Devices
2. Tap the Acer Keyboard Cover (or Acer TravelMate X313
Bluetooth Keyboard) option and then tap the minus sign to the
right to remove the device (it may take a moment for the keyboard to
be removed from the device list.)
3. Press and hold the Power button until both the battery and the
function LEDs blink repeatedly. Release the Power button. The
keyboard is now in pairing mode.
4. Tap Add a device. The X313 searches for any available Bluetooth
devices to pair with.
5. Once it finds the Acer Keyboard Cover (or Acer TravelMate X313
Bluetooth Keyboard), tap it.
Note
To save power, turn the keyboard off when not in use.
Note
The name of the keyboard may vary.
Note
The keyboard stays in pairing mode for three minutes.
Note
The name of the keyboard may vary.

Your Acer computer tour - 19
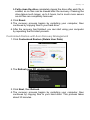
6. The screen now displays a six-digit passcode. Using the keyboard,
enter the passcode and press Enter.
7. Once pairing is complete, the function LED will stop blinking.
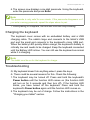
Charging the keyboard
The keyboard cover comes with an embedded battery and a USB
charging cable. The cable's large end connects to the tablet's USB
port and the small end connects to the keyboard's micro USB port.
When the battery LED quickly blinks orange, the keyboard's battery is
critically low and needs to be charged. Keep the keyboard connected
until the Battery LED is blue. You can still use the keyboard as normal
while it is charging.
Troubleshooting
Q: My keyboard doesn't do anything when I press the keys.
A: There could be several reasons for this. Check the following:
1. The keyboard may be turned off. Press and hold the keyboard's
Power button until the function LED comes on (the function LED
will turn on for 5 seconds and then turn off). If the function LED
blinks, you have turned off the keyboard. Press and hold the
keyboard's Power button again until the function LED comes on.
2. The keyboard may be out of charge. Follow the instructions in the
"Charging your tablet" section.
Note
The passcode is only valid for one minute. If the passcode disappears or if
you enter a wrong passcode, repeat the steps above to pair.
Note
The tablet must be on for the keyboard to charge.

20 - Your Acer computer tour
Cradle (optional)
The following set of images show you the cradle.
Front view
2
3
1
No. Icon Item Description
1
Card reader
Accepts one Secure Digital (SD) card.
Note: Pu
sh to remove/install the card.
2
USB connector Connects to the computer’s USB port.
3
DC-out jack
Provides power from the cradle to the
comp
uter.
Note
The cradle needs to be plugged into an AC power source.
Page is loading ...
Page is loading ...
Page is loading ...
Page is loading ...
Page is loading ...
Page is loading ...
Page is loading ...
Page is loading ...
Page is loading ...
Page is loading ...
Page is loading ...
Page is loading ...
Page is loading ...
Page is loading ...
Page is loading ...
Page is loading ...
Page is loading ...
Page is loading ...
Page is loading ...
Page is loading ...
Page is loading ...
Page is loading ...
Page is loading ...
Page is loading ...
Page is loading ...
Page is loading ...
Page is loading ...
Page is loading ...
Page is loading ...
Page is loading ...
Page is loading ...
Page is loading ...
Page is loading ...
Page is loading ...
Page is loading ...
Page is loading ...
Page is loading ...
Page is loading ...
Page is loading ...
Page is loading ...
Page is loading ...
Page is loading ...
Page is loading ...
Page is loading ...
Page is loading ...
Page is loading ...
Page is loading ...
Page is loading ...
Page is loading ...
Page is loading ...
Page is loading ...
Page is loading ...
Page is loading ...
Page is loading ...
Page is loading ...
Page is loading ...
Page is loading ...
Page is loading ...
Page is loading ...
Page is loading ...
Page is loading ...
Page is loading ...
Page is loading ...
Page is loading ...
Page is loading ...
-
 1
1
-
 2
2
-
 3
3
-
 4
4
-
 5
5
-
 6
6
-
 7
7
-
 8
8
-
 9
9
-
 10
10
-
 11
11
-
 12
12
-
 13
13
-
 14
14
-
 15
15
-
 16
16
-
 17
17
-
 18
18
-
 19
19
-
 20
20
-
 21
21
-
 22
22
-
 23
23
-
 24
24
-
 25
25
-
 26
26
-
 27
27
-
 28
28
-
 29
29
-
 30
30
-
 31
31
-
 32
32
-
 33
33
-
 34
34
-
 35
35
-
 36
36
-
 37
37
-
 38
38
-
 39
39
-
 40
40
-
 41
41
-
 42
42
-
 43
43
-
 44
44
-
 45
45
-
 46
46
-
 47
47
-
 48
48
-
 49
49
-
 50
50
-
 51
51
-
 52
52
-
 53
53
-
 54
54
-
 55
55
-
 56
56
-
 57
57
-
 58
58
-
 59
59
-
 60
60
-
 61
61
-
 62
62
-
 63
63
-
 64
64
-
 65
65
-
 66
66
-
 67
67
-
 68
68
-
 69
69
-
 70
70
-
 71
71
-
 72
72
-
 73
73
-
 74
74
-
 75
75
-
 76
76
-
 77
77
-
 78
78
-
 79
79
-
 80
80
-
 81
81
-
 82
82
-
 83
83
-
 84
84
-
 85
85


Acer TravelMate X313-E User manual
- Category
- Notebooks
- Type
- User manual
- This manual is also suitable for
Ask a question and I''ll find the answer in the document
Finding information in a document is now easier with AI
Related papers
-
Acer AL2032 User manual
-
Acer Aspire ZC-106 Installation guide
-
Acer W4-820 User manual
-
Acer Iconia W4-820 Operating instructions
-
-
Acer Aspire ZC-605 User manual
-
-
Acer Veriton Z4810G User manual
-
Acer Aspire Z24-880 User manual
-
Acer Aspire C22-820 User manual
Other documents
-
ENERMAX Acrylux User manual
-
Lenovo IdeaPad P580 User manual
-
Packard Bell iMedia xx.UAV User manual
-
Sony SVD-1122 Series Windows 8.1 Owner's manual
-
-
Sony SVD11223CXB Owner's manual
-
-
Sony VAIO SVL24125CXB Owner's manual
-
Sony VAIO SVD112190X Owner's manual
-