Olympus C2100 Ultra Zoom Owner's manual
- Category
- Camcorders
- Type
- Owner's manual
This manual is also suitable for
Page is loading ...

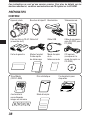
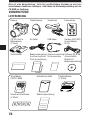
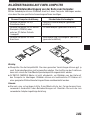
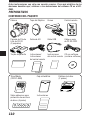
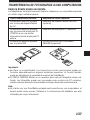
Camera Lens cap Strap Remote control
CR-V3 lithium A/V cable USB cable RS-232C PC
battery (2 packs) serial cable
Warranty card Instructions Remote control Software CD’s
(concise version)/ instructions (including
Quick Start Guide instructions
on CD-ROM)
2
GETTING STARTED
PACKAGE CONTENTS
SmartMedia Static-free case Index labels
(SSFDC-8MB) (2 pieces)
Write-protect adhesive Instructions
seals (4 pieces)
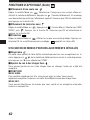
These instructions are only a concise version. For more details on the functions
described here, refer to the software CD’s instructions on CD-ROM
.

3
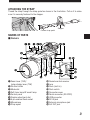
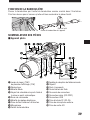
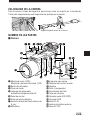
NAMES OF PARTS
1
9
8
0
!
#
@
9
% ^
&
*
(
$
2 3 4 5 6 7
1 Zoom lever (T/W)/
Index-display lever (T/W)
2 Shutter button
3 Mode dial
4 Self-timer lamp/AF assist lamp
5 Control panel
6 Diopter adjustment dial
7 5-pin external flash socket
8 Microphone
9 Strap eyelet
0 Remote control receiver
! Lens
@ Flash (built-in)
# Flash switch
$ Connector cover
% Serial connector (RS-232C)
^ USB connector
& DC-IN jack
* External microphone jack
( A/V OUT jack
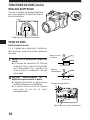
m Camera
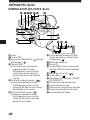
ATTACHING THE STRAP
Thread the strap through the strap eyelet as shown in the illustration. Pull on it to make
sure it is securely fastened to the stopper.
Stopper
Camera strap eyelet

4
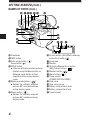
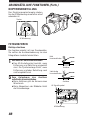
NAMES OF PARTS (Cont.)
) Viewfinder
q INFO button
w Flash mode button ( )/
Erase button ( )
e DRIVE button
● Returns vertically-oriented pictures
rotated using the Macro button or
Metering mode button to their
original position during display
mode.
r Metering mode button ( )
● Rotates the vertically-oriented
pictures 90° counterclockwise
during display mode.
t Macro button ( )
● Rotates the vertically-oriented
pictures 90° clockwise during
display mode.
y AE lock button (AEL)/Multi-metering
button/Print button( )
u Arrow pad
i Monitor
o OK button/Manual focus button
(MF)/Protect button ( )
p Monitor button ( )
Q Menu button ( )
W Power switch
(POWER OFF/ON/ RESET)
E Card cover
R Card access lamp
T Battery compartment cover
Y Battery compartment lock
U Tripod socket
)
i
u
o
p
Q
R
T Y U
q w e r t y
W
E
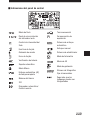
GETTING STARTED (Cont.)

5
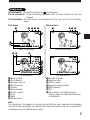
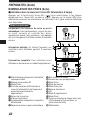
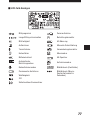
m Control panel indications
Flash mode
Slow shutter
synchronization flash
Flash intensity control
Card writing
Sound record
Card error
Battery check
Auto bracket
Macro mode
Full-time AF
White balance
ISO
Self-timer/Remote control
Sequential shooting
Exposure compensation
AF system
Manual focus
Stabilization system
Metering mode
AE memory
Record mode
Number of storable still
pictures
Seconds remaining in movie
mode

6
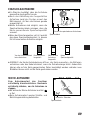
NAMES OF PARTS (Cont.)
m
Viewfinder/Monitor indications (Picture information)
Press the Monitor button ( ) to select whether images appear on the Monitor or in
the viewfinder. Press the INFO button to select how much information is displayed. The
following 3 types of display are available.
1 Flash stand-by/Jitter warning/flash
charge
2 AF confirmation mark
3 Shooting mode
4 Battery check (displayed after the
camera is turned on and when
warnings appear)
5 Aperture value
6 Shutter speed
7 Exposure compensation/ Exposure
differential
8 AF target mark
9 Memory gauge
0 Number of storable pictures
! Drive mode
@ Metering mode
# Macro mode
$ White balance
% ISO
^ Record mode
& Flash mode
* Slow shutter synchronization flash
(not displayed when the flash is in the
flash override mode)
( Stabilization system
F2.8 1/800
+
2.0 P
2
8
3
4
1
5
6 7
9
0
F2.8 1/800
+
2.0
ISO100
SQ
P
SLOW1
!
@
#
$
%
^
&
*
(
Record mode
Only the AF target mark: Warnings (AF correct
mark and battery check) appear when required.
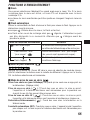
Settings that are changed are displayed for approx.
2 seconds.
Partial information: When using the camera, these
indications are displayed for approx. 2 seconds.
Full information: These indications are displayed
constantly in the Record mode.
GETTING STARTED (Cont.)

7
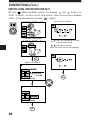
Display mode
No information: Only battery check and are displayed.
Partial information: These indications disappear after a certain amount of time has
elapsed.
Full information: All indications are displayed all the time while in the Display
mode.
Still picture
Partial information
345623.12.
,
00 21:56
HQ
x10
1
2 43 5
6
7
8
9
1 Battery check
2 Print reserve
3 Number of prints
4 Sound record
5 Protect
6 Record mode
7 Frame number
8 Time
9 Date
0 Movie picture
! Number of pixels
@ Aperture value
# Shutter speed
$ Exposure compensation
% White balance
^ ISO
& File number (In the Movie picture
display mode, the total recording time
is displayed.)
Movie picture
FILE:123-3456
HQ
SIZE: 1600x1200
F2.8 1/800 2.0
ISO400
23.12.
,
00 21:56
x10
!
$
@9 #
%
^
8
&
Full information
Partial information
3456
HQ
1
0 54
6
7
FILE: 123-3456
HQ
SIZE: 320x240
!
&
Full information
Note:
The indications that appear on a movie picture that has been selected and displayed
from the thumbnail display are different from those that appear when the movie picture
is displayed using the Movie play function.

8
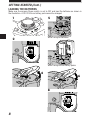
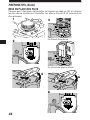
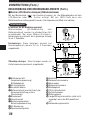
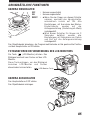
LOADING THE BATTERIES
Make sure the camera Power switch is set to OFF and load the batteries as shown in
the illustration. A CR-V3 lithium battery pack cannot be charged.
1
3
2
When using lithium battery packs
5
When using AA batteries
6
8
4
7
GETTING STARTED (Cont.)

9
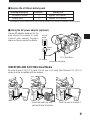
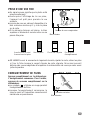
m Service life of lithium battery pack
Shooting/Displaying Condition Battery life
Number of photos
1
Approx. 200 frames
Display time
2
Approx. 330 minutes
* These figures are for reference only and are not guaranteed.Tests based on conditions set by Olympus.
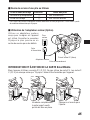
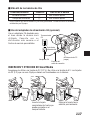
m Using the AC power adapter (optional)
Use an AC adapter designed for the
area where the camera is used.
Consult your nearest Olympus
dealer or Service center for details.
Power
plug
Connection cord plug
AC adapter
AC wall
outlet
DC-In jack (Black)
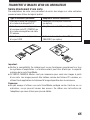
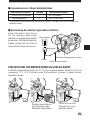
INSERTING AND EJECTING SmartMedia
Be sure to use a 3V (3.3 V) card. Do not use a 5 V card. Non-Olympus 3 V (3.3 V)
cards must be formatted with the camera.
Push the card in to eject it.
Insert the card fully until
you feel it lock into place.

10
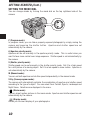
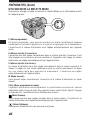
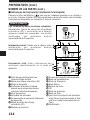
SETTING THE MODE DIAL
You can change modes by turning the mode dial on the top righthand side of the
camera.
P (Program mode):
In program mode, you can take a properly exposed photograph by simply aiming the
camera and pressing the shutter button. Aperture and shutter speed are set
automatically by the camera.
A (Aperture priority mode):
Aperture can be set manually in the aperture priority mode. This is useful when you
want to have more control over image exposure. Shutter speed is set automatically by
the camera.
S (Shutter priority mode):
Shutter speed can be set manually in the shutter priority mode. Set it to a high speed
for a still picture of a moving object. Set it to a low speed to show motion. Aperture is
set automatically by the camera.
M (Manual mode):
You can set both aperture and shutter speed independently in the manual mode.
S-Prg (Scene program mode):
The camera will automatically optimize the combination of aperture and shutter speed
according to the type of subject. You can select from Portrait, Sports, Landscape and
Night Scene. Selections are displayed in the menu.
(Movie mode):
You can shoot motion pictures in the movie mode. Aperture and shutter speed are set
automatically by the camera.
(Display mode):
Allows you to view a display of your photographs.
M
O
D
E
D
I
A
L
S
M
S-Prg
A
P
GETTING STARTED (Cont.)

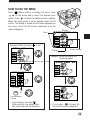
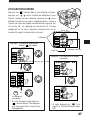
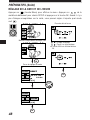
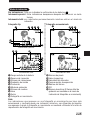
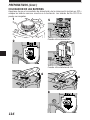
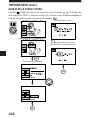
HOW TO USE THE MENU
11
Press (Menu button) to display the menu, press
on the Arrow pad to select the desired menu
option. Press to select the additional menu options.
When the menu option is set as desired, press the OK
button. The setting is stored and the frame reappears on
the menu. Press the OK button repeatedly until the
menu disappears.
[
1/5
]
F2.8 1/800 0.0 P
OFF
ISO
WB
ON
AUTO
AUTO
DIGITAL
ZOOM
Monitor
Scroll
Current settings
1/5 page
[
1/5
]
F2.8 1/800 0.0 P
OFF
ISO
WB
ON
AUTO
AUTO
DIGITAL
ZOOM
Example: When the white is set
[
1/5
]
F2.8 1/800 0.0 P
ISO
WB
DIGITAL
ZOOM
AUTO
To set up
OK
or
The adjustment
is saved.
• If you finish by pressing
(Menu button), any adjustments
you have made will not be saved.
[
1/5
]
F2.8 1/800 0.0 P
OFF
ISO
WB
ON
AUTO
AUTO
DIGITAL
ZOOM
Example: When moving to the
following pages
[
2/5
]
F2.8 1/800 0.0 P
SLOW
MULTI
METERING
OFF
OFF
1.0 x3
O
BKT
• If you press at page 1/5,
the monitor displays page 5/5.

[
1/5
]
F2.8 1/800 0.0 P
OFF
ISO
WB
ON
AUTO
AUTO
DIGITAL
ZOOM
12
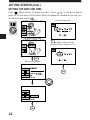
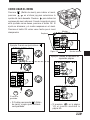
SETTING THE DATE AND TIME
Press (Menu button) to display the menu. Press on the Arrow pad to
select SETUP and press the OK button. When no images are recorded on the card, you
can set any mode except .
SETUP
[
5/5
]
F2.8 1/800 0.0 A
MODE
SETUP
S-Prg
[
3 / 3
]
m /f t m
RESET
FILE NAME
2 3 . 1 2 . ’ 0 0
1 2 : 3 4
Mode setting screen
[
3/3
]
m/ft
FILE NAME
SETUP
Still picture record menu
OK
OK
Date and time screen
: Changes the setting.
: Moves to other settings.
●The year 2000 is displayed as ’00.
OK
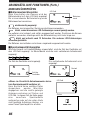
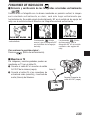
GETTING STARTED (Cont.)

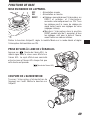
Press (Moniter button). The same sign
on the finder will be displayed on the monitor.
The displayed subject will switch between the
viewfinder and monitor each time you press
this button.
13
BASIC FUNCTIONS
TURN THE POWER ON
OFF : Power off
ON : Power on
RESET : ● Move the switch to reset momentarily and
then release, and the power switch will
automatically move back to ON. All
settings except the mode setting menu
will be reset to the factory-preset (initial
settings).
● Hold the switch in the reset position for
over 3 seconds, and all settings, except for
the date and time, will be reset to the initial
settings.
Remove the lens cap, set the Mode dial to the desired mode and set the Power switch
to ON.
(Monitor button)
TAKING PICTURES WHILE USING THE MONITOR
TURN OFF THE POWER
Turn the camera's power switch off.
Put on the lens cap.

14
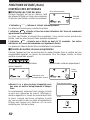
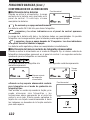
BASIC FUNCTIONS (Cont.)
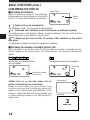
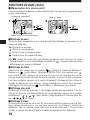
CONFIRMING THE DISPLAY
m Checking the batteries
When the power is turned on, the remaining
battery power will be displayed on the control
panel. If it is low, please replace the batteries.
Battery
check
Control panel
lights and turns off automatically.
The batteries are OK. You are ready to take pictures.
blinks and other indicators on the control panel are displayed normally.
The battery power is low and the batteries should be replaced. You can shoot with the
remaining power, but the batteries may die soon.
blinks and then turns off after 12 seconds. Other indicators on the control
also go out.
The batteries are dead and should be replaced immediately.
m Checking the number of storable pictures left
When the power is turned on in the still picture mode, the number of storable pictures
left will appear on the control panel. For movie pictures, the seconds remaining will
appear.
The number of storable pictures The seconds remaining will appear.
left will appear.
● When there is no storable space left for
pictures in the still picture record mode :
Beeps will emit when the card cannot store
anymore pictures and the displays below will
appear on the control panel and viewfinder. If this
happens, replace the card with a new/storable card
or erase unwanted images in the existing card to
make space.
Number of storable
pictures left
Remaining
time
Control panel
CARD FULL
Viewfinder

15
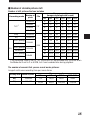
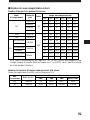
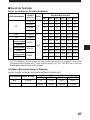
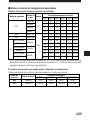
m Number of storable pictures left
Number of still pictures that can be taken
Recording mode
Number of
pixels
Memory capacity
(Image only/Image with sound)
File
2MB 4MB 8MB 16MB 32MB 64MB
0/–
0/–
0/–
2/–
1/1
4/3
2/2
6/5
3/3
9/8
8/7
21/15
1600x1200
1280x960
1024x768
640x480
1600x1200
1600x1200
1280x960
0/–
1/–
1/–
4/–
2/2
8/7
4/4
12/11
6/6
18/16
16/14
40/30
1/–
2/–
3/–
8/–
5/5
16/15
8/8
24/22
13/12
38/32
32/29
82/61
2/–
4/–
6/–
17/–
11/11
31/30
17/16
49/45
26/25
76/66
66/58
165/123
5/–
8/–
13/–
34/–
22/22
64/60
34/33
99/90
53/51
153/132
132/117
331/248
11/–
17/–
27/–
68/–
45/44
128/120
69/67
199/181
107/102
306/265
265/234
664/498
TIFF
*
SHQ
HQ
SQ
TIFF
JPEG
HIGH (quality)
NORMAL
HIGH (quality)
NORMAL
HIGH (quality)
NORMAL
1024x768
640x480
* If the recording mode is set to TIFF, sound will not be recorded with a picture when
the Mode dial is set to P or A/S/M, but it can be added later during playback.
The number of seconds that you can record movie pictures:
Longest continuous recording time per movie frame
Recording mode Number of pixels
Memory capacity
2MB 4MB 8MB 16MB OVER
7/6
31/26
320x240
160x120
14/13
62/53
28/27
126/109
43/42
174/158
SQ
HQ

16
BASIC FUNCTIONS (Cont.)
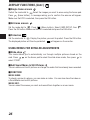
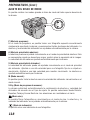
ADJUSTING THE DIOPTER
Turn the Diopter adjustment dial to see
the AF target mark clearly.
Viewfinder
P F2.8 1/30 0.0
AF target mark
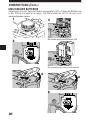
TAKING PICTURES
Proper shutter release
There are 2 steps when releasing the shutter.
Practice well before actually taking photos.
1
Press the shutter button halfway.
● The AF confirmation mark will light
when the focus and exposure are
locked. It will blink if the focus or
exposure are not locked.
2
Press the shutter button fully to release
the shutter and take a picture.
● The camera emits a beep when the
shutter is released.
● The card access lamp blinks while the
picture is being recorded.
Press halfway
Shutter button
Press fully
Shutter button
P F2.8 1/30 0.0
AF confirmation mark
AF target mark

17
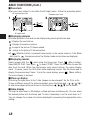
WHEN TAKING A STILL PICTURE
●A beep means that the photograph was
taken successfully.
●Soon after displaying the picture just taken,
the viewfinder will again show the area it is
being aimed at.
●Continuous shooting is available if the
memory gauge shows there is space in the
card.
●When the memory gauge is full, the upper
block will light up and no more pictures can
be taken.
P F2.8 1/30 0.0
Number of storable pictures
Memory gauge
One picture
taken
No recordable
space
More than one
taken
● NEVER open the card cover, eject the card, remove the batteries, or pull the plug
when the card access lamp is blinking. Doing so could destroy stored pictures and
prevent storage of pictures you have just taken.
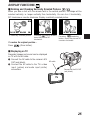
RECORDING MOVIES
Press the shutter button fully. Recording will
start. To stop recording, press the shutter
button fully again.
●The mark will light up in red while
shooting movies.
●When recording starts, correct focusing and
exposure is maintained continuously.
F2.8 1/30 0.0
Seconds remaining
Memory gauge
Before shooting/
No picture taken

18
BASIC FUNCTIONS (Cont.)
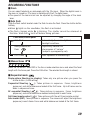
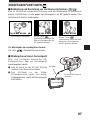
m Displaying pictures
All stored pictures in the card can be displayed by pressing the Arrow pad.
: Displays the next picture.
: Displays the previous picture.
: Jumps to the picture 10 frames ahead.
: Jumps to the picture 10 frames behind.
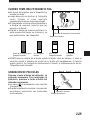
●If (Monitor button) is pressed twice quickly in the record mode or if the Mode
dial is set to , the camera enters the Display mode and pictures are displayed.
m Displaying movies
Select images with the mark using the Arrow pad. Press (Menu button).
Select MOVIE PLAY, then press to select START. Press the OK button to read the
data from the card. When the card access lamp stops blinking, the movie display
starts. To pause, press the OK button while displaying movies. Use the Arrow pad to
display the previous/next frame. To end the movie display, press (Menu button).
The menu display is restored.
m Close-up display
By moving the zoom lever to the T side, images can be enlarged 1.5x, 2x, 2.5x, or 3x.
To see a different area of the picture enlarged, press the Arrow pad ( / / / )
to slide the enlarged picture and view in the directions § / ©/
¶
/Ä on the screen.
m Index display
Turning the zoom lever to W displays multiple pictures simultaneously. You can select
the desired picture with the Arrow pad. To view it separately, turn the zoom lever to T.
You can change the number of pictures displayed by accessing the appropriate menu
setting.
m Focus lock
When your main subject is not within the AF target marks , follow the procedure below.
AF confirmation mark
P F2.8 1/800 0.0
AF target mark
P F2.8 1/800 0.0
1
2
Compose your shot.

19
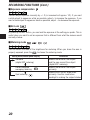
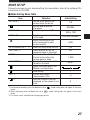
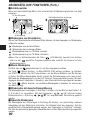
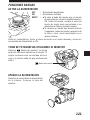
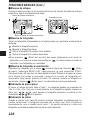
RECORDING FUNCTIONS
m Zoom
You can select telephoto or wide-angle with the 10x zoom. When the digital zoom in
the menu is turned on, 27x zoom is available with the 2.7x digital zoom.
●The speed of the zoom-in/out can be adjusted by changing the angle of the zoom
lever.
m
Auto flash
Slide the flash switch located under the flash to raise the flash. Press the shutter button
halfway.
●When lights on the viewfinder, the flash is activated.
●The flash charges while is blinking. The shutter cannot be released at
this time. Wait until turns off before taking pictures.
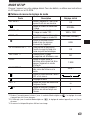
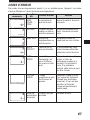
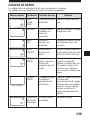
Flash mode/Control panel Use
Auto-Flash Automatically fires in low-light and
backlight conditions.
Red-Eye Reduction Significantly reduces the
Flash phenomenon of “red-eye”
(subject’s eyes appearing red).
Fill-In Flash Fires regardless of available light.
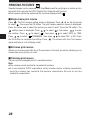
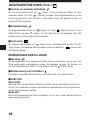
m Manual focus
Press the OK button. Select MF in the focus mode selection menu and select the focal
length with the Arrow pad. Press the OK button. The selected focal length is stored.
m Sequential mode
Single-picture Shooting (no display): Takes only one picture when you press the
shutter button. (Initial setting)
Sequential Shooting ( ): Takes pictures in sequence. Focus, brightness
(exposure), and white balance are locked at the first frame. Up to 5 frames can be
taken in sequence at once.
AF sequential Shooting ( ): Takes pictures in sequence. Focus, brightness
(exposure), and white balance are metered and adjusted in each frame.
Self-timer/remote-control ( ): Takes pictures with the self-timer/remote-control.
Auto bracket (BKT): Takes pictures in sequence. The camera will adjust the brightness
(exposure) in each frame. Focus and white balance are locked at the first frame.

20
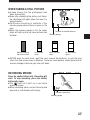
RECORDING FUNCTIONS (Cont.)
m Exposure compensation
You can adjust exposure manually by +/– 2 (in increments of approx. 1/3). If you want
a white object to appear as white as possible, adjust + to increase the exposure. If you
want a black object to appear as black as possible, adjust – to decrease the exposure.
m AE Lock
By pressing the AEL button, you can lock the exposure at the setting you prefer. This is
useful when you want to set an exposure that is different from what the camera would
normally choose.
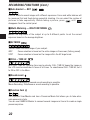
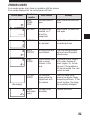
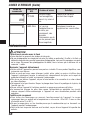
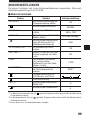
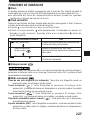
m Metering mode
You can select the area of the brightness for metering. When you know the area is
properly exposed, press the to choose the metering mode.
Setting mode/Control panel display
Functions
Standard Meters the center of the subject
(digital ESP metering) and the area around the subject
(digital ESP metering)
Center-weighted Meters the center of the subject
averaging metering primarily.
Meters within the AF target mark
Spot metering primarily. Use this mode when
backlight is making the subject darker.

21
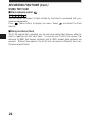
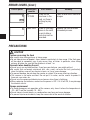
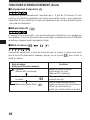
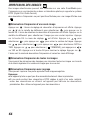
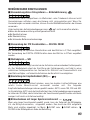
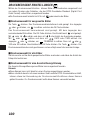
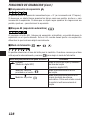
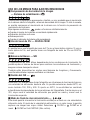
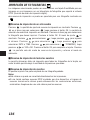
m Compensating for image blur — Stabilization system
When you take pictures with at wide-angle or telephoto, camera shake is more likely to
affect the picture, causing image blur. If this happens to you, you can compensate for
camera shake with the camera shake prevention feature.
Under some conditions, may not work effectively.
●When the camera angle is changed very quickly
●Night-view recording
●Overexposure
●When the battery indicator is blinking
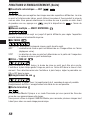
m Using the 27X zoom — DIGITAL ZOOM
You can take a 2.7X zoom photograph with the maximum optical zoom. If you use a
10X optical zoom, you can take an 27X zoom photograph with DIGITAL ZOOM.
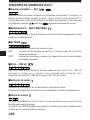
m White Balance — WB
Color reproduction differs depending on the lighting conditions. You can adjust the
white balance to match the lighting conditions and assure natural looking colors.
Settings for tungsten and fluorescent lights are also available, allowing you to get
better results indoors.
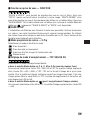
m Changing the ISO —
Increase the ISO when you want to take pictures in low-light situations with a fairly
high shutter speed. You can select from AUTO, as well as 100, 200 and 400. When you
set to AUTO, the sensitivity is automatically changed depending on the shooting
conditions. The higher the ISO, the faster the shutter speed that can be used and the
less light required.
m Slow synchronization flash mode —
This mode allows you to synchronize the light emitted by the flash with a slow shutter
speed. Setting the shutter speed to a lower value lets you capture a sharper image.
Select SLOW1 or SLOW2 on the menu. SLOW2 is 2nd-CURTAIN.
USING MENUS FOR DETAILED ADJUSTMENTS
Page is loading ...
Page is loading ...
Page is loading ...
Page is loading ...
Page is loading ...
Page is loading ...
Page is loading ...
Page is loading ...
Page is loading ...
Page is loading ...
Page is loading ...
Page is loading ...
Page is loading ...
Page is loading ...
Page is loading ...
Page is loading ...
Page is loading ...
Page is loading ...
Page is loading ...
Page is loading ...
Page is loading ...
Page is loading ...
Page is loading ...
Page is loading ...
Page is loading ...
Page is loading ...
Page is loading ...
Page is loading ...
Page is loading ...
Page is loading ...
Page is loading ...
Page is loading ...
Page is loading ...
Page is loading ...
Page is loading ...
Page is loading ...
Page is loading ...
Page is loading ...
Page is loading ...
Page is loading ...
Page is loading ...
Page is loading ...
Page is loading ...
Page is loading ...
Page is loading ...
Page is loading ...
Page is loading ...
Page is loading ...
Page is loading ...
Page is loading ...
Page is loading ...
Page is loading ...
Page is loading ...
Page is loading ...
Page is loading ...
Page is loading ...
Page is loading ...
Page is loading ...
Page is loading ...
Page is loading ...
Page is loading ...
Page is loading ...
Page is loading ...
Page is loading ...
Page is loading ...
Page is loading ...
Page is loading ...
Page is loading ...
Page is loading ...
Page is loading ...
Page is loading ...
Page is loading ...
Page is loading ...
Page is loading ...
Page is loading ...
Page is loading ...
Page is loading ...
Page is loading ...
Page is loading ...
Page is loading ...
Page is loading ...
Page is loading ...
Page is loading ...
Page is loading ...
Page is loading ...
Page is loading ...
Page is loading ...
Page is loading ...
Page is loading ...
Page is loading ...
Page is loading ...
Page is loading ...
Page is loading ...
Page is loading ...
Page is loading ...
Page is loading ...
Page is loading ...
Page is loading ...
Page is loading ...
Page is loading ...
Page is loading ...
Page is loading ...
Page is loading ...
Page is loading ...
Page is loading ...
Page is loading ...
Page is loading ...
Page is loading ...
Page is loading ...
Page is loading ...
Page is loading ...
Page is loading ...
Page is loading ...
Page is loading ...
Page is loading ...
Page is loading ...
Page is loading ...
Page is loading ...
Page is loading ...
Page is loading ...
Page is loading ...
Page is loading ...
Page is loading ...
Page is loading ...
Page is loading ...
-
 1
1
-
 2
2
-
 3
3
-
 4
4
-
 5
5
-
 6
6
-
 7
7
-
 8
8
-
 9
9
-
 10
10
-
 11
11
-
 12
12
-
 13
13
-
 14
14
-
 15
15
-
 16
16
-
 17
17
-
 18
18
-
 19
19
-
 20
20
-
 21
21
-
 22
22
-
 23
23
-
 24
24
-
 25
25
-
 26
26
-
 27
27
-
 28
28
-
 29
29
-
 30
30
-
 31
31
-
 32
32
-
 33
33
-
 34
34
-
 35
35
-
 36
36
-
 37
37
-
 38
38
-
 39
39
-
 40
40
-
 41
41
-
 42
42
-
 43
43
-
 44
44
-
 45
45
-
 46
46
-
 47
47
-
 48
48
-
 49
49
-
 50
50
-
 51
51
-
 52
52
-
 53
53
-
 54
54
-
 55
55
-
 56
56
-
 57
57
-
 58
58
-
 59
59
-
 60
60
-
 61
61
-
 62
62
-
 63
63
-
 64
64
-
 65
65
-
 66
66
-
 67
67
-
 68
68
-
 69
69
-
 70
70
-
 71
71
-
 72
72
-
 73
73
-
 74
74
-
 75
75
-
 76
76
-
 77
77
-
 78
78
-
 79
79
-
 80
80
-
 81
81
-
 82
82
-
 83
83
-
 84
84
-
 85
85
-
 86
86
-
 87
87
-
 88
88
-
 89
89
-
 90
90
-
 91
91
-
 92
92
-
 93
93
-
 94
94
-
 95
95
-
 96
96
-
 97
97
-
 98
98
-
 99
99
-
 100
100
-
 101
101
-
 102
102
-
 103
103
-
 104
104
-
 105
105
-
 106
106
-
 107
107
-
 108
108
-
 109
109
-
 110
110
-
 111
111
-
 112
112
-
 113
113
-
 114
114
-
 115
115
-
 116
116
-
 117
117
-
 118
118
-
 119
119
-
 120
120
-
 121
121
-
 122
122
-
 123
123
-
 124
124
-
 125
125
-
 126
126
-
 127
127
-
 128
128
-
 129
129
-
 130
130
-
 131
131
-
 132
132
-
 133
133
-
 134
134
-
 135
135
-
 136
136
-
 137
137
-
 138
138
-
 139
139
-
 140
140
-
 141
141
-
 142
142
-
 143
143
-
 144
144
-
 145
145
-
 146
146


Olympus C2100 Ultra Zoom Owner's manual
- Category
- Camcorders
- Type
- Owner's manual
- This manual is also suitable for
Ask a question and I''ll find the answer in the document
Finding information in a document is now easier with AI
in other languages
Related papers
-
Olympus C-60 User manual
-
-
-
-
-
-
-
-
 MF DIGITAL 5500 Series User manual
-

Other documents
-
Samsung LANDIAO M100 Quick start guide
-
-
iON FILM 2 SD User manual
-
-
Samsung SAMSUNG L110 User manual
-
Approx APPPD014GB Datasheet
-
-
Minolta DIMAGE G400 User manual
-
-