Page is loading ...

MODEL#: DTU40
OUTPUT: DPDT, Dry Contacts (Unpowered) all in one may also be used for SPST, SPDT, DPST
CONTACT RATINGS:
NO CONTACTS:
40 AMPS RESISTIVE @ 120-277 VAC, 60 Hz
30 AMPS INDUCTIVE @ 120-277 VAC
1HP, 30FLA, 90LRA @ 120 VAC
2HP, 20FLA, 60 LRA @ 240 VAC
30 AMPS BALLAST @ 120 VAC
20 AMPS BALLAST @ 277 VAC
15 AMPS TUNGSTEN @ 120 VAC
20 AMPS RESISTIVE @ 28 VDC
720 VA PILOT DUTY @ 120-240 VAC
30 AMPS MAX ABOVE 104°F
NC CONTACTS:
30 AMPS RESISTIVE @ 120-277 VAC, 60 Hz
15 AMPS INDUCTIVE @ 120-277 VAC
1/4HP, 12FLA, 30 LRA @ 120 VAC
1/2HP, 12FLA, 33 LRA @ 250 VAC
10 AMPS BALLAST @ 120-277 VAC
290 VA PILOT DUTY @ 125 VAC
360 VA PILOT DUTY @ 240 VAC
OPERATING TEMP: -31°F to 116°F (-35°C to +47°C) Relative Humidity is 10% to 95%
TIMER SUPPLY: 120/208-240/277VAC, 60Hz Detects voltage automatically
(NO DIP SWITCH SETTING REQUIRED)
POWER CONSUMPTION: 9VA Max @ 120VAC
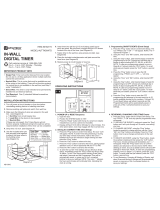
INSTALLATION & WIRING DIAGRAM
UNIT IS TO BE INSTALLED BY A LICENSED ELECTRICIAN
1. Mount the enclosure at eye level using screws or other suitable fastening device. Bring supply and
load wires in through bottom or side knockouts.
2. Wire as per typical wiring diagram below, and follow all local and NEC codes.
3. To ensure proper connection to the terminal block, turn the screw fully counterclockwise before
inserting wires. Firmly fasten the screw terminal
4. If the unit fails to respond within a few seconds, push the Reset button with an insulated tool.
The unit will display a flashing “12:00 A” along with the day (MO).
5. To set the time, press and hold the button.
6. Press the h+ button to set the time in hours, and press the m+ button to set the time in minutes.
Press the Day button to set the day of the week. When you’ve set the correct time, release the
button. The unit is now keeping time.
TO ADJUST DAYLIGHT SAVING TIME (TWICE A YEAR)
1. If you want to move the clock forward one hour, press both the h+ and m+ buttons
simultaneously. The DST segment on the LCD will become visible, to demonstrate that you are in
the Daylight Saving Time Mode.
2. To go back to the standard time in the fall, press the h+ and m+ buttons simultaneously again.
The DST segment on the LCD will turn off.
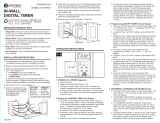
PROGRAMMING & OPERATING THE TIMER
PROGRAMMING
The DTU40 memory can hold up to 7 programs. Each program consists of 2 events, an ON time and
an OFF time. The events can be set up to execute on a daily basis or on a combination of days.
1. Press the Timer button.The display shows:
2. As in setting the time, you use the h+ and m+ buttons to set the time of day that the event will
occur. Press the Day button to select the day(s) of the week in which you would like the switch to
turn ON. Along with individual day schedules, you can also set the switch to operate on the following
schedules, in order: MO-SU, MO, TU, WE, TH, FR, SA,SU, MO-FR, SA-SU, MO-SA, MO+WE+FR,
TU+TH+SA MO-WE, TH-SA, and then back to all days.
3. Press the Timer button again. This will store the program, and allow you to program the OFF
event. The display will show the “Timer 1 OFF” and “ - - : - -”. Set the OFF time using the h+, m+,
and Day buttons as in Step 2. Pressing the Timer button will store this event, and allow you to
program the second ON event. You can program up to seven (7) ON and OFF events this way.
MANUAL OVERRIDE SWITCH
To manually override the load status: When not setting the time, or programming a schedule, press
the button: The load will change from ON to OFF, or from OFF to ON. The LCD display will change
to show the load is ON or OFF. The load will remain ON or OFF until the next scheduled event.
RANDOM ON/OFF TIMES
This feature allows you to change the actual switching times of previously programmed ON and OFF
events by up to 30 minutes before, or after their original programming. This gives your lights a
“lived-in” feel, providing added security.
1. To engage Random mode, press both the Day and h+ buttons simultaneously. The TIMER segment
on the LCD will blink, to demonstrate that you are in the Random Mode.
2. To go back to the regularly scheduled settings, press the Day and h+ buttons simultaneously
again. The TIMER segment on the LCD will no longer be displayed.
REVIEWING, EDITING OR DELETING PROGRAMS
To review all programs:
1. Press the Timer button. The LCD will display the first event, the “Timer 1 ON” event.
2. Each successive press of the Timer button will display the next program, alternating
ON and OFF schedules.
To Edit a program:
1. Use the Timer button until the LCD displays the schedule you want to edit.
2. Use the h+, m+ and Day buttons as earlier to change the desired time or day.
3. Press the Timer button to store the revised schedule and display the next.
To Delete a program:
There are two ways to prevent a program from happening; you can either erase it, or hide it. Use
the Timer button until the LCD displays the schedule you want to change.
(a) To erase a program:
Press the h+ button to advance the event time past 11PM will change the display to “--:--”.
(b) To hide a program:
Press the button: the LCD will display “--:--”. The unit will no longer switch the load at that
time. To reactivate the schedule, use the Timer button until the LCD displays the schedule section
that was hidden. Press the again. The earlier selected event time will reappear.
888.500.4598 • www.nsiindustries.com
UNIVERSAL MULTI-VOLTAGE
DIGITAL TIME SWITCH
Use copper wire AWG 8-18 suitable for 90°C. WIRING TO COMPLY WITH ALL LOCAL AND
NATIONAL ELECTRICAL CODES. Bonding between conduit connection is not automatic and must be
provided as part of the installation. THE ENCLOSURE MUST BE PROPERLY GROUNDED.
Minimum 10.6 lb. in. torque required at the
terminals to ensure proper connections.
Strip the supply and load wires to 1/2”.
LI-885(D)
PATENT PENDING
HN
LN
NC NO C
LN
LOAD
NC NO C
LN
Typical Wiring Diagram, 120/277 VAC Application
HN
L1 L2
NC NO C
L1
NC NO C
L2
Typical Wiring Diagram, 208/240 VAC Application
TIMER
SUPPLY
TIMER
SUPPLY
LOAD
LOAD
NSi Industries, LLC • USA • 888.500.4598 • www.nsiindustries.com
/