IMPORTANT:
• ALLINSTALLATIONWORKSHOULDBEDONEBYACCREDITEDPROFESSIONAL.
• SHUTOFFPOWERSUPPLYATFUSEORCIRCUITBREAKER!
• USEONLYTHESPECIFIEDBULBS.DONOTEXCEEDTHEMAXIMUMWATTAGE!
CONNECTING THE WIRES
Haveanassistantsupportthexture’sweightwhilecompletingthewiring.Cutaway
excesswire.Attachthexture’swirestothepowersupplywiresfromthejunctionbox.
Connectblacktosmooth/black/transparent(L)wire;whitetoribbed/white/transparent
(N)wire;groundtoground(greenorcopper).Twisttheendsofthewirepairstogether,
andthentwistonawireconnector.Makesurealltwistsareinthesamedirection.If
thereisnogroundwire(greenorcopper)fromthejunctionbox,locategroundscrewon
mountingstrap(A)andwrapthexture’sgroundwirearoundthegreengroundscrew.Use
ascrewdrivertosecuregroundscrewontothemountingbracket/mountingstrap.Tuckall
wiresneatlyintothejunctionbox.
For Customer Service, contact
the place of purchase.
AssemblyInstructions:3167-4P (Colson)
CLEANING TIPS
Treat the xture gently! Regular cleaning will reduce the need for deep cleaning. For regular cleaning, turn off the light and wipe down the
xture with a clean lint-free cotton or microber cloth. Never spray cleaner directly onto the xture.
PREPARING FOR INSTALLATION
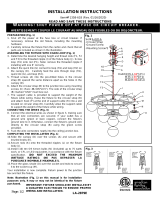
Carefullyremoveallofthecontentsfromthecarton.Seetheimportantnotesabove.Shut
offthepoweratthecircuitbreakerandcompletelyremovetheoldxturefromtheceiling,
includingtheoldmountingstrap.
Fromthepartsbagremovethemountingstrapassembly.Mountingstrap(A)contains
threadedholes.Twoofmountingscrews(C)shouldbeattachedtomountingstrap(A).You
mayneedtotightenthenutsthatholdthesescrewsinplace.Placemountingstrap(A)over
thejunctionboxsothatmountingscrews(C)arevertical,andinalignmentwiththehole
locationsonthexture’scanopy(D).Securemountingstrap(A)tothejunctionboxwith
mountingscrews(B)andascrewdriver.Tightenthescrewssecurely.
FINISHING THE INSTALLATION
Pushcanopy(D)uptotheceilingandtightlythreadnuts(E)ontotheexposedthreadsofmountingscrews(C).
Slidecandlesleeves(J)oversockets(K).Installthebulbs(I-notincluded)intosockets(K)inaccordancewiththexture’s
specications.Donotexceedthemaximumwattage.(Fig2):Shade(M)maybeincludedwiththexture.Iftheshadeisincluded,please
checktoseewhichside(toporbottomhastheacrylicclip(Q)attached.Placeshade(M)underthesphericalarms(L)ofthextureand
slidetheshadeupoverthearm.Aligntheclipsontothesphericalarms(L)andlowertheshadesothattheclipslandoneacharm.
Yourinstallationisnowcomplete.Turnonthepowerandtestthexture.
Fig 2
L
M
Q
ASSEMBLING THE FIXTURE
Foradjustingtheheightofxture,thisxture
contains:
Three12”rods(G)andone6”rod(F).Eachrodcan
beconnectedtoanotherbytwistingthethreaded
endofoneintotheoppositeendofanother.
Eachrodmayalsobeusedalonetoconnectthe
xturebodytotheswivel(H2)oncanopy(D).By
measuring,decidethedesiredoverallheightofyour
xtureanddeterminehowmanyrodsareneededto
achievethedesiredheight.Pushthexture’swires
througheachrod.Threadthebottomrodontopost
(H)ofthexture’sbody.Pullthewiresuntiltautand
thenconnecttherodstogetherasdescribedabove.
Ifthethetoprodcannotbethreadedintoswivel
(H2),pleaseusethehexagonwrench(H3)toloosen
screw(H4).
G1
G3
C
G2
I
J
K
N
O
A
B
F
D
E
P
H
L
M
H2
H4
H3
-
 1
1
Golden Lighting 3167-4P PW-PW Operating instructions
- Type
- Operating instructions
- This manual is also suitable for
Ask a question and I''ll find the answer in the document
Finding information in a document is now easier with AI
Related papers
-
Golden Lighting 4855-FM RBZ-SD Installation guide
-
Golden Lighting 6068-SF WG Installation guide
-
Golden Lighting 2618-5 CH Installation guide
-
Golden Lighting 2618-M1L EB Installation guide
-
Golden Lighting 2618-M1L CH Installation guide
-
Golden Lighting 9808-3P BLK Operating instructions
-
Golden Lighting 3604-M1L CH-RD Installation guide
-
Golden Lighting 3604-L PW-SF Installation guide
-
Golden Lighting 3285-4P GMT Installation guide
-
Golden Lighting 3118-M1L CH-OP Installation guide
Other documents
-
Minka Group 2332-77 User manual
-
 Minka Lavery 4025-679 User manual
-
 Minka Lavery 1064-699 User manual
-
American Lighting P1356-618 Alluria Pendant Light User manual
-
 George Kovacs P1358-618 User manual
-
George Kovacs P1359-618 User manual
-
ROOMS TO GO 90621294 Assembly Instructions
-
Minka Lavery 1054-691 User manual
-
aLora PL307912 User manual
-
Sharper Image Cordless LED Floor Lamp Owner's manual


