Page is loading ...

PEEL & STICK LUXURY VINYL TILE
PREPARARATION:
1. Why is acclimation necessary for my floor tiles and how long? Acclimation allows the solid vinyl flooring to become equal to
the installed environment. This will better allow the flooring to become more stable during normal temperature fluctuations.
All floors must be acclimated under normal site conditions and temperatures for 48 hours prior to installation. Ideal room
temperatures for luxury vinyl should be maintained at 65°F-85°F (19°C-29°C).
2. What subfloors are approved for peel & stick tiles and planks? Approved subfloors are
• Concrete
• Underlayment grade plywood
• Exterior grade plywood (sanded face, B-C or better grade)
• Properly prepared non-cushion backed vinyl flooring
• All subfloors must be clean, dry and free of contaminants such as oil, grease, paint, sealers, waxes, curing compounds,
excessive moisture, hydrostatic pressure.
• Floors must be structurally sound, rigid and flat to 3/16” in 10 feet (F-32).
3. Why not OSB, Luan or other subfloors? OSB, Luan, particle board, Masonite and other non-underlayment grade plywood are
generally not smooth and not constructed with exterior rated adhesives, making them susceptible to moisture related failures.
Additionally, these types of substrates may have a coating which is not compatible with floor adhesives (including peel and
stick adhesives) and will prevent a proper bond.
4. What if I go over existing vinyl / sheet vinyl / linoleum? Existing sheet goods are permitted provided they are non-cushioned
back, single layer floors. Sheet goods must be properly prepared with a suitable cementitious embossing leveler; following the
embossing leveler’s manufacturer directions regarding preparation of the surface and mixing with the appropriate additive.
5. What if the existing vinyl floor has texture? Use a cementitious embossing leveler to skim the surface of the textured floor.
Follow the embossing leveler’s manufacturer directions regarding preparation of the surface and mixing with the appropriate
additive.
6. Is a Primer necessary for peel and stick installation? No, primers are not necessary on the recommended subfloors in our
Installation Guides. If you want to use a primer, it MUST be a latex based specifically made for VINYL FLOORING.
7. How do I make some corners and edge stick back down that are lifting? Gently heat the area of the tile with a heat gun or a
common hair dryer on low setting. When the tile becomes pliable, simply press it back into place and then place some weights
on it overnight.
8. Can I install over a heated floor? Stainmasterâ luxury vinyl floors can be installed over radiant heated floors provided the
floor is NOT allowed to be heated of 85°F (29°C), or cooled below 55°F (13°C).
INSTALLATION:
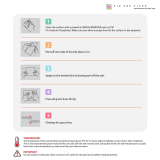
1. What are the arrows on the back of the release paper for? Directional arrows are for keeping the finish looking consistent
throughout the installation. Also used when laying tiles in a quarter-turned method giving a more random look.
2. Can I use “extra” adhesive with my peel and stick installation tiles? NO! Common latex-based flooring adhesives are not
compatible with Stainmasterâ peel and stick tiles. Use of a secondary adhesive may cause a plasticizer migration and will
cause an adhesive failure.
3. What type of tools do I need for installation? Commonly used tools for vinyl tile installation are; a utility knife with heavy duty
blades, 100lb 3 section roller, chalk line, measuring tape, broom, pencil, heat gun, speed square, wide putty knife, small trim
pull bar.
4. How much space is needed for expansion? Peel and stick luxury vinyl requires 1/8” expansion gap at all vertical surfaces it
meets.
5. Is a 100lb roller required and where can I get one? YES! Proper rolling with a 100lb 3 section roller will ensure proper pressure
is applied to the flooring for adhesives to bond to the substrate. Most equipment rental stores have these to rent by the day.
6. Where to start; from the center or from the corner of the room? Plank installations usually start from the upper, left corner
of the room while tile installations are started from the center point of the room.
7. How do cut round shapes or special cuts? Use a compass or or create a template with a piece of cardboard for special cuts
and draw your shape. Then carefully heat the tile with the heat gun or hair dryer on the lowest setting. When the tile is warm
and pliable, carefully use a utility knife with a sharp blade to cut the shape. Multiple passes will be best.
FREQUENTLY ASKED QUESTIONS

8. How do I remove adhesive from the joints and tops of the tiles? On peel and stick tiles, you will need to use mineral spirits.
Using a soft, white cloth, apply mineral spirits sparingly to the cloth first. Then gently dab the area on the tile with the cloth to
pull the adhesive up. Do not pour the mineral spirits on the tile or use the cloth in a rubbing motion as this may damage the
finish of the tile or lead to an adhesive failure.
9. How do I remove a damaged tile? Use a heat gun or hair dryer on the lowest setting and heat up the self-stick tile. This will
reactivate the adhesive and allow it to be pulled up using a putty knife. Be careful not to damage the adjoining tiles.
GROUTING:
1. Can I use other colors from other brands other than Blue Hawk? Yes. Any pre-mixed, synthetic adhesive-type grout can be
used on Stainmasterâ luxury vinyl tiles. Check the manufacturer’s label / website for proper installation at thin depths (less
than 2.5mm).
2. What size grout spacing is allowed? Tile should be a minimum of 1/16” – 3/16” wide.
3. How long should I wait to apply grout? Wait 24 hours after installation to allow tile adhesives to properly cure.
4. Do I need to seal the grout? No. Acrylic grouts are much more stain resistant, mold resistant and non-porous than traditional
cementitious grouts. The manufacturers of them all state not to seal in their materials and instructions.
CLEANING:
1. How do I clean my floor? Use a DAMP mop and “neutral pH” cleaner to remove any sediments or contaminants to the
flooring. These cleaners are safe enough for regular use on solid, luxury vinyl flooring. Do not use any type of chemical or
harsh cleaners. Regular sweeping and vacuuming with and electric broom are also recommended. Do not use a vacuum with a
standard “bristled beater bar” as this can damage the wear layer on the floor covering.
2. What shouldn’t I use on my floor to clean it? Don’t use the following: Abrasive cleaners, abrasive powders, oil based cleaners,
detergent based cleaners, multi surface cleaners or bleaches.
3. What can I use to bring a shine to my floor? Use of satin or gloss floor finishes will enhance the sheen of a vinyl floor. Be sure
to use a floor finish that is compatible with solid vinyl tiles.
4. Why not mop with soapy water? Mops generally use too much water and leave a lot of water behind, which can seep thru the
seams in the tiles and planks and cause adhesive failures and subfloor swelling. Soapy waters can also leave behind an
unwanted film on your floor surface.
5. Can I use a Swiffer? Yes. Swiffer’s work well for daily maintenance on your vinyl floors.
6. Can I use a steam mop? No. Steam mops can get too hot and cause your adhesive to fail.
MISCELLANEOUS:
1. Will my floor scuff? Yes. Certain materials will scuff a vinyl floor like dark soled shoes, sneakers, rubber based shoes or
furniture bottoms.
2. How can I prevent scuff marks, scratches or gouging? Apply an aftermarket finish to the flooring to prevent scuffing and
minor scratching. Use felt type furniture protectors on all furniture legs and bottoms. When moving heavy furniture, use soft
“Sliders” specifically made for hard surface floors.
3. Will my pets damage my floor? Common household pets are fine, but keep in mind that some dogs have tougher, sharper
nails and will gain traction differently on a hard surface floors causing them to grip with their claws more. Keeping your pet’s
nails trimmed and filed will aid in prevention of scratches, by keeping them on the pads of their feet.
4. Can my peel and stick tiles be installed on stairs? Stainmasterâ luxury vinyl can be installed on stairs, however we do not
recommend any type of aftermarket finish to be applied on flooring used on the stairs.
5. Can peel and stick tiles be installed on the walls or ceiling? While not originally intended for use on walls or ceiling
applications, we cannot specifically recommend or warrant our products to be used in these circumstances. Our pressure
sensitive adhesives are not meant to be used in any application other than to lay flat.
6. Can Stainmaster
ââ
luxury vinyl peel and stick tiles be used in homes with wheelchair access? Our floors exceed the ADA
recommendations for static coefficient of friction and slip resistance and are suitable with wheelchair traffic. Stainmasterâ
luxury vinyl floors are NOT recommended to be installed on ADA ramps and accesses.
7. Are furniture protectors really necessary? YES!! Furniture protector pads ARE necessary to prevent surface scratching and
scuffing. Nylon type protectors are the best to use. Felt protectors can be used but must be changed frequently to keep the
amount of embedded debris to a minimum. We recommend replacement >3 times a year to avoid buildup of debris on the felt.
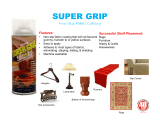
8. What type of rugs should I use? Area rugs, walk off mats and throw rugs should NOT have rubber backing. Keep to soft
surface fabric backed area rugs to prevent scratching or discoloration of your floor.

Claim Process:
How do I file a claim?
While Novalis strives to manufacture the highest quality of of luxury vinyl flooring available today, we realize there may be an
occasion for a customer to file a claim. Please follow the following steps below to contact us regarding any issues you may have with
your Stainmaster
ââ
luxury vinyl floor.
1. Call 1-866-668-2547 extension 221 to obtain a claim form
2. Fill out the claim form to its entirety with as much detailed information as possible
3. Provide us with pictures showing the issues you are having with your floor.
4. Fax, email or mail back with a copy of your purchase receipts and pictures. (note: no claims will be processed without the
proper proof of purchase receipts)
5. Labor charges are not covered and will NOT be reimbursed. This product is intended for residential use and a do-it-yourself
application and installation. Please see warranty for further information.
6. Once information is received back, please allow 7-14 business days to process the claim. The customer will be notified using
the contact information provided on the claim form.
7. Novalis reserves the right to request samples or perform a site inspection on all claims.
We advise you read all documentation regarding installation and your warranty thoroughly before installing your Stainmaster
ââ
luxury vinyl floor. If you have any questions, please contact us immediately for help.
Email:
stainmasterlvtinfo@novalis-intl.com
Phone: 1-866-668-2547 ext. 221
FOR ADDITIONAL INFORMATION:
Visit the manufacturer’s Stainmaster Information Support page:
http://novalisinnovativeflooring.us/stainmaster-installation-instructions/
/