1
All Rights Reserved
Printed in the USA
2001 by The Toro Company
8111 Lyndale Avenue South
Bloomington, MN 55420-1196
Replacement Pedal Kit
Workman
1100/2100 and Twister Utility Vehicle
Part No. 104-7012
Form No. 3327-218
Installation Instructions
Removing the Old Pedals
1. Position the machine on a level surface, stop the
engine, and remove the key.
If you leave the key in the ignition switch,
someone could accidently start the engine and
seriously injure you or other bystanders.
Remove the key from the ignition switch before
you do any maintenance.
Caution
2. If you have a floor mat, remove it from around the
accelerator and brake pedals.
3. Remove the metal plate on the floor surrounding the
pedals.
4. Disconnect the accelerator cable and spring from the
accelerator pedal.
5. Disconnect the brake rod from the brake pedal.
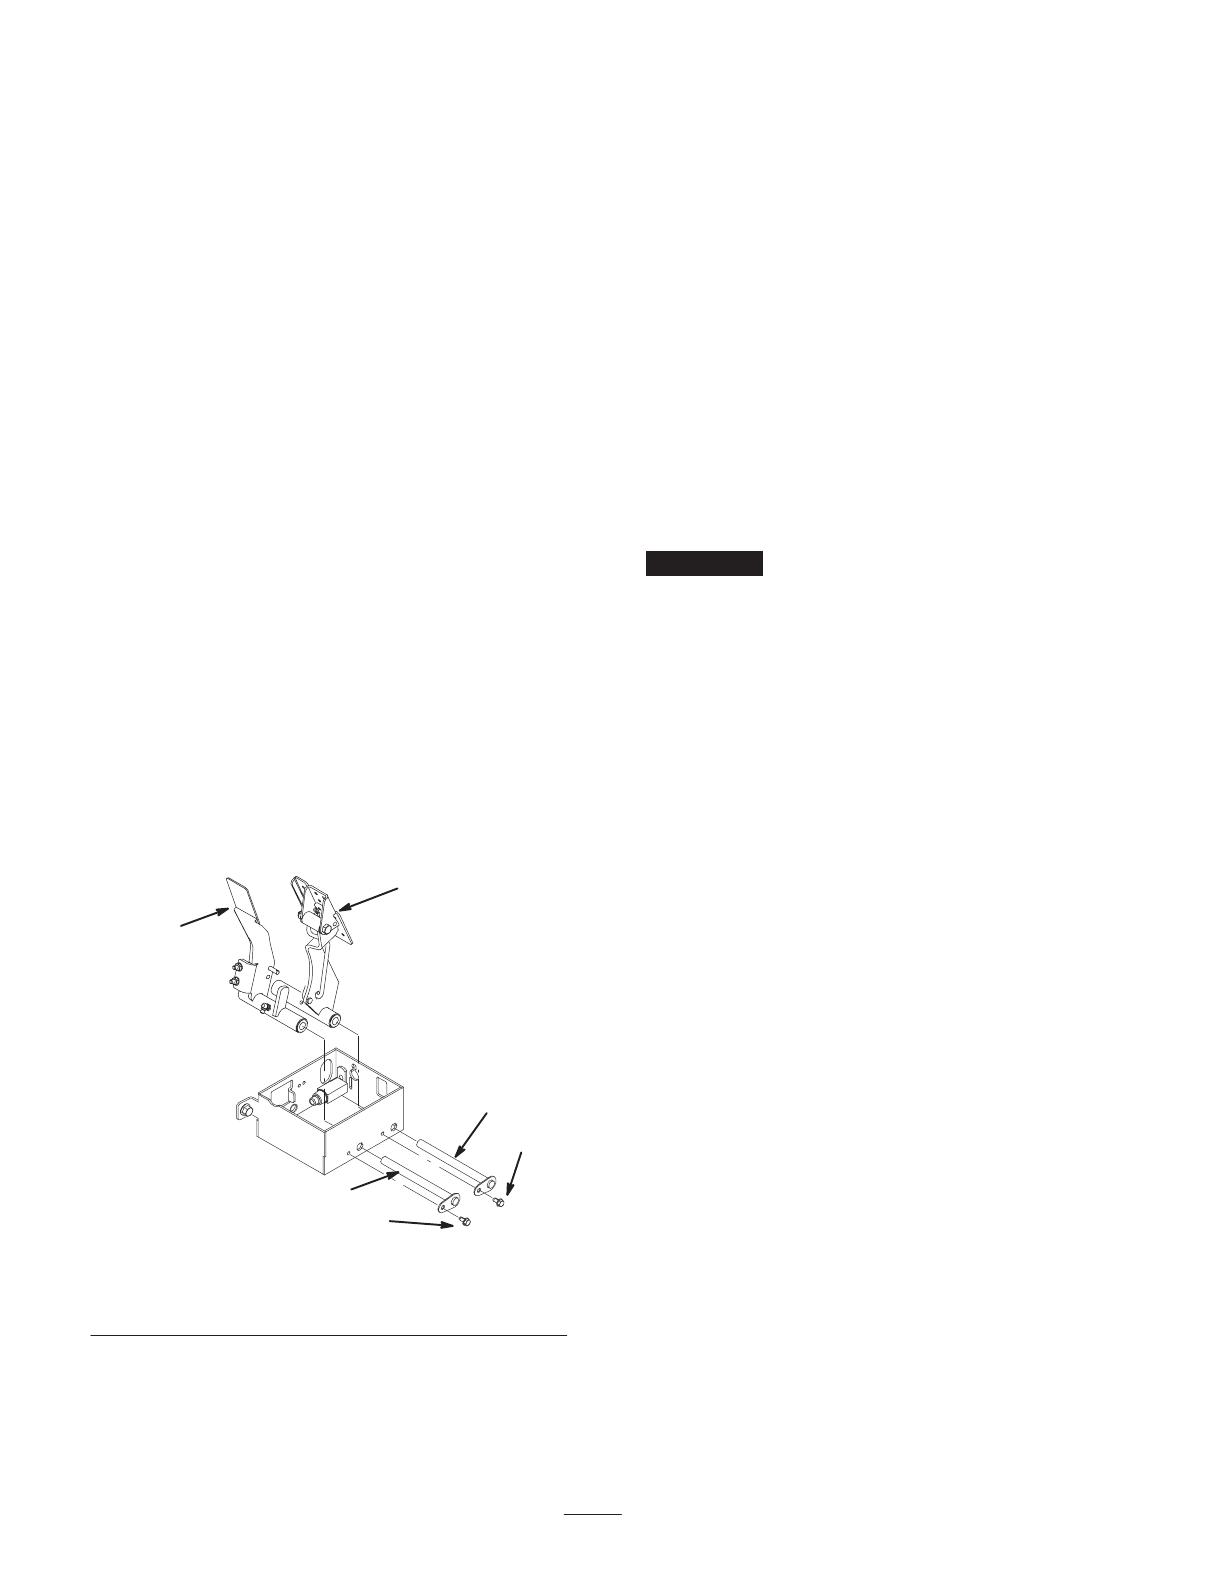
6. Remove the bolts securing the pedal pivot rods
(Fig. 1).
7. Pull out the pivot rods, removing the pedal assemblies
from the top (Fig. 1).
m-5780
2
2
1
1
Figure 1
1. Pivot rod 2. Bolt
Installing the New Pedals
1. Remove the bolt and nut securing the parking brake
pedal to the brake pedal. Save the torsion spring and
discard the rest of the parking brake pedal (Fig. 2).
m-5778
1
14
17
13
16
15
3
14
13
11
10
8
7
6
9
8
6
4
5
2
12
Figure 2
1. Parking brake pedal
2. Brake pedal
3. Accelerator pedal
4. Torsion spring
5. Flange nut, 3/8 in.
6. Small bushing
7. Bolt, 2-1/2 x 3/8 in.
8. Cotter pin
9. Parking brake mounting
tube
10. Parking brake rod
11. Washer
12. Parking brake detent
13. Pedal mounting tube
14. Large bushing
15. Nuts
16. Adjustment screws
17. Brake pawl
2. Remove the cotter pins, parking brake detent, and
washer from the brake pedal, discarding the rest of the
pedal assembly (Fig. 2).
2
3. Remove the bolts securing the brake pawl to the
accelerator pedal and the brake pawl, discarding the
rest of the accelerator pedal assembly (Fig. 2).
4. Install 2 small bushings into the parking brake pedal
mounting tube (Fig. 2).
5. Install the new parking brake pedal to the new parking
brake using a bolt (2-1/2 x 3/8 in.) and flange nut
(3/8 in.) and the torsion spring from the old pedal
(Fig. 2).
6. Connect the parking brake rod the the parking brake
pedal and secure it with a cotter pin (Fig. 2).
7. Install the washer and parking brake detent on the new
brake pedal assembly securing it to the parking brake
rod and the pedal with the cotter pins removed
previously (Fig. 2).
8. Install the brake pawl to the new accelerator pedal
with the bolts removed previously (Fig. 2).
9. Measure the heights of the 2 adjustment screws on the
old accelerator pedal and then remove them and the
nuts that secure them (Fig. 2).
10.Install the 2 adjustment screws and nuts on the new
accelerator pedal, adjusting them to the same height
that they were set on the old pedal (Fig. 2)l.
11. Install 2 large bushing into the ends of the mounting
tubes on each pedal (Fig. 2).
12.Insert the accelerator pedal assembly into the pedal
box and secure it into the front position using a pivot
rod removed previously (Fig. 3).
m-5780
2
4
4
3
3
1
Figure 3
1. Accelerator pedal
2. Brake pedal
3. Pivot rod
4. Bolt
13.Insert the brake pedal assembly into the pedal box and
secure it into the rear position using a pivot rod
removed previously (Fig. 3).
14.Secure the pivot rods with the 2 bolts removed
previously (Fig. 3).
15.Connect the accelerator cable and spring to the
accelerator pedal.
16.Connect the brake rod to the brake pedal.
Adjusting the Accelerator
Pedal
1. Check and adjust as necessary the accelerator stop bolt
to allow for full engagement of the parking brake
detent in the brake pawl when the brake pedal is at the
maximum travel position.
2. Check and adjust as necessary the switch stop bolt to
allow for the full travel of the switch without
bottoming it out.
Important Full travel of both the brake and
parking brake pedal should not trigger the switch.
Completing the Installation
1. Install the metal plate surrounding the pedals.
2. Install the floor mat if necessary.
/