Page is loading ...

TEMPLATE PLANTILLA
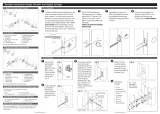
MEASURE
BACKSET
1. Adjust and install latch
Measure your door backset as shown.
Note, for a 1-1/2” (38mm) diameter
hole, test if latch extends and retracts.
Chisel out area if required.
Install turnpiece.
INTERIOR
Install latch with 11/16” screws.
Install exterior cylinder assembly.
Not to be used on 1 1/2” holes.
2. Install trim
EXTERIOR
Ensure the latch is inserted
with the word “UP” on top.
3. Install strike
1/8” pilot holes may be required.
If backset of door measures 2 3/4” (70mm),
adjust latch by rotating face as shown.
Single Cylinder Deadbolt Installation Instructions
Lifetime Warranty
This product comes with a lifetime mechanical and finish warranty to the
original residential user against defects in material and workmanship as
long as the original user occupies the residential premises upon which the
product was originally installed. This warranty DOES NOT COVER scratches;
abrasions; deterioration due to the use of paints, solvents, or other chemicals;
abuse; misuse; or product(s) used in commercial applications. Upon return
of a defective product to Baldwin Hardware Corporation, Baldwin may repair
or replace the product or refund the purchase price. Baldwin is not liable for
incidental or consequential damages. Some states do not allow the exclusion
or limitation of incidental or consequential damages, so the above exclusion
may not apply to you. This warranty gives you specific legal rights and you
may also have other rights that vary from state to state. If a mechanical or finish
defect occurs, please call 1-877-315-7853 in the U.S. and Canada or return it
to Baldwin Hardware Corporation, Consumer Services, 19701 Da Vinci, Lake
Forest, California 92610.For customers outside of the U.S. and Canada, claims
under this warranty must be made only to either the place of purchase or to the
listed importer.
Presge Series
www.baldwinprestige.com

TEMPLATE PLANTILLA
Garantía de por Vida
Este producto viene con una garantía de por vida sobre los componentes
mecánicos y el acabado otorgada al usuario original,cubriendo defectos en
materiales y mano de obra, por el tiempo en que este usuario original ocupe la
residencia donde se hayan instalado los productos por primera vez. Esta garantía
NO CUBRE rayones, abrasiones, deterioro debido al uso de pinturas, solventes
u otras sustancias químicas; abuso, mal uso o uso del/de los producto/s en
aplicaciones comerciales. Con la devolución de un producto defectuoso a
Baldwin Hardware Corporation, Baldwin podrá reparar o reemplazar el producto
o reembolsar el precio de compra. Baldwin no se hace responsable por daños
consecuentes ó imprevistos. Algunos estados no permíten la exclusión ó
limitación de daños consecuentes ó imprevistos, de modo que ésta exclusión
puede no aplicarse a usted. Ésta garantía le otorga derechos legales y usted puede
tambien tener otros derechos que varían de un estado a otro. Si ocurre un defecto
mecánico o en el acabado, llame a 1-877-315-7853 en los ESTADOS UNIDOS
Y CANADA ó devuelbalo a Baldwin Hardware Corporation, consumer services,
19701 Da Vinci, Lake Forest, California 92610. Para clientes fuera de los Estados
Unidos y Canadá, los reclamos bajo esta garantía se deben realizar solamente a
través del lugar en donde se compró el producto o del importador indicado.
MIDA EL
BACKSET
1. Regule e instale el picaporte
Mida el backset desu puerta como
se muestra.
Note, para un orificio de diámetro de
1-1/2” (38mm), pruebe si el picaporte
se extiende y se retrae. Remueva área
si fuese necesario.
Instale pieza giratoria.
INTERIOR
Instale el recibidor con tornilles de 11/16”.
Instale ensamblaje de
cilindro exterior.
No utilizer en orificios de 1 1/2”.
2. Instale el Trim
EXTERIOR
Asegure que el picaporte sea
insertado con la palabra “UP”
hacia arriba.
3. Instale el recibidor
Orificios de 1/8” podrián ser regueridos.
Si el backset de la puerta mide 2 3/4”
(70mm), ajuste el picaporté rotando la cara,
tal como se muestra.
Instrucciones para instalación de serrojo de cilindro simple
Presge Series
www.baldwinprestige.com
/


