Page is loading ...

INSTRUCTION MANUAL
N13275
Model Number TB-2190
LCD Steam Iron
AFTER SALES SUPPORT
AUS Hotline Costs
1300 886 649 [email protected]
AUS
MODEL: TB-2190 PRODUCT CODE:4248 07/2014

1
AFTER SALES SUPPORT
AUS Hotline Costs
1300 886 649 [email protected]
AUS
MODEL: TB-2190 PRODUCT CODE:4248 07/2014
AFTER SALES SUPPORT
AUS Hotline Costs
1300 886 649 [email protected]
AUS
MODEL: TB-2190 PRODUCT CODE:4248 07/2014
Contents
01 Warranty Details
02 Welcome
03 General Safety Instructions
05 Product Overview
06 Getting Started
07 Features
08 Instructions
12 Other Useful Information
15 Repair and Refurbished Goods or Parts Notice
LCD Steam Iron
Warranty Details
The products are guaranteed to be free from defects in workmanship and
parts for a period of 36 months from the date of purchase. Defects that occur
within this warranty period, under normal use and care, will be repaired,
replaced or refunded at our discretion, solely at our option with no charge for
parts and labour. The benefits conferred by this warranty are in addition
to all rights and remedies in respect of the product that the consumer
has under the Competition and Consumer Act 2010 and similar state and
territory laws.
Our goods come with guarantees that cannot be excluded under the
Australian Consumer Law. You are entitled to a replacement or refund for
a major failure and to compensation for any other reasonably foreseeable
loss or damage. You are also entitled to have the goods repaired or
replaced if the goods fail to be of acceptable quality and the failure does
not amount to a major failure.
YEAR WARRANTY
3

3
AFTER SALES SUPPORT
AUS Hotline Costs
1300 886 649 [email protected]
AUS
MODEL: TB-2190 PRODUCT CODE:4248 07/2014
2
AFTER SALES SUPPORT
AUS Hotline Costs
1300 886 649 [email protected]
AUS
MODEL: TB-2190 PRODUCT CODE:4248 07/2014
Welcome
Congratulations on choosing to buy a STIRLING
®
product.
All products brought to you by STIRLING
®
are manufactured to the highest
standards of performance and safety and, as part of our philosophy of customer
service and satisfaction, are backed by our comprehensive 3 Year Warranty. We
hope you will enjoy using your purchase for many years to come.
Read this manual thoroughly before first use, even if you are familiar with this type
of product. The safety precautions enclosed herein reduce the risk of fire, electric
shock and injury when correctly adhered to. Keep the manual in a safe place for
future reference, along with the completed warranty card, purchase receipt and
carton. If applicable, pass these instructions on to the next owner of the appliance.
Always follow basic safety precautions and accident prevention measures when
using an electrical appliance, including the following:
Electrical safety and cord handling
• Voltage: Make sure your outlet voltage and circuit frequency correspond to the
voltage indicated on the appliance rating label and your outlet socket is properly
earthed. If this is not the case, do not use the iron.
• Separate circuit: Do not use any other appliance at the same time on the same
electrical circuit as it may overload the circuit and trip the circuit breaker.
• Water: To reduce the risk of electrocution, never operate the iron with wet
hands. Never immerse the cord, plug or iron in water or other liquid.
• No extension cord: Do not use this iron with an extension cord.
• Protect the power cord. Do not damage the cord, do not kink or squash it
and protect it from sharp edges. Do not let the cord touch any hot surface,
including the ironing soleplate. Run the cord in such a way that there will be no
risk of anyone pulling it inadvertently or tripping over it during use. Unwind and
straighten the cord before use. Do not roll the cord around the iron for storage
until the iron has cooled down, then loop the cord loosely around the iron.
• Damage: Do not pick up or operate the appliance after it malfunctions, is
leaking, has been dropped or damaged in any manner, or if there are visible
signs of damage. Do not use it if it works intermittently or stops working entirely.
In case of damage, contact the after sales support line for advice.
• Damaged cord: If the power supply cord is damaged, do not attempt to change
it yourself. A damaged cord or plug must be replaced by the manufacturer or a
qualified person in order to avoid a hazard.
• Repair: To avoid the risk of electric shock, do not disassemble the iron. Incor-
rect reassembly can cause a risk of electric shock when the iron is used. Never
insert any objects into the appliance.
• Disconnect: Turn all controls off and unplug the iron from the power socket
before filling the water tank with water, before emptying the tank and after use.
Grip the plug when disconnecting, do not pull on the cord.
General Safety Instructions

5
AFTER SALES SUPPORT
AUS Hotline Costs
1300 886 649 [email protected]
AUS
MODEL: TB-2190 PRODUCT CODE:4248 07/2014
4
AFTER SALES SUPPORT
AUS Hotline Costs
1300 886 649 [email protected]
AUS
MODEL: TB-2190 PRODUCT CODE:4248 07/2014
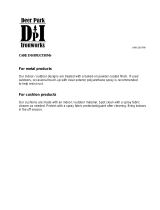
General Safety Instructions (Cont.) Product Overview
1 Water Spray Nozzle
2 Water Inlet Cover
3 Steam On/Off Button
4 LCD Display
5 Temperature Control Buttons:
TEMP (not visible, on the opposite side)
TEMP / Power On/Off
6 Burst of Steam Button
7 Spray Button
8 Soft Grip Handle
9 Cord Grommet
10 Heel Rest
11 Self-Clean Button
7
6
5
4
9
3
2
1
8
10
11
Usage conditions and restrictions
• Domestic use only: This appliance is designed and intended for indoor
household use only. It is not suitable for commercial or outdoor use. Do not use
it for anything other than its intended purpose and only use it as described here.
• Usage restriction: The appliance is not intended for use by persons (including
children) with reduced physical, sensory or mental capabilities, or lack of experi-
ence and knowledge, unless they have been given supervision or instruction
concerning use of the appliance by a person responsible for their safety.
• Children: Young children should be supervised to ensure they do not play with
the appliance. Close supervision is necessary when any appliance is used by
or near children. Do not let children touch the iron while it is in use.
• Liability: Improper use or installation may result in the risk of fire, electric shock
and/or injury. We assume no liability for any eventual damages caused by
improper use or inappropriate handling, or by any other noncompliance with
the instructions in this manual.
Safe operation
• Work surface: Only use and rest the appliance on a firm, flat and stable surface.
• Water tank: Only fill water into the water tank. Make sure the iron is unplugged
before filling the tank. Do not add scented water, vinegar or any other additives
into the water tank; they can damage the iron. Empty the water tank after use.
• Water inlet: Do not open the water inlet cover during use.
• Temperature control: Ensure the temperature dial is set to the minimum (MIN)
position before plugging the iron into a wall outlet and before unplugging it.
• Heel rest position: When not in use or during storage, place the iron upright (on
its heel rest position) on a flat surface to avoid overturning.
• Unattended: Do not leave the appliance unattended when it is connected to a
mains power supply outlet or when it is resting on an ironing board.
CAUTION: Hot!
• The iron generates high temperature steam that can cause scalding. Always
handle with care and warn other users of potential danger.
• Do not touch the iron rest or soleplate during or just after ironing. It is hot!
• Use caution when turning the iron upside down to avoid spillage of hot water.
• RCD: Unless your home is already fitted with a residual current device (safety
switch), we recommend installing an RCD with a rated residual operating
current not exceeding 30mA to provide additional safety protection when using
electrical appliances. See your electrician for professional advice.

7
AFTER SALES SUPPORT
AUS Hotline Costs
1300 886 649 [email protected]
AUS
MODEL: TB-2190 PRODUCT CODE:4248 07/2014
6
AFTER SALES SUPPORT
AUS Hotline Costs
1300 886 649 [email protected]
AUS
MODEL: TB-2190 PRODUCT CODE:4248 07/2014
Getting Started
Before first use
• Unpack the appliance but keep all packaging materials until you have
made sure your new iron is undamaged and in good working order. Plastic
wrapping can be a suffocation hazard for babies and young children, so
ensure all packaging materials are out of their reach.
• Inspect the cord and plug for damage or wear before each use. Do not use
the appliance if the appliance or its cord have been damaged or are not
working properly. In case of damage, contact our after sales support line for
advice on return or repair of the damaged product.
• Remove any protective films or stickers from the soleplate and iron, if there
are any.
• Unwind and straighten the power cord.
• Fill the iron as described in “Filling the water reservoir”, page 8.
• Connect the iron to a suitable power point; the iron will beep and the LCD
will display all logos for one second, then turn off.
• Press the TEMP
button to turn on the iron; the LCD will display one dot
and the iron will start to heat up.
• Press the TEMP
button to raise the temperature setting to the maximum
setting (Linen), as described in “Selecting a temperature setting”, page 8.
• The iron is now ready for first use. For first time ironing, we recommend using
on an old towel or similar cloth and ironing it with full steam until no more
steam is produced.
• When the water tank is empty and no more steam is produced, the
preparation work is completed. The iron is now ready for proper use.
Features
Anti-drip system
This steam iron features an automatic anti-drip system, which prevents water
escaping from the soleplate when the iron is too cold to produce steam. You do
not have to activate this feature.
During use, the anti-drip system may emit a loud clicking sound, particularly
during heat-up or while cooling down. This is perfectly normal and indicates that
the system is functioning correctly.
Auto shut-off
This safety feature operates automatically and shuts off the power supply when
the iron is not being used while connected to a mains supply outlet. It operates in
two modes:
Auto shut-off in horizontal and side rest
• The iron will switch off automatically after about 30 seconds if the iron is
immobile in the ironing position (horizontal and side rest).
• The LCD will display the pause symbol
and the backlight will be off.
• Simply move the iron to turn it back on.
Auto-shut off in vertical
• The iron will switch off automatically after about 8 minutes if the iron is left
on its heel rest position (vertically).
• The LCD will display AUTO-OFF and the backlight will be off.
• Simply move the iron to turn it back on.
NOTE: The iron will take about 60 seconds to reach its previous soleplate
temperature.
Language selection
You can change the language settings on the LCD from English to German or
French. To change the setting, connect the iron to the power supply and switch it
on, then press the TEMP button and hold it for two seconds: the LCD displays
EN (this is the default setting, denoting the language is English). Press the
same button again to change the language to German (DE) or French (FR), the
language options run in a loop. When your desired language shows up, leave it
for three seconds to confirm your selection.
Built-in anti-scale system
The built-in anti-scale cartridge is designed to reduce a scale build-up that may
occur during steam ironing. While it will not completely stop the natural process
of scale build-up, it will prolong the working life of your iron.

9
AFTER SALES SUPPORT
AUS Hotline Costs
1300 886 649 [email protected]
AUS
MODEL: TB-2190 PRODUCT CODE:4248 07/2014
8
AFTER SALES SUPPORT
AUS Hotline Costs
1300 886 649 [email protected]
AUS
MODEL: TB-2190 PRODUCT CODE:4248 07/2014
Instructions
Filling the water reservoir
• Make sure the iron is disconnected
from the power point.
• Open the water inlet cover.
• Using a beaker, fill the reservoir with
water, as illustrated (Fig. 1).
• Fill up to the MAX level marked on the
side of the water tank.
NOTE: Only fill the tank with water.
Do not use water with any chemical additives or other liquids.
Selecting a temperature setting
• Connect the iron to a suitable mains power outlet: the LCD lights up for a
second, a beep is emitted and then the screen will turn off.
• Press the TEMP
/ POWER ON/OFF button to turn on the iron: one dot will
appear on the LCD (this is the lowest heat setting).
• Press the TEMP
/ POWER ON/OFF button to raise the temperature
setting from one to three dots and to the maximum, as illustrated (Fig. 2).
• Press the TEMP
button to lower the temperature setting. The iron will
beep every time you press the temperature control buttons to adjust the
temperature setting.
• Whenever the setting is changed from low to high or from high to low, the
symbol will appear on the LCD and the or symbol will blink.
• When the soleplate temperature has reached the selected temperature
setting, the iron will beep, the LCD will display the
symbol and the
or symbol will disappear.
• The iron is ready for use.
Instructions (Cont.)
Dry ironing
• Connect the iron to a suitable mains power outlet:
the LCD lights up for a second, a beep is emitted
and then the screen will turn off.
• Press the TEMP
/ POWER ON/OFF button to
turn on the iron: one dot will appear on the LCD
(this is the lowest heat setting).
• To select the temperature setting according to the
recommendation of the garment label, follow the
instructions under “Selecting a temperature setting”, opposite.
• The iron is now ready for dry ironing (Fig. 3).
• To switch off the iron, press and hold the TEMP
button for two seconds:
the LCD will go blank with a beep.
• Disconnect the iron from the mains supply outlet.
• After the iron has cooled down completely, store it vertically in a safe place,
out of children's reach.
Steam ironing
• Fill the iron as described in “Filling the water
reservoir”, opposite.
• Connect the iron to a suitable mains power outlet:
the LCD lights up for a second, a beep is emitted
and then the screen will turn off.
• Press the TEMP
/ POWER ON/OFF button to
turn on the iron: one dot will appear on the LCD
(this is the lowest heat setting).
• Set the temperature to setting 4 or higher, as illustrated in Fig. 2, opposite.
• Press the steam button for steaming: the iron will beep and the
symbol
will start blinking.
• When the iron is ready for steam ironing, all symbols will stop blinking (Fig. 4).
• To switch off the iron, press and hold the TEMP
button for two seconds:
the LCD will go blank with a beep.
• Disconnect the iron from mains supply outlet.
• After the iron has cooled down completely, store it vertically in a safe place,
out of children's reach.
Fig. 1
Fig. 2
Fig. 3
Fig. 4

11
AFTER SALES SUPPORT
AUS Hotline Costs
1300 886 649 [email protected]
AUS
MODEL: TB-2190 PRODUCT CODE:4248 07/2014
10
AFTER SALES SUPPORT
AUS Hotline Costs
1300 886 649 [email protected]
AUS
MODEL: TB-2190 PRODUCT CODE:4248 07/2014
Instructions (Cont.)
Burst of steam
This function provides an extra amount of steam to remove stubborn wrinkles.
• Fill the iron as described on page 8.
• Set the temperature setting to setting 5 or higher
(see “Selecting a temperature setting”, page 8).
• Press the BURST OF STEAM button: steam will
shoot from the holes of the soleplate into the fabric
being ironed, removing the wrinkles (Fig. 5).
• For stubborn creases, wait a few seconds before
pressing the BURST OF STEAM button again.
Most wrinkles can be removed within three presses.
NOTE: You may need to press the BURST OF STEAM button a few times
to start this function. For optimum steam quality, do not operate this
function more than three times in succession.
Burst of steam in vertical position
WARNING: Do not apply steam on any clothes or fabrics that are being worn by
humans or pets. The temperature of the steam is very high and can
cause serious burns!
This function provides an extra amount of steam to remove wrinkles on delicate
garments in hanging position, such as hanging curtains or a suit on a clothes
hanger.
• Fill the iron as described in “Filling the water
reservoir”, page 8.
• Set the temperature setting to setting 5 or higher
(see “Selecting a temperature setting”, page 8).
• Hold the iron 15–30cm away from the garment
and press the BURST OF STEAM button: steam will
penetrate into the garment, removing the wrinkles
(Fig. 6).
• For stubborn wrinkles, wait a few seconds before
pressing the BURST OF STEAM button again.
Most wrinkles can be removed within three presses.
NOTE: It may be necessary to press the BURST OF STEAM button a few
times to start this function. For optimum steam quality, do not operate
the burst of steam more than three times in succession.
Instructions (Cont.)Instructions (Cont.)
Water spray
This function can be used any time and is not affected by any setting.
• Fill the iron as described in “Filling the water
reservoir”, page 8.
• Aim the nozzle at the garment, then press the
SPRAY button (Fig. 7).
NOTE: It may be necessary to press the
SPRAY button a few times to start this
function.
Emptying and storing after use
• Disconnect the iron from the mains supply outlet.
• When the iron has cooled down completely, open
the water inlet cover, hold the iron upside down
and shake it gently to remove any remaining
water (Fig. 8).
• Store it vertically in a safe place where it cannot
fall on anyone.
Fig. 5
Fig. 6
Fig. 7
Fig. 8

13
AFTER SALES SUPPORT
AUS Hotline Costs
1300 886 649 [email protected]
AUS
MODEL: TB-2190 PRODUCT CODE:4248 07/2014
12
AFTER SALES SUPPORT
AUS Hotline Costs
1300 886 649 [email protected]
AUS
MODEL: TB-2190 PRODUCT CODE:4248 07/2014
Other Useful Information (Cont.)
Self-cleaning function
This function removes any scale build-up and mineral deposits in the steam
chamber. After the steaming function has been used for more than 5 hours, the
soleplate needs to self-clean and the symbol will be shown on the LCD.
• Half-fill the water reservoir, as described on page 8.
• Place the iron on a stable surface in upright, standing position.
• Connect the iron to a mains supply outlet and turn on the iron.
• Select the Linen (MAX) / temperature setting 7 (see page 8).
• Press and hold the TEMP
button for two seconds to turn off the iron,
then disconnect it from the mains supply.
• Holding the iron horizontally over a sink, press and hold the SELF-CLEAN
button.
CAUTION: Steam and boiling hot water will drain from the holes on the
soleplate, washing away any scales and minerals that have built
up inside the steam chamber. Take care not to burn yourself.
• Still holding the SELF-CLEAN button, gently move the iron back and forth
until the water tank is empty.
• When the self-cleaning process is complete, release the self-clean button,
rest the iron back on its heel rest and allow it to cool down completely.
• Wipe the soleplate with a cold, damp cloth.
CAUTION: Always keep your skin/body away from the hot steam and water.
Manually cleaning the iron
• Disconnect the iron from the mains power supply and allow it to cool down
completely.
• Use a dampened cloth or non-abrasive sponge to remove any deposits off
the soleplate or the housing.
NOTE: Never use sharp or rough objects to remove deposits off the soleplate.
Never use any abrasive cleansers, vinegar or descaling agents to clean
any part of the iron.
Other Useful Information
Hints for ironing
• Sort out the items to be ironed according to the type of fabric. This will
minimise the frequency of temperature adjustment for different garments.
• If you are unsure about the type of fabric, test-iron a small area on the
backside or inside of the garment. Start with a low temperature and increase
gradually.
• When ironing heat-sensitive fabrics, wait for about three minutes after turning
down the heat. Temperature adjustments need a certain time to reach the set
level, no matter if you turn the heat up or down.
• Delicate fabrics such as silk, wool, velour, etc. are best ironed with an ironing
cloth to prevent shine marks.
• You may need to press a few times to activate the spray, burst of steam and
vertical burst of steam functions.
Reading garment labels
Read the garment labels and follow the manufacturer’s ironing instructions.
The symbols used stand for the following fabric types:
Cool iron:
Acrylic
Acetate
Elastane
Polyamide/
Nylon
Warm iron:
Polyester
Silk
Triacetate
Viscose
Wool
Hot iron:
Cotton
Linen
Temperature control settings

15
AFTER SALES SUPPORT
AUS Hotline Costs
1300 886 649 [email protected]
AUS
MODEL: TB-2190 PRODUCT CODE:4248 07/2014
14
AFTER SALES SUPPORT
AUS Hotline Costs
1300 886 649 [email protected]
AUS
MODEL: TB-2190 PRODUCT CODE:4248 07/2014
Repair and Refurbished
Goods or Parts Notice
Unfortunately, from time to time, faulty products are manufactured which need to
be returned to the supplier for repair.
Please be aware that if your product is capable of retaining user-generated data
(such as files stored on a computer hard drive, telephone numbers stored on
a mobile telephone, songs stored on a portable media player, games saved on
a games console or files stored on a USB memory stick) during the process of
repair, some or all of your stored data may be lost. We recommend you save this
data elsewhere prior to sending the product for repair.
You should also be aware that rather than repairing goods, we may replace them with
refurbished goods of the same type or use refurbished parts in the repair process.
Please be assured though, refurbished parts or replacements are only used
where they meet ALDI’s stringent quality specifications.
If at any time you feel your repair is being handled unsatisfactorily, you may
escalate your complaint. Please telephone us on 1300 886 649 or write to us at:
Tempo (Aust) Pty Ltd ABN 70 106 100 252
PO BOX 6056 Frenchs Forest, Sydney, Australia NSW 2086
Telephone: 1300 886 649 (Aust) - Fax: (02) 9975 2688
Tempo Help Desk: 1300 886 649 (Aust)
(Operating Hours: Mon-Fri 08:30am to 06:00pm EST)
Email: [email protected]
LCD Steam Iron
Other Useful Information
Responsible disposal
At the end of its working life, do not throw this appliance out with your
household rubbish. Electrical and electronic products contain substances
that can have a detrimental effect on the environment and human health
if disposed of inappropriately. Observe any local regulations regarding the
disposal of electrical consumer goods and dispose of it appropriately for
recycling. Contact your local authorities for advice on recycling facilities in
your area.
YEAR WARRANTY
3

17
AFTER SALES SUPPORT
AUS Hotline Costs
1300 886 649 [email protected]
AUS
MODEL: TB-2190 PRODUCT CODE:4248 07/2014
16
AFTER SALES SUPPORT
AUS Hotline Costs
1300 886 649 [email protected]
AUS
MODEL: TB-2190 PRODUCT CODE:4248 07/2014
This page has been left blank intentionally. This page has been left blank intentionally.

AFTER SALES SUPPORT
AUS Hotline Costs
1300 886 649 [email protected]
AUS
MODEL: TB-2190 PRODUCT CODE:4248 07/2014
Warranty returns
Should you for any reason need to return
this product for a warranty claim, make sure to
include all accessories with the product.
Product does not work?
If you encounter problems with this product, or if it fails to perform
to your expectations, make sure to contact our
After Sales Support Centre on 1300 886 649
before returning it to the store for a refund.
/