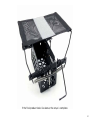
Dogtra QL2 LAUNCHER
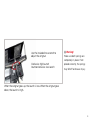
The Dogtra QL2 LAUNCHER is a versatile and easy-to-use launcher that is perfect for training and exercising your dog. With its adjustable spring tension settings, you can customize the launch distance to suit your dog's needs. The launcher also features a safety pin to prevent accidental firing.
Dogtra QL2 LAUNCHER
The Dogtra QL2 LAUNCHER is a versatile and easy-to-use launcher that is perfect for training and exercising your dog. With its adjustable spring tension settings, you can customize the launch distance to suit your dog's needs. The launcher also features a safety pin to prevent accidental firing.


-
 1
1
-
 2
2
-
 3
3
-
 4
4
-
 5
5
-
 6
6
-
 7
7
-
 8
8
-
 9
9
-
 10
10
-
 11
11
-
 12
12
-
 13
13
-
 14
14
-
 15
15
-
 16
16
-
 17
17
-
 18
18
-
 19
19
-
 20
20
-
 21
21
-
 22
22
-
 23
23


Dogtra QL2 LAUNCHER Owner's manual
- Type
- Owner's manual
- This manual is also suitable for
Dogtra QL2 LAUNCHER
The Dogtra QL2 LAUNCHER is a versatile and easy-to-use launcher that is perfect for training and exercising your dog. With its adjustable spring tension settings, you can customize the launch distance to suit your dog's needs. The launcher also features a safety pin to prevent accidental firing.
Ask a question and I''ll find the answer in the document
Finding information in a document is now easier with AI
Other documents
-
Simplicity 1691791 User manual
-
 Dixon 114863 - DCK3 User manual
-
Draper Bench Mounted Spindle Moulder Operating instructions
-
Craftsman 536.270211 Owner's manual
-
 RJTech 10H User manual
-
-
-
Jotul GZ 550 DV II User manual
-
 Exmark metro Setup Instructions
-
 Char-Griller 8125 Owner's manual


