Page is loading ...

DL30/DL50 Distance Learning Tracking Camera
Quick Start Guide
Getting Started
Please visit the following link to learn more about the camera before using it:
https://www.averusa.com/education/support/ (Select Distance Learning Tracking
Cameras.)
You can also find new Firmware, Software, Frequently asked questions and the User
manual as well as a host of guides in the respective tabs below:
To access more help, please submit a trouble shooting tickets here:
https://averusa.force.com/support/s/contactsupport
Camera Mount Suggestions (Optional Accessories)
For details on optional accessories, consult your local dealer.
Wall mount (Part#PTMLTWM01) Ceiling mount (Part#PTMLTCM02)
P/N: 300AS500-EHE

Dimension
200mm (7.87”)
158.8mm (6.25”) 162.2mm (6.39”)
Cable Fixing Plate Installation
1
Secure the cable fixing plate to the camera with two M2 x 4mm screws in the package.
Plug in cables.
Use four cable ties in the package to
secure the cables and cable fixing plate.
[Note] DL30 does not support HDMI port.

Connections
RJ-45 cable
(PoE+
IEEE 802.3at)
USB cable
Projector TV
HDMI cable
or
Power outlet
Power adaptor
Power cord
Desktop
Microphone
Audio cable
Laptop
or
Network
[Note] DL30 does not support HDMI port.

Remote Control
The remote control requires two “AAA” size batteries. Make sure batteries are installed properly before
use.
Name Function
(1) Power
Turn the unit on/standby/privacy:
Press once to turn on privacy
mode. Press again to turn off
privacy mode.
Long press for 3 seconds to turn on
standby mode. Short press again to
turn off standby mode.
(2) Remote Control LED
It will be on when pressing other
buttons.
(3) Menu
Open and exit the OSD menu.
[Note] DL30 does not support OSD
menu.
(4) Switch
Switch from presenter to another
presenter.
(5) Auto Tracking On
Turn on auto tracking.
(6) Auto Tracking Off
Turn off auto tracking.
(7) Number buttons
Use for setting the preset position 0~9.
(8) Preset
Press “Preset” + “Number button (0~9)”
simultaneously to set the preset position.
Remote control LED and camera button
LED will not light when pressing Preset
button alone.
(9) Reset
Press “Reset” + “Number button (0~9)” simultaneously to cancel
pre-configured preset position. Remote control LED and camera button
LED will not light when pressing Reset button alone.
(10)
▲,▼,◄, & ►
Pan and tilt the camera. Pan/Tilt speed by remote control is fixed. You
may change pan/tilt speed by using web browser. For setting details of
web browser, please refer to user manual.
(11) Enter
After opening the OSD menu, confirm the selection or make a selection
in OSD menu.
(12) Zoom In/Out
Zoom in/out. Zoom in/out speed by remote control is fixed. You may
change zoom in/out speed by using web browser. For setting details of
web browser, please refer to user manual.
(13) EV +/-
EV level adjustment.
(14) Upper Body
Presenter’s size on screen is upper body.
(15) Full Body
Presenter’s size on screen is full body.
(16) Zone
Zone mode.
(17) Camera Select
CAM1 to CAM4 buttons. Select a camera to operate. Once a camera is
selected, the CAM button LED will be on when pressing other buttons.

LED Indicator
LED Status
Blue (Blinking every 2 seconds) Tracking On
Blue (Solid) Normal Operation and Tracking Off
Orange (Blinking) Camera Initialization
Orange (Solid) Standby Mode
Red (Blinking) Firmware Update
CaptureShare
CaptureShare is a software tool that you can use with cameras to setup, record, streaming, capture
image, and use whiteboard function via a USB cable. It is a powerful application that helps teachers
turn AVer cameras into an even more effective distance learning collaboration tool.
[Note]
If teachers need to use DL tracking camera as webcam or camera for teaching, use the
supplied USB cable to connect the camera to the computer, open video collaboration application such
as Zoom, Skype, or Microsoft
®
Teams, and choose DL tracking camera for video source.
IP Address Setup
DL cameras’ default setting is DHCP on.
If there is DHCP environment
1. Connect your camera to the internet and wait for your camera to get IP address.
2. From your server, you can find your new camera IP address.
3. If necessary, modify the IP address.
Or if you want to configure by yourself
1. Use the remote control and press the button “8” eight times to switch to Static IP mode.
2. The default IP for the camera would be set to 192.168.1.168.
3. Set up your computer with static IP 192.168.1.x and then type in 192.168.1.168 in your web
browser to access the camera.

AVer PTZ Management
When your camera is all setup on the network, you can download our free camera control and
management software AVer PTZ Management. This software enables complete control of its devices
on Windows PCs and laptops. And it offers convenient and simultaneous control of up to 128 cameras.
AVer PTZ Control Panel
AVer PTZ Control Panel puts you in charge of all the basic controls and relevant settings of your AVer
Distance Learning Tracking cameras. PTZ Control Panel gives you access to live video and audio
streams from your cameras on an iPad screen, and it allows you to control the camera’s capture and
PTZ functions. You can even enable or disable tracking features like Presenter or Zone mode, and
store and call up to 256 preset positions.
Our developers are continuously working to create even more advanced settings to make this
application a perfect replacement for a physical remote.
Download link
USA: https://www.averusa.com/education/support
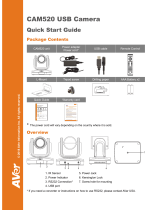
Package Contents
Camera Unit
Power Adapter &
Power Cord
Cable Fixing
Plate
Cable Ties (x4)
M2 x 4mm Screws
(x2)
Quick Start Guide Remote Control USB Cable
1/4”-20, L=7.5mm
Screw

Contact Information
AVer Information Inc.
https://www.averusa.com
668 Mission Ct., Fremont, CA 94539, USA
Tel: +1 (408) 263 3828
Toll-free: +1 (877) 528 7824
Technical support: support.usa@aver.com
Federal Communication Commission
NOTE: This equipment has been tested and found to comply with the limits for a Class A digital device,
pursuant to part 15 of the FCC Rules. These limits are designed to provide reasonable protection
against harmful interference when the equipment is operated in a commercial environment. This
equipment generates, uses, and can radiate radiofrequency energy and, if not installed and used in
accordance with the instruction manual, may cause harmful interference to radio communications.
Operation of this equipment in a residential area is likely to cause harmful interference in which case
the user will be required to correct the interference at his own expense.
FCC Caution: Any changes or modifications not expressly approved by the party responsible for
compliance could void the user's authority to operate this equipment.
This device complies with part 15 of the FCC Rules.
Operation is subject to the following two conditions:
(1) This device may not cause harmful interference, and
(2) this device must accept any interference received, including interference that may cause undesired
operation.
This Class A digital apparatus complies with Canadian ICES-003.
CAUTION
Risk of explosion if battery is replaced by an incorrect type.
Dispose of used batteries in a safe and proper manner.
©2021 AVer Information Inc. All rights reserved.
/