Page is loading ...

Clydesdale Model 8492
6400-41427
R: 10/5/23
Clydesdale
(Model 8492)
Hybrid
Wood Burning
Fireplace Insert
OWNER'S MANUAL
Installation And
Operating Instructions
PFS Report F20-631
SAVE THIS OWNER’S MANUAL
FOR FUTURE REFERENCE
PLEASE READ THIS ENTIRE OWNER’S MANUAL BEFORE YOU INSTALL AND USE YOUR
NEW CLYDESDALE WOOD INSERT.
Ce manuel est disponible en français sur hearthstonetech.com
If this room heater is not properly installed, a house fire may result.
To reduce the risk of fire, follow the installation instructions.
Failure to follow these instructions can result in property damage, bodily injury, or even death.
Conforms to UL Std. 1482-2022
Conforms to ULC Std. S628-93
We recommend that our products be installed
and serviced by professionals who are
certified in the U.S. by NFI (National Fireplace
Institute), or by W.E.T.T. (Wood Energy
Technology Transfer) in Canada.
www.nficertified.org
www.wettinc.ca
CONTACT LOCAL AUTHORITIES WITH JURISDICTION (BUILDING DEPARTMENT or FIRE
OFFICIALS), ABOUT PERMITS REQUIRED, RESTRICTIONS AND INSTALLATION
INSPECTION IN YOUR AREA.
WARNING: This product can expose you to
chemicals including glass wool fiber and carbon
monoxide which are known to the State of California to
cause cancer, birth defects or other reproductive harm.
For more information go to www.P65Warnings.ca.gov
California Prop 65

pg. 2 Hearthstone Quality Home Heating Products Clydesdale Model 8492
Notes on Stove Operation and Efficiency
Rating:
You have purchased a Hearthstone Clydesdale 8492 tested to EPA Method 28, 28A and 5H, 40 CFR Part 60 where applicable.
This wood heater is certified to comply with the U.S. Environmental Protection Agency 2015 particulate emissions standard and is
approved for sale after May 15, 2020. It is certified at 1.16 gr/hr. emission rate and under specific test conditions has been shown
to deliver heat at rates ranging from 14,829 to 32,588 Btu (output).
This wood heater has a manufacturer-set minimum allowable low burn rate that must not be altered. It is against federal
regulations to alter this setting or otherwise operate this wood heater in a manner inconsistent with operating instructions in this
manual.
Please refer to the Warranty section of this manual for registration instructions. In case of warranty claims, please contact the point
of original sale or the nearest authorized Hearthstone dealer. Our dealer network processes all warranty claims. Authorized
Hearthstone dealers can be located at www.hearthstonestoves.com.
This heater is designed to burn natural wood only. Higher efficiencies and lower emissions generally result when burning air-dried
seasoned hardwoods, as compared to softwoods or to green or freshly cut hardwoods. DO NOT BURN: Garbage, lawn clippings,
material containing rubber (including tires), materials containing plastic, waste petroleum products paints or paint thinners, asphalt
products, materials containing asbestos, construction or demolition debris, railroad ties, pressure
treated wood, manure or animal remains, salt water driftwood or other previously saltwater saturated materials, unseasoned wood,
paper products, cardboard, plywood or particleboard. Burning these materials may result in a release toxic fumes or render the
heater ineffective and cause smoke. This prohibition against burning these materials does not prohibit the use of fire starters made
from paper, cardboard, sawdust, wax and similar substances for the purpose of starting a fire in the Clydesdale wood insert.
Following the maintenance guidelines set forth in this manual will help ensure the efficient use of your wood heater and minimize
visible emissions. Having your stove inspected by a trained professional on a regular basis will greatly increase the potential for
recognizing potential impacts to efficiency.
Proper draft is important to the efficient operation of your heater. Refer to the Normal Operation section of this manual for
information regarding adequate draft. Both excessive and sub-minimum draft can affect the efficiency of your wood heater.
Excessive draft can lead to over-consumption of fuel, lower overall heating capacity of the insert and potential over firing. Low draft
can result in inefficient burns, low heat output, expulsion of smoke into the living area when opened and an increased potential for
build-up of flammable materials in the flue.
Efficiency:
E
fficiency was measured and weighted using EPA Method 28R and CSA B415-10 methodology. A weighted average was used to
calculate the overall efficiency across all of the 4 burn rate categories using the higher heating value (HHV). The weighted average
efficiency is 79% (HHV).
To maximize the efficient use of your woodstove insert, make sure it is sized properly for the space you plan to heat. An oversized insert
will often be forced to burn at a lower and dirtier burn rate. Consult with your dealer for sizing and correctly placing the insert in your
home. Maximizing the efficiency of your wood insert will heat your house quickly, burn cleaner and use less wood.
Refer to the Choosing Firewood section of this manual for appropriate fuel selection. Seasoned firewood is typically at or below 20%
moisture content. This can be measured with any number of hand-held moisture meters available through your local hearth shop.
Follow instructions included in the meter you purchase to measure fuel wood moisture content. Burn only dry, seasoned wood as using
wet wood will greatly reduce your efficiency.
CO Emissions:
The Clydesdale 8492 has the following CO emission (g/hr.) rates by burn level: Category 1 –0.56 Category 2 –1.26 Category 3 –
.79 and Category 4 – 1.79. In general, the higher burn rate that can be safely maintained without
over-firing the stove the cleaner the stove will operate. Wet wood or unapproved fuel described above can greatly affect the
emissions of a wood burning stove.
Smoke/Fire/CO Detectors:
It is highly recommended that smoke and CO detectors be installed throughout the heated space when a wood burning heater is
installed. Be certain to install these devices not only in the area where the wood appliance is located, but also in bedrooms,
hallways leading to other areas of the house and all common areas of the heated space. Check the batteries in these devices and
assure operation by performing whatever test operations are recommended by the manufacturer.

pg. 3 Hearthstone Quality Home Heating Products Clydesdale Model 8492
TABLE OF CONTENTS
INTRODUCTION ..................................................................................................................... 4
CODES ............................................................................................................................................................................................................
SAFETY INFORMATION ................................................................................................................................................................................
PERIODIC CHECKLIST ..................................................................................................................................................................................
EMERGENCY PROCEDURES .......................................................................................................................................................................
SPECIFICATIONS .................................................................................................................. 7
INSTALLATION ...................................................................................................................... 8
UNPACKING ...................................................................................................................................................................................................
PACK LIST ......................................................................................................................................................................................................
INSTALLING YOUR STOVE...........................................................................................................................................................................
HEARTH REQUIREMENTS & FLOOR PROTECTION ................................................................................................................................
COMBUSTIBLE SURFACE REQUIRED CLEARANCES..............................................................................................................................
CHIMNEY CONNECTOR SYSTEMS AND CLEARANCES ..........................................................................................................................
OUTSIDE AIR SUPPLY .................................................................................................................................................................................
VENTING COMPONENTS & CONFIGURATION REQUIREMENTS ............................................................................................................
OPERATION ......................................................................................................................... 23
CONTROLS AND FEATURES ........................................................................................................................................................................
CHOOSING FIREWOOD ................................................................................................................................................................................
BUILDING A FIRE ..........................................................................................................................................................................................
NORMAL OPERATION ...................................................................................................................................................................................
MAINTENANCE .................................................................................................................... 29
CATALYTIC COMBUSTOR INSPECTION AND REPLACEMENT PROCEDURES .....................................................................................
INSPECTING THE CATALYSTS AND REMOVING/REPLACING THE BAFFLE ...........................................................................................
REMOVING OR REPLACING THE CATALYSTS ..........................................................................................................................................
REPLACING THE REFRACTORY STONE AND SECONDARY RISER ASSEMBLY ....................................................................................
GLASS REPLACEMENT PROCEDURES .....................................................................................................................................................
CREOSOTE FORMATION & REMOVAL ......................................................................................................................................................
GASKETS ........................................................................................................................................................................................................
GLASS .............................................................................................................................................................................................................
TROUBLESHOOTING .......................................................................................................... 33
COMMON ISSUES ..........................................................................................................................................................................................
TROUBLESHOOTING GUIDE ........................................................................................................................................................................
CATALYST TROUBLESHOOTING GUIDE ...................................................................................................................................................
REPLACEMENT PARTS & OPTIONAL ACCESSORIES .............................................................................................................................
SAFETY LABEL ................................................................................................................... 37
LIMITED WARRANTY .......................................................................................................... 38

pg. 4 Hearthstone Quality Home Heating Products Clydesdale Model 8492
INTRODUCTION
Congratulations! You have just invested in a most unique
wood burning Fireplace Insert – the Clydesdale Model
8492 is a clean burning EPA certified, TruHybrid™ wood
burning Fireplace Insert. You can be proud to join the
Hearthstone family with our Premier Cast Iron Wood
Burning Fireplace Insert.
The generous firebox depth and width allows for loading
of wood up to 22 inches long!
Your purchase ensures years of clean, comfortable heat
with minimal maintenance. The Clydesdale blends
modern, TruHybrid™ technology with the unique beauty
and heating qualities of soapstone (used as the firebox
lining) and cast iron. Soapstone is well known for its
even heat production and long heat-retaining ability. We
trust that you will appreciate the quality of our
handcrafted product.
Please read this manual in its entirety. Its purpose is to
familiarize you with your wood insert's safe installation,
proper break-in, operation and maintenance. It contains
information that is useful to you now, and in the years to
come. Keep it handy and refer to it as needed.
Use these instructions as well as national, state, and
local building codes to install your wood insert.
Ensure to maintain the designated chimney liner and
wood insert clearances to walls, ceilings, hearth, and
other combustible surfaces. This will help reduce the risk
of fire. Failure to follow these instructions can result in
property damage, bodily injury, and even death.
SAFETY NOTICE:
AN IMPROPERLY INSTALLED STOVE CAN
RESULT IN A HOUSE FIRE. FOR YOUR SAFETY,
CAREFULLY FOLLOW THE INSTALLATION
DIRECTIONS. CONTACT LOCAL BUILDING OR
FIRE OFFICIALS ABOUT RESTRICTIONS AND
INSTALLATION INSPECTION IN YOUR AREA.
The safety of your will depend on many factors, some
of which include: distance to combustible objects,
correct venting, and adequate chimney maintenance.
Should you have any questions, do not hesitate to
contact your dealer for additional information.
This stove should not be installed in a factory-built
fireplace.
This Clydesdale Model 8492 wood insert is warranted
through your dealer by:
Hearthstone Quality Home Heating Products, Inc®
317 Stafford Ave.
Morrisville, Vermont 05661, USA
www.Hearthstonestoves.com

pg. 5 Hearthstone Quality Home Heating Products Clydesdale Model 8492
CODES
When you install your Clydesdale woodstove
insert, it is imperative that you adhere to all Federal
and local codes. Obtain these codes from either of
the following sources:
American National Standards Institute, Inc. (ANSI)
1430 Broadway
New York, NY 10018
www.ansi.org
National Fire Protection Association, Inc. (NFPA)
Battery March Park
Quincy, MA 02269
www.nfpa.org
If you are installing your Clydesdale in a mobile or
manufactured home, follow the guidelines
described in the Manufactured Home Construction
and Safety Standard, Title 24 CFR, Part 3280
(United States).
SAFETY INFORMATION
Read and understand this Owner's Manual
thoroughly before installing and using this
Fireplace Insert.
Make sure to install your Fireplace Insert:
According to the manufacturer's
recommendations
In accordance with all applicable codes
With the proper sized chimney liner
When using your insert, follow these safety
precautions:
Never modify this fireplace insert in any way.
Never burn kiln dried, painted or treated wood in
this fireplace insert.
DO NOT BURN GARBAGE. Never burn garbage
or trash, colored or glossy paper, solvents,
plywood, artificial logs, cardboard, or driftwood, in
this fireplace insert.
Never burn coal in this stove.
DO NOT BURN FLAMMABLE FLUIDS.
DO NOT USE CHEMICALS OR FLUIDS TO
START THE FIRE. Never use gasoline,
kerosene, charcoal lighter fluid, or other
flammable fluids to start or invigorate the fire.
These fuels will cause dangerous burning
conditions in the stove. Keep all such materials
away from the fireplace insert.
Never use a wood grate or other device to
elevate the fire.
Never allow logs in the firebox to hit the glass
when the door is closed.
Never slam the door or use the door to force
wood in to the stove.
Never over-fire your fireplace insert. (See page
28)
Never put articles of clothing or candles on a hot
stove.
Never connect the stove to a flue used by
another appliance.
Never connect to or use in conjunction with any
air distribution ductwork unless specifically
approved for such installations
Other safety guidelines:
Keep all combustible items such as furniture,
drapes, clothing, and other items, at least 36"
(0.92 m) from the stove (See page 9)
Install a C O / smoke detector, preferably in an
area away from your wood stove.
Keep a fire extinguisher handy. We recommend
the type rated "A B C."
Dispose of ashes properly. (See page 28)
Keep children and pets away from the stove when
it is burning; they could be seriously injured by
touching a hot stove.
Clean your chimney system as needed.
Make-up combustion air may be required if:
1.
This solid-fuel-fired appliance does not
draw steadily, smoke rollout occurs, fuel
burns poorly, or back-drafts occur whether
or not there is combustion present.
2.
Existing fuel-fired equipment in the house,
such as other fireplaces or other heating
appliances, smell, do not operate properly,
suffer smoke roll-out when opened, or
back-draft whether or not there is
combustion present.
3.
Opening a window slightly on a calm
(windless) day alleviates any of the above
symptoms.
4.
The house is equipped with a well-sealed
vapor barrier and tight-fitting windows
and/or has any powered devices that
exhaust house air.

pg. 6 Hearthstone Quality Home Heating Products Clydesdale Model 8492
5.
There is excessive condensation on
windows in the winter.
6.
A ventilation system is installed in the
house.
If these or other indications suggest that infiltration air
is inadequate, additional combustion air should be
provided from the outdoors.
PERIODIC CHECKLIST
Perform each of these tasks at the specified
intervals.
At the End of Every Week:
Empty ashes from the firebox, sooner if the
firebox is full.
At the Beginning of Every Other Month:
Depending upon your use of the stove, visually
inspect the chimney connector and chimney for
creosote. (See page 3)
Check door seals using the "dollar bill test." -
When the stove is cool, shut the door on a dollar
bill. If the bill pulls out without any resistance,
then your stove’s door is not sealing properly.
To tighten the seal, adjust the door latch
mechanism or change the door gasket.
Inspect the face of the catalytic combustor for fly
ash and soot. Use an ash rated vacuum with a
soft-bristled brush attachment to vacuum fly ash
if present. It is recommended to visually inspect
the catalytic combustor at least 3 times during
the heating season, or every 2 months.
At the End of Every Season:
Have chimney/ liner and connection to the
insert inspected and cleaned by a professional
• Thoroughly clean out the firebox of the
Fireplace Insert.
Inspect all door gasket material and replace if
worn, frayed, cracked or extremely hard.
• Replace any badly cracked refractory
soapstone in the firebox.
•
Clean dust away from the ash lip assembly
and grills.
• Remove the Ash Lip Cover and inspect
the blower assembly - clean if necessary.
EMERGENCY PROCEDURES
If you have a stovepipe or chimney fire, follow these
instructions:
1.
If the fire is too threatening, leave the area and
call the fire department immediately! If not,
perform the next three steps.
2.
Close the primary air control.
3.
Close the stovepipe damper (if present).
4.
Close the bypass damper
5.
Keep the stove front door closed!
WARNING: DO NOT ATTEMPT TO PUT OUT A
STOVEPIPE OR CHIMNEY FIRE BY THROWING
WATER ONTO THE STOVE, STOVEPIPE, OR
CHIMNEY. THE EXTREMELY HIGH
TEMPERATURE OF SUCH FIRES CAN CAUSE
INSTANTANEOUS STEAM AND SERIOUS BODILY
HARM.
Once the chimney fire expires, leave the primary air
control and bypass handle closed and let the fire in
the stove die out completely. Inspect the stove,
stovepipe, and chimney thoroughly for any sign of
damage before firing the stove again. You must
correct any damage before using your stove again.
Contact your local municipal or provincial fire
authority for information on how to handle a chimney
fire. Have a clearly understood plan to handle a
chimney fire.
Establish a routine for the fuel, wood burner and
firing technique. Check daily for creosote build-up
until experience shows how often you need to clean
to be safe. Be aware that the hotter the fire the less
creosote is deposited, and weekly cleaning may be
necessary in mild weather even though monthly
cleaning may be enough in the coldest months.

pg. 7
Hearthstone Quality Home Heating Products Clydesdale Model 8492
SPECIFICATIONS
Maximum Heat Output:
60,000 BTU per hour of
cordwood (based on independent laboratory test
results).
Size of Heated Area:
Up to 2,000 square feet.
Firebox Capacity:
2.4 cubic feet or 48 pounds of
wood (The amount and weight of wood contained per
cubic foot of firebox volume can vary from 15 to 36 lbs.
per cubic foot depending on type of wood, moisture
content, packing density and other factors. As a
constant for comparison and test purposes, we are
assuming 20 lbs. of seasoned hardwood per cubic foot
of firebox volume).
Depth: 24.81” (63 cm)
Front Door Size: 22" wide x 11.5" high
(55.88 x 29.21 cm)
Chimney Liner Size: 6" (152 mm) diameter
Metal Chimney: 6" (152 mm) inside diameter
Masonry Chimney: 6” (15.2cm) inside diameter
(Round flue)
8” x 8” (20 x 20cm) (square
flue)
Maximum Log Length:
22” (55.88 cm)
Flue Exit: Top exit only
Height:
23.12" (58.72 cm)
Width:
31.38” (80.31 cm)
Actual Weight: 550 pounds
Castings Finish: Painted Matte or Porcelain
Enamel
Figure 1 – Clydesdale Dimensions
*Bracket can be cut
back to this width if
necessary
*

pg. 8
Hearthstone Quality Home Heating Products Clydesdale Model 8492
INSTALLATION
UNPACKING
Pre-Installation Prep
Hearthstone packages your Clydesdale Fireplace
Insert with the greatest care so that it ships safely.
Under certain circumstances, however, damage can
still occur during transit and handling. When you
receive your Fireplace Insert, unpack it carefully,
inspecting it, and all parts for damage. Also, ensure
that all parts are included. If any parts are damaged
or missing, please contact your dealer immediately.
PACK LIST
1- Clydesdale 8492 Fireplace Insert
1- Façade and Ash Lip w/ blower (in place on
insert)
1- Façade Top Grill (in place on insert)
2- Catalysts (ships in firebox)
1- Surround Kit Box (ships on top of insert)
In Firebox:
2- Boxes, Refractory Stone Kit (A & B)
1- Bag, Wood Handle Kit (2 handles and
2 screws).
1- Envelope, Owner’s Manual Packet
1- Pouch, Touch-up Paint (Enamel only)
When installing this unit in a fireplace, you must
attach the provided metal label (3300-148) to the
fireplace prior to installing the insert (see illustration
WITH ALL CHIMNEYS, A POSITIVE CONNECTION
MUST BE MADE BETWEEN THE FIREPLACE
INSERT’S FLUE COLLAR AND THE CHIMNEY (see
page 9)
Ensure that the Fireplace Insert will have enough
clearance to combustible materials in the vicinity.
These combustibles can include walls, floor, ceiling,
fireplace mantle, and chimney decor. You must
carefully consider the clearances to all of these
combustibles before actually connecting your
Fireplace Insert.
This stove should not be installed in a factory-built
fireplace.
Read this chapter to obtain a sound understanding of
how to properly install your Fireplace Insert. Contact
the following agency for more information:
National Fire Protection Agency
Batterymarch Park
Quincy, MA 02269
1-800-344-3555
1-617-770-3000
www.nfpa.org
on
p
age
9
).

pg. 9 Hearthstone Quality Home Heating Products Clydesdale Model 8492
Venting Components & Configuration
Installing a Venting System
DO NOT CONNECT THIS UNIT TO ANY AIR
DISTRIBUTION DUCT OR SYSTEM
Secure all joints, including attaching the flue
liner to the Fireplace Insert's flue collar, with
three sheet metal screws. Install #10 x 1/2" (3 mm
x 13 mm) sheet metal screws into the holes pre-
drilled in the flue collar. Eliminating the screws can
cause joints to separate from the vibrations that
result from a creosote chimney fire.
Remember, the NFPA has recommended minimum
clearances for chimney connectors to combustibles
such as walls and ceilings. Once the Fireplace Insert
is installed at safe distances from these combustible
surfaces, it is important to maintain these connector
clearances for the remainder of the installation.
Connecting Your Wood Fireplace
Insert
You can connect your Clydesdale to a prefabricated
metal chimney or a masonry chimney. See Figure A
for an example to aid in connections.
With all chimneys, a positive connection must be
made between the fireplace insert’s flue collar
and the chimney.
In an existing Masonry Chimney:
1. Connect the insert to a listed 6” stainless steel
flexible connector that connects to a listed 6”
stainless steel liner extending the full length of the
chimney.
2. In all cases, a sealed block off plate, or a plug of
other noncombustible material such as unfaced
fiberglass insulation, must be installed at the damper
area of the existing fireplace to seal the chimney
from the room air.
The fireplace insert must be installed with a
continuous chimney liner with a minimum diameter of
6” extending from the fireplace insert to the top of the
chimney. The chimney liner must conform to the
class 3 requirements of chimney liner standards
ULC-S635 or ULC-S640.
Do not use aluminum or galvanized steel pipe as
a connector or chimney liner. These materials
are not suitable for solid fuel burning
applications.
Connecting to a Prefabricated
Metal Chimney
Before installing the stove in a prefabricated metal
chimney, the fireplace must have the following
characteristics:
1) Include a full height listed chimney liner meeting
ULC-S635 or ULC-S640 standards.
2) The means to prevent room air passage to the
chimney cavity of the fireplace.
3) Does not disturb the airflow in or within the
fireplace when installed (louvers, or cooling air
inlet or outlet ports must not be blocked).
4) Not be altered in any way, except for the
following:
a) External trim pieces which do not affect the
operation of the fireplace can be removed,
providing they are stored on or within the
fireplace for re-assembly if the insert is
removed.
b) The chimney damper can be removed to
install the chimney liner.
5) Must not have blocked circulating chambers (if
available).
6) The means for removing the insert to clean the
chimney flue.
7) Have a permanent metal warning label (provided
with the Clydesdale—see following illustration)
attached to the fireplace by riveting it to the
outside wall, stating that the fireplace must be
restored to its original condition for safe use
without the insert.

pg. 10 Hearthstone Quality Home Heating Products Clydesdale Model 8492
WARNING: DO NOT CONNECT THE FIREPLACE
INSERT TO A CHIMNEY FLUE SERVING ANOTHER
APPLIANCE.
Ensure the size of the chimney’s flue is appropriate
for the Clydesdale. The Clydesdale requires a 6"
(152 mm) inside diameter flue for new installations. A
6” diameter flue provides adequate draft and
performance. You can use an 8" (203 mm) diameter
existing flue with a reducer. An oversized flue
contributes to creosote accumulation. (In this case,
bigger is NOT better.)
There are two ways to install a prefabricated metal
chimney:
An interior installation where the chimney passes
inside the residence through the ceiling and roof.
An exterior installation where the chimney passes
through the wall behind the Fireplace Insert then up
the outside of the residence.
Whenever possible, choose an interior chimney. An
interior chimney heats quickly and retains its heat;
thus promotes a better draft and discourages the
formation of creosote. An exterior chimney does not
benefit from the surrounding warmth of the building,
so it typically operates at lower flue temperatures than
an interior chimney. An exterior chimney’s draft is not
as strong and may experience increased creosote
accumulation.
REMOVE THE DAMPER OR LOCK IT OPEN.
Connection to a Masonry Chimney
Hire a professional to examine the masonry chimney
for cracks, loose mortar, and other signs of
deterioration and blockage before connection. If the
chimney needs repairs, complete them before
installing and using your Fireplace Insert. Do not
install your Fireplace Insert until the chimney is safe
for use.
The masonry chimney must be lined from the insert
to the flue cap with a listed 6” stainless steel flexible
connector that connects to a listed 6” stainless steel
liner extending the full length of the chimney.
Use the following checklist to ensure that your
masonry chimney meets these minimum
requirements:
Chimney wall construction:
A brick, modular block, rubble or stone wall at
least 4" (102 mm) thick.
Flue liner:
Minimum ceramic flue liner thickness of 5/8" (16
mm). Installed with refractory mortar and with at
least 1" (25 mm) air space.
An equivalent listed chimney flue liner system
meeting class 3 requirements of chimney liner
standards ULC-S635 or ULC-S640.
Interior chimney requirements:
At least 2" (51 mm) clearance to combustible
structure
Fire stops installed at the spaces where the
chimney passes through floors and/or ceiling.
Insulation must be 2" (51 mm) from the chimney.
Exterior chimney requirements:
At least 1" (25 mm) clearance to combustible
structure.
Chimney height requirements: (See page 11)
At least 3 feet (0.9 m) higher than the highest part
of the roof opening through which it passes.
At least 2 feet (0.6 m) higher than any part of the
roof within 10 feet (3 m) measured horizontally
from the top of the chimney. This Fireplace Insert
requires a minimum chimney height of 13 feet (4
m). The maximum recommended chimney
height is 30 feet (9m).
IMPORTANT: You must seal the damper area
around the chimney liner to prevent room air
from entering the chimney cavity of the
fireplace.
WARNING: DO NOT REMOVE BRICKS OR
MORTAR FROM THE EXISTING FIREPLACE!
(Exception) Removal of masonry or steel (including
the damper plate) from the smoke shelf and adjacent
damper frame if necessary to accommodate a
chimney liner, provided their removal will not weaken
the structure of the fireplace and chimney, and will not
reduce protection for clearance to combustible
materials to less then required by the National
Building Code.

pg. 11
Hearthstone Quality Home Heating Products Clydesdale Model 8492
Figure A – CONNECTING TO A MASONRY CHIMNEY

pg. 12
Hearthstone Quality Home Heating Products Clydesdale Model 8492
Masonry Fireplace must be built to NFPA211
standards.
R1.5 insulation below hearth protection OR bottom of
insert installed minimum 7” above hearth protection
with R0 insulation.
Mantle Shield 94-79700 is available to
install to achieve shielded mantle
clearances.
Measured from bottom
of fuel loading opening
All measurements from sheet metal shroud unless otherwise
noted
Fi
g
ure 2
–
Minimum Fire
p
lace Dimensions
Hearth Requirements & Floor
Protection
Combustible flooring must be protected with a covering of
noncombustible material (slate, marble tiles, other
noncombustible material can be used for this purpose). The floor
protection must extend beyond the body of the Fireplace Insert
at the minimum as follows. Insulation below the non-combustible
material must be R1.5 insulation below hearth protection OR
bottom of insert installed minimum 7” above hearth protection
with R0 insulation
(13.25” if measured from bottom of fuel opening).
Installing the stove in a room with Luxury Vinyl Plank (LVP) or Luxury
Vinyl Tile (LVT) flooring requires extra consideration from the stove to
the LVP or LVT flooring. Some LVP and LVT flooring begins to warp at
110° Fahrenheit. Each installation and flooring specification is different.
Consult the flooring manufacturer for maximum temperature
recommendations. Additional shielding to prevent warping may
be necessary depending on the flooring used.
Clearances to Combustibles
*Measured from fuel door o
p
enin
g
.
Fi
g
ure 4
–
Clearance to Combustibles Dimensions

pg. 13
Hearthstone Quality Home Heating Products Clydesdale Model 8492
Clearances to unprotected mantle
Clearances to shielded mantle
Mantle Shield 94-79700 is available to install to
achieve shielded mantle clearances.
Clearances to NFPA 211 Protected
Surfaces
You can reduce the clearances to combustible
surfaces by using any National Fire Protection Agency
(NFPA) approved wall protection system. Refer to
NFPA 211 for specific and complete details:
National Fire Protection Agency
Battery March Park
Quincy, MA 02269
1-800-344-3555
1-617-770-3000
www.nfpa.org

pg. 14
Hearthstone Quality Home Heating Products Clydesdale Model 8492
Familiarizing yourself with the stove:

pg. 15
Hearthstone Quality Home Heating Products Clydesdale Model 8492
Unpacking and Installing the Insert
Step One: Remove the contents of the firebox. This
will include the owner’s manual packet, two boxes
of soapstone refractory bricks, a bag of two
catalyst, and a pouch containing enamel touch-up
(if applicable).
Step Two: Remove the Clydesdale from the pallet
(see Figure 6).
Locate the four mounting clips attached to the
leveling bolts (two in the front and two in the
back) which secure the insert to the shipping
pallet. Remove the lag bolts and clips with a 1/2"
wrench. The front two clips are under the
Facade (see figure 6). Removing the facade
and ash lip will ease clip removal and handling
the insert.
When working on or around
enamel parts handle them with care.
1.
Remove Ash Lip by backing out the setscrews
just below both front corners of the ash lip.
Then with the door opened wide, lift the front
edge of the ash lip slightly (avoid making
contact with door) and move it to the left (If
the door hinges are on the left move ash
lip to the right.) and out from under the door.
Remove the grill (see figure 5). Remove the
bypass knob from the push-pull rod.
2.
Close the door to within 1 inch, turn the
door handle to the 12 o-clock position. Grip
the facade (see figure.5) by the sides,
close
to the height of the ash lip, and pull the
bottom of the façade
out about 2 inches to
clear the door and handle, lift slightly and
slide facade off of bypass rod.
Step Three:
Measure fireplace for flue arrangement.
Determine the position of the insert in relationship to
where the chimney liner enters the fireplace. The flue
collar can be installed at 30 degrees as well as vertical.
See figure 1.
Step Four:
Remove Flue Collar from Insert.
The flue collar bolts can be accessed through the
fuel loading door opening. To get at the bolts a few
steps must first be taken:
1.
Remove the baffle halves by lifting the right side of
the baffle support off of the stone retainer. Slide the
baffle support to the right and detach it from the left
side (see figure 7).
2.
Slide baffle halves, one at a time to the front of the
stove and remove. Note: The baffles can be broken by
mishandling. Take care not to bump or crush them.
3.
Remove the access plate (see figure 8) using a
7/16" socket wrench.
Fi
g
ure 7
–
Baffle Su
pp
ort and Baffle Half
(
left side
)
Figure 8– Access Plate and Catalyst Detail
Half (left side shown)
Figure 6 – Pallet Mounting Clip Detail (Left
Front Shown - Façade and Ash lip
Removed)

pg. 16
Hearthstone Quality Home Heating Products Clydesdale Model 8492
4.
Remove flue collar from insert. Once collar is
removed, hand tighten bolts to keep the long
section of locks pointing to center. This position
will aid in handling collar from inside stove and
keep them from flopping around. A good view of
bolts can be had by looking through the bypass
door opening.
Step Five: Install the flue collar to the liner (using three
screws) adjust position of flue collar and seal remaining
chimney opening. The flue collar should be hanging in
the fireplace close to the height it will be when
reattached to the insert (see figure 10). The flue collar
should also be positioned so the lock bolts are parallel to
the back wall of the fireplace. This way, the flue collar will
need a minimal amount of adjustment when the insert is
pushed into its final position.
NOTE: Before final installation, check the floor
of the fireplace for uneven bricks or stones at
the points the insert levelers will sit. Using a
level, determine how much the front and rear
leveling bolts need to be adjusted. It's best to
have the insert installed level, or tilted slightly
back so the door will not swing open on its
own. The rear bolts can only be adjusted
before the unit is installed.
If the hearth is very uneven, consider laying
down a piece of sheet metal to aid in sliding
and positioning the insert into place.
Figure 9 - View Through Bypass Door
Opening
Figure 10 - Flue Collar Ready

pg. 17
Hearthstone Quality Home Heating Products Clydesdale Model 8492
Step Six:
Attach the surround mounting bracket (see kit
94-5991110 instructions).
Note: If the insert will be placed far enough into the
fireplace so that the bracket will interfere with the re-
installation of the facade and grill, now is a good time to
reinstall them. First, check the position of the catalyst
probe (see figure 12) and adjust if needed. Also, if the
door and/or power cord are to be reversed (see page 20)
Optional Installation steps for detail) do these before re-
installing facade.
To mount the facade, pull the bypass rod
out (with knob
removed), and reverse the
procedure in step 2 subsection
2.
As the facade is being mounted be sure to let the clips on
the top rear corners fall into the cast pockets (see figure
12) so it will sit in the correct position. The crossbar on
the facade will not fit into the groove under the door if the
top of the facade is not down in the pockets correctly. If
the facade and grill are enameled, the grill will have
screws in the bottom corners to keep it slightly above the
facade to prevent chipping. There should be no need to
adjust these screws.
Step Seven: Move the insert into position. Check level and
measure to be sure the insert is centered and parallel to the
fireplace. Look through the bypass door opening to confirm
collar is where expected.
Step Eight: Use the flue collar locks (see figure 9) to pull
the collar into position, then swing each so the short arm
becomes captured between the cast stops on either side of
the opening. This will prevent the collar from pulling away
as the bolts are tightened.
NOTE: Take care that while tightening the lock bolts that
they are parallel to the stove and that the rib on the bottom
of the collar is seated in the gasket groove on the top of the
insert.
Step Nine: Reinstall the baffle (see figure 7 & 11) by
reversing step 4 subpart 1.
Step Ten:
Reinstall the ash lip by reversing step 2 subpart
1 (see figure 6). The rear of the ash lip will fit against the
gasket under the door. This is a seal to prevent ashes from
falling into the blower area. Be careful with enamel parts.
Ash lip may be tight fitting and require some downward
force to get the front to drop in.

pg. 18
Hearthstone Quality Home Heating Products Clydesdale Model 8492
Step Eleven – Install refractory stone.
Floor stones are in (ABC) BOX B
Side and back stones (EFD) are in BOX A
Lay out the stones on a piece of cardboard to sort
the different sizes (a tape measure is handy for
this) into stacks so they can be selected when
needed. Use figure 13 to identify and locate the
stones correctly.
Note:
To get the side stone under the stone retainer
(see figure 7) install them far to the front of the firebox
and slide them to the back.
Install the refractory stone in the following order:
1.
Stone D (2 stones), Center rear wall stones (1-0000-103).
2.
Stone E (2 stones), Side wall stones (1-0400-904).
3.
Stone F (2 stones), Side wall stones (1-0400-905).
4.
Stone A (2 stones), Front floor outer stones (1-0000-101).
5.
Stone A (2 stones), Rear floor outer stones (1-0000-
101) do not push them to the back wall yet.
6.
Stone D (2 stones), Outer rear wall stones (1-0000-
103) one at a time. Hold each of these up and push
each Center floor Stone A under rear stone (see figure
13).
7.
Stone C (1 stone), Front square floor stone (1-0400-902).
8.
Stone A (1 stone), Front sideways floor stone (1-0000-
101).
9.
Stone B (1 stone), Rear floor center stone (1-0000-001).
Figure 14: Door and Bypass Knobs
Figure 13 – Refractory Stone Layout

pg. 19
Hearthstone Quality Home Heating Products Clydesdale Model 8492
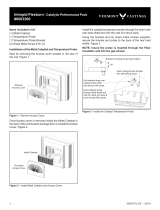
Installing the Catalyst
The two catalysts are shipped in a bag located in the
firebox for shipment. Remove the catalysts from the bag
and install them through the access hole after the chimney
liner has been installed.
The catalyst sit in pockets to either side of the access
opening. They do not require gasket.
Reinstall the access hole cover after the catalyst are
installed.
Installing the surround
Remove the surround components from the large cardboard box
that accompanied the Clydesdale Insert. Included are the
surround panels, assembly hardware, and surround mounting
bracket. Refer to the instructions included with the surround for
complete assembly and installation.
Read this Owner’s Manual for all other installation and
operational requirements.
Optional Installation Steps
There are two options that can improve the convenience of
installation and operation that are worth considering. They
both involve the removal of the facade and should be done
before final installation.
Continued on next page.

pg. 20
Hearthstone Quality Home Heating Products Clydesdale Model 8492
Reversing the Door
The door can be reversed to open from the
right (hinges on left). The default is door
opens from the left to the right. To get the
door to level and center may require
several adjustments. Having the door level
and centered is important for a good seal to
the insert. If in doubt about this process
have a professional installer do the reversal.
Although the door can be reversed while the
facade is installed it's easier to do with the
facade removed.
Step 1:
Open door fully and note the
position of the hinges where they attach to
the insert. With a pencil draw a circle
around the head of the screws (see figure
15) where they attach the fixed hinges.
These circles will give a starting point
when the hinges are moved to the other
side of the insert.
Step 2:
Using a 5/32 (4mm) hex wrench,
remove top and bottom screws (see figure
16) from left side holes where hinges will
be mounted. Remove latch catch.
Save
screws to plug holes when hinges and
catch are moved.
Note:
If the facade is installed, follow step 2
subpart 1and 2 of "Unpacking And
Installing The Insert" to remove it.
Figure 15: Mark Hinges
Figure 16: Transfer Latch and Screws
/