Page is loading ...

Customer Service Center
Decatur, Illinois
800.423.1323
www.muellercompany.com
moreinfo@muellercompany.com
WARNING: Before working on, or disassembling the Hydrant (including removing any bolts(s) holding the Hydrant together), shut off gate valve to isolate
Hydrant from main water source. Loosen (do not remove) one nozzle cap two turns and check for water under pressure inside Hydrant - bleed off any pressure, then
remove nozzle cap completely. Open Hydrant main valve completely. A continuous ow of water, no matter how slight, indicates Hydrant is not properly isolated from
the main water supply, and that problem must be corrected before any Hydrant disassembly can proceed. Disassembly of Hydrant with pressurized water acting
against the main valve could result in unexpected ejection of Hydrant parts, debris or high-pressure water stream, which could cause serious bodily injury.
Reliable Connections
TM
Super
Centurion®
350 Fire
Hydrant
MUELLER®
opERating instRUctions ManUaL
TABLE OF CONTENTS PAGE
Inspection and Maintenance 2
Filling Oil Reservoir 3
Facing the Hydrant 4
RestoringServiceafterTrafcKnockover 5-6
MainValveReplacement:BonnetFlange 7-8
MainValveReplacement:LowerBarrelFlange 9-10
ReplacingDamagedNozzles 11
ChangingtheShoe 12
AddinganExtension 13-14
Parts 15
RepaintingtheHydrant 16
!

MUELLER® Super Centurion 350 Fire Hydrant
Inspection and Maintenance
23
Remove all Nozzle Caps. Clean and
lubricate threads.
ExamineinsideofBarreltomake
certain Drain Valves have completely
drained water from Barrel. If water
fails to drain from Barrel, it may
be caused by one or more of the
following conditions:
1. Water Table in ground is higher
than drains.
2. When Hydrant was installed,
coarse gravel was not placed around
Drains, in locations where ground
hasamakeupsuchthatitwillnot
absorb water.
3. Drains are stopped by some
foreign material.
4. Failure to leave Cap off of Hydrant
to allow air to enter so Barrel will
drain.
The foregoing procedure introduces
full line pressure to Drain Valves.
It provides the best method for
cleaning Drain Valves using water
pressure.
IMPORTANT - Initial installation
of Hydrant MUST BE MADE
PROPERLY so Trafc Flange
will function properly. Hydrant
should be blocked at ground line
and around Shoe using concrete
or similar substance to prevent
ground from giving way when
Hydrant is struck.
This manual applies to all Mueller
SuperCenturion350FireHydrants.
Inspection
To ensure their readiness for
immediate use, it is recommended
that Fire Hydrants be inspected and
testedatsix-monthintervals.
Inspect visually for damaged or
missing parts.
Loosen one Nozzle Cap slightly and
tighten the others. Open Hydrant
fully. Tighten loose Nozzle Cap
whenwaterstartstoow.Remove
OilFillerPlugtocheckoillevel.Ifoil
levelislow,llasshownonpage
3.Checkallangeconnectionsfor
leaks.TurnOperatingNuttofully
CLOSED position.
IfwateroroiloverowedfromOil
Filler Hole, remove Bonnet and
replaceO-ringsinboththeBonnet
and the Hold Down Nut. Inspect
and clean Stem, and replace it if
corrodedorpitted.Checkoillevel.
ReplaceBonnetandtestforleaks.
UseA-367BrassSleevewhen
removing or replacing Bonnet or
Hydrant Barrel to protect stem
O-rings.
Remove one Nozzle Cap, stand on
the side of Hydrant opposite the cap
removed, open Hydrant fully, and
ushBarrelandHydrantLateral.
Turn Operating Nut to fully CLOSED
position.
For additional information on
Hydrantanchorage,blocking,and
drainage, see AWWA Standard
C600andManualM17.
Assembly
Proper assembly of Super Centurion
350HydrantThrustBearingontop
of Thrust Collar. (A.)
3-pieceThrustBearingassembled
on Operating Nut Thrust Collar
(shown partially withdrawn from
bonnet to show bearing detail).
Roller Bearing/Race must be located
between the upper and lower
Bearing Washers (B.).
GENERAL
A.
B.

MUELLER® Super Centurion 350 Fire Hydrant
2
Filling Oil Reservoir
3
RemoveOilFillerPlugandcheckoil
level. Oil should be level with Oil Filler
Plug Hole.
If oil is low, use a small funnel to add
MUELLER Hydrant Lubricant.
WhenoilislevelwithOilllerPlug
Hole, replace Oil Filler Plug.
1. 2. 3.
CAUTION: Always ll the oil reservoir with the Bonnet installed, the Hydrant in its normal upright position, and
the main valve fully closed. If the Hydrant is lled with lubricant under any other circumstances, excess lubricate can
overll the Bonnet and create a pressure lock. This could result in damage to the seals or Bonnet or prevent proper
Hydrant operation.
!
EQUIPMENT & TOOLS NEEDED –PPE:Safetyshoes,safetyvest,safetyglasses,workgloves.
Tools: 1/4”hex-headwrench,A-51lubricatingoil.

MUELLER® Super Centurion 350 Fire Hydrant
Facing the Hydrant
1. 3.
LoosenNutsonTrafcFlangeBolts. Rotate Upper Barrel section as desired.
4. 5.
Tighten Operating Nut, turning in
closing direction.
TightenTrafcFlangeBoltsto60ft-lbs. Turn Operating Nut in closing direction
tomakesureMainValveisclosed
tightly, then turn in opening direction
approximately1/4turntorelieve
tension on operating mechanism.
2.
6.
Turn Operating Nut slightly in the
opening direction to relieve compression
between Barrel sections.
4
EQUIPMENT & TOOLS NEEDED –PPE:Hardhat,safetyshoes,safetyvest,safetyglasses,workgloves.
Tools: A-311operatingwrenchandproperbolt/nutwrenches.
5

MUELLER® Super Centurion 350 Fire Hydrant
Restoring Service after Trac Knockover
4.
Remove stainless steel Cotter Pin from stainless steel Clevis Pin. Remove Clevis
PinandbrokenTrafcCouplingfromUpperStem.Unboltandremovebroken
TrafcFlangefromUpperBarrel.RemoveHold-DownNut,ThrustBearing,and
OperatingNutfromBonnet.LubricateA-367BrassSleeveandslideoverthreaded
StemendtopreventO-ringdamage.UnboltBonnetfromUpperBarrel.SlideUpper
Stem out of Bonnet and remove Brass Sleeve.
AssembleUpperStemandnewTrafc
Coupling onto Lower Stem and retain it
with the new stainless steel Clevis Pin
and new stainless steel Cotter Pin.
2.
Remove stainless steel Cotter Pin from
stainless steel Clevis Pin in Lower Stem
(throw away the old Clevis Pin, Cotter
Pin,andoldTrafcCoupling).
3.
AssemblenewTrafcCouplingto
Upper Stem with new stainless steel
Clevis Pin and new stainless steel
Cotter Pin.
NOTE: “This End Up” Molded on
Coupling.
1.
WARNING: Before removing any bolt(s) holding the Hydrant together, shut off gate valve to isolate Hydrant from
main water source. Loosen (do not remove) one nozzle cap two turns and check for water under pressure inside Hydrant
– bleed off any pressure, then remove nozzle cap completely. Open Hydrant main valve completely. A continuous ow
of water, no matter how slight, indicates Hydrant is not properly isolated from the main water supply, and that problem
must be corrected before any Hydrant disassembly can proceed. Disassembly of Hydrant with pressurized water acting
against the main valve could result in unexpected ejection of Hydrant parts, debris or high-pressure water stream,
which could cause serious bodily injury.
!
5
EQUIPMENT & TOOLS NEEDED –PPE:Hardhat,safetyshoes,safetyvest,safetyglasses,workgloves.
Tools:Wrench,A-311operatingwrench,A-367BrassSleeve,TrafcFlangeRepairKit.

MUELLER® Super Centurion 350 Fire Hydrant
Restoring Service after Trac Knockover
CAUTION: Always ll the oil reservoir with the Bonnet installed, the Hydrant in its normal upright position, and
the main valve fully closed. If the Hydrant is lled with lubricant under any other circumstances, excess lubricate can
overll the Bonnet and create a pressure lock. This could result in damage to the seals or Bonnet or prevent proper
Hydrant operation.
5.
AttachUpperBarrelwithnewTrafc
Flange Halves (with bevel on outer
edge downward) and Bolts; being sure
TrafcFlangeO-ring*isingroovein
UpperBarrel.TightenBoltsto60ft-lbs.
7.
8.
Remove Oil Filler Plug in side of Bonnet.
Pour MUELLER Hydrant Lubricant into
Oil Reservoir until it is level with Oil Filler
Plug Hole. Replace Oil Filler Plug (see
Lubrication section on page 3).
9.
6.
Turn Operating Nut in closing direction
tomakesureMainValveisclosed
tightly, then turn in opening direction
approximately1/4turntorelieve
tension on operating mechanism.
CheckBonnetO-ring*forproper
position and condition. Attach Brass
Sleeve to Upper Stem and lubricate
outsidetoprotectO-ringSealsfrom
thread damage. Place Bonnet onto
Upper Barrel and assemble Bonnet
Boltsonlyhand-tight.RemoveBrass
Sleeve. Reassemble Operating Nut,
ThrustBearing,andHold-DownNut
(snug-tighten).BesureO-ringSeals
are in good condition at thread shoulder
onoutsideofHold-DownNutandon
inside where contact is made with
Operating Nut.
*TodeterminecorrectO-ringsforBonnetandGroundLineanges,whicharesimilarin
appearance:smallerdiameterO-ringisusedatBonnetange;largeratGroundlineange.
!
6
EQUIPMENT & TOOLS NEEDED –PPE:Hardhat,safetyshoes,safetyvest,safetyglasses,workgloves.
Tools:Wrenches,A-311operatingwrench,A-367BrassSleeve,TrafcFlangeRepairKit.
TorqueBonnetBoltsto40-80ft-lbs.
TorqueHold-DownNutto200-300
ft-lbs.afterBonnetBoltsaretight.Open
GateValve.UnscrewoneHoseNozzle
Cap slightly to bleed air. Open Hydrant
fully. Tighten Hose Nozzle Cap when
waterstartsowingandcheckallange
connectionsforleaks.TurnOperating
Nut to fully closed position and remove
Hose Nozzle Cap to allow Barrel to
drain. Replace Hose Nozzle Cap.
7

MUELLER® Super Centurion 350 Fire Hydrant
Main Valve Replacement: Bonnet Flange
1.
4.
RemoveHold-DownNutOperating
Nut and Thrust Bearing from Bonnet.
LubricateA-367BrassSleeveandslide
overthreadedstemtopreventO-ring
damage. Unbolt and remove Bonnet.
Remove Brass Sleeve.
StraightenstainlesssteelLockWasher,
unscrew Cap Nut and remove Washer,
Stem Seal, Lower Valve Plate, Main
Valve and Seat Ring. Clean, inspect and
replace any damaged parts (Main Valve
can be reversed to provide new seal).
Replace Drain Valve Facings. Inspect
and lubricate Top and Bottom Seat Ring
O-rings(replaceifnecessary).Lubricate
all threaded surfaces and reassemble.
WithCapNuttightenedto100ft-lbs,
bendedgesofstainlesssteelLock
WasheroveroneatontheLowerValve
PlateandoneatontheCapNut.
2. 3.
SlideslottedendoftheA-359Seat
Wrench over top of Stem and engage
the slot with Pin in Upper Stem. Thread
Operating Nut onto stem and tighten
against wrench to hold it securely.
Pull up on the Seat Wrench to be sure
the main valve is completely closed.
Lowersupportarmontotopangeof
the Upper Barrel and tighten Thumb
Screw to hold the Main Valve in the
closed position. Remove Main Valve
Assembly by turning Seat Wrench
counter-clockwise.
Lift out Wrench, Lower Stem, Main
Valve Assem bly and Seat Ring from
Hydrant Barrel as a unit.
7
WARNING: Before removing any bolt(s) holding the Hydrant together, shut off gate valve to isolate Hydrant from
main water source. Loosen (do not remove) one nozzle cap two turns and check for water under pressure inside Hydrant
– bleed off any pressure, then remove nozzle cap completely. Open Hydrant main valve completely. A continuous ow
of water, no matter how slight, indicates Hydrant is not properly isolated from the main water supply, and that problem
must be corrected before any Hydrant disassembly can proceed. Disassembly of Hydrant with pressurized water acting
against the main valve could result in unexpected ejection of Hydrant parts, debris or high-pressure water stream,
which could cause serious bodily injury.
!
5.
Lower Main Valve into the Barrel.
Lower Support Arm and tighten Thumb
Screw. Carefully thread main valve
assemblyclockwiseintothebaseofthe
Hydrant. Hand tighten.
EQUIPMENT & TOOLS NEEDED –PPE:Hardhat,safetyshoes,safetyvest,safetyglasses,workgloves.
Tools:Wrench,A-367brasssleeve,A-359seatwrench,A-311operatingwrench,MainValveRepairKit,A-51lubricatingoil.

9
CAUTION: Always ll the oil reservoir with the Bonnet installed, the Hydrant in its normal upright position, and
the main valve fully closed. If the Hydrant is lled with lubricant under any other circumstances, excess lubricate can
overll the Bonnet and create a pressure lock. This could result in damage to the seals or Bonnet or prevent proper
Hydrant operation.
!
MUELLER® Super Centurion 350 Fire Hydrant
Main Valve Replacement: Bonnet Flange
8.
Remove Oil Filler Plug on side of
Bonnet. Pour MUELLER Hydrant
Lubricant into Oil Reservoir until it is
level with Oil Filler Plug Hole. Replace
Oil Filler Plug (see Lubrication section
on page 3).
10.
7.
Turn Operating Nut in closing direction
tomakesureMainValveisclosed
tightly, then turn in opening direction
approximately1/4turntorelieve
tension on operating mechanism.
CheckBonnetO-ring*forproper
positionandcondition.AttachA-367
Brass Sleeve to Upper Stem and
lubricateoutsidetoprotectO-ringSeals
from thread damage. Place Bonnet
onto Upper Barrel and assemble
BonnetBoltsonlyhand-tight.Remove
Brass Sleeve. Reassemble Operating
Nut,ThrustBearing,andHold-Down
Nut(snug-tighten).BesureO-ring
Seals are in good condition at thread
shoulderonoutsideofHold-DownNut
and on inside where contact is made
with Operating Nut.
*TodeterminecorrectO-ringsforBonnetandGroundLineanges,whicharesimilarin
appearance:smallerdiameterO-ringisusedatBonnetange;largeratGroundlineange.
8
9.
TorqueBonnetBoltsto40-80ft-lbs.
TorqueHold-DownNutto200-300
ft-lbs.afterBonnetBoltsaretight.Open
GateValve.UnscrewoneHoseNozzle
Cap slightly to bleed air. Open Hydrant
fully. Tighten Hose Nozzle Cap when
waterstartsowingandcheckallange
connectionsforleaks.TurnOperating
Nut to fully closed position and remove
Hose Nozzle Cap to allow Barrel to
drain. Replace Hose Nozzle Cap.
EQUIPMENT & TOOLS NEEDED –PPE:Hardhat,safetyshoes,safetyvest,safetyglasses,workgloves.
Tools:Wrench,A-367brasssleeve,A-359seatwrench,A-311operatingwrench,MainValveRepairKit,A-51lubricatingoil.
6.
TightenMainValveto100-150ft-lbs.RemoveWrenchfromStembyremoving
Operating Nut.

WARNING: Before removing any bolt(s) holding the Hydrant together, shut off gate valve to isolate Hydrant from
main water source. Loosen (do not remove) one nozzle cap two turns and check for water under pressure inside Hydrant
– bleed off any pressure, then remove nozzle cap completely. Open Hydrant main valve completely. A continuous ow
of water, no matter how slight, indicates Hydrant is not properly isolated from the main water supply, and that problem
must be corrected before any Hydrant disassembly can proceed. Disassembly of Hydrant with pressurized water acting
against the main valve could result in unexpected ejection of Hydrant parts, debris or high-pressure water stream,
which could cause serious bodily injury.
!
EQUIPMENT & TOOLS NEEDED –PPE:Hardhat,safetyshoes,safetyvest,safetyglasses,workgloves.
Tools:Wrench,A-367brasssleeve,A-359seatwrench,A-311operatingwrench,MainValveRepairKit,A-51lubricatingoil.
MUELLER® Super Centurion 350 Fire Hydrant
Main Valve Replacement: Lower Barrel Flange
4.
Lower Main Valve into the Barrel.
Lower Support Arm and tighten Thumb
Screw. Carefully thread main valve
assemblyclockwiseintothebaseofthe
Hydrant. Hand tighten.
SlideslottedendofA-359SeatWrenchoverLowerStem.AlignholesinWrenchand
Stem and attach Wrench to Stem with Clevis Pin. Lower Support Arm onto the Flange
of Lower Barrel and tighten Thumb Screw (to hold Main Valve in closed position).
RemoveMainValveAssemblybyturningWrenchcounter-clockwiseandliftout
Wrench, Lower Stem, Main Valve Assembly and Seat Ring from Hydrant Barrel as a
unit.
3.
StraightenstainlesssteelLockWasher,
unscrew Cap Nut and remove Washer,
Stem Seal, Lower Valve Plate, Main
Valve and Seat Ring. Clean, inspect
and replace any damaged parts.
Replace Drain Valve Facings. Inspect
and lubricate Top and Bottom Seat Ring
O-rings(replaceifnecessary).Lubricate
all threaded surfaces and reassemble.
WithCapNuttightenedto100ft-lbs,
bendedgesonstainlesssteelLock
WasheroveroneatontheLower
ValvePlateandoneatontheCapNut.
1.
RemoveHold-DownNut,Thrust
Bearing and Operating Nut from
Bonnet. Lubricate Brass Sleeve
and slide over threaded stem end to
preventO-ringdamage.
Unbolt and remove Bonnet. Remove
TrafcFlangeBoltsandTrafcFlange.
Remove Upper Barrel.
Remove Upper Stem and Stem
Coupling from Lower Stem.
2.
9

CAUTION: Always ll the oil reservoir with the Bonnet installed, the Hydrant in its normal upright position, and
the main valve fully closed. If the Hydrant is lled with lubricant under any other circumstances, excess lubricate can
overll the Bonnet and create a pressure lock. This could result in damage to the seals or Bonnet or prevent proper
Hydrant operation.
!
MUELLER® Super Centurion 350 Fire Hydrant
Main Valve Replacement: Lower Bonnet Flange
EQUIPMENT & TOOLS NEEDED –PPE:Hardhat,safetyshoes,safetyvest,safetyglasses,workgloves.
Tools:Wrench,A-367brasssleeve,A-359seatwrench,A-311operatingwrench.
6.
Reassemble Upper Stem to Lower
Stem. Place Upper Barrel in place and
reassembleTrafcFlange.*Tighten
Boltsto60ft-lbs.
5.
TightenMainValveto100-150ft-
lbs. Remove Wrench from Stem by
removing Clevis Pin.
8.
Remove Oil Filler Plug on side of
Bonnet. Pour MUELLER Hydrant
Lubricant into Oil Reservoir until it is
level with Oil Filler Plug Hole. Replace
Oil Filler Plug (see Lubrication section
on page 3).
7.
CheckBonnetO-ring*forproper
position and condition. Attach Brass
Sleeve to Upper Stem and lubricate
outsidetoprotectO-ringSealsfrom
thread damage. Place Bonnet onto
Upper Barrel and assemble Bonnet
Boltsonlyhand-tight.RemoveBrass
Sleeve. Reassemble Operating Nut,
ThrustBearing,andHold-DownNut
(snug-tighten).BesureO-ringSeals
are in good condition at thread shoulder
onoutsideofHold-DownNutandon
inside where contact is made with
Operating Nut.
*TodeterminecorrectO-ringsforBonnetandGroundLineanges,whicharesimilarin
appearance:smallerdiameterO-ringisusedatBonnetange;largeratGroundlineange.
10.
Turn Operating Nut in closing direction
tomakesureMainValveisclosed
tightly, then turn in opening direction
approximately1/4turntorelieve
tension on operating mechanism.
10
9.
TorqueBonnetBoltsto40-80ft-lbs.
TorqueHold-DownNutto200-300
ft-lbs.afterBonnetBoltsaretight.Open
GateValve.UnscrewoneHoseNozzle
Cap slightly to bleed air. Open Hydrant
fully. Tighten Hose Nozzle Cap when
waterstartsowingandcheckallange
connectionsforleaks.TurnOperating
Nut to fully closed position and remove
Hose Nozzle Cap to allow Barrel to
drain. Replace Hose Nozzle Cap.
11

MUELLER® Super Centurion 350 Fire Hydrant
Replacing Damaged Nozzles
1. 3.
Remove Nozzle Cap. PlaceA-316NozzleWrenchonNozzle
withWrenchForksfacingtoward
HydrantBarrelandlockedontoNozzle
Drive Lugs. Replace Nozzle Cap and
tighten until Cap rests loosely against
backsideofWrench.RemoveNozzle
(nozzlethreadsoutinaclockwise
rotation). Additional leverage may
be obtained by placing a length of 2”
schedule40steelpipeoverthehandle
of the Nozzle Wrench.
4.
InstallNozzleO-ringontheinletsideof
the Nozzle. Thread new Nozzle into
Upper Barrel, attach Nozzle Wrench as
described in Step 3, and tighten Nozzle
(nozzlethreadsinaclockwiserotation)
toapproximately600ft-lbstorque(100
lbs.pullona6’lever).
Remove Nozzle Cap and Nozzle
Wrench.PlacetheNozzleLock(Part
143137),lengthwiseintheslotformed
by the Nozzle Drive Lugs and the
BarrelBore.DrivetheA-316Nozzle
LockinplacebystrikingtheNozzle
LockInstallationToolseveraltimeswith
a heavy brass hammer.
2.
RemovestainlesssteelNozzleLock
by driving it out with a pointed tool and
hammer.
CAUTION: Wear safety glasses
when using a striking tool. The
Nozzle Lock does not have to be
completely seated into the slot, but
it should be well engaged along the
entire length of the Nozzle Drive Lug
and Barrel Bore.
5.
Replace and tighten Nozzle Cap.
6.
11
!
EQUIPMENT & TOOLS NEEDED –PPE:Hardhat,safetyshoes,safetyvest,safetyglasses,workgloves.
Tools:Wrench,A-316nozzlewrench,A-317NozzleLockInstallationTool,brasshammer.

MUELLER® Super Centurion 350 Fire Hydrant
Changing the Shoe
1. 3.
Tighten Operating Nut to be sure Main
Valve is in the fully closed position.
Slip off Hydrant Shoe.
4.
Lubricate new Shoe and Bottom Seat
RingO-ring.PositionShoetoslipin
place.
Slip new Shoe in place being careful
not to damage Bottom Seat Ring
O-ring.
2.
Removeall6ShoeBoltNuts.
5.
Replace Shoe Bolts and Nuts and
tightento100ft-lbs.
6.
EQUIPMENT & TOOLS NEEDED –PPE:Hardhat,safetyshoes,safetyvest,safetyglasses,workgloves.
Tools:Wrench,A-316nozzlewrench.
12

MUELLER® Super Centurion 350 Fire Hydrant
Adding an Extension
4.
Attach Extension Barrel to Lower
Barrel with solid Extension Flange
halves (without groove) and Bolts,
beingsureO-ringisinplace.
WARNING: Before removing any bolt(s) holding the Hydrant together, shut off gate valve to isolate Hydrant from
main water source. Loosen (do not remove) one nozzle cap two turns and check for water under pressure inside Hydrant
– bleed off any pressure, then remove nozzle cap completely. Open Hydrant main valve completely. A continuous ow
of water, no matter how slight, indicates Hydrant is not properly isolated from the main water supply, and that problem
must be corrected before any Hydrant disassembly can proceed. Disassembly of Hydrant with pressurized water acting
against the main valve could result in unexpected ejection of Hydrant parts, debris or high-pressure water stream,
which could cause serious bodily injury.
2.
UnboltTrafcFlange.RemoveUpper
Barrel.RemoveUpperStemandTrafc
Stem Coupling by removing the lower
stainless steel Cotter Pin and stainless
steel Clevis Pin.
Place Extension Stem and Extension
Coupling on Lower Stem and retain
it with stainless steel Clevis Pin and
stainless steel Cotter Pin.
5.
AssembleUpperStemandTrafcStem
Coupling onto Extension Stem and
retain it with stainless steel Clevis Pin
and stainless steel Cotter Pin.
NOTE: Make sure Trafc Stem
Coupling is installed with “This End
Up” towards the Upper Stem.
1.
RemoveHold-DownNut,Thrust
Bearing and Operating Nut from
Bonnet.LubricateoutsideofA-367
Brass Sleeve and slide over threaded
stemendtopreventO-ringdamage.
Unbolt Bonnet from Upper Barrel and
remove. Remove Brass Sleeve.
3.
!
13
EQUIPMENT & TOOLS NEEDED –PPE:Hardhat,safetyshoes,safetyvest,safetyglasses,workgloves.
Tools:Wrench,A-311operatingwrench,pliers,A-367BrassSleeve,HydrantExtensionKit.

MUELLER® Super Centurion 350 Fire Hydrant
Adding an Extension
CAUTION: Always ll the oil reservoir with the Bonnet installed, the Hydrant in its normal upright position, and
the main valve fully closed. If the Hydrant is lled with lubricant under any other circumstances, excess lubricate can
overll the Bonnet and create a pressure lock. This could result in damage to the seals or Bonnet or prevent proper
Hydrant operation.
6.
AttachUpperBarrelwithTrafcFlange
Halves (with bevel on outer edge
downward)andBolts;beingsureTrafc
FlangeO-ring*isingrooveinUpper
Barrel.TightenBoltsto60ft-lbs.
8.
9.
Remove Oil Filler Plug on side of
Bonnet. Pour MUELLER Hydrant
Lubricant into Oil Reservoir until it is
level with Oil Filler Plug Hole. Replace
Oil Filler Plug (see Lubrication section
on page 3).
TorqueBonnetBoltsto40-80ft-lbs.
TorqueHold-DownNutto200-300
ft-lbs.afterBonnetBoltsaretight.Open
GateValve.UnscrewoneHoseNozzle
Cap slightly to bleed air. Open Hydrant
fully. Tighten Hose Nozzle Cap when
waterstartsowingandcheckallange
connectionsforleaks.TurnOperating
Nut to fully closed position and remove
Hose Nozzle Cap to allow Barrel to
drain. Replace Hose Nozzle Cap.
10.
7.
Turn Operating Nut in closing direction
tomakesureMainValveisclosed
tightly, then turn in opening direction
approximately1/4turntorelieve
tension on operating mechanism.
CheckBonnetO-ring*forproper
position and condition. Attach Brass
Sleeve to Upper Stem and lubricate
outsidetoprotectO-ringSealsfrom
thread damage. Place Bonnet onto
Upper Barrel and assemble Bonnet
Boltsonlyhand-tight.RemoveBrass
Sleeve. Reassemble Operating Nut,
ThrustBearing,andHold-DownNut
(snug-tighten).BesureO-ringSeals
are in good condition at thread shoulder
onoutsideofHold-DownNutandon
inside where contact is made with
Operating Nut.
*TodeterminecorrectO-ringsforBonnetandGroundLineanges,whicharesimilarin
appearance:smallerdiameterO-ringisusedatBonnetange;largeratGroundlineange.
!
14
EQUIPMENT & TOOLS NEEDED –PPE:Hardhat,safetyshoes,safetyvest,safetyglasses,workgloves.
Tools:Wrenches,A-311operatingwrench,A-367BrassSleeve,HydrantExtensionKit.
15

MUELLER® Super Centurion 350 Fire Hydrant
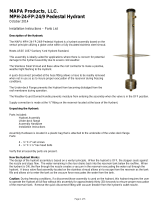
Super Centurion® 350 Parts
A-1 Operating Nut
A-85 Weather Seal 1
A-3 Hold-Down Nut O-ring 1
A-84 Hold Down Nut
A-5 Bonnet O-ring 1
A-6 Thrust Bearing
A-7 Oil Filler Plug
A-8 Bonnet
A-9 Bonnet Bolt & Nut
A-10 Bonnet Flange O-ring 1, 4
A-11 Upper Stem
A-12 Stem O-ring 1
A-13 Nozzle Locks (Pumper & Hose)
A-14 Pumper Nozzle
A-15 Pumper Nozzle Gasket
A-16 Pumper Nozzle O-ring
A-17 Pumper Nozzle Cap
A-18 Hose Nozzle
A-19 Hose Nozzle Gasket
A-20 Hose Nozzle O-ring
A-21 Hose Nozzle Cap
A-22 Cap Chain
A-23 Chain Ring
A-24 Upper Barrel
A-25 Traffic Stem Coupling 4
A-26 Traffic Flange Bolt & Nut 4
A-27 Traffic Flange O-ring 4
A-28 Traffic Flange 4
A-29 Cotter Pin 4
A-30 Clevis Pin 4
A-31 Lower Stem
A-32 Lower Barrel
A-33 Stem Pin
A-34 Drain Valve Facing 2
A-35 Drain Valve Facing Screw 2
A-36 Upper Valve Plate
A-37 Shoe Bolt & Nut 2
A-38 Drain Ring Housing O-ring 2
A-39 Top Seat Ring O-ring 2, 3
A-40 Drain Ring Housing
A-42 Drain Ring
A-43 Seat Ring 3
A-44 Bottom Seat Ring O-ring 2, 3
A-45 Main Valve 2, 3
A-46 Lower Valve Plate 2, 3
A-47 Cap Nut Seal 2, 3
A-48 Lock Washer 2
A-49 Lower Valve Plate Nut
A-50 Shoe
1. AvailableaspartofBonnetRepairKit
2. AvailableaspartofShoeRepairKit
3. AvailableaspartofMainValveRepairKit
4. AvailableaspartofTrafcFlangeRepairKit
15
1
85
3
5
8
10
12
14
16
18
19
20
21
22
23
24
25
26
28
30
33
35
39
42
44
46
48
50
37
84
6
9
11
13
15
17
27
29
31
34
36
40
43
45
47
49
38
32
7
§

Water (U.S.)
1.800.423.1323
www.muellercompany.com
moreinfo@muellercompany.com
Form 12860 - Rev 06/17
Copyright©2017MuellerCo.,LLC.AllRightsReserved.
Thetrademarks,logosandservicemarksdisplayedinthisdocumenthereinarethepropertyofMuellerCo.,LLC,itsafliatesorotherthirdparties.
Productsmarkedwithasectionsymbol(§)aresubjecttopatentsorpatentapplications.Fordetails,visitwww.mwppat.com.Theseproductsare
intended for use in potable water applications. Please contact your Mueller Sales or Customer Service Representative concerning any other application(s).
Reliable Connections
TM
Water (Canada)
1.705.719.9965
www.muellercanada.com
International
1.423.490.9555
www.mueller-international.com
international@muellercompany.com
MUELLER® Super Centurion 350 Fire Hydrant
Repainting the Hydrant
Preparation and Instructions
The following procedure is
recommended to touch up/repair
hydrantscoatedwithAmercoat370
fast dry epoxy coating to assure a
goodnish.
1. Thoroughly clean the hydrant.
Wash off any dirt or lose debris.
2. Remove surface rust by wire
brushing, sandblasting, etc.
3. Roughen shinny surfaces with
light sanding (to improve paint
adhesion).
4. Primer coat bare metal.
Spot prime with one of these
recommended spray primers:
•Preferred–PPGAmercoat®
370(2-partepoxy)orAmercoat®
One (single component epoxy).
These expoxies can be ordered
directlyfromPPG(seeorderform
available on Mueller Co. website
muellercompany.com).
•Optional–Rust-Oleum® brand
Clean Metal Primer, Professional
Primer, Rusty Metal Primer, or
Rust Reformer Primer.
•Optional–Krylon® brand Rust
Tough® Rust Preventative enamel.
Coating Repair/Repainting
Since2010,MuellerCo.hasbeen
coating shoes, lower and upper
barrels, bonnets and hose cap
castings (inside and outside) with
PPGAmercoat®370epoxyprimer
and top coated exposed portions of
the hydrant – including the exterior
of the bonnet, upper barrel and
hosecaps–withSherwin-Williams®
Polane® SP Polyurethane Enamel.
(Priorto2010alkydenamelpaint
was used.)
Whileprecautionsaretakento
protect hydrants during transit, top
coat repair is sometimes necessary
due to damage from transportation
and handling. Hydrants may also
requirere-coatingafterextended
periods of exposure to prevailing
environmentalconditions.Re-
coatingandtouch-uprequirethe
same process.
Theprocesstorepairorre-coat
a hydrant is similar to that used
for most other painted products,
requiring surface preparation,
application of an appropriate primer
and care in applying the top coat.
5. Applytopcoatatabove50°F.
•Sherwin-Williams® Polane® SP
PolyurethaneEnamel–2-part
enamel designed to be sprayed.
Requires Personal Protective
Equipment (PPE).
•Sherwin-Williams®KEM®
400AcrylicEnamel–single
component that can be brushed.
Also available in spray cans, 3 oz.
paintpensand6oz.brushincap
bottles. Can be ordered directly
fromSherwin-Williams® (see order
form available on Mueller website
muellercompany.com).
Ordering Touch-up Kit
DownloadaCoatingTouch-upKit
form from the Mueller Co. website
atwww.muellercomapny.com,click
on Resources>Downloads>Fire
Hydrant–Sec 9. Under “Coatings &
DataSheets”clickoneither:
•PrimerTouch-upKitOrderForm
•TopCoatTouch-upKitOrderForm
/