Page is loading ...

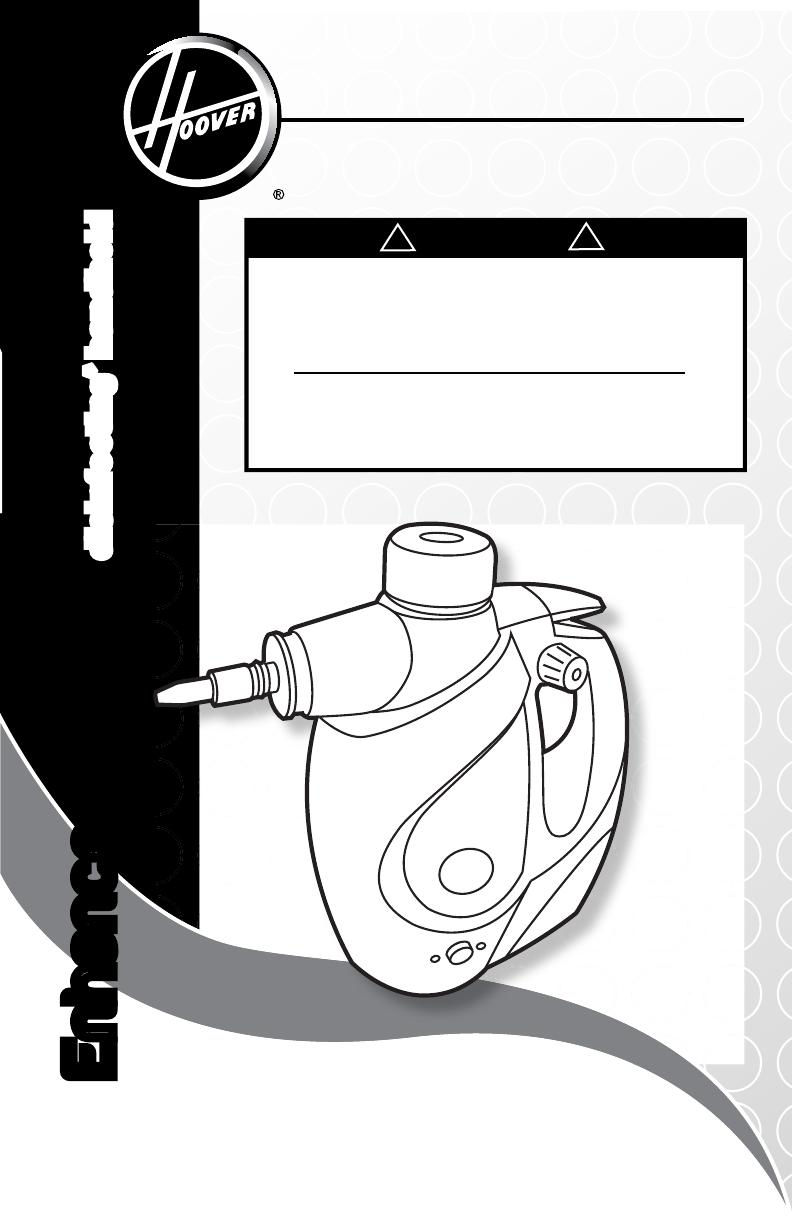
OWNER'S MANUAL
Operating and Servicing Instructions
Español - página E1
©2011 Techtronic Floor Care
Technology Limited. All Rights
Reserved. #961145001 ID102313-R0
THIS PRODUCT IS INTENDED FOR HOUSEHOLD
USE ONLY. IF USED COMMERCIALLY
WARRANTY IS VOID.
READ CAREFULLY BEFORE ASSEMBLY AND USE.
Questions or concerns?
For assistance, please call Customer Service at 1-800-944-9200
Mon-Fri 8am-7pm EST. PLEASE DO NOT RETURN THIS Appliance
TO THE STORE.
IMPORTANT
!
!
hoover.com
*On hard, non porous surfaces, when used with Hoover
®
Multi-Purpose Disinfectant in accordance with owner’s
manual, without tools and attachments.
disinfecting
*
handheld
Enhanced Clean
TM
2
Thank you for choosing a HOOVER
®
appliance.
Please enter the complete model and Manufacturing
Code in the spaces provided.
MODEL
MFG. CODE
Tip: Attach your sales receipt to this owner’s manual.
Verification of date of purchase may be required for
warranty service of your HOOVER
®
appliance.
Be sure to register your appliance online at Hoover.com
or call 1-800-944-9200 to register by phone. Visit Hoover.
com for additional video instructions for assembly and
maintenance.
MANUFACTURING CODE
If you need assistance:
Visit our website at hoover.com. Follow the authorized dealer locator link to find the Hoover
®
authorized
dealer nearest you or call 1-800-944-9200 for an automated referral of Hoover
®
authorized dealer
locations (U.S. only) or to speak with a customer service representative; Mon- Fri 8am- 7pm EST.
PLEASE DO NOT RETURN THIS APPLIANCE TO THE STORE.
(Label located on bottom of Steamer)
Important Safety Instructions....................................................................................3
Carton Contents .........................................................................................................5
Steamer Description...................................................................................................5
How To Use: Steamer .................................................................................................6
Filling Clean Water Tank ..........................................................................................6
Removing And Filling Solution Tank ........................................................................6
Operating Cleaner ...................................................................................................7
Refilling Water During Operation .............................................................................7
After Cleaning ..........................................................................................................8
How To Use: Accessories ..........................................................................................8
Attaching Accessories .............................................................................................8
Accessory Chart ......................................................................................................9
Maintenance ................................................................................................................10
Cleaning Wand And Wedge Pads ...........................................................................10
Storage ........................................................................................................................10
Troubleshooting .........................................................................................................11
Service .........................................................................................................................11
Warranty ......................................................................................................................12
Contents
Please visit Hoover.com
for video instructions
for this cleaner.

3
IMPORTANT SAFETY INSTRUCTIONS
SAVE THESE INSTRUCTIONS
When using an electrical appliance, basic precautions should always be
followed, including the following:
READ ALL INSTRUCTIONS BEFORE USING THIS APPLIANCE.
WARNING: TO REDUCE THE RISK OF FIRE,
ELECTRIC SHOCK OR INJURY:
• Fully assemble before operating.
• Operate Steamer only at voltage specified on data label on bottom of cleaner.
• Do not leave appliance when plugged in. Unplug from outlet when not in use and
before cleaning or servicing.
• Do not use or store outdoors.
• Do not use for space heating purposes.
• Do not immerse in water.
• Do not allow to be used as a toy. Not intended for use by children age 12 and under.
Close supervision is necessary when used near children. To avoid injury or damage,
keep children away from appliance, and do not allow children to place fingers or
other objects into any openings.
• Use only as described in this manual. Use only manufacturer’s recommended
attachments and appliances.
• Do not use with damaged cord or plug. If appliance is not working as it should, has
been dropped, damaged, left outdoors, or dropped into water, take it to a service
center prior to continuing use.
• Do not pull or carry by cord, use cord as a handle, close a door on cord, or pull cord
around sharp edges or corners. Do not place appliance on cord. Do not run appli-
ance over cord. Keep cord away from heated surfaces.
• Do not unplug by pulling on cord. To unplug, grasp the plug, not the cord.
• Do not put any object into openings. Do not use with any opening blocked.
• Keep hair, loose clothing, fingers, and all parts of body away from openings.
• Turn off all controls before unplugging.
• Use extra care when cleaning on stairs. When not in use do not place cleaner on
stairs or furniture, as it may result in injury or damage.
• Do not use in areas where flammable or combustible liquids, such as gasoline may
be present.
• Connect to a properly grounded outlet only. See Grounding Instructions.
• Do not clean over floor electrical outlets.
• Before cleaning any electrical appliance, check and follow manufacturer’s cleaning
guidelines. Never apply steam to electrical parts.
• To avoid burn or injury, do not apply steam directly to any person or animal.
• Only use water to refill the clean water tank. Do not use any type of chemicals or
additives in the clean water tank.
• Do not open the water fill safety cap when using the steamer.
• Do not add descaling, aromatic, alcoholic appliances, cleaning solutions, scented
perfumes, oils or any other chemicals to the water used in this appliance as this
may damage the unit or make it unsafe for use. While this steamer is designed for
tap water, to increase effectiveness of the steam and to avoid build up of minerals,
you may use distilled water to fill steamer.

GROUNDING
OUTLET BOX
4
CAUTION: TO REDUCE THE RISK OF DAMAGE:
• Store in a dry place. Do not expose machine to freezing temperatures.
• With steam activated, do not allow appliance to spray in one location for an extended
period of time, as damage to surface can result.
GROUNDING INSTRUCTIONS
This appliance must be grounded. If it should malfunction or breakdown, grounding
provides a path of least resistance for electric current to reduce the risk of electric
shock. This appliance is equipped with a cord having an equipment-grounding
conductor (C) and grounding plug (A). The plug must be inserted into an appropriate
outlet (B) that is properly installed and grounded in accordance with all local codes
and ordinances.
WARNING: Improper connection of the equipment-grounding conductor can
result in the risk of electric shock. Check with a qualified electrician or service person if you
are in doubt as to whether the outlet is properly grounded. Do not modify the plug provided
with the appliance - if it will not fit the outlet, have a proper outlet installed by a qualified
electrician. This appliance is for use on a nominal 120-volt circuit and has a grounding
plug that looks like the plug (A) illustrated in Fig. 1. A temporary adapter (D) may be used
to connect this plug to a 2-pole receptacle (E) if a properly grounded outlet is not available
(Fig. 2). The temporary adapter should be used only until a properly grounded outlet (B)
can be installed by a qualified electrician (Fig. 1). The green colored rigid ear, lug, or the
like (F) extending from the adapter must be connected to a permanent ground (G) such
as a properly grounded outlet box cover (Fig. 2). Whenever the adapter is used, it must be
held in place by a metal screw. NOTE: In Canada, the use of a temporary adapter is not
permitted by the Canadian Electrical Code.
D
F
E
G
D
B
A
C
2
1
• Do not use steamer in an enclosed space filled with vapor given off by oil-based
paint, paint thinners, some moth proofing substances, flammable dust, or other
explosive or toxic vapors.
• When in use, never turn the appliance over or use while on its side.
• Allow steamer sufficient time to cool prior to removing the microfiber pad.
• Before cleaning the steamer, unplug the power cord from the electrical outlet and
clean with a dry or damp cloth. Do not pour water or use alcohol, benzene or paint
thinner on the unit.
• Do not fill clean water tank under running water, use only manufactures supplied
fill cup.
• Do not completely remove safety cap when tank is hot.
• Fill tank only when cool.
• Do not turn on until tank is filled with water.
• Safety cap must always be tightened before use.
• While in use, do not incline appliance more than 45 degrees.
• WARNING: This appliance contains chemicals known to the State of California to cause
cancer, birth defects or reproductive harm. WASH HANDS AFTER HANDLING.

5
Carton Contents
1
250ml---MAX
1.1
Remove all parts from carton and identify each item shown.
Make sure all parts are located before disposing
of packing materials.
A. Handheld Steamer
B. Window Squeegee/Garment
Steaming Tool
C. Turbo Nozzle Extension
D. Small Nylon Scrub Brush
E. Medium Nylon Scrub
Brush
F. Small Brass Scrub Brush
G. Angle Nozzle
H. Grout Cleaning Tool
I. Scraping Tool
J. Wedge (Large Surface
Cleaning)
K. Wand (Crevice Dusting)
L. (2) Pads For Wedge
(Standard Microfiber)
M. (2) Pads For Wand
(Standard Microfiber)
N. Garment Steamer Cloth
O. Hose Assembly For Wand Or
Wedge With Built In Handle
P. Polypropylene Fiber Bag
(For Storage)
Q. Hard Plastic Funnel
R. Measuring Cup
A
B
C
D
E F
G
H
I
J
K
L
M
N
O
P
Q
R
1. Steam Nozzle
2. Water Fill Safety Cap
3. Steam Trigger
4. Handle Grip
5. Power Cord
6. Power Indicator Light
7. Safety Pressure Indicator
8. Clean Control Dial
9. Solution Tank
10. Steam Ready Indicator Light
11. Power Button
12. Water Tank
1
2
3
4
5
7
8
9
6
10
Steamer Description
2
2.1
11
TECHNICAL SPECIFICATION
Model Number: WH20100
Input Power: AC 120V / 60Hz / 10A
12
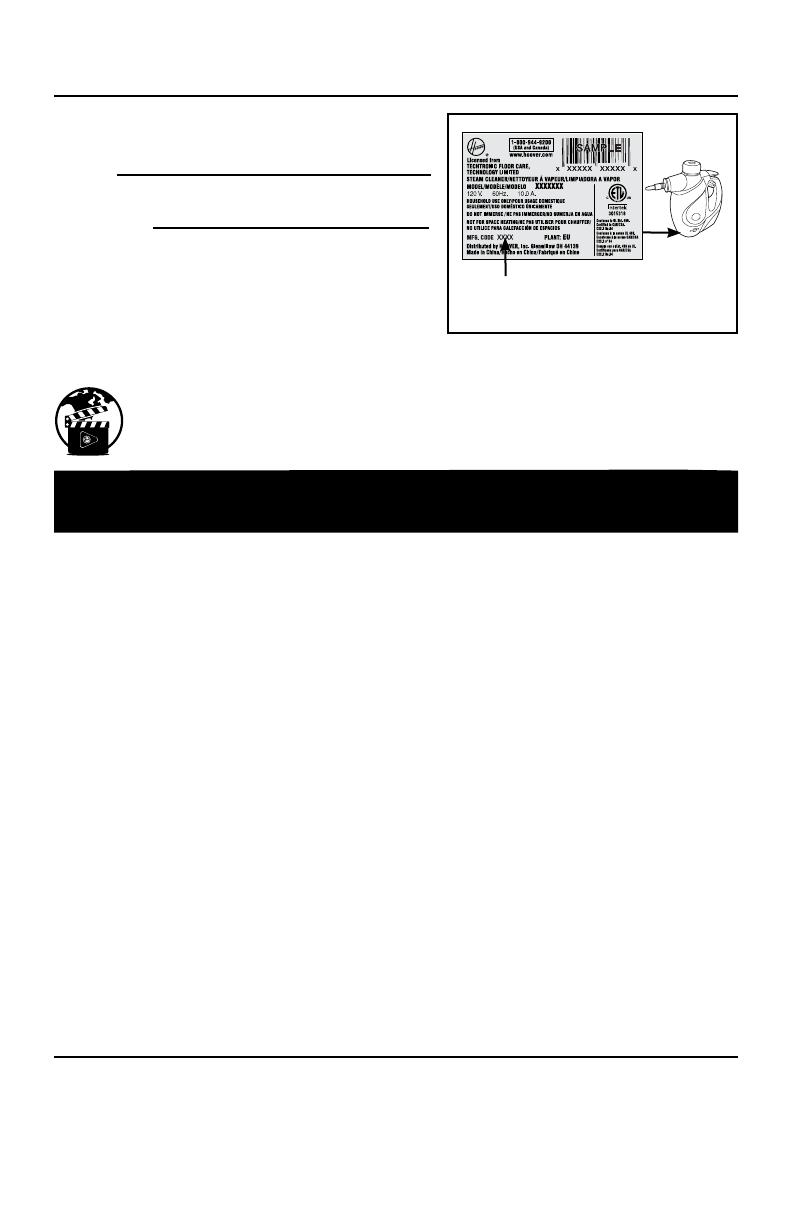
6
Press sides of solution tank to release tank
from steamer.
Squeeze tabs on side of tank to slide tank out of
steamer as shown (3.3).
Remove cap from the top of tank (3.4).
DO NOT MIX HOOVER
®
MULTI-PURPOSE
DISINFECTANT OR HOOVER
®
MULTI-
PURPOSE CLEANER WITH ANY OTHER
CLEANING SOLUTION.
Fill the tank with recommended Hoover
®
Multi-
Purpose Disinfectant or Hoover
®
Multi-Purpose
Cleaner using funnel and measuring cup.
Replace cap ensuring that it is fully sealed.
Replace tank by sliding it into opening and
applying light pressure to the back of the tank
until tabs on side of the tank lock into body
of steamer.
Adjust clean control dial by turning the dial
(3.5) to the desired setting, which will
automatically dispense the solution when
pressing the trigger. Turn to the “off” position
if no Hoover
®
solution is desired.
REMOVING AND FILLING SOLUTION TANK
3.3
How to Use: Steamer
3
3.4
WARNING
Turn off, unplug, and allow steamer to cool before servicing or filling tank. Do not clean over floor
electrical outlets. Use only with Hoover
®
Multi-Purpose Disinfectant or Hoover
®
All-Purpose Cleaner.
!
!
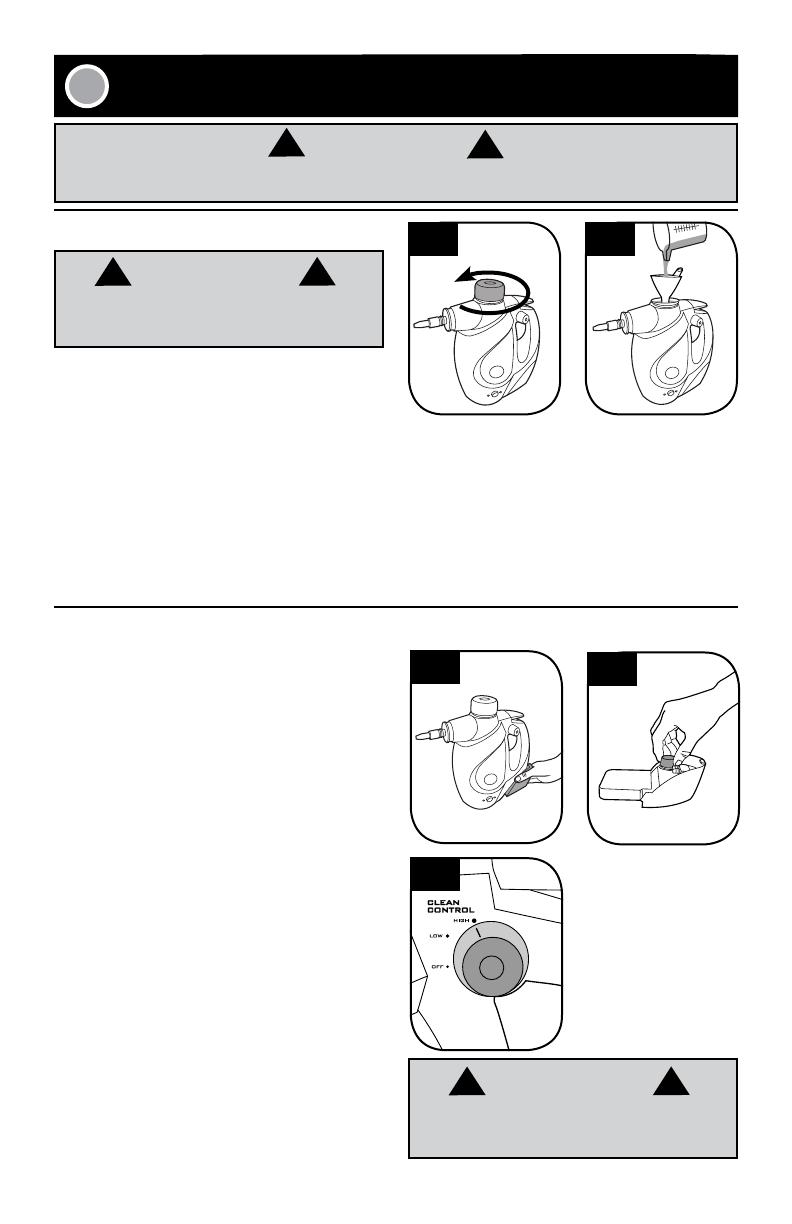
Place the appliance on a level platform. If you are
filling the clean water tank during or after use,
see “Refill Water During Operation” instructions
below. After you have ensured the steamer has
cooled and pressure has been released, the
water fill safety cap should turn freely for removal.
Unscrew the water fill safety cap counter-
clockwise (3.1), and insert funnel.
Add 300ml clean water into the measuring cup,
as indicated on cup, and pour the water into the
tank (3.2). (Max. capacity of the tank is 300ml. Do
not overfill the tank to allow space to be left at
the top).
3.1
3.2
FILLING CLEAN WATER TANK
Use caution when removing water fill safety cap.
Even when cap is able to be turned the steamer
may still be hot, especially the metal ring.
CAUTION
!
!
3.5
Do not leave clean control dial in between settings.
Make sure the dial clicks into the proper setting
before use.
CAUTION
!
!
Re-install the water fill safety cap in a clockwise
direction and tighten until completely sealed.
Turn power switch off and unplug cord.
Press down steam trigger (3.6,A) to release
pressure. When tank is under pressure, the
safety pressure indicator will rise above the
surface of the cap (3.7,B). When the tank is not
under pressure the safety pressure indicator will
be flush or below the surface (3.7,C).
Wait 7-10 minutes until the safety pressure
indicator has gone down, which indicates the
steamer has cooled. After 10 minutes, if the
safety pressure indicator has not fully dropped,
release residual steam pressure by pressing
trigger and then gently pushing the safety
pressure indicator. Slowly unscrew the water fill
safety cap counter-clockwise, but do not
remove. Allow machine to cool an additional 5
minutes. After you have ensured the steamer
has cooled and pressure has been released,
the water fill safety cap should turn freely for
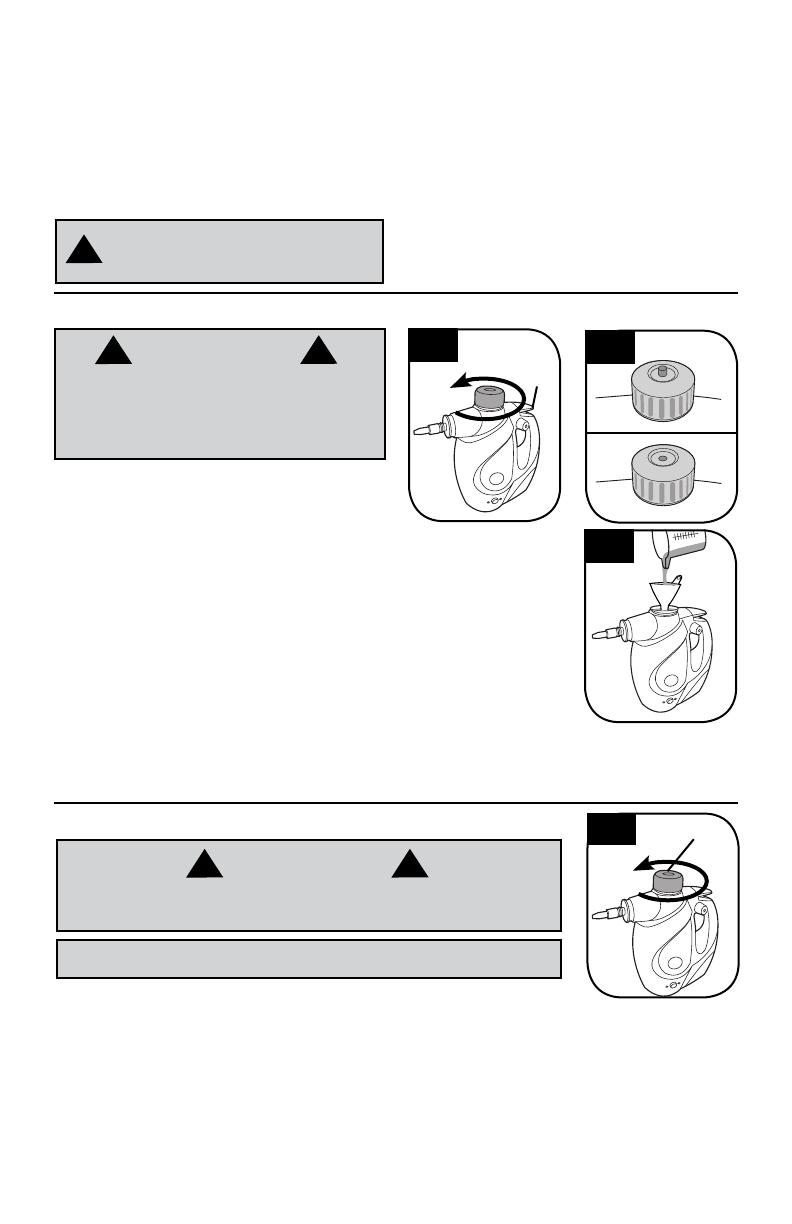
REFILLING WATER DURING OPERATION
3.6
3.7
A
To avoid burn injury, do not refill clean water tank
before steamer has cooled completely. Use caution
when removing water fill safety cap. Even when
cap is able to be turned the steamer may still be
hot, especially all metal surfaces.
CAUTION
!
!
removal. Unscrew the
water fill safety cap
completely (3.8).
Remove any remaining
water to avoid overfilling,
insert funnel and add
300ml clean water into
the measuring cup. Pour
the water into the tank
(3.8). (Max. capacity of
the tank is 300ml. Do not
overfill the tank to allow
space to be left at the top).
Re-install the water fill safety cap in a clockwise
direction and tighten until completely sealed.
7
OPERATING THE CLEANER
Press the power button. The blue power indicator
light should illuminate. If the light does not illuminate,
check the “troubleshooting” section for more details.
The steam cleaner should take between 3-6
minutes to heat up to steam temperatures, which
will be indicated when the green “steam ready”
indicator illuminates.
WARNING
Do not operate unit
without water in
clean water tank.
!
To Disinfect
To disinfect and kill 99.9% of harmful bacteria,
use steam cleaner without tools and attachments.
Fill the solution tank with the Hoover
®
Multi-
Purpose Disinfectant as directed in “Removing and
Filling Solution Tank” section on page 6. Turn Clean
Control dial to HIGH. Hold steam nozzle 6-8” from
surface. Spray for 10 seconds and allow to sit for 1
minute.
3.8
B
C
After the steamer is used, turn power off and then unplug the power cord.
Press down the steam trigger to release all pressure.
Wait 7-10 minutes until the safety pressure indicator has gone down, which indicates the steamer has
cooled. After 10 minutes, if the safety pressure indicator has not fully dropped, release residual steam
pressure by pressing trigger and then gently pushing the safety pressure indicator. Slowly unscrew the
water fill safety cap counter-clockwise, but do not remove. Allow machine to cool an additional 5 minutes.
After you have ensured the steamer has cooled and pressure has been released, the water fill safety cap
should turn freely for removal. Unscrew the cap completely (3.9).
Empty the residual water in the tank and allow to dry. Clean the external surface with a dry cloth.
Re-install the water fill safety cap in a clockwise direction and tighten until completely sealed.
3.9
A
Make sure safety cap is tightened securely before
continuing use or for storage.
IMPORTANT
AFTER CLEANING
To avoid burn injury, do not refill clean water tank before steamer has cooled
completely. Use caution when removing water fill safety cap. Even when cap
is able to be turned the steamer may still be hot, especially all metal surfaces.
CAUTION
!
!
8
How to Use: Accessories
4
Turn off, unplug, and allow steamer to cool before using or removing
accessories. Always have the nozzle pointed away from you and others
during installation.
CAUTION
! !
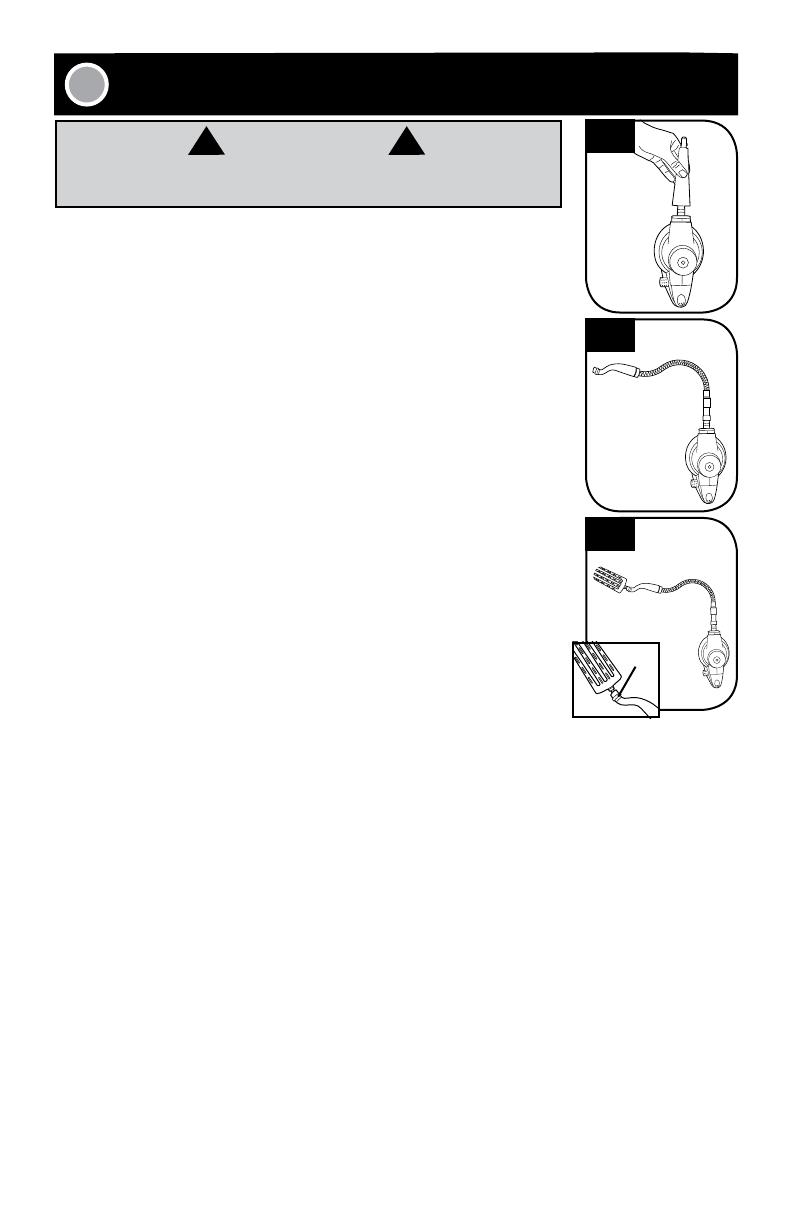
ATTACHING ACCESSORIES
See the "Accessories Chart” on page 9 for suggested use and extensions required.
NOZZLE EXTENSION
How to Attach
Fit the Turbo Nozzle Extension over the Steam Nozzle on Handheld
Steamer (4.1). Align the orientation marks and rotate clockwise until Turbo
Nozzle Extension is in locked position and secure. Once Turbo Nozzle
Extension is attached, use for direct steam application or attach desired
accessories. See “Accessory Chart” on page 9 for which accessories can
be attached.
To remove Turbo Nozzle Extension rotate counter-clockwise and gently pull
away from steamer.
STEAM NOZZLE
The Steam Nozzle is permanently attached to Handheld steamer and
can be used for direct steam application or attach desired accessories. See
“Accessory Chart” on page 9 for which accessories can be attached.
HOSE
How to Attach and Remove
Fit the hose assembly with built in handle over the Steam Nozzle on Handheld
Steam Cleaner (4.2). Align the orientation marks and rotate clockwise until
hose assembly is in locked position and secure.
To remove assembly, slide release button at the base of Hose away from
steamer and rotate counter-clockwise and pull away Hose.
Attaching Accessories to Hose Assembly with Built-In Handle
Once hose assembly is attached, you can attach the wand or wedge
accessory to the hose handle (4.3, A). To connect accessories, pull back the
quick release ring on handle and insert the wand or wedge. Once wand or
wedge is attached, release the ring (4.3, B), attach the corresponding
Microfiber pad and secure with the bungee clip. See “Accessory Chart” on
page 9 for suggested use. See “Maintenance” section on page 10 for cleaning
instructions.
4.1
4.2
4.3
A
B
ACCESSORY REQUIRED EXTENSION
FOR USE
SUGGESTED USE
NOZZLE
EXTENSION
STEAM
NOZZLE
HOSE
Turbo Nozzle
Extension
X Used for direct steam application, but primarily
as an extension to attach smaller accessories.
Window
Squeegee/
Garment
Steaming Tool
X Shower glass doors, mirrors, glass, removing
soap scum and grime. Garment tool for taking
wrinkles out of garments, steaming draperies,
tablecloths, and more (without solution).
Small and
Medium Nylon
Scrub Brushes
X Oven, microwaves, stove tops, showers,
bathtubs, faucet fixtures, tile, grout, toys,
refrigerators, etc.
Small Brass
Scrub Brush
X Ovens. Cleaning metal appliances. (Scratch
resistant surfaces)
Angle Nozzle X Stove tops, around faucet edges, grout,
microwaves, sinks, hard to reach areas, etc.
Grout Cleaning
Tool
X Cleaning all grout lines, sanded on non-
sanded.
Scraping Tool X Scraping baked on food, grime, and grease.
Removing residue or other difficult substances
from surfaces.
Wedge (Large
Surface
Cleaning) with
pads
X Cleaning counter tops, tables, cabinets, ceiling
fans, range ovens, range hoods, refrigerators
inside and out. Mirrors, glass doors, showers,
tile walls, and cleaning non-porous, sealed,
hard furniture as well as upholstery.
Wand (Crevice
Dusting) with
pads
X Staircase banisters railings, chandeliers,
around refrigerators, microwaves, and other
hard to reach areas. For dusting around
furniture and fixtures.
Garment
Steamer Cloth
X For use when steaming garments, draperies,
tablecloths, etc. (without solution)
Hose Assembly
For Wand Or
Wedge With
Built In Handle
X Only for use with wand and wedge tools.
ACCESSORIES CHART: EXTENSIONS AND USAGE
9
Before cleaning any electrical appliance, check and follow appliance manufacturer’s cleaning guidelines.
Never apply steam to electrical parts.
CAUTION
!
!

10
Maintenance
5
Storage
6
It contains no user serviceable parts. Do not try to repair it yourself. Any servicing that requires disassembly
other than cleaning must be performed by a qualified appliance repair technician.
ALL servicing should be done by an authorized service representative.
IMPORTANT
Allow the steamer to fully cool down before
performing any maintenance or troubleshooting
checks.
IMPORTANT
Never use bleach or fabric softener when
washing the microfiber cleaning pad.
Machine washable on “warm” setting. Always
use a mild detergent.
For best care results, lay flat to dry.
CLEANING WAND AND
WEDGE PADS
After the steamer is used, turn power off and then unplug the power cord.
Press down the steam trigger to release all pressure.
Wait 7-10 minutes until the safety pressure indicator has gone down, which indicates the steamer has
cooled. After 10 minutes, if the safety pressure indicator has not fully dropped, release residual steam
pressure by pressing trigger and then gently pushing the safety pressure indicator. Slowly unscrew the
water fill safety cap counter-clockwise, but do not remove. Allow machine to cool an additional 5
minutes. After you have ensured the steamer has cooled and pressure has been released, the water
fill safety cap should turn freely for removal. Unscrew the cap completely (3.5).
Empty the residual water in the tank and clean the external surface with a dry cloth. Allow to dry.
Re-install the water fill safety cap in a clockwise direction and tighten until completely sealed.
Leaving unused solution in solution tank will not affect performance.
Store upright in a protected, dry area. Keep water funnel and measuring cup for future use.
Service
8
USE TROUBLESHOOTING GUIDE AS A FIRST STEP TO RESOLVE ANY PROBLEMS YOU MAY BE
EXPERIENCING.
All servicing should be done by an authorized service representative.
WARNING
! !
To reduce risk of personal injury - unplug steamer before servicing and allow to cool.
PROBLEM POSSIBLE REASON POSSIBLE SOLUTION
Reduced steam or
no steam
1.Clean water tank may be empty. 1. Please refer to the “Refill Water During
Operation” section - page 7.
2. There is no power to the unit. 2. Turn power button on or check fuse or
breaker in home.
3. The Water Fill Safety Cap may
not be attached correctly.
3. Please refer to the “Refill Water During
Operation” section - page 7.
4. Steam Nozzle may be blocked. 4. With unit unplugged and all steam
discharged, clean any visible debris from
outlet of steam nozzle using a paper clip.
Appliance worked
intermittently and
then stopped
1. Not enough water in the tank. 1. Please refer to the “Refill Water During
Operation” section - page 7.
Unit will not turn on 1. Blown fuse or breaker. 1. Replace fuse or breaker in home.
2. Power cord not plugged in. 2. Plug cord into a working circuit.
3. Power button is not on. 3. Press power button and make sure the
blue light is illuminated
4. Internal fuse is blown. 4. Call a customer service representative
at: 1-800-944-9200
Troubleshooting
7
To obtain approved Hoover
®
service and genuine Hoover
®
parts, locate the nearest Authorized Hoover
®
Warranty Service Dealer (Depot) by:
•CheckingtheYellowPagesunder“VacuumCleaners”or“Household”.
•Visitourwebsiteathoover.com(U.S.Customers)orhoover.ca(Canadiancustomers).
Follow the service center link to find the service outlet nearest you.
•Foranautomatedreferralofauthorizedserviceoutletlocationscall1-800-944-9200.
Do not send your steamer to Hoover
®
, Inc., in Glenwillow for service. This will only result in delay.
If you need further assistance:
To speak with a customer service representative call 1-800-944-9200; Mon-Fri 8am-7pm EST. Always
identify your steamer by the complete model number when requesting information or ordering parts. (The
model number appears on the bottom of the steamer.)
PLEASE DO NOT RETURN THIS PRODUCT TO THE STORE.
11

Warranty
9
LIMITED TWO YEAR WARRANTY
(Domestic Use)
WHAT THIS WARRANTY COVERS
When used and maintained in normal household
use in accordance with the Owner’s Manual,
your HOOVER
®
appliance and hose assembly
is warranted against original defects in material
and workmanship for a full two years from date
of purchase (the “Warranty Period”). During the
Warranty Period, Hoover
®
will provide labor and
parts, at no cost to you, to correct any such
defect in appliances purchased in the United
States, U.S. Military Exchanges and Canada.
HOW TO MAKE A WARRANTY CLAIM
If this appliance is not as warranted, take or send
the appliance to either a Hoover
®
Authorized
Warranty Service Dealer along with proof of
purchase. For an automated referral to authorized
service outlets in the U.S.A., phone: 1-800-944-
9200 OR visit Hoover
®
online at www.hoover.
com. For additional assistance or information
concerning this Warranty or the availability of
warranty service outlets, phone the Hoover
®
Consumer Response Center, Phone 1-800-944-
9200, Mon-Fri 8am-7pm EST.
WHAT THIS WARRANTY DOES NOT COVER
This Warranty does not cover: use of the appliance
in a commercial operation (such as maid,
janitorial and equipment rental services), pads,
accessory tools and attachments, improper
maintenance of the appliance, damage due to
misuse, acts of God, nature, vandalism or
other acts beyond the control of Hoover
®
,
owner’s acts or omissions, use outside the
country in which the appliance was initially
purchased and resales of the appliance by the
original owner. This warranty does not cover
pick up, delivery, transportation or house calls.
However, if you mail your appliance to a
Hoover
®
Authorized Warranty Service Dealer,
cost of shipping will be paid one way.
This warranty does not apply to appliances
purchased outside the United States, including its
territories and possessions, outside a U.S. Military
Exchange and outside of Canada. This warranty
does not cover appliances purchased from a
party that is not an authorized retailer, dealer, or
distributor of Hoover
®
appliances.
OTHER IMPORTANT TERMS
This Warranty is not transferable and may not be
assigned. This Warranty shall be governed and
construed under the laws of the state of Ohio. The
Warranty Period will not be extended by any
replacement or repair performed under this
Warranty.
THIS WARRANTY IS THE EXCLUSIVE
WARRANTY AND REMEDY PROVIDED BY
HOOVER
®
. ALL OTHER WARRANTIES,
EXPRESSED OR IMPLIED, INCLUDING
WARRANTIES OF MERCHANTABILITY OR
FITNESS FOR PARTICULAR PURPOSE, ARE
DISCLAIMED. IN NO EVENT WILL HOOVER
BE LIABLE FOR ANY SPECIAL, INDIRECT,
INCIDENTAL OR CONSEQUENTIAL DAMAGES
OF ANY KIND OR NATURE TO OWNER OR
ANY PARTY CLAIMING THROUGH OWNER,
WHETHER BASED IN CONTRACT,
NEGLIGENCE, TORT OR STRICT APPLIANCES
LIABILITY OR ARISING FROM ANY CAUSE
WHATSOEVER. Some states do not allow the
exclusion of consequential damages, so the
above exclusion may not apply to you. This
warranty gives you specific rights; you may also
have others that vary from state to state.
12
OWNER'S MANUAL
Operating and Servicing Instructions
Español - página E1
©2011 Techtronic Floor Care
Technology Limited. All Rights
Reserved. #961145001 ID102313-R0
THIS PRODUCT IS INTENDED FOR HOUSEHOLD
USE ONLY. IF USED COMMERCIALLY
WARRANTY IS VOID.
READ CAREFULLY BEFORE ASSEMBLY AND USE.
Questions or concerns?
For assistance, please call Customer Service at 1-800-944-9200
Mon-Fri 8am-7pm EST. PLEASE DO NOT RETURN THIS Appliance
TO THE STORE.
IMPORTANT
!
!
hoover.com
*On hard, non porous surfaces, when used with Hoover
®
Multi-Purpose Disinfectant in accordance with owner’s
manual, without tools and attachments.
disinfecting
*
handheld
Enhanced Clean
TM
/