Page is loading ...
Page is loading ...

3
Thank you for choosing MULTIBLITZ, we hope you enjoy working with this high quality
product. MULTIBLITZ flash units are designed and manufactured without exception in
Germany.
CAUTION!
Please read the instruction manual carefully before using this product.
Flash-/ and halogen tubes as well as metal parts can become very hot during
operation and may cause burns if not properly handled.
Opening the unit could be extremely dangerous!
Do not open the unit by yourself!
Service should only be executed by an authorized MULTIBLITZ service location.
Do not obstruct the venting slots.
Do not place filters, diffusing materials, or any other obstructions directly onto
the flash-/ and halogen tubes.
Do not expose the unit to water (spray-/ or dripping water)
Do not run the PROFILUX PLUS with gasoline or diesel generators.
Use exclusively with Multiblitz battery packs or mains voltage.
This unit should be serviced once a year by an authorized MULTIBLITZ service
location.
The crossed out wheeled bin label that can be found on your product indicates that
this product should not be disposed of via the normal household waste stream.
To prevent possible harm to the environment or human health please
separate this product from other waste streams to ensure that it can
be recycled in an environmentally sound manner. For more details on
available collection facilities please contact your local government
office or the retailer where you purchased this product.
In order to avoid excessive concentration of ozone produced by using strong flash
devices, it is necessary to ventilate confined spaces regularly.
The minimum distance of 0.3m to the illuminated area must be strictly
maintained.
Protection glases has to be replaced in case of damage.
EN
Vielen Dank, dass Sie sich für Multiblitz entschieden haben. Wir hoffen, dass Ihnen
die Arbeit mit diesem hochwertigen Qualitätsprodukt Freude bereiten wird. MULTIBLITZ
Blitzgeräte werden ohne Ausnahme in Deutschland entwickelt und hergestellt.
ACHTUNG!
Lesen Sie diese Bedienungsanleitung genau durch, bevor sie dieses Produkt
anwenden. Die Blitz-/ und Halogenröhren sowie Metallreflektoren werden
im Betrieb sehr warm und können bei nicht sachgerechter Handhabung Ver-
brennungen verursachen.
Das Öffnen des Gerätes könnte lebensgefährlich sein!
Öffnen sie das Gerät unter keinen Umständen selber!
Der Service sollte nur von einer autorisierten MULTIBLITZ Vertragswerkstatt
durchgeführt werden.
Decken Sie nicht die Ventilationsschlitze ab. Setzen Sie niemals Filter, Diffusor-
Material oder ähnliches direkt auf die Blitz-/ oder Halogenröhre.
Das Gerät darf auf keinen Fall Wasser oder Feuchtigkeit ausgesetzt werden.
Der Kontakt mit Spritz- oder Tropfwasser ist möglichst zu vermeiden.
Die PROFILUX PLUS Geräte dürfen nicht mit Benzin- oder Dieselgeneratoren
betrieben werden. Die Geräte sind ausschließlich mit einem Multiblitz Akku
oder Netzspannung zu betreiben.
Zur Vermeidung einer möglichen Beeinträchtigung der Umwelt oder der
menschlichen Gesundheit darf dieses Produkt nicht in den Hausmüll
gegeben werden, um zu gewährleisten, dass es in einer umweltver-
träglichen Weise recycelt wird. Wenden Sie sich für Informationen
zu Entsorgungseinrichtungen an die zuständige Behörde oder das
Geschäft, in dem Sie dieses Produkt erworben haben.
Um eine unzulässige Ozonkonzentration, die durch Verwendung
von starken Blitzgeräten entsteht, zu vermeiden ist es notwendig geschlossene
Räume regelmäßig zu lüften.
Bitte achten Sie darauf, dass Sie den Mindestabstand von 0,3m
zu der zu erhellenden Fläche unbedingt einhalten
Beim Arbeiten mit der Halogenröhre PACHAL unbedingt das Pyrex-Schutzglas
benutzen. Sollte es beschädigt sein muss es umgehend ersetzt werden.
Das Gerät sollte einmal jährlich in einer autorisierten MULTIBLITZ Vertragswerk-
statt überprüft werden.
D
Page is loading ...
Page is loading ...
Page is loading ...
Page is loading ...

8
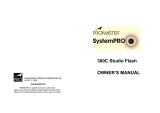
USER’S GUIDE.
IR/Photo
Slave cell
Output Setting
Radio trigger
channel selection / ID selection
Beep/Lamp
Ready indicator
ID activation for radio trigger
Test button
Activates radio trigger
Sync Socket
Connector/Antenna
of radio receiver
Display
Radio receiver „active“ indication
Indication CH/ ID (radio trigger)
IR/Photo Slave Cell
On-Off
Activates
Pre-Flash Eliminator,
Pre-Flash Eliminator
„active“ indication
Modeling Lamp On
(prop x)-Off
Modeling Light
„Auto-Off“ indication
Power On-Off
Modeling Lamp
100% On-Off
Modeling Light
„Auto-Off“ indication
Fuse holder/
Spare fuse
IMPORTANT INFORMATION!
1. Read the Multiblitz Propac „Quick Start Guide“ thoroughly before operating
a Profilux Plus unit with a Propac battery pack.
2. A halogen tube (for 100-130 V or 220-240 V) is included in the scope of delivery.
To ensure a correct color temperature of the modeling light, we recommend to use
the appropriate halogen tube for mains or battery voltage (see below). Halogen
tubes, if not included in the scope of delivery, are available from your Multiblitz
distributor.
Operation with 220-240 V mains voltage:
Profilux Plus 200, 70 W halogen tube (Code: PROHAL)
Profilux Plus 400, 150 W halogen tube (Code: LUHAL 2)
Profilux Plus 800, 205 W halogen tube (Code: LUHAL 3)
Operation with 100-130 V mains voltage/
Battery operation (see „Propac Quick Start Guide“):
150 W halogen tube (Code: PACHAL)
Pyrex-Dome (Code: PLUSKLA)
3. It is absolutely necessary to exchange the halogen tube when switching from
battery operation to 220–240 V mains operation and from 100-130 V mains
operation to 220–240 V mains operation.
100-130 V mains operation to 220-240 V mains operation:
Exchange the 100 V–130 V halogen tube PACHAL with the 220–240 V
tubes PROHAL, LUHAL 2 or LUHAL 3.
Battery operation with Propac-1 or -2 to 220-240 V mains operation:
Exchange the 100 V–130 V halogen tube PACHAL with the 220–240 V
tubes PROHAL, LUHAL 2 or LUHAL 3.
It is not necessary to exchange halogen tubes when switching from battery opera-
tion with a Propac 1 or Propac 2 to 100-130 V mains operation and vice versa.
The recommended tube for battery operation and 100- 130 V mains operation
(Code: PACHAL) is designated for both operating modes.
4. The modeling light can be used during battery operation. To conserve
battery power the modeling light turns off automatically after 15 sec.
if no flash is fired, during that time the „Modeling Light On-Off“ button blinks
(the „Modeling Light 100 %“ button as well, if switched on). As soon as a flash
is fired the modeling light turns on again and the „Modeling Light On-Off“ button
glows permanently.
EN

9
PROFILUX PLUS
QUICK START
1. Protection Cap
In order to open the reflector lock (red slider, located at the bottom of
the device) push the slider away from the protection cap. Remove the
protection cap by turning it counter- clockwise and pulling it away from
the device.
2. Halogen tube
Place the supplied halogen tube into the halogen tube socket by pushing
it down and then turning it clockwise. Keep in mind to avoid touching the
bulb with your fingers to ensure longevity of the tube. Attach the supplied
pyrex dome (Code: PLUSKLA) when operating the unit with 110-130 V
mains voltage or a Propac battery pack.
3. Mains connection
Connect the unit to a power outlet using the supplied mains cable,
the „I-0“ button glows red and the unit is in „stand-by” mode. Switch
on the unit by pressing the „I-0“ button, the button lights up red and
the unit is ready for operation.
4. Synchronisation with a radio trigger
The unit/s may be fired using a radio trigger (RS 2/ TRIGGER HAPPY/
TRIGGER ONE, sold separately). The radio trigger (transmitter) has to
be attached to the cameras’ flash shoe, when the camera is triggered the
unit/s will fire synchronously.
For detailed information on the RS 2/ TRIGGER HAPPY/ TRIGGER ONE
radio trigger please refer to the corresponding user manual.
Selecting the receiving channel:
The unit is equipped with a 16-channel radio trigger (receiver).
Transmitter (RS 2/ TRIGGER HAPPY/ TRIGGER ONE) and receiver must
be set to the same channel. The receiver can be activated and set to the
desired receiving channel with the following key sequences:
- Press and hold the “TEST” button , the unit fires once and the symbol
for the channel selection “CH” appears on the display after 3 sec.
Now let go of the button.
- After approx. 2 sec. the unit emits a beep and the symbol on the display
changes from „CH” to „--“, meaning that the receiver is not activated
and no channel is selected (factory setting).
- The desired receiving channel can now be set by turning the output
control, e.g. to “12“ (channel 12). Confirm the selection of the channel
by pressing the “Test“ button, the previously selected output appears on
the display again.
- The radio trigger is now active and acts on the selected channel.
- A total of 16 channels are available.
Changing the receiving channel:
- Press and hold the “TEST” button, the unit fires once and the symbol for
the channel selection “CH” appears on the display after 3 sec. Now let
go of the button.
- After approx. 2 sec. the unit emits a beep and the symbol on the display
changes from „CH” to the previously selected channel, e.g. to “07“
(channel 7). The desired receiving channel can now be set by turning the
output control, e.g. to “15“ (channel 15). Confirm the selection of the
channel by pressing the “TEST“ button, the previously selected output
reappears on the display.
- The radio trigger now acts on the newly selected channel.
- It is possible to select 16 channels
5. Synchronisation with a sync cable
Plug the supplied sync cable (Code: MASYG) into the units’ sync terminal
and connect it to your camera. In a multi-flash set-up the sync cable only
needs to be connected to the master-unit, all other slave-units will fire
without delay, triggered by their built-in IR receiver/Slave Cell. Remember
to activate the IR receiver/Slave Cell on each slave-unit.
6. Optical Synchronisation
1. The unit may be fired using an Infrared Remote Trigger (Code: MUSEN,
sold separately). Attach the IR remote trigger to your cameras’ flash
shoe.
The flash units´ IR receiver/Slave Cell must be activated by pressing the
corresponding button. The unit will fire synchronously with the camera
when it is being triggered. In a multi-flash set-up, the IR receiver/Slave
Cell must be activated on each unit.
2. The unit features a built-in “Pre-Flash Eliminator”. It serves the pur-
pose to optically synchronize the unit to a built-in flash of a digital
camera or a shoe mount flash that does not feature a off-function for
the “red eye” or TTL/ETTL pre-flashes. After programming, the unit
“ignores” the cameras´ “red eye” or TTL/ETTL pre-flash pulse and
synchronizes to the main flash of the camera.
- Press and hold the “IR receiver/Slave Cell On-Off” button for approx.
3 sec., the symbol „PF“ (pre-flash) appears on the display, now let go
of the button, a short acoustic signal sounds.
- Now, trigger the camera flash within 10 sec. at a distance of
approx. 2 m from the unit.
- The “IR receiver/Slave Cell On-Off” button blinks steadily, the unit has
“learned” the pulse of the pre-flash, it is now is in pre-flash mode
and syncs to the cameras´ main flash.
To leave pre-flash mode, proceed as described above but without
triggering a camera flash.
The IR receiver/Slave Cell will always be inactive after deactivating
the Pre-Flash Eliminator and must be activated again when required.
7. Radio remote control/ ID selection:
With the radio remote control (TRIGGER HAPPY, sold seperately),
it is possible to control all functions of the PROFILUX PLUS.
Up to 16 flash units and subgroups of units can be controlled with one
radio remote control.
Before using a radio remote control it is necessary to select an ID as well
a CHANNEL on each unit.
Use the „Beep/Lamp Ready indicator“ button to select an ID:
- Press and hold the “ Beep/Lamp Ready indicator ” button for approx.
3 sec., the symbol „ID“ appears on the display
- The desired receiving ID can now be set by turning the output control
dial e.g. to “1“ (ID 1).
- Confirm the selection of the ID by pressing the “ Beep/Lamp Ready
indicator“ button, a short acoustic signal sounds.
For detailed information on controlling PROFILUX PLUS flash units with
a radio remote control (TRIGGER HAPPY) please refer to the corresponding
user manual.

10
USER’S GUIDE.
PROFILUX PLUS
FAQ
Is it necessary to exchange the 220-240 V modelling lamp (PROHAL, LUHAL 2 or
LUHAL 3, included in the scope of supply for 220-240 V countries) for a 100-130
V modelling lamp (PACHAL, not included in the scope of supply for 220-240 V
countries) when I travel and go from 220-240 V mains operation to 100-130 V
mains operation?
Technically it is not necessary for the modeling lamp will not take any damage.
Practically we advise to change the modelling lamp in order to assure
a correct rendition of colour. Be sure to also apply pyrex dome PLUSKLA when
using a 100-130 V modelling lamp.
Is it necessary to exchange the 100-130 V modelling lamp (PACHAL, included
in the scope of supply for 100-130 V countries) for a 220-240 V modelling lamp
(PROHAL, LUHAL 2 or LUHAL 3, not included in the scope of supply for 100-130
V countries) when I travel and go from 100-130 V mains operation to 220-240 V
mains operation?
Yes, this is absolutely necessary, otherwise you will damage the 100-130 V
modelling lamp.
Why must I apply pyrex dome PLUSKLA when using 150 W/100-130 V modelling
lamp PACHAL?
100-130 V bulbs with b15 socket do not have a built-in fuse, this is why the
pyrex dome has to be applied to the flash unit. 220-240 V bulbs with b15
socket have a built-in fuse.
Why does the unit doesn’t fire when I try to trigger it with the RS 2 radio trigger
or radio remote control (TRIGGER HAPPY/ TRIGGER ONE)?
Check if a receiving channel of the built-in radio trigger is active.
See item 4.
Why does the full control of units doesn’t work with the radio remote control
in a multiple-flash setup?
Check if ID’s and CH are selected on each unit. Just with individual unit ID’s
it is possible to address single units in a multiple-flash set up. See item 7.
(Radio remote control TRIGGER HAPPY) sold seperately)
Why does the unit doesn´t fire when I try to trigger it with the MUSEN
infrared trigger?
Check if the “IR/Photo Slave Cell On-Off” button is switched on.
Why does the housing on the right side of the unit (as seen from the control
panel) heats up a bit during stand-by?
An entirely uncritical process. The right side of the unit is where the multivoltage
power supply sits. Determined by the system it gets warm to the
touch during stand-by mode.
Why does the unit sometimes fires a light flash approx. 15 sec after switching it off?
The unit automatically dissipates trigger energy so changing the flash tube
for example can be performed without compunction.
Why does the unit fires sometimes when I turn down the output control to often in
a short period of time?
The unit has to dissipate excess energy every time the output control is being
turned down.
Why can´t I focus my COMSCH umbrella reflector when using it with a Profilux
Plus unit?
Because the housing size of the Profilux Plus units differs from all other
Multiblitz units. Use the PLUSCH umbrella reflector with Profilux Plus units.
EN

11
PROFILUX PLUS
TECHNICAL DATA
MODEL 200 400 800
FLASH POWER
J(WS) 200 400 800
POWER SUPPLY (AUTOMATIC MULTI-VOLTAGE)
V 100 - 260 100 - 260 100 - 260
F-STOP, 1M, ISO 100
REFLECTOR FILNOS 45 64.6 90.7
LEITZAHL, 1M,ISO 100
REFLECTOR FILNOS 45 79 118.7
POWER RANGE
F-STOPS / J (WS) 7 / 3 - 200 7 / 6 - 400 8 / 6 - 800
POWER INCREMENTS
F-STOPS 1/10 1/10 1/10
RECYCLING TIME: (AT MAX. OUTPUT, 230 V)
SEC 0.6 1.5 2.6
RECYCLING TIME: (AT MAX. OUTPUT, 110 V)
SEC 0.9 1.8 4.0
FLASH DURATION T 0,5
SEC 1/3000-1/1200 1/1700-1/900 1/1600-1/800
COLOUR TEMPERATURE: (AT MAX OUTPUT)
K 5500 +/- 150 5500 +/- 150 5500 +/- 150
BATTERY OPERATION PROPAC 1 / PROPAC 2
YES YES YES
BUILT-IN 16 CHANNEL RADIO TRIGGER
YES YES YES
ACOUSTICAL/OPTICAL “READY” INDICATION
YES YES YES
IR/SLAVE CELL ON-OF
YES YES YES
“TEST” BUTTON
YES YES YES
BUILT-IN PRE-FLASH ELIMINATOR (“RED EYE”/TTL, E-TTL)
YES YES YES
FAN COOLED
YES YES YES
AUTO-DUMPING
YES YES YES
COLOUR TEMPERATURE STABILIZED
- - YES
FLASH TUBE, UV– ABSORBING
CODE PLUSROW PLUSROW PLUSREW
MODELING LIGHT (220-240 V MAINS OPERATION)*
W 75 75 205
TYPE*
CODE / SOCKET PROHAL / B 15D LUHAL 2/ B 15D LUHAL 3 / B 15D
MODELING LIGHT CONTROL RANGE
W 1.2 - 75 2.3 - 150 1.6 - 205
MODELING LIGHT (100-130 V MAINS OPERATION, BATTERY OPERATION)
W 150 150 150
TYPE*
CODE / SOCKET PACHAL / B 15D PACHAL / B 15D PACHAL / B 15D
MODELING LIGHT CONTROL RANGE
W 2.4 - 150 2.,4 - 150 1.2 - 150
SYNCHRONISATION
SYNC LEAD, RADIO, SLAVE CELL, IR, HOT-SHOE & CAMERA FLASH, TRIGGER HAPPY
SYNC VOLTAGE
V < 5 < 5 < 5
CONNECTED LOAD
KVA 0.92 0.92 0.92
FLASH VOLTAGE STABILITY
% +/- 0.5 +/- 0.5 +/- 0.5
RADIO INTERFERENCE SUPPRESSION
ACCORDING TO CE, DIN IEC 491, VDE 0882
DIMENSIONS (W X L X H)
MM 120 X 282 X 149 120 X 282 X 149 120 X 325 X 150
WEIGHT
KG 1.9 2.2 2.7
*220-240 V halogen tubes (75 W, 150 W, 205 W) can be used in all Profilux Plus units.
Tolerances of the technical data for measured values and components according to the standard DIN IEC // Subject to technical changes
Page is loading ...
Page is loading ...
Page is loading ...
Page is loading ...
Page is loading ...
Page is loading ...
Page is loading ...
Page is loading ...
Page is loading ...
Page is loading ...
Page is loading ...
Page is loading ...
Page is loading ...

25
SHOOTING SET-UP:
PROFILUX PLUS 600 // SOFT BEAM REFLECTOR (COMWEW) // PROPAC 1

MULTIBLITZ DR. ING. D. A. MANNESMANN GMBH | FERDINAND - PORSCHE - STRASSE 19 | D-51149 KÖLN | GERMANY | FON: +49 (0) 2203 - 93 96 10 | FAX: +49 (0) 2203 - 93 96 49
E-MAIL: [email protected] | INTERNET: WWW.MULTIBLITZ.DE
D/EN/ES/F/IT
06.11
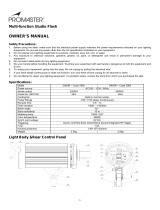
1 x fl ash tube
Profi lux Plus 200/400
Code: PLUSROW
FLASH TUBE
CABLE
UNIT
220 - 240 V 100 - 130 V
BATTERY OPERATION WITH PROPAC-1/-2
1 x fl ash tube
Profi lux Plus 800
Code: PLUSREW
1 x power cable, 5 m
Code: VANET
1 x sync lead
Profi lux Plus 200/400
Code: MASYG
1 x pyrex dome
Profi lux Plus
200/400/800
Code: PLUSKLA
1 x halogen tube 150 W
Profi lux Plus
200/400/800
Code: PACHAL
1 x POFILUX PLUS 200/400/800
with protection cap PLUSKAP
Code: PROPLUS 2/4/8
1 x halogen tube 70 W
Profi lux Plus 200
Code: PROHAL
1 x halogen tube 150 W
Profi lux Plus 400
Code: LUHAL 2
1 x halogen tube 205 W
Profi lux Plus 800
Code: LUHAL 3
SCOPE OF DELIVERY
PROPLUS 2/4/8
VISIT US ONLINE:
WWW.MULTIBLITZ.DE
/