Page is loading ...

DATE:
DATE:
REVISIONS
DESCRIPTION
REV.
DATE
APPROVED
ZONE
REMOVE ALL BURRS AND SHARP EDGES
1
2
x.xx ± .010
1
UNLESS OTHERWISE SPECIFIED:
REV
DWG. NO.
A
SIZE
DESCRIPTION:
Vestil Manufacturing Co.
COMMENTS:
CHECKED BY:
DRAWN BY:
x.xxx ± .005
ANGLES ± 0° 30' ± 1° 0'
DO NOT SCALE DRAWING
3
4
5
PROHIBITED.
MATERIAL
TOLERANCES MACHINE WELDMENT
PROPRIETARY AND CONFIDENTIAL
FRACTIONS ± 1/32 ± 1/16
DECIMALS x.x ± .025 ± .015
SHEET 1 OF
CONCENTRIC .006 TIR .060 TIR
DIMENSIONS ARE IN INCHES
THE INFORMATION CONTAINED IN THIS
DRAWING IS THE SOLE PROPERTY OF
VESTIL MANUFACTURING CO. ANY
REPRODUCTION IN PART OR AS A WHOLE
WITHOUT THE WRITTEN PERMISSION OF
VESTIL MANUFACTURING CO. IS
SCALE
02/02/05
020205A
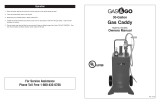
Drill for 1/4" J-bolt
DETAIL A
CADDY INSTALLATION
JY
MC
02/02/05
Self drilling screws
4. Set the caddy back in place and insert the j-hooks.
2. With marker, mark on the bottom side of the caddy the two drill points. Place the J-bolts
the pallet truck carriage and square caddy to pallet truck.
parts on the pallet jack
3. Remove the caddy and using a 1/4" drill bit, drill the two holes marked in step two.
1. Place Pallet Caddy on pallet truck with front lip of caddy sitting in front of
as far toward the forks as possible for better stability.
5. Install the washers over the threaded
portion of the J-hook on the inside of the
caddy and install the nuts. Tighten until
snug. Make sure unit is level to pallet
jack when done.
6. Add self drilling screws(included) as
nessesary taking care not to damage
A
Hardware List
Qty
(2) 1/4" x 4" J-Bolt
(2) 1/4" Lock nuts
(2) 12-24 x 7/8" Self Tapping Screws
(2) 1/4" Flat Washer
(2) 1/4" x 1 1/4" Fender Washer
/