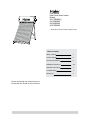
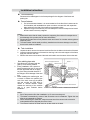
Haier GV150REMB is a non-pressurized, gravity-fed water heater that features a durable inner cylinder made of SUS304 stainless steel, high-efficiency thermal insulation, and an aluminum-zinc-coated outer shell for corrosion resistance. With a capacity of 150 liters, it can provide ample hot water for various household needs. The horizontal water heater has 16 all-glass vacuum tubes that collect solar energy to heat the water, making it an energy-efficient and environmentally friendly option.
Haier GV150REMB is a non-pressurized, gravity-fed water heater that features a durable inner cylinder made of SUS304 stainless steel, high-efficiency thermal insulation, and an aluminum-zinc-coated outer shell for corrosion resistance. With a capacity of 150 liters, it can provide ample hot water for various household needs. The horizontal water heater has 16 all-glass vacuum tubes that collect solar energy to heat the water, making it an energy-efficient and environmentally friendly option.


-
 1
1
-
 2
2
-
 3
3
-
 4
4
-
 5
5
-
 6
6
-
 7
7
-
 8
8


Haier GV150REMB User manual
- Type
- User manual
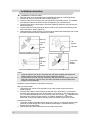
Haier GV150REMB is a non-pressurized, gravity-fed water heater that features a durable inner cylinder made of SUS304 stainless steel, high-efficiency thermal insulation, and an aluminum-zinc-coated outer shell for corrosion resistance. With a capacity of 150 liters, it can provide ample hot water for various household needs. The horizontal water heater has 16 all-glass vacuum tubes that collect solar energy to heat the water, making it an energy-efficient and environmentally friendly option.
Ask a question and I''ll find the answer in the document
Finding information in a document is now easier with AI
Related papers
-
Haier GV110REMB User manual
-
Haier S125ENF User manual
-
Haier Solar Water Heater User manual
-
Haier QBJ1-130A58E Instructions For Use Manual
-
-
-
Haier Sea Elephant King PJF1-100W User manual
-
-
Haier PJF1- 120 User manual
-
Other documents
-
HTP Phoenix Solar Water Heater User manual
-
LG HM121M.U33 Installation guide
-
 FAFCO 500 Series Installation guide
-
LG HM091MRS Installation guide
-
State 186489-002 User manual
-
LG AHUW076A3.EWGBATK Installation guide
-
 AO Smith GVR Series User manual
-
Taurus Group 60 User manual
-
Caterpillar TAURUS 70 User manual
-

