Celestron 31043-CT-DS User manual

Category
Telescopes
Type
User manual

Celestron 31043-CT-DS is a 114mm Newtonian Reflector Telescope that comes with two eyepieces (20mm and 10mm) for different magnifications. It also includes a StarPointer red dot finderscope for easy target acquisition and a sturdy tripod with an accessory tray for convenient storage of eyepieces and other accessories. This telescope is ideal for beginners interested in exploring the wonders of the night sky, allowing them to observe celestial objects such as the Moon, planets, and star clusters with clarity and detail.

Celestron 31043-CT-DS is a 114mm Newtonian Reflector Telescope that comes with two eyepieces (20mm and 10mm) for different magnifications. It also includes a StarPointer red dot finderscope for easy target acquisition and a sturdy tripod with an accessory tray for convenient storage of eyepieces and other accessories. This telescope is ideal for beginners interested in exploring the wonders of the night sky, allowing them to observe celestial objects such as the Moon, planets, and star clusters with clarity and detail.

Dovetail
Mount
Fastening
Screws
Unbox your telescope and verify that all parts are present. Your
AstroMaster includes: a 114mm telescope tube, a StarPointer
red dot fi nderscope (with CR2032 3V battery), a pre-assembled
tripod with center leg brace and altazimuth mount attached, two
eyepieces, an accessory tray, a lens cloth, one insert card with a
download code for the FREE Celestron Starry Night Software, and
one insert with information about the FREE Celestron Sky Portal
app for your smartphone or tablet.
Ensure that all three legs are about the same length and the tripod
is roughly level.
Your fully assembled tripod should now appear as shown.
Spread the tripod legs apart. Loosen the tightening screws at the
bottom of each leg and extend each leg about 6 to 12 inches.
To attach the accessory tray, line up notches and turn clockwise
until tray tabs lock into place with the tripod brackets.
Back out the fastening screws on the tripod mount to provide
clearance for the telescope tube’s dovetail. Then slide the dovetail
into the mount.
Retighten the screws to secure the legs in place.
Properly assembled, the accessory tray should appear as
pictured above.
Center the dovetail in the mount and tighten the fastening screws.
For added security, tighten the angled lock-down screw next to the
fastening screw.
1
4
7
2
5
8
3
6
9
ENGLISH
QUICK SET-UP GUIDE
#31043CTDS
Fastening
Screws
114 A Z
114MM REFLECTOR TELESCOPE
SOLAR WARNING! Never attempt to view the Sun through
any telescope without a proper solar fi lter!
Battery
Cover
On/Off
Switch
Loosen the setscrew on the focuser. Remove the plastic cap
covering the end of the focuser.
Remove the small plastic tab under the battery cover by pulling it
straight out. For longer battery life, be sure to turn off fi nderscope
when not in use.
Insert the barrel of the 20mm eyepiece into the focuser and tighten
the setscrew.
Loosen the two Philips-head screws on the side of the fi nderscope
and slide the clamp over the fi nderscope bracket. Secure the fi nder-
scope in place by tightening the two Philips-head screws.
10
13
You are now ready to use your AstroMaster telescope.
15
11 12
Remove the lens cap from the front of the telescope before you
begin observing.
14
BONUS SOFTWARE INCLUDED
Enhance your astronomy experience by downloading our free software for PC and Mac plus our free SkyPortal planetarium app for iOS and Android.
MINIMUM SYSTEM REQUIREMENTS
Windows:
- Windows 7 or higher
- 500 MHz or higher processor
- 128 MB RAM
- 850 MB of hard disk space
- 32 MB OpenGL capable graphics card
- Minimum recommended monitor resolution of 1024 x 768 pixels.
Android: Version 4.0 and higher
Mac:
- Universal Binary (PPC/Intel compatible)
- OS X 10.4 or higher (10.5 or higher)
- G3 450 MHz or higher processor
- 128 MB RAM
- 850 MB of hard disk space
- 32 MB OpenGL capable graphics card
- Minimum recommended monitor resolution of 1024 x 768 pixels.
Apple: iOS 4.3 and higher
CENTER THE TARGET IN THE EYEPIECE
Look through the telescope using your lower powered eyepiece. Move
the telescope until the object you chose lies in the center of the view.
If the image is blurry, gently turn the focus knobs on either side of
the telescope until it comes into sharp focus. NOTE: The image
in your telescope may appear inverted. This is perfectly normal in an
astronomical telescope.
Look through the fi nderscope and locate the crosshair reticle. Continue
moving the telescope until the crosshair appears over the Moon.
CHOOSE A TARGET
Take the telescope outside during the day and fi nd an easily recognizable
object, such as a streetlight, car license plate or sign. The object should
be as far away as possible, but at least a quarter mile away.
With the Moon visible in the sky, set up your telescope with the 20mm
eyepiece installed. Move the telescope so that it is roughly pointing
toward the Moon.
ADJUST THE FINDERSCOPE
Without moving the telescope, use the two adjustment knobs
to move the fi nder around until the red dot appears over the same object
you are observing in the telescope’s 20mm eyepiece.
CONGRATULATIONS! YOU HAVE NOW
OBSERVED YOUR FIRST CELESTIAL OBJECT!
To get a closer view of the Moon, loosen the set screws on the focuser
and remove the 20mm eyepiece. Replace it with your 10mm eyepiece
and tighten the set screws to secure it in place. The 10mm eyepiece
will give you signifi cantly more magnifi cation, making the Moon appear
much larger.
NOTE: You may need to adjust the focus knobs when you change
eyepieces, so make sure you are getting the sharpest image
possible.
YOUR FINDERSCOPE IS NOW ALIGNED!
It should not require realignment unless it is bumped or dropped.
You can view many other celestial objects, such as planets, star clusters
and nebulae using this same technique if you know where to fi nd them in the
night sky.
Celestron’s free SkyPortal app for iOS and Android can help you locate and
identify a wide array of celestial objects quickly and easily.
LOOK THROUGH FINDERSCOPE
Once the object is centered in your 20mm eyepiece, look through the
nderscope and locate the red dot.
Look through the telescope’s 20mm eyepiece. Gently turn the focus knobs
to adjust the sharpness of the image.
1122
10mm
20mm
3344
44
55
55
The fi nder is one of the most important parts of your telescope. It
helps you locate objects and center them in the eyepiece. The fi rst
time you assemble your telescope, you need to align the fi nder to the
telescope’s main optics. It’s best to do this during the day.*
* SOLAR WARNING! Never attempt to view
the Sun through any telescope without a
proper solar fi lter!
The best and easiest target for you to try to view fi rst is the Moon.
Try observing the Moon at different points in its phase cycle. The
best time to view the Moon is from two days after a New Moon up
to a few days before a Full Moon. During this period, you will be able
to see the most detail in the craters and lunar mountain ranges.
ALIGNING THE
FINDERSCOPE
YOUR FIRST NIGHT OUT
THE MOON
2220mm Eyepiece
Focus Knobs
11
3320mm Eyepiece
Focus Knobs
BATTERY ACCESS INSTRUCTIONS
The StarPointer finderscope is powered by a long life 3V lithium battery (#CR2032) located directly under the StarPointers front end.
To access the battery compartment, turn the StarPointer upside down. Using a Phillips head screwdriver, loosen the screw and lift up the battery cover. When replacing the battery, make sure to install the new battery with its positive
terminal (+) facing outward. If the telescope will not be in use for a long period of time, it is recommended to remove the battery from the StarPointer.
WARNING: KEEP BATTERIES OUT OF REACH OF CHILDREN.
Examine devices and make sure the battery compartment is correctly secured, e.g. that the screw or other mechanical fastener is tightened.
• Do not use if compartment is not secure.
• Dispose of used button batteries immediately and safely. Flat batteries can still be dangerous.
• Tell others about the risk associated with button batteries and how to keep their children safe.
SOLAR WARNING
Never look directly at the Sun with the naked eye or with a telescope unless you have the proper solar filter. Permanent and irreversible eye damage may result.
Never use your telescope to project an image of the Sun onto any surface. Internal heat build-up can damage the telescope and any accessories attached to it.
Never use an eyepiece solar filter or a Herschel wedge. Internal heat build-up inside the telescope can cause these devices to crack or break, allowing unfiltered sunlight to pass through to the eye.
Do not leave the telescope unsupervised, especially when children or adults unfamiliar with the correct operating procedures of your telescope are present.
This device complies with Part 15 of the FCC Rules. Operation is subject to the following two conditions: (1) This device may not cause harmful interference, and (2) this device must
accept any interference received, including interference that may cause undesired operation.
CAUTION: Changes or modifications not expressly approved by the party responsible for compliance could void the user’s authority to operate the equipment.
For more information on this product or to download the instruction manual, please visit the respective product page on celestron.com
©2022 Celestron. Celestron and Symbol are trademarks of Celestron, LLC. All rights reserved. Celestron.com
2835 Columbia Street, Torrance, CA 90503 USA
SOLAR WARNING: Never attempt to view the sun through any telescope without a proper solar filter.
NEED ASSISTANCE?
Contact Celestron Technical Support
celestron.com/pages/technical-support
Printed in China
10-22
celestron.com/pages/warranty
Votre AstroMaster inclus: tube de télescope de 114 mm de 114mm,
chercheur point rouge StarPointer (avec pile CR2032 3V), trépied
pré-assemblé avec entretoise centrale et monture altazimutale
installée, deux oculaires, un plateau à accessoires, un tissu de
nettoyage de lentille, et une carte d’insertion avec un code de télé-
chargement pour le logiciel GRATUIT Celestron Starry Night, et une
insertion avec des informations sur l’application GRATUITE Celestron
Sky Portal pour votre smartphone ou votre tablette.
1
4
7
2
5
8
3
6
9
FRANÇAIS
#31043CTDS
114 A Z
TÉLESCOPE À RÉFRACTEUR 114 MM
AVERTISSEMENT SUR LE SOLEIL! Njamais regarder
directement vers le Soleil à l’œil nu ou avec un télescope, à
moins que vous n’utilisiez un fi ltre solaire adéquat.
Les trois pieds devraient être tous de la même longueur pour que la
plateforme du télescope soit à niveau.
Voici à quoi devrait ressembler le trépied entièrement assemblé.
Pour installer le trépied, écartez complètement les pieds. Étendez
chacun des trois pieds du trépied de 15 à 30 centimètres (6 à 12
pouces) vers le bas.
Pour fi xer le plateau à accessoires, alignez les encoches et tournez
le plateau dans le sens horaire jusqu’à ce que les languettes du
plateau se verrouillent aux supports du trépied.
Faites glisser ensuite queue d’aronde du tube du télescope
dans la monture. Assurez-vous de dévisser les vis de fixation de
manière à laisser suffisamment de dégagement pour la queue
d’aronde.
Utilisez les trois vis de fi xation situées au bas de chaque pied pour
xer fermement les pieds.
La photo ci-dessus montre à quoi ressemble un plateau à accessoires
bien installé.
Centrez la queue d’aronde sur la monture et serrez la vis de fi xation.
Pour plus de sécurité, serrez la vis de verrouillage inclinée située à
côté de la vis de fi xation.
Queue d’aronde
Monture
Fixation Vis Fixation Viss
Pile
Couvercle
Bouton
d’alimentation
Desserrez la vis de réglage sur le foyer. Enlevez le capuchon en
plastique qui couvre l’extrémité du porte-oculaire.
Retirez les deux languettes de plastique situées sous le capot de
la pile en tirant dessus. Pour préserver la durée de vie de la pile,
assurez-vous d’éteindre le chercheur lorsque vous ne l’utilisez pas.
Insérez le barillet de l’oculaire 20mm et serrez la vis de réglage. Loosen the two Philips-head screws on the side of the fi nderscope
and slide the clamp over the fi nderscope bracket. Secure the fi nder-
scope in place by tightening the two Philips-head screws.
10
13
Vous êtes maintenant prêt à utiliser vous télescope AstroMaster.
15
11 12
Enlevez le protège-objectif de l’avant du télescope avant de
commencer à observer.
14
LOGICIEL BONUS INCLUS
Améliorez votre expérience d’astronomie en téléchargeant notre logiciel gratuit pour PC et Mac ainsi que notre application gratuite de planétarium SkyPortal pour iOS et Android.
CONFIGURATION MINIMALE REQUISE
Windows:
- Windows 7 ou supérieur
- Processeur 500 MHz ou supérieur
- 128 Mo de RAM
- 850 Mo d’espace disque
- Carte graphique compatible OpenGL 32 Mo
- Résolution d’écran minimale recommandée de 1024 x 768 pixels.
Android: Version 4.0 et supérieure
Mac:
- Binaire universel (compatible PPC/Intel)
- OS X 10.4 ou supérieur (10.5 ou supérieur)
- Processeur G3 450 MHz ou supérieur
- 128 Mo de RAM
- 850 Mo d’espace disque
- Carte graphique compatible OpenGL 32 Mo
- Résolution d’écran minimale recommandée de 1024 x 768 pixels.
Apple: iOS 4.3 et supérieure
CENTRER LA CIBLE DANS L’OCULAIRE
Regardez dans le télescope en utilisant votre oculaire basse puissance.
Déplacez le télescope jusqu’à que l’objet choisi se trouve au centre du
champ de vision. Si l’image est fl oue, faites doucement tourner l’une ou
l’autre molette de mise au point jusqu’à ce que l’image soit nette.
NOTE : L’image observée dans votre télescope peut apparaître
inversée. Cela est parfaitement normal pour un télescope astronomique.
Regardez dans le chercheur et localisez le réticule. Continuez à orienter
le télescope jusqu’à ce que le réticule soit superposé sur la Lune.
CHOISIR UNE CIBLE
Installez le télescope à l’extérieur en journée, et repérez un objet
aisément reconnaissable, comme un feu de signalisation, une plaque
d’immatriculation ou un panneau. L’objet doit se situer aussi loin que
possible, mais à au moins un quart de mile de vous.
Lorsque la Lune est visible dans le ciel, installez votre télescope comme
décrit ci-dessus, avec l’oculaire de 20mm installé. Déplacez le télescope
de manière qu’il pointe plus ou moins vers la Lune.
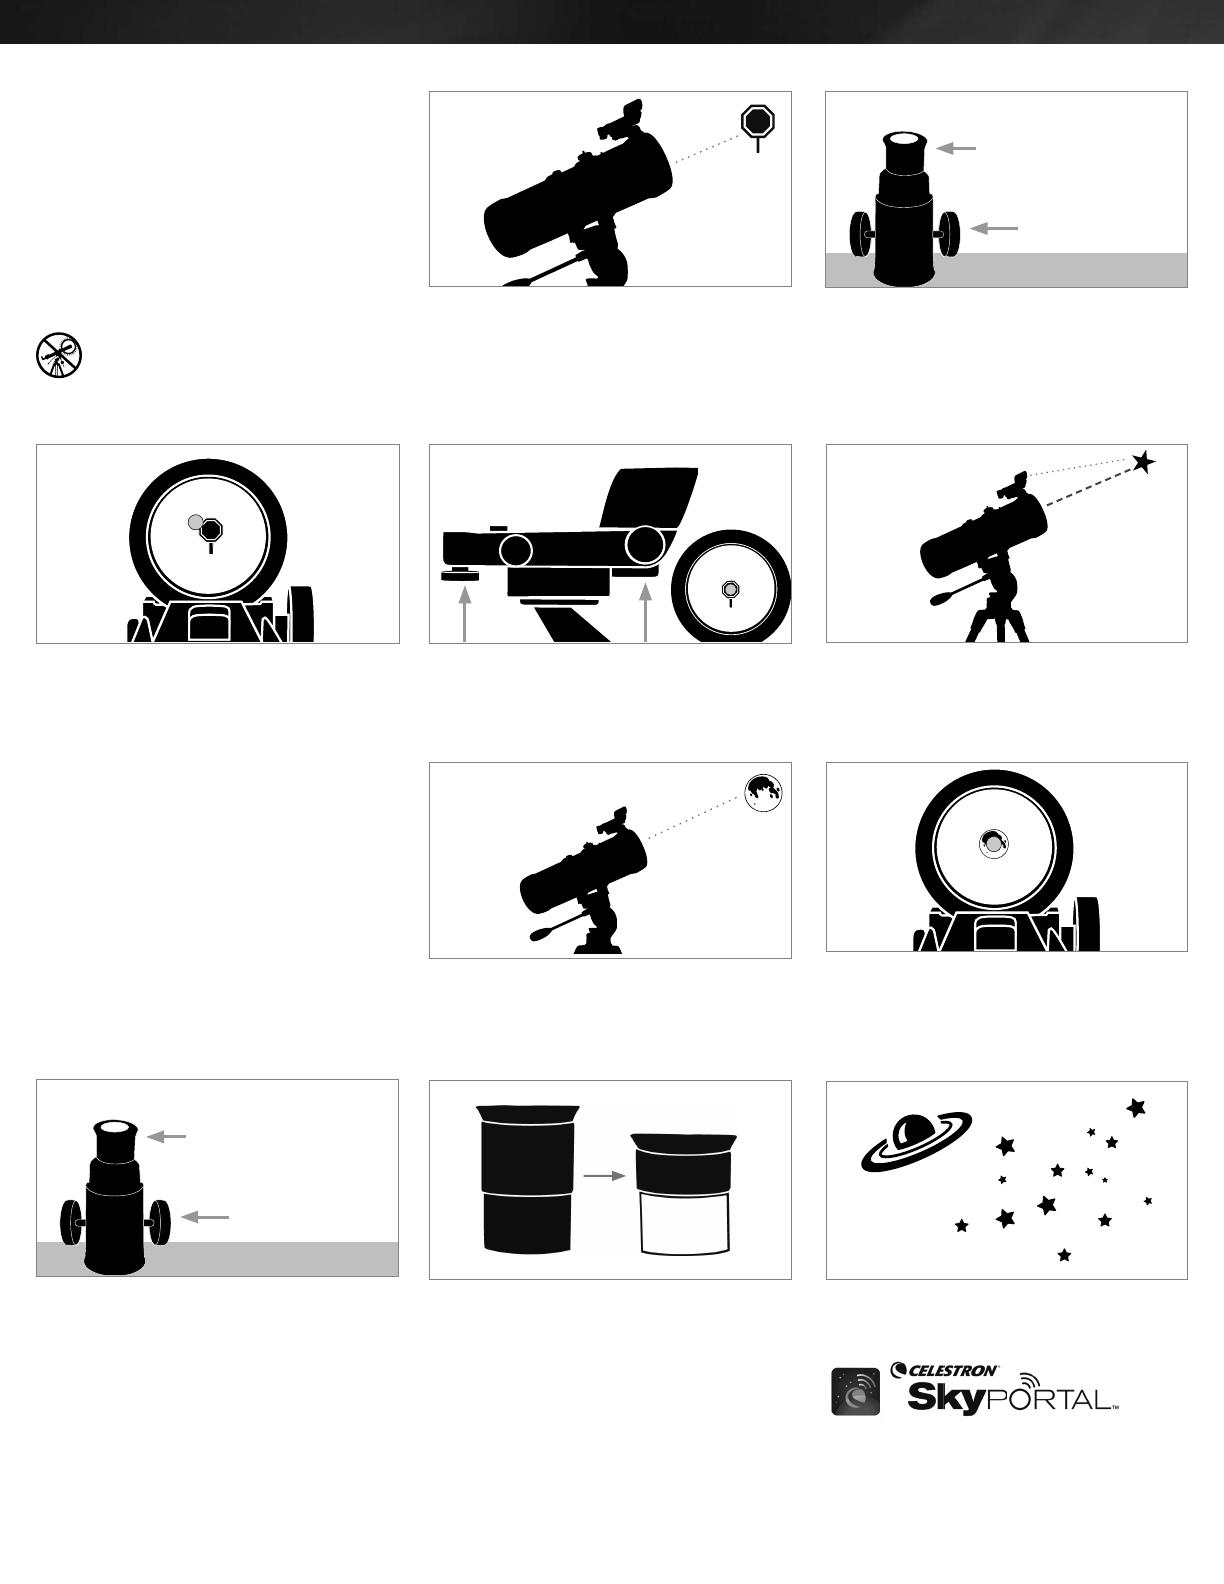
AJUSTER LE CHERCHEUR
Sans déplacer le télescope, utilisez les deux molettes de
réglage pour orienter le chercheur, jusqu’à ce que point rouge apparaisse
en superposition avec l’objet observé dans l’oculaire de 20mm.
LICITATIONS !
VOUS AVEZ MAINTENANT
OBSERVÉ VOTRE PREMIER OBJET CÉLESTE!
Pour obtenir une meilleure vue de la Lune, desserrez les vis de fi xation du
système de mise au point et retirez l’oculaire de 20mm. Remplacez-le par
l’oculaire de 10 mm et serrez les vis de fi xation pour le fi xer. L’oculaire de
10 mm permettra un grossissement notablement plus important, faisant
apparaître la Lune en bien plus grand.
NOTE : Il est possible que vous deviez ajuster les molettes de mise
au point après avoir changé l’oculaire, pour garantir que vous
disposez de l’image la plus nette possible.
VOTRE CHERCHEUR EST MAINTENANT
ALIGNÉ !
Il n’aura pas besoin d’être aligné de nouveau tant qu’il n’aura pas subi un
choc ou qu’il sera tombé.nt unless it is bumped or dropped.
Vous pouvez voir un grand nombre d’objets célestes, comme les planètes,
les amas d’étoiles et les nébuleuses en utilisant la même technique, si
vous savez comment les trouver dans le ciel nocturne.
L’appli SkyPortal gratuite de Celestron, disponible pour iOS et Android,
peut vous aider à identifi er une grande variété d’objets célestes,
rapidement et aisément.
REGARDER DANS LE CHERCHEUR
Une fois l’objet centré dans votre oculaire de 20mm, regardez dans le
chercheur et localisez point rouge.
Regardez dans l’oculaire de 20 mm dans le télescope. Faites tourner
doucement la molette de mise au point pour ajuster le netteté de l’image.
1122
10mm
20mm
3344
44
55
55
Le chercheur est l’un des composants les importants de votre
télescope. Il vous aide à localiser des objets et à les centrer dans
votre oculaire. La première fois que vous assemblez votre télescope,
vous devez aligner le chercheur avec le système optique principal
du télescope. Il est plus facile d’effectuer cette opération pendant
la journée*.
* AVERTISSEMENT SUR LE SOLEIL! N’essayez
jamais d’observer le soleil à l’aide d’un télescope
sans utiliser un filtre solaire adéquat.
La meilleure cible, qui est également la plus aisée est la Lune.
Essayez d’observer la Lune à différents moments de ses phases.
Le meilleur moment pour observer la Lune est deux jours après la
nouvelle Lune et quelques jours avant la pleine Lune. Pendant cette
période, vous pourrez distinguer la plus grande quantité de détails
dans les cratères et les chaînes de montagnes lunaires.
ALIGNER LE
CHERCHEUR
VOTRE PREMIÈRE NUIT
DOBSERVATION
LA LUNE
1122
Oculaire de 20 mm
Molettes de mise au point
33
Oculaire de 20 mm
Molettes de mise au point
INSTRUCTIONS DACCÈS À LA PILE
Le chercheur StarPointer est alimenté par une pile au lithium 3V longue durée de vie (#CR2032), installée directement sous la partie avant du StarPointer.
Pour accéder au compartiment de pile, retournez le StarPointer. En utilisant un tournevis cruciforme, desserrez la vis et soulevez le cache de la pile. Lorsque vous remettez la pile en place, assurez-vous que vous l’installez avec la borne positive (+)
orientée vers l’extérieur. Si vous prévoyez de ne pas utiliser l’unité pendant une période prolongée, il est recommandé de retirer la pile du StarPointer.
AVERTISSEMENT: GARDER LES PILES HORS DE PORTÉE DES ENFANTS.
Examinez les appareils et assurez-vous que le compartiment à piles est correctement fermé, c.-à-d. que la vis ou les autres dispositifs de fermeture sont bien fermés.
• Ne l’utilisez pas si le compartiment n’est pas correctement fermé.
• Jetez les piles-bouton immédiatement et en toute sécurité. Les piles vides restent dangereuses.
Informez les personnes de votre entourage des risques associés aux piles-bouton et comment assurer la sécurité de leurs enfants.
AVERTISSEMENT SUR LE SOLEIL
Ne jamais regarder directement vers le Soleil à l’œil nu ou avec un télescope, à moins que vous n’utilisiez un filtre solaire adéquat. Cela peut causer des lésions oculaires permanentes et irréversibles.
N’utilisez jamais votre télescope pour projeter une image du Soleil sur une surface quelconque. Une concentration de chaleur dangereuse peut être générée à l’intérieur et endommager le télescope et les accessoires attachés.
N’utilisez jamais un un filtre solaire d’oculaire ou une cale de Herschel. De la chaleur peut se concentrer dans le télescope, risquant d’entraîner des failles ou des cassures sur les autres appareils, permettant à la lumière non filtrée du Soleil
d’atteindre les yeux.
Ne laissez pas votre télescope sans surveillance en présence d’enfants ou d’adultes qui ne sont pas familiarisés avec son utilisation correcte.
Cet appareil est conforme à la partie 15 des règles de la FCC. Son fonctionnement est soumis aux deux conditions suivantes : (1) cet appareil ne doit pas causer d’interférences nuisibles et (2) cet appareil doit
accepter toute interférence reçue, y compris les interférences susceptibles de provoquer un fonctionnement indésirable.
ATTENTION : Les changements ou modifications non expressément approuvés par la partie responsable de la conformité peuvent annuler l’autorité de l’utilisateur à faire fonctionner l’équipement.
Pour en savoir plus sur ce produit, ou télécharger le mode d’emploi, visitez la page correspondante du produit sur celestron.com.
©2022 Celestron. Celestron et Symbol sont des marques déposées de Celestron, LLC. Tous les droits sont réservés. Celestron.com • 2835 Columbia Street,
Torrance, CA 90503 États-Unis
AVERTISSEMENT SUR LE SOLEIL! Njamais regarder directement vers le Soleil à l’œil nu ou avec
un télescope, à moins que vous n’utilisiez un filtre solaire adéquat.
BESOIN D’ASSISTANCE?
Contactez le support technique de Celestron
celestron.com/pages/technical-support
Imprimé en chine
10-22
celestron.com/pages/warranty
  • Page 1 1
  • Page 2 2
  • Page 3 3
  • Page 4 4
  • Page 5 5
  • Page 6 6
  • Page 7 7
  • Page 8 8

Celestron 31043-CT-DS User manual

Category
Telescopes
Type
User manual

Celestron 31043-CT-DS is a 114mm Newtonian Reflector Telescope that comes with two eyepieces (20mm and 10mm) for different magnifications. It also includes a StarPointer red dot finderscope for easy target acquisition and a sturdy tripod with an accessory tray for convenient storage of eyepieces and other accessories. This telescope is ideal for beginners interested in exploring the wonders of the night sky, allowing them to observe celestial objects such as the Moon, planets, and star clusters with clarity and detail.

Ask a question and I''ll find the answer in the document

Finding information in a document is now easier with AI

in other languages