
Wall Chimney Hood
Instruction Manual
CCH601SS / CCH601BK /
CCH701 / CCH901SS /
CCH901BK / CCH101
Contact Caple on 0117 938 7420 for spare parts or www.caple.co.uk

Instruction manual CCH2Please keep this instruction manual for future reference
CONTENTS
Introduction 3
Safety Instructions 4
Environmental Protection 9
Installation 10
Operation 16
Care and Maintenance 17
Troubleshooting 19
Product Dimensions 20
Caple Contact Details 24

Instruction manual CCH 3
Please keep this instruction manual for future reference
INTRODUCTION
Thank you for choosing this Caple extractor hood.
To ensure that you get the best results from your
new extractor, we strongly suggest that you read this
instruction manual thoroughly before use. If treated with
care, your Caple extractor should give you years of trouble-
free use.
To register ownership, please ensure you complete and
return the guarantee card supplied with the appliance or
visit www.caple.co.uk and register here.
This instruction manual is designed to provide you with
all the required information related to the installation, use
and maintenance of the appliance.
This hood is designed to extract unpleasant odours from
the kitchen; it is not intended to extract steam. In order
to operate the unit correctly and safely, please read this
instruction manual carefully before installation and use.
The cooker hood uses high quality materials and is made
with a streamlined design. Equipped with an electric
motor and centrifugal fan, it provides strong extraction
with low noise. It also features non-stick grease filters and
an easy installation.

Instruction manual CCH4Please keep this instruction manual for future reference
IMPORTANT
This appliance must only be used for the purpose it is
intended. Other types of use are not permitted and may
prove dangerous. Caple will not be held liable for any
damage caused by the incorrect use of the appliance.
Do not use any accessories or attachments not
recommended by Caple as this may result in fire, electric
shock or injury.
To protect against fire, electrical shock and injury to
persons, do not immerse cords or plugs in water or any
other liquid.
Never touch the appliance with wet or damp hands.
Never pull the power cable as you could damage it.
If the appliance is faulty, do not attempt to repair it.
Isolate it from the mains electric supply and contact
Caple Service either by phone 0117 938 7420 or email
service@caple.co.uk
Keep all packaging (including plastic bags, polystyrene
foam etc) out of the reach and away from children.
Do not rest large or unstable objects on any part of the
appliance.

Instruction manual CCH 5
Please keep this instruction manual for future reference
IMPORTANT
Caple cannot be held responsible for injuries or losses
caused by incorrect use or installation of this product.
Please note that Caple reserve the right to invalidate
the guarantee supplied with this product following
incorrect installation or misuse of the appliance. Under
no circumstances should any external covers be removed
for servicing or maintenance except by suitably qualified
personnel.
SAFETY INSTRUCTIONS
-Never let children operate the machine.
-The cooker hood is for home use only, not suitable for
barbecuing, restaurants or other commercial purposes.
-The cooker hood and its filter should be cleaned regularly
in order to keep in good working condition.
-Clean the cooker hood according to the instruction
manual to reduce the risk of fire.
-When using a gas hob, do not leave naked flames under
the extractor.
-Before connecting this appliance check that the power
supply cord is not damaged.
-If the room where the hood is to be used contains a fuel
burning appliance such as a central heating boiler then
its flue must be of the sealed or balanced flue type. If
other types of flue or appliances are fitted ensure that
there is an adequate supply of air to the room.

Instruction manual CCH6Please keep this instruction manual for future reference
-The air must not be discharged into a flue that is used
for exhausting fumes from appliances burning gas or
other fuels.
-Regulations concerning the discharge of air have to be
conformed to.
-Do not flambé under the cooker hood.
-Never leave frying pans unattended during use as over-
heated fats and oils may catch fire.
-To ensure the best performance, we recommend
switching on the extractor 15 minutes before cooking
and leave it running 15 minutes after. This will ensure
that the air in the kitchen is being circulated before
cooking commences and the air is being cleaned after
cooking has finished.
-The performance of your extractor will vary depending
on a number of factors. These include type of extraction,
room volume, length of ducting, ventilation available and
the cleanliness of the filters.
-This appliance is not intended for use by persons
(including children) with reduced physical, sensory or
mental capabilities, or lack of experience and knowledge,
unless they have been given supervision or instruction
concerning use of the appliance by a person responsible
for their safety.
-Children should be supervised to ensure that they do not
play with the appliance.
-Cleaning and user maintenance must not be made by
children without supervision.

Instruction manual CCH 7
Please keep this instruction manual for future reference
-Never immerse the appliance in water.
-This appliance is intended to be used in household and
similar applications such as:
› Staff kitchen areas in shops, offices and other
working environments.
› Farm Houses.
› By clients in hotels, motels and other residential
type environments.
› Bed and breakfast type environments.
-To avoid all risk, if the power cable is damaged, it must
only be replaced by a Caple appointed engineer.
-Appliances can be used by persons with reduced
physical, sensory or mental capabilities or lack of
experience and knowledge if they have been given
supervision or instruction concerning use of the
appliance in a safe way and understand the hazards
involved.
-Children must not play with this appliance.
-When not in use and before cleaning, always isolate the
appliance from the electrical supply.

Instruction manual CCH8Please keep this instruction manual for future reference
ELECTRICAL SHOCK HAZARD
-Only plug this unit into a properly earthed outlet. If in
doubt seek advice from a suitably qualified engineer.
-Failure to follow these instructions can result in death,
fire, or electrical shock.
-This appliance must be connected to the mains by a
competent person. We recommend that the appliance is
connected by a qualified electrician who is a member of
the N.I.C.E.I.C who will comply with the I.E.E and local
regulations. Electrical information can be found on the
rating plate.

Instruction manual CCH 9
Please keep this instruction manual for future reference
ENVIRONMENTAL PROTECTION
Waste electrical products should not be disposed of with household waste. Please recycle where
facilities exist. Check with your Local Authority or retailer for recycling advice. This appliance is
marked according to the European directive on Waste Electrical and Electronic Equipment (WEEE).
By ensuring this product is disposed of correctly, you will help prevent potential negative
consequences for the environment and human health, which could otherwise be caused by
inappropriate waste handling of this product. The symbol on the product indicates that this
product may not be treated as household waste. Instead it shall be handed over to the applicable
collection point for the recycling of electrical and electronic equipment. Disposal must be carried
out in accordance with local environmental regulations for waste disposal.
For more detailed information about treatment, recovery and recycling of this product, please
contact your local council, your household waste disposal service or the retailer where you
purchased the product
WARRANTY
Your new appliance is covered by warranty. The warranty card is enclosed - if it is missing, you
must provide the following information to your retailer in order to receive a replacement: date of
purchase, model and serial number. Registration can also be completed online by visiting
www.caple.co.uk.
Ensure you keep your warranty card safe, you may need to show it to Caple Service together with
proof of purchase. If you fail to show your warranty card you will incur all repair charges.
Spare parts are only available from Caple Service and spare parts authorised centres.
CE DECLARATIONS OF CONFORMITY
This appliance has been manufactured to the strictest standards and complies with all applicable
legislation, Low Voltage Directive (LVD) and Electromagnetic Compatibility (EMC).
UKCA DECLARATIONS OF CONFORMITY
This appliance has been manufactured to the strictest standards and complies with all
applicable legislation.
TECHNICAL FICHE
This appliance conforms to all current and applicable energy regulations. To view the Technical
Fiche that supports the energy labelling data, please visit the product page on our
website www.caple.co.uk

Instruction manual CCH10 Please keep this instruction manual for future reference
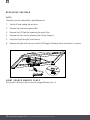
INSTALLATION
PREPARE FOR THE INSTALLATION:
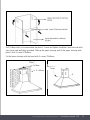
If you have an outlet to the outside, your cooker hood can be
connected as per the below picture by means of an extraction duct
with an interior diameter of 150mm.
Before installation, turn the unit off and unplug it from the outlet.
The cooker hood should be placed at a minimum distance of
65~76cm above the hob. It is the manufacturer of the hob who
determines the clearance required and the clearance quoted by
the hob manufacturer must be followed. In the absence of any
instructions supplied with a gas hob the minimum distance between
the hob and the hood must be at least 760mm.
The width of the extractor hood must correspond with at least the
width of the hob fitted below.
When installed above a gas hob or range cooker, do not use all the gas burners simultaneously
for prolonged periods of time at the maximum setting (max. 15mins). There can be a risk of burns
if the housing or extractor surfaces become hot, and there is also a risk that the extractor can
become damaged due to excessive heat. If 3 or more burners are used simultaneously.
Never operate the gas hob without pans situated on the burners as the excess heat can damage
the extractor.
4
Earthed Outlet Box
Earthed Plug
Earthed Outlet
4

Instruction manual CCH 11
Please keep this instruction manual for future reference
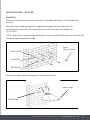
INSTALLATION - DUCTED
WARNING:
Observe the warning concerning the operation of the appliance when air is discharged from
the room.
When the cooker hood and appliance supplied with energy other than electricity are
simultaneously in operation, the negative pressure in the room must not exceed 4 Pa
(4×10⁻⁵ Bar).
Drill 3 x 8mm holes to accommodate the bracket. Screw and tighten the bracket onto the wall with
the screws and screw plugs provided.
Level up the cooker hood and hang onto the wall bracket hook.
5
5
5
Screw Plug
Wall Bracket
Holes on Wall
Screw
(4mm x 30mm)
Wall Bracket
Cooker Hood

Instruction manual CCH12 Please keep this instruction manual for future reference
After hanging the hood on the bracket, remove the grease filters, mark 2 holes inside the hood for
safety screws. After marking, remove the hood, drill two holes and insert 2 wall plugs and finally
fix the safety screws with 2 screws (ST4x30mm).
Fix the one-way-valve to the air outlet of the cooker hood. Then, attach the exhaust pipe onto the
one-way-valve as shown below.
CHIMNEY INSTALLATION
Place the upper chimney into lower chimney, use 2 pcs ST4x8mm screws to attach lower and
upper chimney together.
Before attaching the bracket to the chimney, decide the location of lower chimney bracket fixing
holes for fixing the lower chimney bracket in the later steps.
NOTE:
Do not fasten screws too much, make sure upper chimney can be telescopically adjusted after
assembled.
6
Exhaust pipe
Cooker hood
6
Exhaust pipe
Cooker hood
6
Exhaust pipe
Cooker hood
Exhaust Pipe
Cooker Hood

Instruction manual CCH 13
Please keep this instruction manual for future reference
Drill 2×8mm holes to accommodate the plate II. Screw and tighten the plate II onto the wall with
two screws and wall plugs provided. Slide up the upper chimney and fix the upper chimney with
plate II with 2 screws ST4x8mm.
Fix the lower chimney with the hood with 2 screws ST4x8mm.
7
7
7
7
Screw
4 x 8mm
4 x 30mm
Plate ||

Instruction manual CCH14 Please keep this instruction manual for future reference
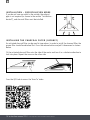
INSTALLATION – RECIRCULATION MODE
If you do not have an outlet to the outside, the exhaust
pipe is not required (as shown in the section “Installation -
ducted”), and charcoal filters must be installed.
INSTALLING THE CHARCOAL FILTER (CAP60CF)
An activated charcoal filter can be used to trap odours. In order to install the charcoal filter, the
grease filter should be detached first. Press the release button and pull it downward as shown
below.
Fit the activated charcoal filter onto the side of the motor and turn it in a clockwise direction to
lock into place. Repeat the same on the other side.
Scan the QR Code to access the ‘How To’ video.
8
, and
charcoal filters must be installed.
9
(CAP61CF)
We recommend replacing these filters every 6 months. Replacement
filters (CAP61CF) can be purchased directly from www.caple.co.uk

Instruction manual CCH 15
Please keep this instruction manual for future reference
9
(CAP61CF)
We recommend replacing these filters every 6 months. Replacement
filters (CAP61CF) can be purchased directly from www.caple.co.uk
NOTE:
Make sure the filter is securely locked. Otherwise,
it may loosen and be dangerous.
When using a charcoal filter, the extraction power
may be slightly reduced.
We recommend replacing these filters every 6
months. Replacement filters (CAP60CF) can be
purchased directly from www.caple.co.uk.

Instruction manual CCH16 Please keep this instruction manual for future reference
OPERATION
10
10
10
10
10
10
10
10
10
10
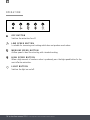
OFF BUTTON
Switches the extraction fan off.
LOW SPEED BUTTON
Is suitable for simmering and cooking which does not produce much odour.
MEDIUM SPEED BUTTON
Airflow speed is ideal for extracting with standard cooking.
HIGH SPEED BUTTON
When a high amount of smoke or odour is produced, press the high speed button for the
most effective extraction.
LIGHT BUTTON
Switches the light on and off.

Instruction manual CCH 17
Please keep this instruction manual for future reference
CARE AND MAINTENANCE
IMPORTANT:
Before cleaning or maintenance please switch off the electricity supply and remove the plug from
the wall.
REGULAR CLEANING
Use a soft damp cloth with lukewarm mildly soapy water or household cleaning detergent. Never
use metal pads, chemicals, abrasive material, abrasive cleaning creams or stiff brushes to clean the
appliance.
CLEANING THE GREASE FILTER
Clean the filter every month to help minimise the risk of fire. The filter collects grease, smoke and
dust, therefore the filter is directly affecting the efficiency of the cooker hood. If not cleaned, the
grease residue (which is potentially flammable) will saturate the filter. It can be easily cleaned with
warm water and washing up liquid, alternatively the filters can be cleaned in your dishwasher.
Please ensure no other items are washed with the filters, they must be washed separately to
prevent food becoming trapped in the gauze. Cleaning the grease filters in the dishwasher may
lead to discolouration, this is normal and is a not a fault with the product.
REPLACING YOUR CHARCOAL FILTER
This only applies if you are using the hood in recirculation mode (not vented to the outside). The
charcoal filter traps your cooking odours and they need to be replaced, this can vary depending on
how frequently the cooker hood is used. We recommend replacing them at least every 6 months.
This extractor uses CAP60CF charcoal filters. Filters can be purchased directly from
www.caple.co.uk.

Instruction manual CCH18 Please keep this instruction manual for future reference
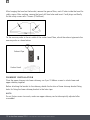
REPLACING THE BULB
NOTE:
The lights must be replaced by a qualified person.
1. Switch off and unplug the extractor
2. Remove the aluminium grease filter
3. Remove the LED light by squeezing the metal clips.
4. Remove the clip cover by removing the lid (see image a.)
5. Unclip the light fixing (b.) and remove.
6. Replace the light with the same rated LED fitting by following these instructions in reverse.
1. Switch off and unplug the extractor
2. Remove the aluminium grease filter
3. Remove the LED light by squeezing the metal clips
4. Remove the clip cover by removing the lid (see
image a.)
5. Unclip the light fixing (b.) and remove
6. Replace the light with the same rated LED fitting
by following these instructions in reverse.
a.
b.
LIGHT SOURCE ENERGY CLASS
This product contains a light source of energy efficiency class G.

Instruction manual CCH 19
Please keep this instruction manual for future reference
TROUBLESHOOTING
FAULT CAUSE SOLUTION
The lights on, but the fan
does not work
The fan blade is jammed.
Switch off the unit and contact Caple Service. To
be repaired by qualified service personnel only.
The motor is damaged.
The lights and fan do not
work
A blown fuse. Replace the fuse.
The power cord is loose. Plug in to the power supply again.
Serious vibration of the unit
The fan blade is damaged. Switch off the unit and contact Caple Service. To
be repaired by qualified service personnel only.
The fan motor is not fixed tightly. Switch off the unit and contact Caple Service. To
be repaired by qualified service personnel only.
The unit is not hung correctly
on the bracket.
Take down the unit and check whether the
bracket is in the correct location.
The extraction performance
is not good The filter requires cleaning.
Clean the grease filter as directed in the ‘Care
and maintenance’ section. Replace the charcoal
filter (if in recirculation mode).
If the above table has not solved the problem please contact Caple Service by phone on
0117 938 7420 or by email service@caple.co.uk

Instruction manual CCH20 Please keep this instruction manual for future reference
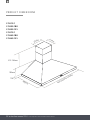
PRODUCT DIMENSIONS
CCH101
CCH901BK
CCH901SS
CCH701
CCH601BK
CCH601SS
DIMENSIONS
600/700/900/1000mm
480mm
373-740mm
180mm
20mm
222mm
172mm
Page is loading ...
Page is loading ...
Page is loading ...
Page is loading ...
-
 1
1
-
 2
2
-
 3
3
-
 4
4
-
 5
5
-
 6
6
-
 7
7
-
 8
8
-
 9
9
-
 10
10
-
 11
11
-
 12
12
-
 13
13
-
 14
14
-
 15
15
-
 16
16
-
 17
17
-
 18
18
-
 19
19
-
 20
20
-
 21
21
-
 22
22
-
 23
23
-
 24
24


