Universal Ubiquitous Uface 7 Pro Face Recognition Terminal User manual

Type
User manual

The Universal Ubiquitous Uface 7 Pro Face Recognition Terminal provides advanced facial recognition with a 0.1% false accept rate and a recognition speed of less than 1 second. Featuring a 10000-face database, this device offers high accuracy and efficiency. With support for 232 serial output, Wiegand 26 and 34 output, you can easily integrate it into your existing security system.

The Universal Ubiquitous Uface 7 Pro Face Recognition Terminal provides advanced facial recognition with a 0.1% false accept rate and a recognition speed of less than 1 second. Featuring a 10000-face database, this device offers high accuracy and efficiency. With support for 232 serial output, Wiegand 26 and 34 output, you can easily integrate it into your existing security system.

PRODUCT
BOOKLET
Uface 7 Pro
( OS-M375C4-V-R23WFCQ )
Device introduction
Parts list
Dimensional drawing
Platform/Software
operating instruction
Appearance description
Illumination intensity
Position
Height
Steps
Wiring connection
Features
FAQ
Installation
Product description
No. QuantityName
1 1Host
2 1Support
3 1Wrench
4
5
3
3
Expansion pipe
Flat head self-tapping screws
6 4Flat head screws
7 1Tail line
8
9
1
1
Power adapter
Installation sticker
10 1Warranty
Parts list
Dimensional drawing
Dear customer:
Thank you for using our product. For better use, please carefully read this instruction. If you have any
issues not mentioned here, please contact the provider. All parts of this booklet are reserved by our
company, including words, pictures and graphics. Without written permission, no unit or individual
shall extract, copy, translate or edit the content in this instruction.
Unit: mm
The software carried by the product is LAN version(supports the secondary development). Please mark the
need for software version when place the order. Please contact the customer service for another version if
download or contact the customer services.
Platform/Software Operating Instruction
Appearance description
1 / 2
RGB camera
Infrared camera
MIC
Instruction
RS232 WG OUT RS485 ALARM INPUT Switching value WG IN
RS232
WG OUT
RS485
ALARM INPUT
Switching value
WG IN
Power input
RJ45
TX_232
RX_232
GND
WG_OUT-D0
WG_OUT-D1
GND
485-
485+
GND
SENSOR
BUTTON
DOOR_NO
DOOR_COM
DOOR_NC
WG_IN_D1
WG_IN_D0
GND
The recognized face, of which, the illumination
intensity ( “intensity” in short) shall not be lower
than 30 Lux
when the device put in a totally dark environ-
ment, the face illumination intensity, 0.5m
distance to the device, is about 100 Lux. The
nearer to the device, the higher the intensity is.
If there is overexposure on the face, the face
characteristics will be unable to be extracted
and may lead to hard recognition.
image and registered image; backlight, side-light and
(Analysis: from the view of human eyes, the color
changes on face skin may result in wrong recognition
of identity; unclear exposure area, no matter large or
The test standard is as shown on the picture:
the angle between dotted line A and dotted line
B is 90 ° , the test adopts the common light
meter with full spectrum, and applies U30 stan-
time.
Back light
Intensity test
Illumination intensity in actual scenarios
Strong light
Side light
Device stands between
device and light source
Side-light may lead to
uneven light on the face
Backlight may make the
face too dark
Direct strong light may
cause overexposure
500 Lux,
overexposure
30 Lux, dim
100 Lux, bright
50 Lux, normal
300 Lux, slight
exposure
Reference to intensity
Illumination intensity
1. Install the device in a place with little impact
from light source.
2. Add a registered image according to the site
condition, and it is suggested to use this product
to enroll images.
3. Properly lower the threshold value according
to usage.
Improvements
Device
0.5m~1m
d
90° Light source
A
B
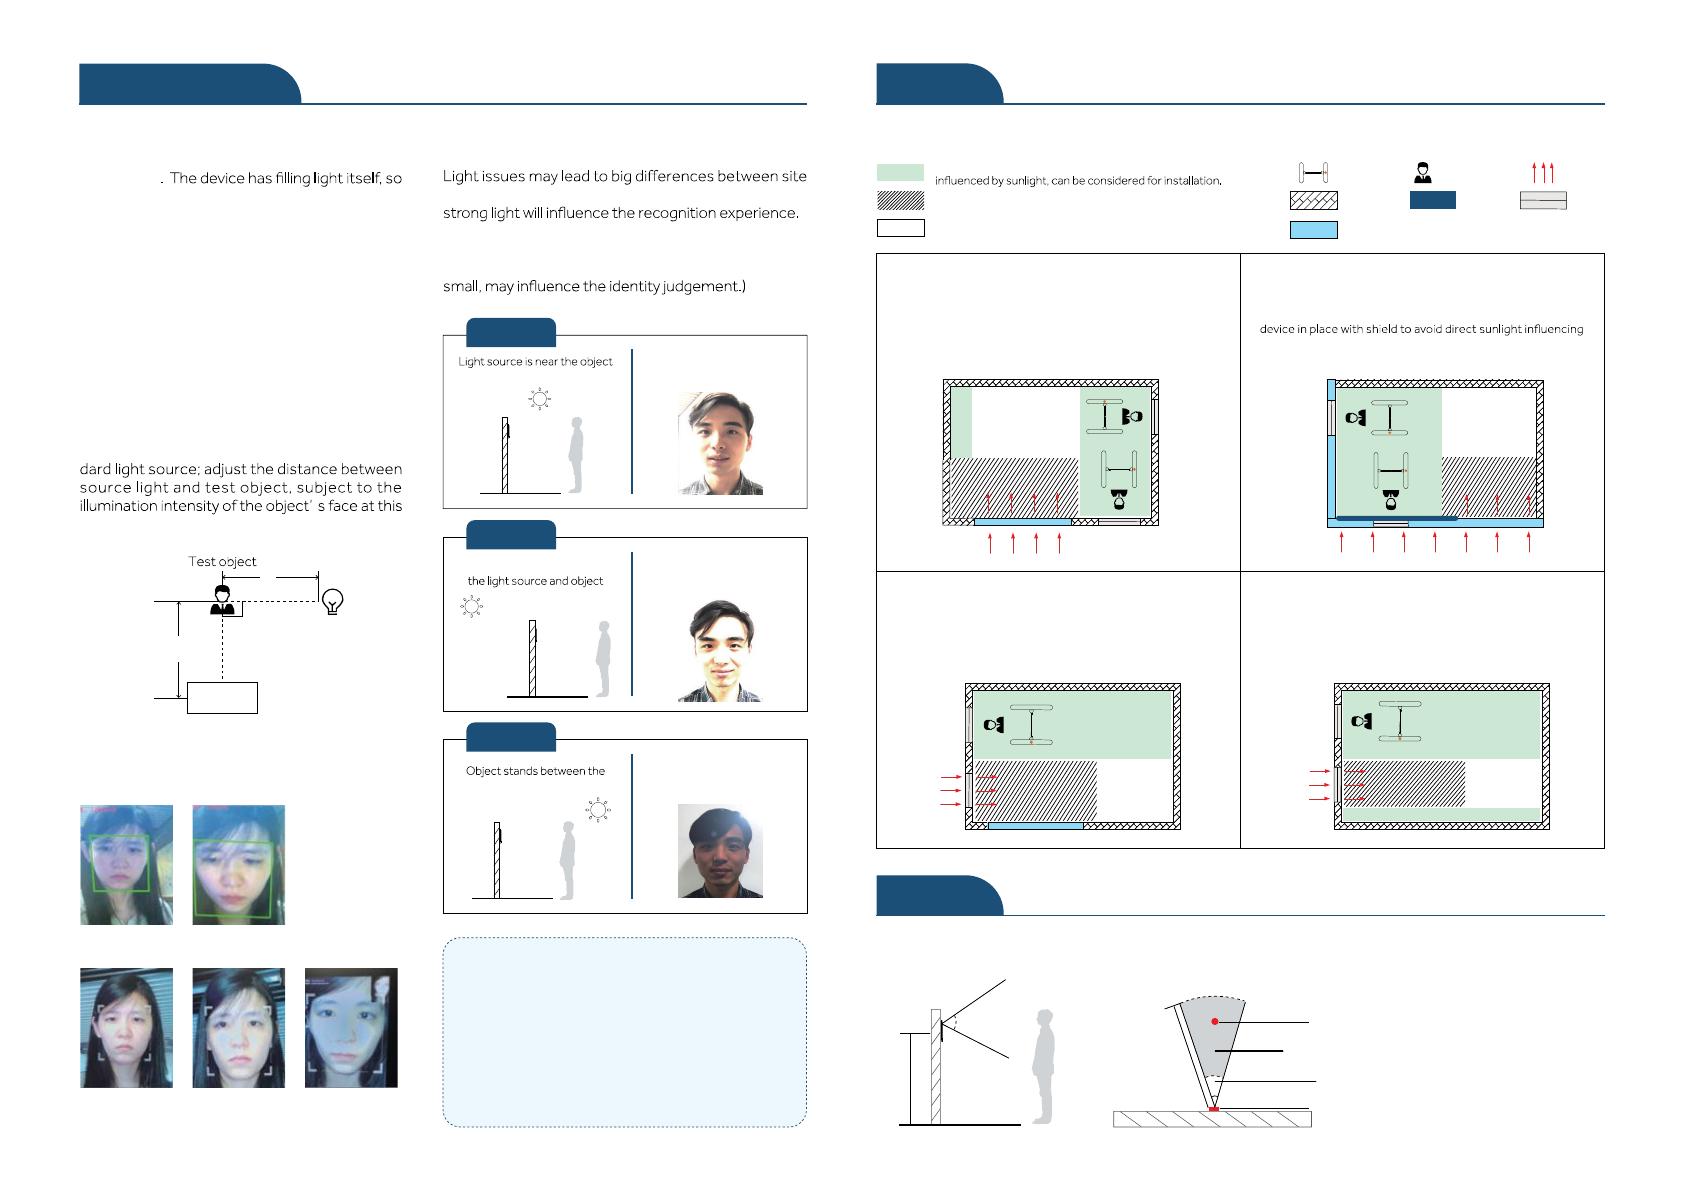
When the sunlight shines indoor through the window, the face
recognition terminal device shall not be installed in shown black
shadow area, instead, shall be installed in place with little
sunlight impact, no side-light and no backlight. (Glass window
can be deemed as no walls)
Sunlight shines indoor
If the room has glass wall, there is no shield for sunlight, then it
is suggested to hang curtains over the window, and install the
the recognition. (Glass window can be deemed as no walls)
Glass window
Sunlight shines through the door, the device shall be installed at
the place with shields and little light impact. Glass window can
be deemed as no shields, the device shall be installed at the side
without glass window or with curtain hung.
Sunlight shines through the door, with glass window at
one side
Sunlight shines through the door, the device shall be installed at
the place with shields and little light impact.
Sunlight shines through the door
Suggested installation height (the
distance between the lens and
the ground) is 1.4m, as the
recognizable body height range,
0.5m distance away from the
device, is 1.3m-1.7m; the
recognizable body height range,
1m distance away from the
device, is 1m-2m. (There are
some deviations)
Camera vertical wide-angle Camera horizontal wide-angle
Wall
1.4m
Device
Gate
User
2m
Recognition area
Position 3 / 4
Height
Glass window (same as the semi-outdoor scene
with no walls)
Device Light
DoorWall
Person
Curtain
Device shall be installed in places avoiding backlight, side-light and strong light.
This place, 3m away from the window, or does not
FOV(V)
FOV(H)
Backlight, side-light or direct strong light, not
suitable for installation.
Other areas, install in suitable places according
to actual light impact.
Indoor
Door
Light
Wall/Shields
Indoor
Door
Light
Wall/Shields
Indoor
Light Door
Door
Wall/Shields
Indoor
Door
Glass wall
Wall/Shields
Light
Steps 5 / 6
1Paste the installation sticker on the wall, and keep the horizontal line parallel with the ground
and the red line 1.4m distance to the ground; drill screw holes on suitable position on the wall
according to the installation method (if use 86-box, then no need to drill holes).
3
2Connect power cable, network cable and other wires, thread the connected tail line
out the hole. 5Insert the device upper slot into the hook on support, and align the lower slot with the
limit slice, use hexagonal wrench to tighten the tamper screw in shown direction, to
Move the support to align the holes
on it with that on the wall, and use
(Attention: If the wall has hard
foundation, self-tapping screws shall
be used together with expansion
pipe; if the wall has soft foundation,
use self-tapping screws directly.)
4Align the socket of tail line with the
interface at device back, use thr
1.4m calibration line
1.4M Outlet hole
1.4m calibration line
2
3
1
1.4m calibration line
Installation notes
power supply for the host end, and abnormal phenomena like repeat restart, system crash may
occur. If the power is far away from the device, the power cable can be extended (strong current).
may cause repeat restart.
multi-strand cable in parallel or use copper core bold cable, to ensure voltage >11V.
Attention: If use network cable, the extension cable use 4-strand cable as positive pole and 4-strand cable as negative pole.
If not clear with how to extend, please contact the provider to change “Special power strip”.
Wiring connection 7 / 8
Wiring for magnetic door Wiring for automatic door
System installation schematic
drawing for magnetic door
Wiring schematic drawing for touching
switch of magnetic door
System installation schematic drawing
for automatic door
Wiring schematic drawing for mechanical
switch of magnetic door
Wiring schematic drawing for sensor
switch of automatic door
Auto-door controller
+ assembly units
Relay interface
Sensor (inside)
DC12V Ethernet
Host
Power (access control)
Door exit
(inside)
Magnetic lock
Host
Relay interface
Ethernet
PUSH
GND
12V
COM
NC
NO
12V
GND
NO
NC
COM
12V
12V
Power (access control)
Door exit
Magnetic lock
Ethernet
Host
Power Relay
Opening signal PUSH
Public end GND
12V
Controller of auto-door (only used terminals will be listed)
Ethernet
DC+
DC-
NO
COM Sensor
DC+
DC-
NO
COM
Host
Power Relay
NO
NC
COM
Door exit
PUSH
GND
12V
COM
NC
NO
12V
12V
Host
Power (access control)
Magnetic lock
Ethernet
Power Relay
1. When arrange the wires, if the 12V power supply cable of the host does not adopt the “Special power strip
and is in long distance, resulting in large resistance, then abnormal phenomena may occur easily such as
shown as follow.
standard, American standard, British standard and so on.
Power
GND
12V
Cable equivalent
resistance1
Cable equivalent
resistance2
Voltage meter
V
Host
9 / 10
Try to restart and reset
When the device stops in some interface for a long time, users can plug out the power switch,
press RESET button for 8-12s to restart the device. Besides, users can contact after-sales service
and make some feedback.
FAQFeatures
Do not dirty or damage the display screen
Do not use unknown power adapter to
avoid burning out the device
• Characteristics
Store records in local
Quick recognition speed
Secondary development (integrated)
Complete functions
High extensibility
dynamic dual-camera; face database is 10000, the 1:N recognition accuracy is 99.99% under 0.1%
false accept rate.
(a) Device using cloud platform supports storing 50 thousand pieces of face images (smaller than
400KB), 1 million pieces of recognition records (0.45KB) and about 100 thousand pieces of on-site
capture images; (b) Device using LAN support storing 50 thousand pieces of face images (each
image by 100KB) and 1 million pieces of recognition records (including the latest 10 thousand pieces
of on-site capture images)
Recognition speed less than 1s.
Support the interface connection in HTTP; supports 232 serial output, Wiegand 26 and 34 output,
Supports deployment methods like public network and LAN; supports screen display content
Dustproof & Waterproof
IP65
• Cleaning
Please use soft cloth or such materials, lightly wipe the display screen or panel, and to avoid
scrubbing with water and cleaner.
Drop resistance
Please avoid operations such as falling, breaking, bending, heavily pressing and so on.
Working temperature
The normal working temperature for this device is -20~50, if the actual temperature exceeds
FCC Radiation Exposure Statement:
This equipment complies with FCC radiation exposure limits set forth for an uncontrolled
environment. This equipment should be installed and operated with minimum distance 20cm
between the radiator & your body.
This device complies with Part 15 of the FCC Rules. Operation is subject to the following two
conditions:
(1) This device may not cause harmful interference, and (2) this device must accept any
interference received, including interference that may cause undesired operation.
NOTE 1: This equipment has been tested and found to comply with the limits for a Class B digital
device, pursuant to part 15 of the FCC Rules. These limits are designed to provide reasonable
protection against harmful interference in a residential installation. This equipment generates uses
and can radiate radio frequency energy and, if not installed and used in accordance with the
instructions, may cause harmful interference to radio communications. However, there is no
guarantee that interference will not occur in a particular installation. If this equipment does cause
harmful interference to radio or television reception, which can be determined by turning the
equipment off and on, the user is encouraged to try to correct the interference by one or more of
the following measures:
- Reorient or relocate the receiving antenna.
- Increase the separation between the equipment and receiver.
-Connect the equipment into an outlet on a circuit different from that to which the receiver is
connected.
-Consult the dealer or an experienced radio/TV technician for help.
NOTE 2: Any changes or modifications to this unit not expressly approved by the party
responsible for compliance could void the user's authority to operate the equipment.
  • Page 1 1
  • Page 2 2
  • Page 3 3
  • Page 4 4
  • Page 5 5
  • Page 6 6
  • Page 7 7

Universal Ubiquitous Uface 7 Pro Face Recognition Terminal User manual

Type
User manual

The Universal Ubiquitous Uface 7 Pro Face Recognition Terminal provides advanced facial recognition with a 0.1% false accept rate and a recognition speed of less than 1 second. Featuring a 10000-face database, this device offers high accuracy and efficiency. With support for 232 serial output, Wiegand 26 and 34 output, you can easily integrate it into your existing security system.

Ask a question and I''ll find the answer in the document

Finding information in a document is now easier with AI