Page is loading ...

BALLAST/BULB TO LED
FIELD CONVERSION GUIDE
(FOR FT5000 X-SCALE LIGHT PANEL)
CORPORATE HEADQUARTERS: RMA (RETURN MATERIAL AUTHORIZATION)
RETURN ADDRESS:
522 E. Railroad Street 21405 Avenue “B”
Long Beach, MS 39560 Long Beach, MS 39560
Phone: (228) 868-1317
Fax: (228) 868-0437
VERSION 1.0
TDN 07100-00066 09/2006
COPYRIGHT NOTICE
© 2006 Delaware Capital Formation, Inc. All Rights Reserved. Triton Systems
of Delaware, Inc. is an operating company of Dover Electronics, Inc., a subsidiary
of Dover Corporation (NYSE-DOV). DOVER, the DOVER logo and the Dover
family of marks and TRITON, the TRITON logo and the Triton family of marks
are registered trademarks of Delaware Capital Formation, Inc., a wholly owned
subsidiary of Dover Corporation.

2
BALLAST/BULB TO LED CONVERSION (FT5000)
INTRODUCTION
This guide covers the steps for removal of the ballast/flourescent bulb assembly
and installation of the LED light bar assembly and cable connectivity. These
procedures include a list of tools and hardware required for the replacement as
well as the steps involved.
** Attention **
Flourescent bulb contains mercury. Dispose of according
to local, state, or federal laws. For more information (US),
go to www.lamprecycle.org.
IMPORTANT NOTICE
Triton Systems has discontinued offering a ballast/bulb (AC-powered) light
assembly for topper signage (mid/high) and light panels. This affects models
8100, 9100, 97XX, RL5000 (X-Scale/XP), and FT5000 (X-Scale) units. LED-lit
(DC-powered) light assemblies will be the replacement option.
Note: Limited ballast/bulb parts may be available for field replaceable
parts and repair until current inventory is depleted.

3
BALLAST/BULB TO LED CONVERSION (FT5000)
SCOPE
This procedure applies to all service personnel involved in the process of
maintaining or converting Triton ATMs.
REQUIRED PARTS AND TOOLS
BALLAST/BULB LIGHT PANEL
LED LIGHT PANEL
DERIUQERSLOOT
)citengaM(revirdwercSspillihP2#
)citengaM(hcnerWrennapS/xoB)mm9("23/11
srettuClanogaiD
TIKNOITALLATSNIDEL)ELACS-X(0005TF
)36100-00260N/P(
DEILPPUSSTRAP
REBMUNTRAP NOITPIRCSED YTITNAUQ
88100-00190DEL,eludoMraBthgiL1
98700-11030raBthgiLDEL,tekcarB1
23300-02190raBthgiLDEL,elbaCrewoP1
96100-450208/
3x23-8#,wercS" 4
42000-103208#,tuN4
51000-27030parWyT4
*
62800-02190
elbaC
,
rewoPrettilpS
1
05100-00250
DCnoitallatsnIDEL
)launamnoitallatsnIDEL66000-00170sedulcnI(
1
*
.desueralenaPecivreSraeRdnaredaerdracdezirotomahtobfideriuqeR:etoN

4
BALLAST/BULB TO LED CONVERSION (FT5000)
2. Lift the light panel until it latches
on top. Using diagonal cutters, cut
any ty-wraps that secure the light
assemblies power cord back to the
power supply. Caution: DO NOT
cut the speaker wires!
Note: These procedures are completed with the terminal AC power OFF. If
terminal is ON, enter MANAGEMENT FUNCTIONS > SYSTEM PARAMETERS > SHUT
DOWN THE TERMINAL. When prompted, turn power OFF on the units power
supply.
FT5000 LIGHT PANEL LED CONVERSION PROCEDURE
1. Unlock and open the cabinet sleeve
door. Grasp handle on printer
assembly, lift up, and pivot
assembly down. This will allow
better access to light panel removal.
4. Remove the light panel assembly from the unit. This will be replaced with
the LED light bar assembly.
Power cable
Grommet
ÂÂ
ÂÂ
 REMOVING BALLAST/BULB LIGHT PANEL:
3. Disconnect the AC power cord from
the power supply. If there is a
grommet securing the power cord/
speaker wires in place, remove
grommet and separate the power
cord.

5
BALLAST/BULB TO LED CONVERSION (FT5000)
ÂÂ
ÂÂ
 ASSEMBLE LED LIGHT BAR/BRACKET/CABLE:
1. Mount the LED light bar (P/N 09100-00188) to the bracket (P/N 03011-00789)
as shown in figure below. Secure with the three (3) screws/nuts provided
using a phillips screwdriver and box wrench.
2. Plug the 2-pin connector end of the LED power cable (P/N 09120-00332) to
J5 on the LED light bar module as shown below.
ÂÂ
ÂÂ
 INSTALL LED LIGHT PANEL A SSEMBLY:
1. Using a phillips screwdriver (magnetic recommended), remove the three (3)
screws shown and set aside. Note: The two (2) lower screws also secure
small brackets. These brackets will not be required for the new LED light
panel.

6
BALLAST/BULB TO LED CONVERSION (FT5000)
2. Install the LED light panel assembly as shown below with the three (3)
screws removed from the previous step.
ÂÂ
ÂÂ
 CABLE ROUTING AND CONNECTIVITY:
1. Route the LED power cable (and speaker wires) through the slot shown
below. If a grommet was previously in place, route cables through the
grommet and insert grommet in the slot.
2. Connect the 8-pin molex connector of the LED power cable to any unused
connector of the power supply. Note: The largest connector (10-pin) of
the power supply is reserved. DO NOT connect the LED power cable here!

7
BALLAST/BULB TO LED CONVERSION (FT5000)
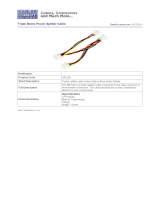
Units that have power supplies where all 8-pin connectors are in use:
Remove one (1) of the cables (preferably any that has two (2) wires connected)
from the power supply. Using the power splitter cable included (P/N 09120-
00826), connect the LED power cable to one side and the recently removed
cable to the other. Plug the female end of the splitter to an 8-pin molex
connector on the power supply.
3. Using the ty-wraps provided, secure the LED power cable with the other
bundled cables.
4. Rotate the printer assembly up to the operate position. Turn the power
supply switch to the ON position.
power splitter cable

8
BALLAST/BULB TO LED CONVERSION (FT5000)
THIS PAGE INTENTIONALLY LEFT BLANK
/