Roland DP-90 User manual

Category
Musical Instruments
Type
User manual
* 5 1 0 0 0 2 8 3 7 9 - 0 3 *
Record Songs
Record your performances
You can record your own playing.
Use your computer to create a CD of a song you recorded
A song you’ve recorded can be copied to your computer, and written to a CD.
page 29
page 36
Play the Piano
Play various sounds
The unit contains a wide variety of tones (sounds).
You can freely select and perform using these tones.
Play two layered tones
You can layer two tones on a single key.
Play dierent tones with your left and right hands
You can divide the keyboard into left and right zones, and select a dierent tone for each zone.
Play duets
You can divide the keyboard into left and right halves, playing it as though it were two pianos.
page 14
page 15
page 16
page 20
Practice Songs
Sound a metronome
You can sound a metronome.
Practice along with the built-in songs
The unit contains numerous built-in songs.
For the song titles, refer to “Internal Song List” (separate leaet).
Practice each hand separately
You can practice along with a song while listening to only the right-hand or left-hand
part play back.
page 22
page 24
page 26
Look What You Can Do!
2
Environmentally Friendly Energy-Ecient Design
The power will turn o after a specied time has elapsed
When thirty minutes have elapsed since you last played or operated the unit, the power will turn o automatically.
* If you don’t want the power to turn o automatically, change the Auto O setting (p. 39).
page 39
Adjust Your Piano
Adjust the keyboard touch
You can adjust the touch sensitivity of the keyboard to match your own playing style.
Add reverberation to the sound
You can add reverberation (ambience) to create the sensation of performing in a
concert hall.
Adjust the brightness of the sound
You can adjust the tone quality of the sound, ranging from a brilliant timbre to a
mellow tone.
page 19
page 18
page 18
Convenient Functions
Transpose the pitch of the keyboard or song
The Transpose function lets you shift the pitch of the keyboard or a song so that you
can perform more conveniently.
Disable the buttons
The Panel Lock function lets you prevent sounds or settings from being changed when
buttons are pressed inadvertently.
Adjust the resonance of chords
The way in which the pianos soundboard vibrates can be adjusted with “Soundboard
Behavior, a setting that lets you modify the way chords resonate.
Switch the temperament
You can switch between various temperaments, such as historic temperaments used
during the Baroque era.
page 21
page 43
page 45
page 44
3
Operation Guide Panel Descriptions Before You Play Performing Practicing
Convenient Functions
Appendix
Function Mode
Before using this unit, carefully read the sections entitled: “USING THE UNIT SAFELY” (p. 56), and “IMPORTANT NOTES” (p. 58). These
sections provide important information concerning the proper operation of the unit. Additionally, in order to feel assured that
you have gained a good grasp of every feature provided by your new unit, Owners Manual should be read in its entirety. The
manual should be saved and kept on hand as a convenient reference.
Copyright © 2012 ROLAND CORPORATION
All rights reserved. No part of this publication may be reproduced in any form without the written permission of ROLAND CORPORATION.
4
Contents
Look What You Can Do! . . . . . . . . . . . . . . . . . . . . . . . . . . . . . . . . . . . . . . . . . . . . . .2
Operation Guide . . . . . . . . . . . . . . . . . . . . . . . . . . . . . . . . . . . . . . . . . . . . . . . . . . . .6
Panel Descriptions . . . . . . . . . . . . . . . . . . . . . . . . . . . . . . . . . . . . . . . . . . . . . . . . 10
Before You Play . . . . . . . . . . . . . . . . . . . . . . . . . . . . . . . . . . . . . . . . . . . . . . . . . . . 12
Opening the Lid . . . . . . . . . . . . . . . . . . . . . . . . . . . . . . . . . . . . . . . . . . . . . . . . . . . . . .12
Closing the Lid. . . . . . . . . . . . . . . . . . . . . . . . . . . . . . . . . . . . . . . . . . . . . . . . . . . . . . . . . . .12
Turning the Power On/O . . . . . . . . . . . . . . . . . . . . . . . . . . . . . . . . . . . . . . . . . . . . .13
Performing . . . . . . . . . . . . . . . . . . . . . . . . . . . . . . . . . . . . . . . . . . . . . . . . . . . . . . . 14
Performing with Various Sounds . . . . . . . . . . . . . . . . . . . . . . . . . . . . . . . . . . . . . . .14
Selecting Tones . . . . . . . . . . . . . . . . . . . . . . . . . . . . . . . . . . . . . . . . . . . . . . . . . . . . . . . . . .14
Performing with Two Layered Tones (Dual Play) . . . . . . . . . . . . . . . . . . . . . . . . . . .15
Playing Dierent Tones with the Right and Left Hands (Split Play) . . . . . . . . . .16
Adjusting the Sound to Your Taste . . . . . . . . . . . . . . . . . . . . . . . . . . . . . . . . . . . . .18
Adding Reverberation to the Sound (Ambience) . . . . . . . . . . . . . . . . . . . . . . . . . .18
Adjusting the Brightness of the Sound (Brilliance) . . . . . . . . . . . . . . . . . . . . . . . . .18
Adjusting the Keyboard Response (Key Touch) . . . . . . . . . . . . . . . . . . . . . . . . . . . .19
Dividing the Keyboard for Two-person Performance (Twin Piano) . . . . . . .20
Shifting the Pitch (Transpose) . . . . . . . . . . . . . . . . . . . . . . . . . . . . . . . . . . . . . . . . .21
Practicing . . . . . . . . . . . . . . . . . . . . . . . . . . . . . . . . . . . . . . . . . . . . . . . . . . . . . . . . 22
Practicing with the Metronome . . . . . . . . . . . . . . . . . . . . . . . . . . . . . . . . . . . . . . .22
Changing the Tempo . . . . . . . . . . . . . . . . . . . . . . . . . . . . . . . . . . . . . . . . . . . . . . . . . . . .22
Changing the Time Signature . . . . . . . . . . . . . . . . . . . . . . . . . . . . . . . . . . . . . . . . . . . .22
Adjusting the Metronomes Volume . . . . . . . . . . . . . . . . . . . . . . . . . . . . . . . . . . . . . .23
Adding a Count-in to Synchronize Your Performance . . . . . . . . . . . . . . . . . . . . . .23
Practicing with a Song . . . . . . . . . . . . . . . . . . . . . . . . . . . . . . . . . . . . . . . . . . . . . . . .24
Selecting and Playing a Song . . . . . . . . . . . . . . . . . . . . . . . . . . . . . . . . . . . . . . . . . . . . .24
Playing Songs Consecutively (All Songs Play) . . . . . . . . . . . . . . . . . . . . . . . . . . . . .25
Adjusting the Volume Balance of the Song and the Keyboard
Performance (Song Balance) . . . . . . . . . . . . . . . . . . . . . . . . . . . . . . . . . . . . . . . . . . . . .
25
Adjusting a Song’s Tempo for Easier Practicing . . . . . . . . . . . . . . . . . . . . . . . . . . . .26
Practicing One Hand at a Time (Part Mute) . . . . . . . . . . . . . . . . . . . . . . . . . . . . . . . .26
Repeatedly Practicing a Portion of a Song (AB Repeat) . . . . . . . . . . . . . . . . . . . .28
Recording the Song You’re Practicing . . . . . . . . . . . . . . . . . . . . . . . . . . . . . . . . . .29
SMF Recording . . . . . . . . . . . . . . . . . . . . . . . . . . . . . . . . . . . . . . . . . . . . . . . . . . . . . . . . . .29
Overdubbing a Recorded Song . . . . . . . . . . . . . . . . . . . . . . . . . . . . . . . . . . . . . . . . . . .30
Converting a Song Recorded as an SMF to Audio . . . . . . . . . . . . . . . . . . . . . . . . .33
Audio Recording . . . . . . . . . . . . . . . . . . . . . . . . . . . . . . . . . . . . . . . . . . . . . . . . . . . . . . . . .34
Transposing a Song for Easier Performance (Audio Transpose) . . . . . . . . . . . . .35
Enjoying Karaoke with an Audio File (Center Cancel) . . . . . . . . . . . . . . . . . . . . . .35
Burning an Audio Recording of a Song (WAV le) to a CD . . . . . . . . . . . . . . . . . .36
Saving a Song with the Name You Specify . . . . . . . . . . . . . . . . . . . . . . . . . . . . . . . .37
Renaming a Song . . . . . . . . . . . . . . . . . . . . . . . . . . . . . . . . . . . . . . . . . . . . . . . . . . . . . . . .38
Convenient Functions . . . . . . . . . . . . . . . . . . . . . . . . . . . . . . . . . . . . . . . . . . . . . 39
Making the Power Automatically Turn O After a Time (Auto O) . . . . . . .39
Retaining the Settings Even After Power-o (Memory Backup) . . . . . . . . .39
Restoring the Factory Settings (Factory Reset) . . . . . . . . . . . . . . . . . . . . . . . . .40
Copying a Saved Song (Copy Song) . . . . . . . . . . . . . . . . . . . . . . . . . . . . . . . . . . . .40
Deleting a Saved Song (Delete Song) . . . . . . . . . . . . . . . . . . . . . . . . . . . . . . . . . .41
Initializing the Memory (Format Media) . . . . . . . . . . . . . . . . . . . . . . . . . . . . . . . .42
Disabling the Buttons (Panel Lock) . . . . . . . . . . . . . . . . . . . . . . . . . . . . . . . . . . . . .43
Various Settings (Function Mode) . . . . . . . . . . . . . . . . . . . . . . . . . . . . . . . . . . 44
Adjusting the Dual Play Volume Balance (Dual Balance) . . . . . . . . . . . . . . . . . . .44
Matching the Pitch with Other Instruments (Master Tuning) . . . . . . . . . . . . . . .44
Changing the Tuning Method (Temperament) . . . . . . . . . . . . . . . . . . . . . . . . . . . .44
Specifying a Song’s Tonic (Temperament Key) . . . . . . . . . . . . . . . . . . . . . . . . . . . . .44
Using a Pianos Unique Tuning (Stretch Tuning) . . . . . . . . . . . . . . . . . . . . . . . . . . .44
Producing Sympathetic Resonance When You Press the Damper Pedal
(Damper Resonance) . . . . . . . . . . . . . . . . . . . . . . . . . . . . . . . . . . . . . . . . . . . . . . . . . . . . .
44
Producing the Resonance of the Strings When the Keys Are Played
(String Resonance) . . . . . . . . . . . . . . . . . . . . . . . . . . . . . . . . . . . . . . . . . . . . . . . . . . . . . . .
45
Playing Sounds When the Keys Are Released (Key O Resonance) . . . . . . . . .45
Adjusting the Sympathetic Resonance of the Grand Piano Body
(Cabinet Resonance) . . . . . . . . . . . . . . . . . . . . . . . . . . . . . . . . . . . . . . . . . . . . . . . . . . . . .
45
Adjusting the Clarity of Individual Notes in a Chord
(SoundBoard Behavior) . . . . . . . . . . . . . . . . . . . . . . . . . . . . . . . . . . . . . . . . . . . . . . . . . .
45
Specifying What the Transpose will Aect (Transpose Mode) . . . . . . . . . . . . . .45
Changing the Pitch of the Tone in Octave Steps (Octave Shift) . . . . . . . . . . . . .45
Selecting the Format for Recording (Recording Mode) . . . . . . . . . . . . . . . . . . . .45
Changing How the Pedal Eects Are Applied (Damper Pedal Part) . . . . . . . . .45
Changing How the Pedals Work (Center Pedal) . . . . . . . . . . . . . . . . . . . . . . . . . . . .46
Preventing Doubled Notes When Connected to a Sequencer (Local
Control) . . . . . . . . . . . . . . . . . . . . . . . . . . . . . . . . . . . . . . . . . . . . . . . . . . . . . . . . . . . . . . . . .
46
MIDI Transmit Channel Settings (MIDI Transmit Channel) . . . . . . . . . . . . . . . . . .46
Setting the Type of CD To be Played Back (CD/Audio Type) . . . . . . . . . . . . . . . .46
Renaming a Song (Save Song) . . . . . . . . . . . . . . . . . . . . . . . . . . . . . . . . . . . . . . . . . . .46
Copying a Saved Song (Copy Song) . . . . . . . . . . . . . . . . . . . . . . . . . . . . . . . . . . . . . .46
Deleting a Saved Song (Delete Song) . . . . . . . . . . . . . . . . . . . . . . . . . . . . . . . . . . . . .46
Initializing the Memory (Format Media) . . . . . . . . . . . . . . . . . . . . . . . . . . . . . . . . . . .46
Changing the USB Driver Settings (USB Driver) . . . . . . . . . . . . . . . . . . . . . . . . . . . .47
Changing the USB ash drive Setting (USB Memory Mode) . . . . . . . . . . . . . . . .47
Controlling Video Equipment (Visual Control Mode) . . . . . . . . . . . . . . . . . . . . . .47
Specifying the Visual Control Channel . . . . . . . . . . . . . . . . . . . . . . . . . . . . . . . . . . . .47
Making the Power Automatically Turn O After a Time (Auto O) . . . . . . . . . .48
Storing Your Settings (Memory Backup) . . . . . . . . . . . . . . . . . . . . . . . . . . . . . . . . . .48
Restoring the Factory Settings (Factory Reset) . . . . . . . . . . . . . . . . . . . . . . . . . . . .48
Troubleshooting . . . . . . . . . . . . . . . . . . . . . . . . . . . . . . . . . . . . . . . . . . . . . . . . . . 49
Error Messages . . . . . . . . . . . . . . . . . . . . . . . . . . . . . . . . . . . . . . . . . . . . . . . . . . . 51
Tone List . . . . . . . . . . . . . . . . . . . . . . . . . . . . . . . . . . . . . . . . . . . . . . . . . . . . . . . . . 52
Main Specications . . . . . . . . . . . . . . . . . . . . . . . . . . . . . . . . . . . . . . . . . . . . . . . 53
Assembling . . . . . . . . . . . . . . . . . . . . . . . . . . . . . . . . . . . . . . . . . . . . . . . . . . . . . . . 54
USING THE UNIT SAFELY . . . . . . . . . . . . . . . . . . . . . . . . . . . . . . . . . . . . . . . . . . . 56
IMPORTANT NOTES . . . . . . . . . . . . . . . . . . . . . . . . . . . . . . . . . . . . . . . . . . . . . . . 58
About the Ivory Feel Keyboard . . . . . . . . . . . . . . . . . . . . . . . . . . . . . . . . . . . . . . . .59
Installing the CD Drive (Sold separately) . . . . . . . . . . . . . . . . . . . . . . . . . . . . . . .59
Index . . . . . . . . . . . . . . . . . . . . . . . . . . . . . . . . . . . . . . . . . . . . . . . . . . . . . . . . . . . . . 60
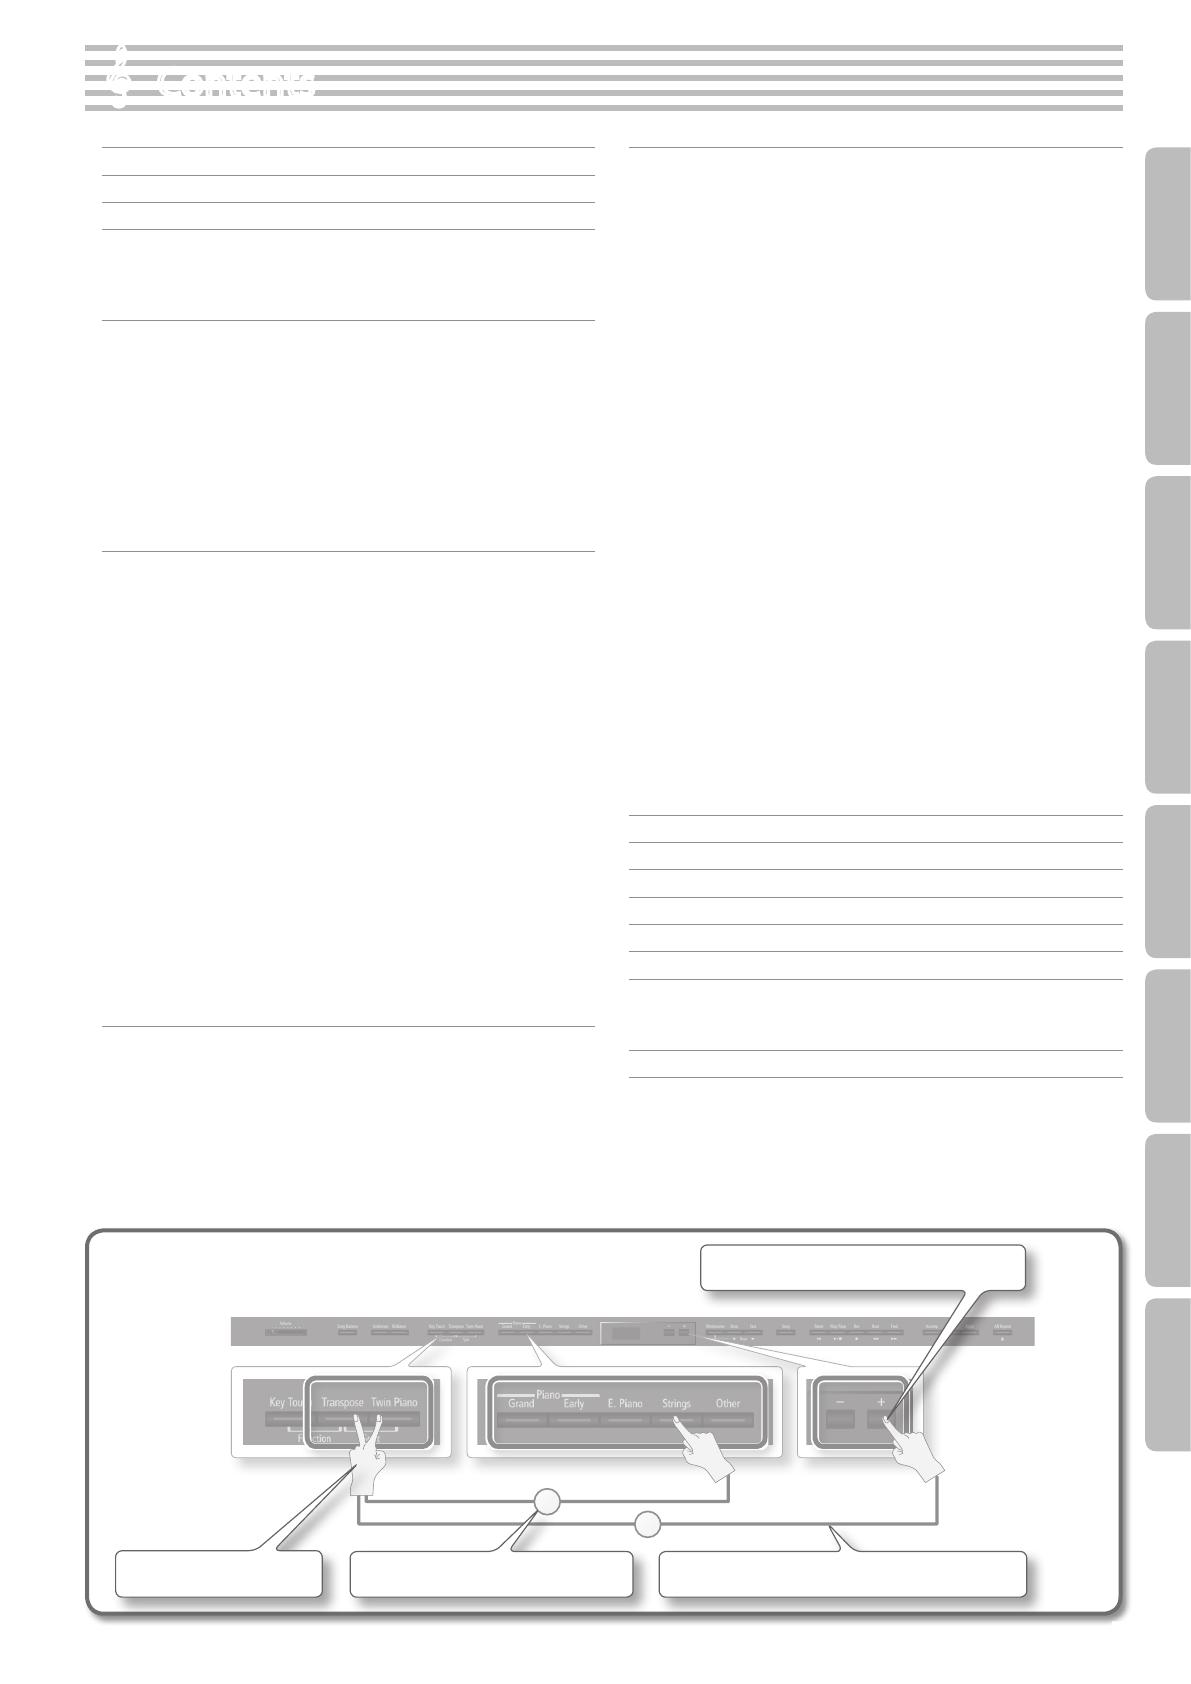
How to read the explanatory illustrations
While holding down a button, press another button.
1
2
Numerals indicate the sequence of steps.
Press one of the enclosed buttons.
Press two buttons.
5
Operation Guide Panel Descriptions Before You Play Performing Practicing
Convenient Functions
Appendix
Function Mode
Operation Guide
Adjusting the Brightness of the Sound (Brilliance)
You can adjust the brightness of the sound you play
from the keyboard or the sounds of a song you play
back.
To turn brilliance on
Press the [Brilliance] button so its lit.
To adjust the brilliance
While holding down the [Brilliance] button, press the [–] [+]
buttons.
page 18
Adding Reverberation (Ambience)
You can add a pleasant reverberation to the sounds,
producing the impression that you are performing in
a concert hall.
To turn ambience on
Press the [Ambience] button so it’s lit.
To adjust the ambience
While holding down the [Ambience] button, press the [–] [+]
buttons.
page 18
Retaining the settings even after power-o (memory backup)
The unit allows you to adjust numerous settings, but these settings will return to their default values as soon as you turn o the
power.
However, by using the Memory Backup feature, you can have the changes you’ve made in settings be retained.
page 39
Transposing Your Performance
(Transpose)
You can transpose the
notes you play on the
keyboard or the notes of a
song you play back.
To turn transpose on
Press the [Transpose] button so its lit.
To adjust the amount of transposition
While holding down the [Transpose]
button, press the [–] [+] buttons.
page 21
Adjusting the Keyboard Touch
(Key Touch)
You can adjust the way
in which the keyboard
responds to your playing.
To turn key touch on
Press the [Key Touch] button so it’s lit.
To adjust the key touch
While holding down the [Key Touch]
button, press the [–] [+] buttons.
page 19
Adjusting the Song Volume
(Song Balance)
By modifying the
playback volume of the
song, you can adjust the balance
between the song and your keyboard
performance.
To turn song balance on
Press the [Song Balance] button so its lit.
To adjust the song balance
While holding down the [Song Balance]
button, press the [–] [+] buttons.
page 25
1. While holding down the [Key Touch]
button, press the [Transpose] button.
2. Use the [ ] [ ] (Slow/Fast) buttons to select
“Memory Backup.
3. Press the [Song] button.
4. Use the [ ] (Fast) button to select “Y.
Adjusting the Overall Volume
Adjust the volume.
MaxMin
6
Operation Guide
Dividing the Keyboard for Two-person Performance (Twin Piano)
This function divides the keyboard into left and right, allowing two
people to play the same range of pitches.
To turn twin piano on
Press the [Twin Piano] button so it’s lit.
To change how the sounds are heard
While holding down the [Twin Piano] button, press the [–] [+]
buttons.
1
The sound of the right-hand keyboard zone will be heard more
loudly from the right speaker than from the left speaker.
The sound of the left-hand keyboard zone will be heard more
loudly from the left speaker than from the right speaker.
2
The sound of the right-hand keyboard zone will be heard only
from the right speaker.
The sound of the left-hand keyboard zone will be heard only
from the left speaker.
page 20
Playing Dierent Tones with the Right and Left Hands (Split Play)
This function divides the keyboard into left and right zones,
allowing you to play a dierent tone in each zone.
To turn split on
While holding down the [Transpose] button, press the [Twin Piano]
button.
To change the tones
Right-hand Tone
1. Press a tone button.
2. Press the [–] [+] buttons.
Left-hand Tone
1. While holding down the [Transpose] button and
[Twin Piano] button, press a tone button.
2. While holding down the [Transpose] button and
[Twin Piano] button, use the [–] [+] buttons.
Changing the keyboard’s split point
While holding down the [Transpose] button and [Twin Piano]
button, play the key that you want to specify as the split point.
page 16
Selecting the Tone
To select a single tone
Press one of the tone buttons, and then use the [–] [+] buttons.
Press one
To layer two tones (dual play)
Press two tone buttons.
Press two
To change the tones
Tone 1 Press the [–] [+] buttons.
Tone 2
Hold down the right-most of the lit tone button, and then use
the [–] [+] buttons.
page 14
page 15
7
Operation Guide Panel Descriptions Before You Play Performing Practicing
Convenient Functions
Appendix
Function Mode
Operation Guide
Selecting a Song
You can select songs.
To select a song
1. Press the [Song] button.
Category
Song Name
Song Number
2. Use the [–] [+] buttons to select a song.
To select a song that’s saved on the USB ash drive
1. Press the [Song] button.
2. While holding down the [Song] button, use
the [–] [+] buttons to select “S.
USB ash drive
3. Use the [–] [+] buttons to select a song.
page 24
Using the Metronome
Heres how to sound the metronome.
To turn the metronome on
Press the [Metronome] button so it’s lit.
To adjust the metronome’s volume
While holding down the [Metronome] button, use the [–] [+]
buttons.
page 22
Changing the Tempo or Time Signature
You can adjust the tempo of the metronome or
song.
To change the tempo
Use the [ ] [ ] (Slow/Fast) buttons.
To change the time signature
While holding down the [Metronome] button, use the [ ] [ ]
(Slow/Fast) buttons.
page 22
Display
This shows various information such as tone names, song names,
and the values of settings.
Tone NameTone Number
Selecting Variation Tones/Adjusting the Settings
You can select tone variations or songs, and adjust various settings.
Holding down the [–] [+] buttons will make the value change
continuously.
To rapidly increase the value, hold down the [+] button and press
the [–] button.
To rapidly decrease the value, hold down the [–] button and press
the [+] button.
To return the value to its default setting, press the [+] and [–] buttons
simultaneously.
8
Operation Guide
Disabling the Buttons (Panel Lock)
Hold down the [AB Repeat] button until the
display shows “Lock.
To cancel panel lock
Hold down the [AB Repeat] button once again for a while.
page 43
Recording/Playback
Heres how to play back or record a
song.
Return to the begin-
ning of the song
Press the [
] (Reset) button.
Play/Stop
Press the [
] (Play/Stop) button.
Enter recording-
standby mode
While stopped, press the [
] (Rec) button.
Record
While in recording-standby mode, press the
[
] (Play/Stop) button.
Rewind
Press the [
] (Bwd) button.
Fast-forward
Press the [
] (Fwd) button.
To play all songs
While holding down the [Song] button, press the [ ] (Play/
Stop) button.
To make a new recording
1. Select the tone that you want to play.
2. Press the [ ] (Rec) button.
3. Press the [ ] (Play/Stop) button to start
recording.
4. Press the [ ] (Play/Stop) button to stop
recording.
To overdub
1. Select the tone to be played.
2. Select the song to be dubbed.
3. Press the [ ] (Rec) button.
4. Press the [+] button.
5. Press the button of the part that you want to record,
making it blink.
6. Press the [ ] (Play/Stop) button to start
recording.
7. Press the [ ] (Play/Stop) button to stop
recording.
page 29page 24
page 25
page 29
page 30
Selecting the Parts that will Play (Part Mute)
Heres how to select the parts that will play.
To select the right-hand part Press the [Right] button so it’s lit.
To select the left-hand part Press the [Left] button so its lit.
To select the other parts Press the [Accomp] button so it’s lit.
To adjust the mute volume of a part
Hold down the button of the part whose volume you want to adjust,
and use the [–] [+] buttons.
page 26
Repeatedly Practicing a Portion of a Song (AB Repeat)
Heres how you can make a specic portion of a
song play back repeatedly.
1. Press the [ ] (Play/Stop) button to play back
the song.
2. At the beginning of the portion to be repeated, press
the [AB Repeat] button.
3. At the end of the portion to be repeated, press the [AB
Repeat] button once again.
page 28
9
Operation Guide Panel Descriptions Before You Play Performing Practicing
Convenient Functions
Appendix
Function Mode
Panel Descriptions
Damper Pedal
Use this pedal to sustain the sound. While this pedal is held down, notes will be sustained for an extended time even if you
release your ngers from the keyboard.
On an acoustic piano, when you step on the damper pedal, you’ll rst hear the sound of the dampers releasing the strings. Then,
you should also be able to hear the sound of strings adjacent to the ones for the notes actually played resonate sympathetically,
resulting in a rich, resounding tone. Additionally, when using half-pedaling techniques, the core of the sound disappears rapidly
while a rich, spacious resonance remains, producing a unique form of reverberation. On the unit, the unique, lingering tones
produced by the half-pedaling technique are reproduced in addition to released-string sounds (Damper Noise) and resonating
sounds (Damper Resonance).
Sostenuto Pedal
The notes you are pressing when this pedal is depressed will be sustained.
Soft Pedal
This pedal is used to make the sound softer.
Playing with the soft pedal depressed produces a sound that is not as strong as when otherwise played with the equivalent
strength. This is the same function as the left pedal of an acoustic piano.
The softness of the tone can be varied subtly by the depth to which you press the pedal.
Pedals
Headphone Hook
Whenever you are not using the headphones, you can hang them
on the headphone hook.
* Don’t hang anything other than headphones on this hook, and don’t apply
excessive force to it.
Doing so may damage the headphone hook.
Front Panel
These buttons and sliders are used to operate the unit.
“Operation Guide” page 69
USB Memory Port
If a USB ash drive is
connected, you can
use it to save or play back songs.
You can do the following things using a USB ash
drive.
WAVE les or MIDI les (SMF) data copied from your computer
can be played back by the unit.
You can make audio recordings of your performances on the unit.
The audio recordings of songs that you’ve made can be played on your
computer, or burned to a CD.
* Carefully insert the USB ash drives all the way in-until it is rmly in place.
* Use a USB ash drive sold by Roland. We cannot guarantee operation if any
other USB ash drive is used.
page 24 page 37
USB Port
If you use a commercially available USB
cable to connect the unit’s USB port to
your computer’s USB port, you’ll be able to
do the following things.
SMF data played back by MIDI-compatible
software can be sounded by the unit.
MIDI data can be transferred between the unit
and your sequencer software (sold separately),
opening up a wide range of possibilities for
music production and editing.
[Power] Switch
This turns the power on/o.
* With the factory settings, the unit’s power will automati-
cally be switched o 30 minutes after you stop playing or
operating the unit.
If the unit’s power has been turned o automatically, you can use
the [Power] switch to turn the unit back on again.
If you don’t want the power to turn o automatically, change the
Auto O setting to “OFF” as described on “Making the Power
Automatically Turn O After a Time (Auto O)” (p. 39).
page 13
10
Panel Descriptions
Phones Jacks
Here you can connect stereo headphones.
The unit has two headphone jacks, two people can
also use headphones simultaneously.
Input Jacks
If a digital audio player
or other audio playback
device is connected here,
you’ll be able to listen to
its playback through the
unit.
Use the controls of your
audio playback device to
adjust the volume.
Don’t forget to remove your headphone adaptor plug!
A headphone adapter plug is included with some
headphones. If you leave a headphone adaptor plug
inserted in the headphone jack, no sound will be heard
from the piano. If you don’t hear sound from the piano,
check the headphone jacks.
* To prevent malfunction and equipment failure, always turn down the volume, and turn o all the units before making any connections.
* When connection cables with resistors are used, the volume level of equipment connected to the Input jacks may be low. If this happens, use connection cables that
do not contain resistors.
Output Jacks
If you connect these jacks to
amplied speakers, the sound of
unit will be heard through them.
MIDI Connectors
You can connect these
to external MIDI devices
(p. 47).
DC In Jack
Connect the
included AC
adaptor here.
* Before making this connection,
you must make sure that the
[Power] switch is o.
Pedal Connector
Connect
the pedal
cord of the
dedicated stand to this
connector.
page 55
page 55
Rear side
Ground Terminal
Depending on the circumstances of a
particular setup, you may experience a
discomforting sensation, or perceive that
the surface feels gritty to the touch when
you touch this device. This is due to an
innitesimal electrical charge, which is
absolutely harmless. However, if you are
concerned about this, connect the ground
terminal (see gure) with an external
ground. When the unit is grounded, a slight hum may occur, depending
on the particulars of your installation. If you are unsure of the connection
method, contact the nearest Roland Service Center, or an authorized
Roland distributor.
Unsuitable places for connection
Water pipes (may result in shock or electrocution)
Gas pipes (may result in re or explosion)
Telephone-line ground or lightning rod (may be dangerous in the event
of lightning)
11
Operation Guide Panel Descriptions Before You Play Performing Practicing
Convenient Functions
Appendix
Function Mode
Before You Play
Opening the Lid
NOTE
• Always use two hands to open and close the lid.
Although the unit’s lid is designed to close slowly and gently
when it is released, the lid immediately closes if it has been
opened only slightly. Take care not to allow your ngers to
become pinched by the lid.
• If small children will be using the unit, adult supervision should
be provided.
• For safety, be sure to close the lid before transporting the piano.
1. Grasp and lift the lid with both hands.
Arm
Arm
2. Close the blind and open the music rest as shown in the
gure.
Blind
Music Rest
Closing the Lid
1. When closing the lid, be sure to close the music rest and
open the blind.
Blind
Music Rest
2. Grasp and gently lower the lid with both hands.
NOTE
When opening or closing the lid, take care not to pinch your
nger in the lid or the arms.
12
Before You Play
Turning the Power On/O
Once everything is properly connected (p. 11), be sure to follow the
procedure below to turn on their power. If you turn on equipment
in the wrong order, you risk causing malfunction or equipment
failure.
NOTE
Before turning the unit on/o, always be sure to turn the volume
down. Even with the volume turned down, you might hear some
sound when switching the unit on/o. However, this is normal
and does not indicate a malfunction.
On
O
1
3
2
Min Max
Turning the power on
1. Move the [Volume] slider all the way to the left to
minimize the volume.
2. Press the [Power] switch.
After a brief interval, you’ll be able to produce sounds by playing
the keyboard.
* This unit is equipped with a protection circuit. A brief interval (a
few seconds) after turning the unit on is required before it will
operate normally.
3. Use the [Volume] slider to adjust the volume.
Adjust the volume while playing something on the keyboard, so
you can hear how it sounds.
The volume increases when you slide it to the right, and decreases
when you slide it to the left.
MEMO
The unit is designed so that nuances in the dynamics of your
playing will be clearly heard even at low volume, and that the
sound will remain clear even at high volume.
Turning the power o
1. Move the [Volume] slider all the way to the left to
minimize the volume.
2. Press the [Power] switch.
The power is turned o.
If you don’t want the power to turn o
automatically, change the Auto O setting to
“OFF”!
With the factory settings, the unit’s power will
automatically be switched o 30 minutes after you stop
playing or operating the unit.
If the unit’s power has been turned o
automatically, you can use the [Power] switch to
turn the unit back on again.
If you don’t want the power to turn o
automatically, change the Auto O setting
to “OFF” as described on “Making the Power
Automatically Turn O After a Time (Auto O)” (p. 39).
NOTE
When the power is turned o, the settings of the unit will
be initialized. If you want to still be retained the next time
you turn on the power, you should refer to “Storing Your
Settings (Memory Backup)” (p. 48) and save your settings.
13
Operation Guide Panel Descriptions Before You Play Performing Practicing
Convenient Functions
Appendix
Function Mode
Performing
Performing with Various Sounds
In addition to piano sounds, the unit lets you enjoy performing with many other sounds (347 types).
These sounds are called Tones. The Tones are categorized into ve groups, each of which is assigned to a dierent Tone button.
Selecting Tones
Let’s start by performing with a piano tone.
When you turn on the power, the Concert (Concert Piano) tone is selected.
1
2
1. Press a tone button to select the tone group.
The currently selected tone number and tone name are displayed.
Tone groups
Tone button Description
Piano [Grand] button Selects grand piano sounds.
Piano [Early] button Selects sounds of early historical pianos.
[E. Piano] button Selects various electric piano sounds used in pop or rock.
[Strings] button Selects the sounds of string instruments such as violins, as well as other instruments used in orchestras.
[Other] button
Selects a variety of sounds such as organ, bass, or accompaniment sounds.
* If you select tone numbers 43–51, you’ll be able to use the keyboard to play the sounds of a drum set or SFX.
* If you’ve selected an organ sound that provides a rotary eect (*1), such as a Jazz Org or a Balad Or, pressing the [Other] button will
switch the speed of the rotary eect.
For details on the tones, refer to Tone List” (p. 52).
*1 Rotary is an eect which simulates the sound of rotating speakers. There is a choice of two settings: Fast and Slow.
2. Use the [–] [+] buttons to select a variation within the tone group.
* If you’ve selected a drum set tone or an SFX set tone, some notes of the keyboard will not produce sound.
Auditioning tones (tone demo)
1. While holding down a tone button, press the [ ] (Play/Stop) button.
A tone demo that uses the rst tone of each tone group will begin playing back.
2. To stop the tone demo, press the [Song] button or the [ ] (Play/Stop) button.
If you are using the VIMA TUNES
You can connect a USB CD drive (sold separately) to the unit (p. 59), and play back separately sold CD-ROMs created for the VIMA.
Songs on VIMA CD-ROM (VIMA TUNES) are programmed with recommended tones suitable for each song.
When you select a song from a VIMA CD-ROM (VIMA TUNES), recommended tones will be assigned to the unit’s [E. Piano], [Strings],
and [Other] tone buttons, and these three tone buttons will blink. When you press a ashing Tone button, the recommended tone
is then selected, enabling you to perform the selected song using a tone matched to that song as it plays back.
14
Performing
Performing with Two Layered Tones (Dual Play)
You can play two tones simultaneously from each note of the keyboard. This feature is called Dual Play.
As an example, heres how to layer piano and strings tones.
1
2
1. While holding down the Piano [Grand] button, press the [Strings] button.
Both buttons will light.
When you play the keyboard, you’ll hear both the piano and the strings tones.
* Dual play is not available if Split Play (p. 16) or Twin Piano (p. 20) are turned on.
* For some combinations of sounds, the eect is not applied to tone 2, and this may aect how the tone sounds.
* Its not possible to layer Piano [Grand] and Piano [Early] tones together.
Selecting tones for dual play
Tone name Corresponding button How to select tones
Tone 1 Left tone button Press the [–] [+] buttons.
Tone 2 Right tone button While holding down the tone button for Tone 2 (the right-most of the lit Tone buttons), and press the [–] [+] buttons.
2. To exit Dual Play, press one of the tone buttons.
Advanced techniques
Changing the pitch of tone 2 in steps of an octave: Octave Shift (p. 45)
Specifying the part(s) aected by the damper pedal: Damper Pedal Part (p. 45)
Adjusting the volume balance of the two tones: Dual Balance (p. 44)
What are eects?
Some of the tones provide a wide variety of other eects that can modify the sound in various ways.
The rotary eect is one of these eects.
15
Operation Guide Panel Descriptions Before You Play Performing Practicing
Convenient Functions
Appendix
Function Mode
Performing
Playing Dierent Tones with the Right and Left Hands (Split Play)
You can play dierent tones in the left and right sides of the keyboard, divided at a certain key.
This feature is called Split Play, and the key at which the keyboard is divided is called the Split Point.
21
1. While holding down the [Transpose] button, press the [Twin Piano] button.
The display will indicate SPLIT.
Name of the right-hand tone
When Split is turned on, the keyboard settings will be as follows.
Split Point (Power-up default: F 3)
Left-hand Tone Right-hand Tone
2. To exit Split Play, hold down the [Transpose] button and press the [Twin Piano] button once again.
* Depending on which tones are being used together, the tones might sound dierent because no eect is applied to the left-hand tone.
Advanced technique
Specifying the part(s) aected by the damper pedal: Damper Pedal Part (p. 45)
Changing the right-hand tone
1
2
1. Press a tone button.
The number and name of tone currently selected for the right-hand zone are shown.
2. Press the [–] [+] buttons.
A dierent tone is selected.
16
Performing
Changing the left-hand tone
1
2
1. While holding down the [Transpose] button and [Twin Piano] button, press a tone button.
The number and name of the tone currently selected for the left-hand zone are shown.
2. While holding down the [Transpose] button and [Twin Piano] button, press the [–] [+] buttons.
A dierent tone is selected.
Advanced technique
Changing the pitch of the left-hand tone in steps of an octave: Octave Shift (p. 45)
Changing the keyboard’s split point
Power-up default: F 3
The split point you specify becomes the
highest note of the left-hand section.
Split Point
Range in which you can specify the split point (B1–B6)
Left-hand Tone
Right-hand Tone
1
1. While holding down the [Transpose] button and [Twin Piano] button, press the key that you want to assign as the split point.
The key you pressed becomes the new split point, and that key will be shown in the display.
Screen Value
B1–B6
(default: F#3)
* In the display, a quotation mark (“) signies a sharp (#).
Saving your settings
The unit’s settings will revert to the
default values when you turn o the
power, but you can save them as
described in “Retaining the Settings
Even After Power-o (Memory Backup)”
(p. 39).
17
Operation Guide Panel Descriptions Before You Play Performing Practicing
Convenient Functions
Appendix
Function Mode
Performing
Adjusting the Sound to Your Taste
The unit lets you add reverberation or modify the brightness of the sound.
Adding Reverberation to the Sound (Ambience)
You can add a pleasant reverberation to the sounds of the unit, producing the impression that you are performing in a concert hall.
This eect is called Ambience.
2
1 3
1. Press the [Ambience] button.
The [Ambience] button will light.
2. While holding down the [Ambience] button, press the [–] [+] buttons.
The display will indicate the depth of the ambience eect values.
Screen Value Explanation
1–10
(default: 5)
Higher values apply deeper ambience.
3. To turn o the ambience eect, press the [Ambience] button once again.
The [Ambience] button will go out.
* Its not possible to specify the depth of ambience individually for each tone. The eect will be applied in the same way to each tone.
Adjusting the Brightness of the Sound (Brilliance)
You can adjust the brightness of the sounds played on the keyboard or played back by a song.
2
1 3
1. Press the [Brilliance] button.
The [Brilliance] button will light.
Saving your settings
The unit’s settings will revert to the
default values when you turn o the
power, but you can save them as
described in “Retaining the Settings
Even After Power-o (Memory Backup)”
(p. 39).
18
Performing
2. While holding down the [Brilliance] button, press the [–] [+] buttons.
The display will indicate the depth of the brilliance eect values.
Screen Value Explanation
-10–0–10
(default: 5)
Positive (+) values make the sound brighter; negative (-) values make the sound more mellow.
3. To turn o the brilliance eect, press the [Brilliance] button once again.
The [Brilliance] button will go out.
Adjusting the Keyboard Response (Key Touch)
The way in which the keyboard responds to your playing strength can be adjusted to your personal taste.
2
1 3
1. Press the [Key Touch] button.
The [Key Touch] button will light.
2. While holding down the [Key Touch] button, press the [–] [+] buttons.
The display will indicate the key touch setting.
Screen Value Explanation
FIX The sound plays at one set volume, regardless of the force used to play the keys.
L2 This setting produces the lightest keyboard touch.
L1
You can achieve fortissimo () play with a less forceful touch than M, so the keyboard feels lighter. This setting
makes it easy to play, even for children.
M
This sets the standard keyboard touch. You can play with the most natural touch. This is the closest to the
touch of an acoustic piano.
This setting is used if the [Key Touch] button is unlit.
H1
(default)
You have to nger the keyboard more forcefully than M in order to play fortissimo ( ), so the keyboard touch
feels heavier. Dynamic ngering adds even more feeling to what you play.
H2 This setting produces the heaviest keyboard touch.
3. To cancel key touch, press the [Key Touch] button once again.
The [Key Touch] button will go out.
Saving your settings
The unit’s settings will revert to the
default values when you turn o the
power, but you can save them as
described in “Retaining the Settings
Even After Power-o (Memory Backup)”
(p. 39).
Saving your settings
The unit’s settings will revert to the
default values when you turn o the
power, but you can save them as
described in “Retaining the Settings
Even After Power-o (Memory Backup)”
(p. 39).
19
Operation Guide Panel Descriptions Before You Play Performing Practicing
Convenient Functions
Appendix
Function Mode
Performing
Dividing the Keyboard for Two-person Performance (Twin Piano)
You can divide the keyboard into left and right zones so that two people can play the same range of pitches, just as though there were two pianos.
This function is called Twin Piano.
For example, you could use Twin Piano to allow a student to play along with their teacher.
31
1. Press the [Twin Piano] button.
The [Twin Piano] button will light, and the Concert (Concert Piano) tone
will be selected.
When you turn Twin Piano on, the keyboard and pedal settings will be as
shown in the illustration.
NOTE
If Twin Piano is on, damper resonance will not be applied; this may cause the piano to sound dierent.
2. Select the tone to be played (p. 14).
The left and right sections will have the same tone.
3. To cancel Twin Piano, press the [Twin Piano] button once again.
The [Twin Piano] button will go out.
Changing the way in which the sound is heard (Twin Piano mode)
1
1. While holding down the [Twin Piano] button, press the [–] [+] buttons.
The display will indicate Twin Piano mode.
Screen Value Explanation
1
(default)
The sound of the right-hand keyboard zone will be heard more loudly from the right speaker than from the
left speaker.
The sound of the left-hand keyboard zone will be heard more loudly from the left speaker than from the right
speaker.
When using headphones, you’ll be able to hear the other person’s playing.
2
The sound of the right-hand keyboard zone will be heard only from the right speaker.
The sound of the left-hand keyboard zone will be heard only from the left speaker.
If you’re using headphones, the sound of the right-hand keyboard zone will be heard in your right ear, and
the sound of the left-hand keyboard zone will be heard in your left ear.
* Ambience will turn o.
* For some tones, the sound might not be divided to left and right.
The damper pedal for
the left area
The damper pedal for
the right area
Conventional
keyboard
Twin Piano
divide point
20
  • Page 1 1
  • Page 2 2
  • Page 3 3
  • Page 4 4
  • Page 5 5
  • Page 6 6
  • Page 7 7
  • Page 8 8
  • Page 9 9
  • Page 10 10
  • Page 11 11
  • Page 12 12
  • Page 13 13
  • Page 14 14
  • Page 15 15
  • Page 16 16
  • Page 17 17
  • Page 18 18
  • Page 19 19
  • Page 20 20
  • Page 21 21
  • Page 22 22
  • Page 23 23
  • Page 24 24
  • Page 25 25
  • Page 26 26
  • Page 27 27
  • Page 28 28
  • Page 29 29
  • Page 30 30
  • Page 31 31
  • Page 32 32
  • Page 33 33
  • Page 34 34
  • Page 35 35
  • Page 36 36
  • Page 37 37
  • Page 38 38
  • Page 39 39
  • Page 40 40
  • Page 41 41
  • Page 42 42
  • Page 43 43
  • Page 44 44
  • Page 45 45
  • Page 46 46
  • Page 47 47
  • Page 48 48
  • Page 49 49
  • Page 50 50
  • Page 51 51
  • Page 52 52
  • Page 53 53
  • Page 54 54
  • Page 55 55
  • Page 56 56
  • Page 57 57
  • Page 58 58
  • Page 59 59
  • Page 60 60
  • Page 61 61
  • Page 62 62
  • Page 63 63
  • Page 64 64

Roland DP-90 User manual

Category
Musical Instruments
Type
User manual

Ask a question and I''ll find the answer in the document

Finding information in a document is now easier with AI