Page is loading ...

INSTALLATION INSTRUCTIONS
SLIM-LINE CONVERTIBLE BAR GUN
INFORMATION & INSTRUCTIONS
CAUTION: NEVER SUBMERGE THE BAR GUN IN HOT WATER OR PLACE NEAR A
HEAT SOURCE. THIS MAY CAUSE THE TUBES TO BURST.
REVISION “C” OR GREATER (NEW FEATURES)
IMPORTANT: Cornelius Convertible Bar Gun has new features not found in other bar
guns. Please read the following document to become familiar with the features of the
Convertible Bar Gun. For installation instructions, see separate document.
THE FOLLOWING INFORMATION IS INCLUDED:
1. An Introduction to the Bar Gun.
2. Changing Flavor Positions between Carb & Non–Carb.
3. Changing Flavor Labels on Convertible Two–Piece Buttons.
4. Change Over Valve Installation Procedures.
5. Using the Water Brix Adjustment Screw (in the head).
6. Button and Manifold Adjustments Screw Identification.
1. INTRODUCTION TO THE CONVERTIBLE BAR GUN
The Convertible Bar Gun readily allows the change from carb to non–carb as well as non–carb to carb with the
turn of a valve called the CHANGE OVER VALVE (C.O.V.). Each flavor line of the Convertible Bar Gun is
equipped with one C.O.V.
NOTICE: The C.O.V. is NOT a reusable part. Like other seals, once removed, it should never be used
again. Always replace removed / used C.O.V.’s with new C.O.V.’s. Never reuse a C.O.V.
There is no need to remove the C.O.V. to make a conversion between carb and non–carb. Change Over Valves
(C.O.V.’s) should only be removed if they leak. Leakage is unlikely if the C.O.V.’s are installed correctly.
The orientation of the valve determines which type of water (still water or soda water) is supplied to each partic-
ular line. The C.O.V.’s are located below the lower case (Slim-Line Figures 5, items 2 and 6).
For Slim-Line Style Bar Guns, soda and water direction arrows are located on inside of the lower plate as noted
in Figure 6.
Any C.O.V. whose arrow points in the same direction as the soda water channel (arrow points to the right) will
supply carbonated water for carbonated beverages. Any C.O.V. whose arrow points in the same direction as the
water channel (arrow points to the left) will supply water for non–carbonated beverages.
CORNELIUS INC g One Cornelius Place g Anoka, MN 55303-6234
Telephone (800) 238-3600 Facsimile (763) 422-3246
Revision Date: May 08, 2014 www.cornelius.com Revision: J
© 1996-2014, Cornelius Inc. 1 Publication Number: 779000007

2
The Convertible Bar Gun will be delivered with all C.O.V.’s correctly oriented for each line. Refer to Figure 4 for
preset positions. No movement of the C.O.V. should be required. However, in order to make a change between
carb and non carb, refer to the instructions under ”Changing between Carb and Non–Carb”. If the C.O.V. should
require replacing, refer to the instructions under ”Change Over Valve Installation Procedure”.
The Convertible Bar Gun also features a still water brix adjustment screw in the head which can be used to
achieve a reduction in the flow rate of still water supplied to a specific group of lines as shown in Figure 6. Any
of the respective lines whose C.O.V. is oriented towards the soda side, is not affected by this metering screw.
NOTICE: Most state and city agencies require a check valve to be installed at the inlet to the city water
line when hooking up any carbonated equipment, such as a carbonator or a bargun.
2. CHANGING FLAVOR POSITIONS BETWEEN CARB & NON–CARB
1. Remove the nozzle.
2. Unscrew the screws of the lower case (Slim Line see Figure 5, item 27). Remove the lower case.
3. Determine which of the C.O.V.’s corresponds to the line which is to be converted.
4. Determine which direction the C.O.V. should be turned as described in “INTRODUCTION TO THE CON-
VERTIBLE BAR GUN”.
5. Fit the C.O.V. key (Figure 1) over the C.O.V.’s hex shaped head and turn the C.O.V. with the key 1/2 turn
to either side as required. The C.O.V. may leak while turning, however, the leak should stop once turning is
finished. Press firmly.
6. Remove the C.O.V. key and check the alignment of the arrow on the C.O.V. head with your desired direc-
tion. Make adjustments if needed to make sure the C.O.V. is aligned with the arrows of the label.
7. Check for leaks at the C.O.V. Leaks can occur at the following two places:
A. The top of the C.O.V. to outside.
Leaks on top of the C.O.V. can readily be seen as coming from the inside of the C.O.V. bore to atmo-
sphere on the bottom of the Bar Valve.
B. Between the water channel and the soda water channel.
Leaks between the water channel and the soda water channel are harder to detect. These may be
observed as a migration of small soda bubbles (CO2 gas) from the soda water channel to the water
channel.
Hold the Convertible gun with the nozzle end of the gun in your hand and the tube flex facing upward.
Look closely for soda bubbles traveling from the soda water side (channels on the left side of the
C.O.V.’s) to the water side (channels on the right side of the C.O.V.’s). Observe for two minutes. Pay
close attention to the valve that was turned.
8. If no leak is found, wipe the head with a soft towel, affix the label and put the lower case back on. Put the
nozzle back in the head.
If a leak is found, turn the C.O.V. one full turn and check for leaks again. If leaking continues, replace the
C.O.V.
9. Purge all of the lines by pushing all of the buttons of the Bar Gun, one at a time for a few seconds.
3. CHANGING FLAVOR LABELS ON CONVERTIBLE TWO-PIECE BUTTONS
The Convertible Bar Gun comes with a Two-Piece Button. The Two-Piece Button provides the ability to change
the flavor labeling on the buttons without relieving the pressure on the Bar Gun. It is made up of a Button Base
and a Button Insert (Figure 5, Items 8 and 26 ). The Base, which is made of a clear plastic, is installed from
under the top case of the Bar Gun. The Insert, which is made of rubber and has the flavor labeling or letters on
it, is installed into the Base. The Insert can be removed from (pried out of) the Button Base with a small slotted
screwdriver or other small tool. To install an Insert, simply push into the Button Base.

3
4. CHANGE OVER VALVE INSTALLATION PROCEDURES
NOTICE: A– Typically the cause of leaks of the C.O.V. seal is due to improper installation. If the C.O.V.
is inserted correctly there will be no leaks. Please read the following instructions carefully.
B– The C.O.V. is NOT a reusable part. Like other seals, once removed, it should be discarded
and a new C.O.V. installed. There is no need to remove the C.O.V. to make a carb or non–carb conver-
sion.
1. Shut off the water, soda water and the syrup line whose C.O.V. is being replaced. Purge the lines by press-
ing the appropriate buttons.
2. Remove the nozzle.
3. Unscrew the screws of the lower case. Remove the lower case.
4. For the Slim-Line Bar Gun, remove retaining plate (see Figure 5, item 12).
5. Using a pair of pliers or the key, remove the old C.O.V. by pulling and rotating in an outward fashion. Once
removed discard the old C.O.V.
6. Lubricate the new C.O.V. using Dow DC200 lube oil. IMPORTANT: Dip the C.O.V. in oil so that it is com-
pletely saturated / covered.
7. Fit the C.O.V. key over the C.O.V.’s hex shaped head.
8. Position the C.O.V. over the corresponding hole of the gun. Make sure that the spring is positioned be-
tween the C.O.V. and the spindle as shown on Figure 2.
9. Press down carefully and gently while maintaining the C.O.V. as straight as possible. Increase your press-
ing force and rotate slightly until it is inserted into the hole. The C.O.V. should rest flush with the ”T” slot of
the gun. It may require an extra inward push near the bottom of the hole/bore to allow the C.O.V. to fit
flush.
10. Make sure that the arrow of the inserted C.O.V. points directly towards the desired direction as indicated on
the label. Make adjustments if needed.
11. Reopen all of the closed lines. Purge the line that had the C.O.V. replaced of all excess oil by dispensing
several drinks. Dispense more if needed.
12. Purge all of the remaining lines one at a time for a few seconds.
13. Check for leaks at the C.O.V. Leaks can occur at the following two places:
A. The top of the C.O.V. to outside.
B. Between the water channel and the soda water channel.
Leaks on top of the C.O.V. can readily be seen as coming from the inside of the C.O.V. bore to atmo-
sphere on the bottom of the Valvhose.
Leaks between the water channel and the soda water channel are harder to detect. These may be
observed as a migration of small soda bubbles (CO2 gas) from the soda water channel to the water
channel.
Hold the Convertible gun with the nozzle end of the gun in your hand and the tube flex facing upward.
Look closely for soda bubbles traveling from the soda water side (channels on the left side of the
C.O.V.’s) to the water side (channels on the right side of the C.O.V.’s). Observe for two minutes. Pay
close attention to the valve that was turned.
14. If no leak is found, wipe the head with a soft towel, affix the label and put the lower case back on (Fig-
ure 5). Put the nozzle back in the head.
If a leak is found, turn the C.O.V. one full turn and check for leaks again. If leaking continues, replace the
C.O.V.

4
5. USING THE WATER BRIX ADJUSTMENT SCREW (IN THE HEAD)
NOTICE: The still water brix adjustment screw can only decrease the flow rate of still water to the specific lines
shown on Figure 1. Therefore products which require the lowest still water flow rates should be dispensed from
these positions.
CAUTION: Adjusting the head metering screw requires a fine flat head screw driver whose blade width
is 1/8” maximum. Using a larger screw driver may result in shaving the threads in the Valve–head as the
metering screw is turned down.
1. Remove the nozzle.
2. Set the flow rate of water at the manifold for the product which requires the largest amount of water. For
example, a product with a brix ratio of five parts water to one part syrup.
3. The metering screw is not effective when it is flush with the surface of the Valve–head. To reduce the water
flow, turn the metering screw clockwise.
4. Continue turning and measuring the flow rate until the desired reduced flow rate is achieved.
5. Put the lower case back on.
6. Put the nozzle back on.
6. BUTTON AND MANIFOLD ADJUSTMENT SCREW IDENTIFICATION
Please note that the 8, 10, 12, and 14 button Bar Guns have different numbering layouts for buttons and man-
ifold adjustment screws.
For button and manifold adjustment screw identification, refer to Figure 8 (8 and 10 button) and Figure 9 (12
and 14 button) bar guns respectively.
7. PROPER CARE & CLEANING
PROPER CARE
2. The Bar Gun Head is not intended to be used as an ice pick and should never be utilized to crack or chip
ice!
CLEANING
1. The easiest and most convenient is to soak the Bar Gun Head in a blender can with luke warm water
(NEVER HOT) for 10–15 minutes. This allows the sticky syrups to be washed off the head, and cleans the
buttons.
2. The nozzle is easily removed and should be cleaned often, inside and out. Remember to clean the inside
of the drip cup frequently.
3. Wipe the stainless steel flex line using a damp, soapy cloth and slightly warm water. Clean or wipe your
flex line daily.
1. The Cornelius Bar Gun, when properly cared for will provide many year of reliable service. To insure
proper operation, we recommend soaking the gun in luke warm water or cold water on a weekly basis or
whenever the buttons tend to stick due to build up of syrup residue. This cleaning process will not
damagethe bar gun.

5
4. The Bar Gun Head buttons and button retaining plate area can sometimes require extra cleaning due to
build–up of dried syrup and tight spaces. The warm water soak already explained can be supplemented by
scrubbing action of a toothbrush and Q–tip. If further cleaning is necessary, the button plate and buttons
can be removed.
NOTE: The Bar Gun must be depressurized first, since the button plate retains the buttons and valve
spindles when the bar gun is pressurized!
5. Soak the head and parts in warm water to wash the syrup off. Make sure all the parts have been replaced
and screws tightened before repressuring the bar gun.

6
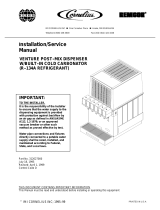
FIGURE 1
FIGURE 2
FIGURE 3
WATER BRIX
ADJUSTMENT
SCREW
LABEL C.O.V.’S
WHICH POINT TO
RIGHT SUPPLY
SODA. THOSE
POINTING LEFT
SUPPLY WATER
WATER
BRIX
SCREW
EFFECTS
THESE
LINES
C.O.V.
C.O.V. KEY
TO CONVERT BETWEEN CARB
AND NON-CARB, SIMPLY RE-
MOVE BOTTOM CASE AND TURN
C.O.V. 180 USING THE KEY OR A
7/32-IN. SOCKET WRENCH
C.O.V. KEY
C.O.V.
SPRING
SPINDLE
LUBRICATE
C.O.V.
LUBRICATE
HOLE
SPRING
SPRING MUST FIT OVER THE
SPINDLE’S RECESSED AREA
AND COV’S INSIDE BOSS AS
SHOWN HERE
SODA
CHANNEL
WATER CHANNEL
LOOK FOR CO
2
LEAK HERE
SODA
CHANNEL
WATER CHANNEL
LOOK FOR CO
2
LEAK HERE
C
L
G
Gr
S
D
Q
Cr
Or
W

SW
Q
L
CD
G
Or
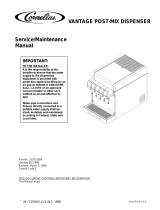
CARBONATED FLAVOR (”S” IS NOT FLAVORED)
NON–CARBONATED FLAVOR (”W” IS NOT FLAVORED)
D
Q
Cr
Or
C
G
T
S
W
L
Q
Or
Cr
L
S
W
G
DC
T
Diet
B
M
Or
Cr
G
14–BUTTON
8 CARB
SW
T
D
Q
C
L
Le
B
Diet
CONVERTIBLE 8, 1O, 12, 14 BUTTON BAR GUNS
ADDITIONAL BUTTON INSERT KITS AVAILABLE
STANDARD BUTTON CONFIGURATION AND CARBONATED POSITIONS
12–BUTTON
7 CARB
10–BUTTON
6 CARB
8–BUTTON
5 CARB
FIGURE 4.

1
3
4
5
6
7
5
5
8
11
9
10
12
13
14
15
16
17 18
19
20
21
22
24
28
25
26
23
27
2
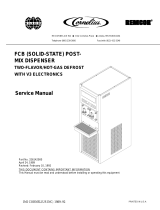
FIGURE 5. 8-10-12 OR 14 BUTTON CONVERTIBLE BAR GUN (SLIM LINE)
Item
No. Part No. Name
1 770000109 Button Plate, 14-Button, Black
770500315 Button Plate, 14-Button, Red
770500200 Button Plate, 14-Button, Blue
770000146 Button Plate, 12-Button, Black
770000313 Button Plate, 12-Button, Red
770500201 Button Plate, 12-Button, Blue
770000142 Button Plate, 10-Button, Black
770000316 Button Plate, 10-Button, Red
770500202 Button Plate, 10-Button, Blue
770000145 Button Plate, 8-Button, Black
770000317 Button Plate, 8-Button, Red
770500203 Button Plate, 8-Button, Blue
2 770000107 Lower Plate, 12 or 14-Button, Black
770000319 Lower Plate, 12 or 14-Button, Red
770500000 Lower Plate, 12 or 14-Button, Blue
770000143 Lower Plate, 8 or 10-Button, Black
770000323 Lower Plate, 8 or 10-Button, Red
770500001 Lower Plate, 8 or 10-Button, Blue
3 300721000 Head Manifold Wedge, Soda and Water
4 770000156 Valve Spring
5 316991000 O-Ring, No. 8
6 770000147 Changeover Valve
7 770000103 Valve Spindle
8 302000202 Button Base
9 770000119 Tube, Syrup
10 302001090 Tube, Product and Water
11 770000106 Head Manifold
12 770000104 Retaining Plate, Changeover Valve, 12
or 14 Button
770000144 Retaining Plate, Changeover Valve, 8 or
10 Button
Item
No. Part No. Name
13 770000155 Screw, Head Manifold, No. 6-32 By
7/8-In. Long
14 770000111 Bushing, Flex, 7/8 I.D., 12 or 14 Button
1230 Bushing, Flex, 7/8 I.D., 8 or 10 Button
15 770000151 Flex, 15/16 I.D. By 33-In. Long, 12 or 14
Button
1225 Flex, 1-In. Dia. By 33-In. Long, 8 or 10
Button
16 317000000 Screw, Case, No. 6-32 By 3/8-In. Long
17 1220 O-Ring, No. 26
18 1221 Nozzle, Black
1262 Nozzle, Transparent, Smoke (Red Gun)
302002064 Nozzle, Blue
19 770000110 Brix Nozzle, Convertible
20 316986003 Head Manifold Wedge, Syrup
21 1231 Key, Changeover Valve
22 302000200 Head (Brix) Metering Screw
23 770000108 Tail Piece, 12 or 14-Button, Black
770000321 Tail Piece, 12 or 14-Button, Red
770500100 Tail Piece, 12 or 14-Button, Blue
770000149 Tail Piece, 8 or 10-Button, Black
770000324 Tail Piece, 8 or 10-Button, Red
770500101 Tail Piece, 8 or 10-Button, Blue
24 770000105 Pre-Mix Valve Spindle
25 316997000 O-Ring, No. 6
26 3096332xx Button Insert (Specify Label)
27 770000154 Screw, Lower Plate, No. 6-32 By 1/4
C-Sunk
28 317996000 O-Ring, No. 7
29 318454000 Holder, Drip Tray (Not Shown)
30 318467000 Drip Cup (Not Shown)
31 313402051 Tube, Drain (Not Shown)

9
FIGURE 6
M
Or
Cr
G
SW
T
D
Q
C
L
Le
B
Diet
Or
Cr
G
S
W
T
D
Q
C
L
SLIM LINE: 14-BUTTON
SECONDARY WATER BRIX
ADJUSTMENT SCREW
C.O.V.
NOTE: C.O.V.’S WHICH POINT TO RIGHT
(3 O’CLOCK) SUPPLY SODA. THOSE
POINTING LEFT LEFT
(9 O’CLOCK) SUPPLY WATER THIS IS
INDICATED BY ARROWS ON THE
INSIDE OF THE LOWER PLASTIC COVER
WATER
BRIX
SCREW
EFFECTS
THESE
LINES
TO CONVERT BETWEEN CARB
AND NON-CARB, SIMPLY REMOVE
LOWER PLATE AND TURN THE
C.O.V. 180° USING THE SLIM LINE
END OF THE KEY.
C.O.V.
KEY
CORNELIUS
SLIM LINE
SLIM LINE: 10-BUTTON
SECONDARY WATER BRIX
ADJUSTMENT SCREW
NOTE: C.O.V.’S WHICH POINT TO RIGHT
(3 O’CLOCK) SUPPLY SODA. THOSE
POINTING LEFT LEFT
(9 O’CLOCK) SUPPLY WATER THIS IS
INDICATED BY ARROWS ON THE
INSIDE OF THE LOWER PLASTIC COVER
C.O.V.
WATER
BRIX
SCREW
EFFECTS
THESE
LINES
TO CONVERT BETWEEN CARB
AND NON-CARB, SIMPLY REMOVE
LOWER PLATE AND TURN THE
C.O.V. 180° USING THE SLIM LINE
END OF THE KEY.
C.O.V.
KEY
CORNELIUS
SLIM LINE

10
T
S
MANIFOLD
G
C
W
Q
L
FIGURE 7
WINE VALVHOSE
BUTTON/MANIFOLD CONFIGURATION
7 BUTTON STANDARD VALVHOSE
BUTTON/MANIFOLD CONFIGURATION
WC
RB
WC
RB
WC
RB
TAIL OF HEAD
HEAD MANIFOLD
O-RING SIDE
INPUT FITTING
MANIFOLD
RB
WC
RB
WC
RB
TAIL OF HEAD
HEAD MANIFOLD
O-RING SIDE
INPUT FITTING
MANIFOLD
WC
W
C
R
B
TAIL OF HEAD
HEAD MANIFOLD
O-RING SIDE
INPUT FITTING
T
G
S
C
W
L
Q
T
G
S
C
W
L
Q
TG
S
C
W
LQ

FIGURE 8
W
5
3
1
4
6
2
SW
S
S
W
HEAD MANIFOLD
O–RING SIDE
TAIL OF HEAD
W
7
5
3
1
6
8
2
4
SW
S
SW
HEAD MANIFOLD
O–RING SIDE
TAIL OF HEAD
S
W
MANIFOLD
INPUT
FITTING
S
W
MANIFOLD
INPUT
FITTING
3
4
65
21
43
78
4
5
126
8
43
621
7
4
6
2
1
5
3
2
1
8
4
3
6
7
5
21
5
6
3
5
8 BUTTON CONVERTIBLE SLIM LINE
BUTTON/MANIFOLD CONFIGURATION
10 BUTTON CONVERTIBLE SLIM LINE
BUTTON/MANIFOLD CONFIGURATION
11

FIGURE 9
5 9 1O 6
8
7
31
24
W
9
7
5
3
1
8
1O
4
6
SW
2
S
SW
4
2
13
7
8
6
1O
95
HEAD MANIFOLD
O–RING SIDE
TAIL OF HEAD
711
12
8
1O
2
9
53
4
6
W1
11
9
7
5
3
1
1O
12
6
8
SW
4
2
S
S1
W
64
3
5
9
2
1O
8
12
11
7
HEAD MANIFOLD
O–RING SIDE
TAIL OF HEAD
5
9
7
3
1
S
W
2
4
8
1O
INPUT
FITTING
6
7
11
9
5
3
S
2
1
W
4
6
10
12
INPUT
FITTING
8
12 BUTTON CONVERTIBLE SLIM LINE
BUTTON/MANIFOLD CONFIGURATION
14 BUTTON CONVERTIBLE SLIM LINE
BUTTON/MANIFOLD CONFIGURATION
12
/