EOS C700 PL

Canon EOS C700 PL User guide

  • Hello! I am an AI chatbot trained to assist you with the Canon EOS C700 PL User guide. I’ve already reviewed the document and can help you find the information you need or explain it in simple terms. Just ask your questions, and providing more details will help me assist you more effectively!
SAFETY INSTRUCTIONS
2
EN
EN
Safety Instructions
Be sure to read these instructions in order to operate the product safely. Follow these instructions to
prevent injury or harm to the operator of the product or others.
WARNING
Denotes the risk of serious injury or death.
Keep the product out of the reach of young children.
Do not disassemble or modify the product.
Do not expose the product to strong shocks or vibration.
Do not touch any exposed internal parts.
Stop using the product in any case of unusual circumstances such as the presence of smoke or a
strange smell.
Do not get the product wet. Do not insert foreign objects or liquids into the product.
Do not expose the terminals to dirt or let them come into contact with metallic pins or other metal
objects.
Use this product only with compatible Canon devices.
CAUTIONS
Follow the cautions below. Otherwise physical injury or property damage may result.
Do not leave the product in places exposed to extremely high or low temperatures. The product may
become extremely hot/cold and cause burns or injury when touched.
For accessories with screens/viewfinders
CAUTIONS
Follow the cautions below. Otherwise physical injury or property damage may result.
Do not look at the screen or through the viewfinder for prolonged periods of time. This may induce
symptoms similar to motion sickness. In such a case, stop using the product immediately and rest for a
while before resuming use.
For accessories with an eyecup
CAUTIONS
Follow the cautions below. Otherwise physical injury or property damage may result.
If any abnormal skin reaction or irritation occurs during or following the use of this product, refrain from
further use and get medical advice/attention.
Be careful not to drop the camera or accessories when attaching, removing or adjusting the
various accessories. Use a table or other stable surface.
Do not connect/attach accessories to cameras and devices that are not compatible with them.
SAFETY INSTRUCTIONS
3
EN
For lens mount kits
WARNING
Denotes the risk of serious injury or death.
Do not leave the lens exposed without the lens cap attached.
TABLE OF CONTENTS
4
EN
2 Safety Instructions
5Introduction
6 Overview of Accessories and Compatible Cameras
7 Communications
7 GP-E1 GPS Receiver
8 GP-E2 GPS Receiver
10 WFT-E6 / WFT-E8 Wireless File Transmitter
11 WFT-E9 Wireless File Transmitter
12 Monitoring
12 LM-V1 / LM-V2 LCD Monitor
16 EVF-V50 OLED Electronic Viewfinder
19 EVF-V70 OLED Electronic Viewfinder
23 Added Functionality and Lens Compatibility
23 OU-700 Remote Operation Unit
27 EU-V1 Expansion Unit 1
30 EU-V2 Expansion Unit 2
37 MO-4E / MO-4P B4 Mount Adapter
40 CM-V1 EF Cinema Lock Mount Kit
40 PM-V1 PL Mount Kit
45 MA-400 Microphone Adapter
49 Shooting Styles and Configuration
49 GR-V1 Camera Grip
52 SU-15 Shoulder Support Unit
55 SG-1 Shoulder Style Grip Unit
Table of Contents
INTRODUCTION
5
EN
Introduction
This user guide covers optional accessories compatible with CINEMA EOS series Canon cameras. It
provides information about how to use the accessories, their compatibility and specifications. Be sure to
read this information carefully to use the products correctly.
Before Using the Accessories
Do not point monitors or viewfinders toward an intense light source, such as the sun on a sunny day or
an intense artificial light source. Doing so may damage the LCD screen/OLED screen or other internal
components. Change the accessory’s angle so that it is not pointing at the light source.
LCD and OLED screens are produced using extremely high-precision manufacturing techniques, with
more than 99.99% of the pixels operating to specification. Very rarely, pixels may misfire or may light up
permanently. This has no effect on the recorded image and does not constitute a malfunction.
Unless specified otherwise, power to the accessories is supplied by the camera.
Your camera may not support all the camera features and functions described in this guide. Refer also to
the instruction manual of the camera being used.
Some of the accessories and tools mentioned in the procedures in this guide may be supplied with
some camera models. Check the list of supplied accessories in the instruction manual of the camera
being used.
If an accessory/tool is not supplied with the camera or with the product being explained, please use an
optional accessory or commercially available product.
Conventions in this Document
Important precautions related to the product’s operation.
Additional information that complements the basic operation procedures.
0 Reference page number in this document.
“Camera” refers to a compatible Canon camera or camcorder (0 6).
This is a multilingual document. You can click on the language code on any page to return
to the beginning of the guide (Table of Contents) in that language.
EN
OVERVIEW OF ACCESSORIES AND COMPATIBLE CAMERAS
6
EN
Overview of Accessories and Compatible
Cameras
The information in this document is verified as of September 2020. Subject to change without previous
notice.
1
Only the LM-V1 LCD Monitor.
2
For details see the instruction manual of the camera and the RC-V100 instruction manual.
3
For details see the instruction manual of the camera.
Accessory
C100
Mark II /
C70
C200
C200B
C300
Mark II
C300
Mark III
C500
Mark II
C700 all
models
0
Communications
GP-E1 GPS Receiver N ——N 7
GP-E2 GPS Receiver NN NN—8
WFT-E6 / WFT-E8 Wireless File
Transmitter
——N ——N 10
WFT-E9 Wireless File Transmitter NN—11
Monitoring
LM-V1 / LM-V2 LCD Monitor NN
1
NN—12
EVF-V50 OLED Electronic Viewfinder NN—16
EVF-V70 OLED Electronic Viewfinder NNNNN19
Added Functionality and Lens Compatibility
RC-V100 Remote Operation Unit NNNNNN
2
OU-700 Remote Operation Unit —————N 23
EU-V1 Expansion Unit 1 NN—27
EU-V2 Expansion Unit 2 NN—30
MO-4E / MO-4P B4 Mount Adapter NNN37
CM-V1 EF Cinema Lock Mount Kit
———NN—40
PM-V1 PL Mount Kit
MA-400 Microphone Adapter N ———45
CDX-36150 Codex Recorder for
Canon EOS C700
—————N
3
Shooting Styles and Configuration
GR-V1 Camera Grip N NN—49
SU-15 Shoulder Support Unit N NNN52
SG-1 Shoulder Style Grip Unit NNN55
COMMUNICATIONS
7
EN
Communications
GP-E1 GPS Receiver
Connect the GPS receiver to the camera’s system expansion terminal in CAMERA (shooting) mode to
have the GPS information (latitude, longitude, altitude) recorded with the metadata of XF-AVC clips. For
details about attaching and configuring the receiver, refer to the instruction manual of the camera being
used and the GP-E1’s instruction manual.
In certain countries/regions, the use of GPS may be restricted. Be sure to use the GPS receiver
in accordance with local laws and regulations of the country/region where the receiver is used.
Be particularly careful when traveling outside of your home country.
Be careful about using GPS functions where the operation of electronic devices is restricted.
The GPS information recorded with clips may contain data that can lead others to locate or
identify you. Be careful when sharing geotagged recordings with others or when uploading
them to the Web.
Do not leave the receiver near strong electromagnetic fields such as near powerful magnets
and motors.
The GPS information recorded with clips corresponds to the location at the start of the
recording.
Initial GPS signal reception will take longer after replacing the receiver’s battery or when first
turning on the receiver after a prolonged period of having been turned off.
EOS C300 Mark II: GPS information will not be recorded with still frames grabbed from a clip.
Do not place cables connected to the camera’s terminals near the receiver. Doing so may
negatively affect the GPS signal.
(attach directly)
System expansion
terminal
COMMUNICATIONS
8
EN
GP-E2 GPS Receiver
Connect the GPS receiver to the camera’s USB terminal in CAMERA (shooting) mode to have the GPS
information (latitude, longitude, altitude) recorded with the metadata of clips and photos. While recording, it
is recommended to place the receiver in the supplied carrying case and attach it to the camera’s grip belt
or carry it on your person.
For details about attaching and configuring the receiver, refer to the GP-E2’s instruction manual.
When using a camera with a Type-C USB terminal, an IFC-40AB III or IFC-150AB III Interface Cable (sold
separately) is required.
Recorded Information
* You can use the GPS information to search and organize clips using Canon XF Utility.
Connecting and Activating the GPS Receiver
1. Turn off the receiver.
2. Connect the receiver to the camera.
Use the USB cable supplied with the GP-E2.
3. Turn on the receiver.
The GPS function is activated. The icon appears on the screen and will flash as the receiver tries
to acquire satellite signals.
When satellite signals are correctly acquired, the icon will stay continuously on. Clips and photos
recorded after that will be geotagged.
Recording format
GPS information
(latitude, longitude, altitude)
Coordinated universal time
(UTC)
Clips
MP4 NN
AVCHD NN
XF-AVC* N
RAW
(Cinema RAW Light)
NN
Photos NN
USB cable (supplied with the GP-E2)
USB terminal
COMMUNICATIONS
9
EN
In certain countries/regions, the use of GPS may be restricted. Be sure to use the GPS receiver
in accordance with local laws and regulations of the country/region where the receiver is used.
Be particularly careful when traveling outside of your home country.
Be careful about using GPS functions where the operation of electronic devices is restricted.
The GPS information recorded with clips and photos may contain data that can lead others to
locate or identify you. Be careful when sharing geotagged recordings with others or when
uploading them to the Web.
Do not leave the receiver near strong electromagnetic fields such as near powerful magnets
and motors.
The GPS information recorded with clips corresponds to the location at the start of the
recording.
You can have the camera’s date and time settings adjusted automatically according to the
information received from the GPS signal. See the [System Setup] menu settings’ table in the
instruction manual of the camera being used.
Initial GPS signal reception will take longer after replacing the receiver’s battery or when first
turning on the receiver after a prolonged period of having been turned off.
EOS C100 Mark II: GPS information will not be recorded with still frames grabbed from a clip.
Do not place cables connected to the camera’s terminals near the receiver. Doing so may
negatively affect the GPS signal.
Cameras with status screens only: You can check the GPS information being received and the
satellite’s signal strength on the status screens. For details see the instruction manual of the
camera being used.
The camera is not compatible with the following receiver functions.
– The [Set now] option for the automatic date adjustment function
– Digital compass function
– Positioning interval function
COMMUNICATIONS
10
EN
WFT-E6 / WFT-E8 Wireless File Transmitter
Connect the wireless transmitter to the camera’s system expansion terminal to be able to connect to a
wireless network or device via Wi-Fi and use the camera’s network functions. For details about attaching
and configuring the wireless transmitter, refer to the instruction manual of the camera being used.
Do not place cables connected to the camera’s terminals near the receiver. Doing so may
negatively affect the wireless signal.
(attach directly)
System expansion
terminal
COMMUNICATIONS
11
EN
WFT-E9 Wireless File Transmitter
Connect the wireless transmitter to the camera’s system expansion terminal to be able to connect to a
wireless network or device via Wi-Fi and use the cameras network functions. For details about configuring
and using network functions, refer to the instruction manual of the camera being used. For the transmitter’s
specifications and restrictions and precautions applicable to its use, refer to the WFT-E9’s Instructions and
Advanced User Guide (online manual available from the website below).
https://cam.start.canon/A001/
Attaching the Transmitter to the Camera
1. Turn off the camera.
2. Attach the expansion system attachment bracket to the camera.
Align the bracket’s pin and screw to the corresponding sockets for
the expansion system attachment bracket on the camera ().
Then, fasten the screw to secure the bracket in place ().
3. Attach the transmitter to the camera.
Align the transmitter’s attachment pin with the hole on the
attachment bracket () and insert the transmitter’s terminal into the
camera’s system expansion terminal ().
Fasten the tightening screw () while keeping the lower part of the
transmitter pressed into the terminal.
4. Turn on the camera.
Do not place cables connected to the camera’s terminals near
the receiver. Doing so may negatively affect the wireless signal.
(attach directly)
System expansion
terminal
MONITORING
12
EN
Monitoring
LM-V1 / LM-V2 LCD Monitor
Connect the LCD monitor to the camera to add a large monitoring screen with touch screen operations
(touch to focus), menu operation buttons and joystick and two assignable buttons.
For details on how to attach and use the LCD monitor, see the instruction manual of the camera being
used.
An optional attachment unit is also required to attach the monitor to the camera.
Names of Parts
1 LCD panel with touch screen
2 FUNC (main functions) button / Assignable
button LCD LM-V1/V2 1
3MENU button
4Joystick
5 MIRROR (invert the displayed image) button
6CANCEL button
7 DISP (display) button / Assignable button LCD
LM-V1/V2 2
8 LCD monitors position alignment mark Í
9 Screw holes for 1/4"-20 screws (11.2 mm
(0.44 in.) deep, x2)
10 VIDEO terminal
Depending on the camera, you may need to update the camera’s firmware when using the
LM-V2 LCD monitor.
VIDEO terminal
UN-5 / UN-10 Unit Cable (optional)
1
2
3
4
5
6
7
8
9
10
MONITORING
13
EN
Attaching the LCD Monitor
About the LCD Attachment Unit
Use the optional LA-V1 or LA-V2 LCD Attachment Unit to attach the LCD monitor to the handle unit or to
the camera’s body itself*. For details see the instruction manual of the camera being used.
* The EOS C300 Mark II is not compatible with the optional LA-V1 LCD Attachment Unit so the LCD monitor can be
used but cannot be physically attached to the camera.
Attaching the LCD Monitor to the Handle Unit
1. Turn off the camera.
2. On the LCD attachment unit, rotate the LCD
monitor mount in the direction of the locking knob
to make the LCD monitor fixation bolt accessible.
3. Attach the LCD monitor to the LCD monitor mount.
Align the Í marks on the monitor and monitor
mount. If necessary, you can also mount the LCD
monitor facing the other way around.
Tighten the LCD monitor fixation bolt using the hex
wrench for 0.64 cm, 1/4" screws.
4. Attach the LCD attachment unit to the handle unit.
Align the attachment mount on the LCD attachment
unit to the handle unit’s front accessory mount.
Tighten the locking knob firmly.
5. Rotate the LCD monitor 90 degrees toward the
handle unit.
6. Connect the LCD monitor to the camera’s VIDEO
terminal using the UN-5 Unit Cable.
Align the Í marks on the cable’s plugs and
terminals.
7. Put the cable through the LCD attachment unit’s
cable clamp.
If necessary, adjust the position of the cable so that
it does not get in the picture or obstruct the view.
LCD Monitor
LM-V1 LM-V2
LCD Attachment Unit
LA-V1 N
LA-V2 N
MONITORING
14
EN
Specifications
* All dimensions and weights are approximate.
Depending on the situation, the screws may become loose. If necessary, use the hex wrench
for 0.64 cm, 1/4" screws to tighten them.
Maintenance of the LCD screen
– Clean the LCD screen using a clean, soft lens-cleaning cloth and commercially available
cleaning fluid for eyeglasses.
– Condensation may form on the surface of the screen when the temperature changes
suddenly. Wipe it with a soft dry cloth.
LCD Monitor
LM-V1 LM-V2
Screen
Type Color LCD
Size 10.1 cm (4.0 in.) 10.9 cm (4.3 in.)
Approximate dot count 1,230,000
(854 (RGB) x 480)
2,760,000
(1280 (RGB) x 720)
Aspect ratio 16:9
Coverage 100%
Touch screen Capacitive touch screen operation
VIDEO terminal Exclusively for connecting the camera
Operating temperature 0 °C – 40 °C (32 °F – 104 °F)
Dimensions* (W x H x D) 120 x 75 x 37 mm
(4.7 x 3.0 x 1.5 in.)
133 x 87 x 38 mm
(5.2 x 3.4 x 1.5 in.)
Weight* 185 g (6.5 oz.) 204 g (7.2 oz.)
MONITORING
15
EN
LM-V1 Detailed Measurements
LM-V2 Detailed Measurements
119.90 (4.7)
75.40 (3.0)
35.99
(1.4)
12.85 (0.51)
36.40
(1.4)
0.63 cm, 1/4" 11.2 (0.44)
15.25 (0.6)
12.85
(0.51)
0.63 cm, 1/4" 11.2 (0.44)
132.9 (5.2)
86.6 (3.4)
37.5
(1.5)
47.4 (1.9)
13 (0.51)
13 (0.51)
15.1 (0.59)
mm (inches)
0.63 cm, 1/4" 11.2 (0.44)
MONITORING
16
EN
EVF-V50 OLED Electronic Viewfinder
Connect the viewfinder to the camera to add a bright OLED monitoring screen that can be turned on/off
automatically thanks to an eye sensor.
Names of Parts
Attaching the Viewfinder to the Camera
1. Turn off the camera.
The accessory will not work if it is attached while the camera is turned on.
2. Remove the camera’s expansion unit cover.
Remove the 2 bolts in the illustration using the hex wrench for M4 bolts.
Supplied Accessories
Connector cover
M4 hex socket head bolts (x2)
Eye cup
Viewfinder cap
1 Viewfinder
2 Eye sensor
3 Diopter adjustment lever
4 Accessory fixation bolts (M4, x2)
5 Screw holes for fixation bolts (x2)
Expansion unit
connector
(attach directly)
1
2
3
4
5
MONITORING
17
EN
3. Attach the viewfinder.
Remove the viewfinder’s connector cover. Align the ridges on the
viewfinder with the protruding tabs on the camera and push the
viewfinder straight, all the way forward.
4. Secure the viewfinder in place.
First, fasten the 2 fixation bolts you removed in step 2 to the top (-1).
Then, fasten the 2 supplied M4 fixation bolts to the rear (-2).
Using the Viewfinder
Adjusting the Viewfinder
1. Adjust the viewfinder’s angle to a comfortable position.
2. Turn on the camera and adjust the dioptric adjustment
lever until the viewfinder’s image is sharp.
Attaching and Removing the Eye Cup
Attach the eye cup so that it covers the rubber rim of the viewfinder.
To remove the eye cup, pull it gently in a “peeling off” motion.
For left eye use, attach the eye cup so that the protruding part
faces the opposite side.
You can disable the eye sensor to turn on the viewfinder
permanently. See the [Monitoring Setup] menu settings’
table in the instruction manual of the camera being used.
Pointing the viewfinder lens at the sun or other strong light
sources may cause damage to internal components. When
you are not using the viewfinder, make sure to attach the
viewfinder cap to the viewfinder. This will also protect the
viewfinder from scratches and dirt. Attach the viewfinder
cap by inserting it into the rubber rim of the viewfinder unit.
MONITORING
18
EN
Specifications
* All dimensions and weights are approximate.
Detailed Measurements
Screen
Type Organic LED
Size 1.18 cm (0.46 in.)
Approximate dot count 1,770,000 dots
(1024 (RGB) x 576)
Coverage 100%
Operating temperature 0 °C – 40 °C (32 °F – 104 °F)
Dimensions* (W x H x D) 61 x 90 x 99 mm (2.4 x 3.5 x 3.9 in.)
Weight* (without connector cover) 170 g (6.0 oz.)
60.5 (2.4)
99 (3.9)
40 (1.6)
60.2 (2.4)
44.4
(1.7)
89.8 (3.5)
68°
mm (inches)
MONITORING
19
EN
EVF-V70 OLED Electronic Viewfinder
Connect the viewfinder to the camera to add a bright OLED monitoring screen that can be dimmed
automatically thanks to an eye sensor. The EVF-V70 offer also additional dials, menu operation buttons
(including 4 assignable buttons) and joystick that add functionality to the camera.
A clamp base is also required to attach the viewfinder to the camera.
About the Clamp Base
Use the clamp base to attach the viewfinder to the handle unit or to the camera’s body itself. For details
see the instruction manual of the camera being used.
* The mounting bracket supplied with the camera is also required.
Supplied Accessories
Clamp rail unit
Clamp base
CL-V1 (optional) CL-V2 (optional) Supplied with the camera
EOS C700 (all models) N
EOS C500 Mark II /
EOS C300 Mark III /
EOS C200 / EOS C200B
N
EOS C300 Mark II N*—
VIDEO terminal
UN-5 / UN-10 Unit Cable (optional)
MONITORING
20
EN
Names of Parts
Depending on the camera used, some of the functions described below may not be available or may
function differently. Buttons with an asterisk (*) in the illustration are illuminated when used with a camera
that features the button illumination function.
1 FUNC (main functions) button/
Assignable button EVF-V70: 1
2 EVF (open the menu) button/
Assignable button EVF-V70: 2
3 BACK (go back to previous screen) button
Use this button to return to the previous
menu level.
4 Viewfinder
5 Eye sensor
6 Dioptric adjustment ring
7 MAGN. (magnification) button/
Assignable button EVF-V70: 3
8 FALSE COLOR button/
Assignable button EVF-V70: 4
9 Swing arm locking screw
10 Swing arm
11 VIDEO terminal
12 Screw hole for 1/4"-20 mounting screws
(25 mm, 0.98 in. deep)
13 SELECT dial/SET button
14 Joystick/SET button
15 Swing arm slider
16 Screw hole for 1/4"-20 mounting screws
(10 mm, 0.39 in. deep)
17 Clamp rail: cable clamps
18 Screw holes for the clamp rail’s cable clamps
19 Rail
20 Clamp rail: rail end caps
21 Clamp rail: slider locking pin
2
*
3
*
7
*
8
*
4
11 9 12 13 14 15 16
56 910 17 18 19
19 2120
1
*
MONITORING
21
EN
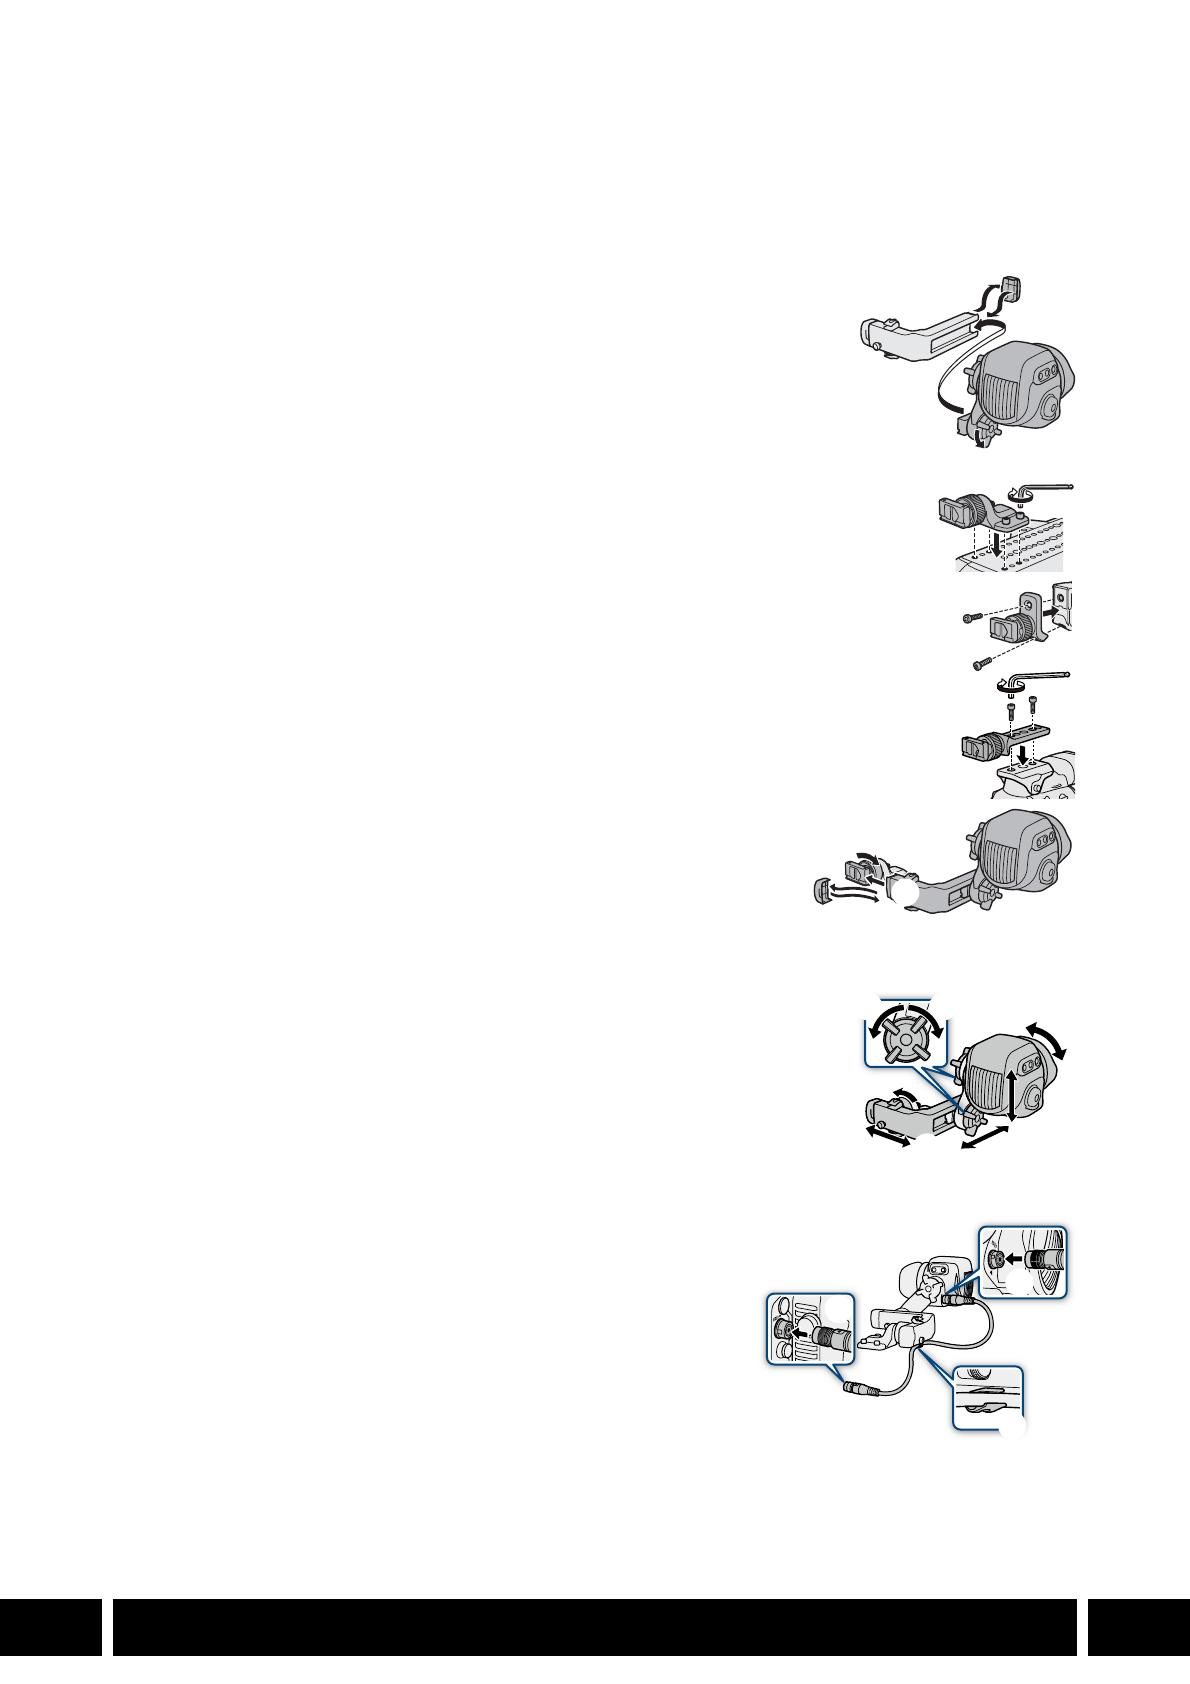
Attaching the Viewfinder to the Camera
1. If necessary, attach the handle unit to the camera.
For details see the camera’s instruction manual.
2. Turn off the camera.
3. Loosen the swing arm’s locking screw (clamp rail side, ).
4. Remove the clamp rail’s end cap (). Insert the swing arm’s slider into
the clamp rail with the “TOP” label facing up ().
5. Attach the end cap that was removed in step 4 to the clamp rail ().
6. Attach the clamp base to the camera.
EOS C700 series:
Attach the clamp base supplied with the camera to the top of the camera ().
Secure it firmly using 4 hex socket head bolts and the hex wrench for 0.64 cm,
1/4" screws.
EOS C500 Mark II / EOS C300 Mark III / EOS C200 / EOS C200B:
Attach the optional CL-V2 Clamp Base to the handle unit (). Secure it firmly using
2 hex socket head bolts and the hex wrench for 0.64 cm, 1/4" screws.
EOS C300 Mark II:
Attach the mounting bracket (supplied with the camera) to the camera. Fit the
optional CL-V1 Clamp Base on top of the bracket so it clicks in place. Secure it firmly
using 2 hex socket head bolts and the hex wrench for 0.64 cm, 1/4" screws ().
7. Loosen the clamp rail locking screw ().
8. Remove the end cap from the other arm of the clamp rail () and
insert the slider at the front of the clamp rail base into the clamp
rail ().
9. Attach the end cap that was removed in step 8 to the clamp rail ().
10.Loosen the other swing arm’s locking screw (viewfinder side, ),
adjust the viewfinder to the desired position (up/down, front/back; )
and then fasten all the screws ().
Be sure to firmly hold the viewfinder with one hand as you adjust the
position.
Fasten the two locking screws of the swing arm and the clamp rail
locking screw on the clamp base.
11.Connect the viewfinder’s VIDEO terminal to the camera’s
VIDEO terminal using an optional UN-5 or UN-10 Unit
Cable ( ).
Align the Î marks on the cable’s plugs and the terminals.
12.Put the unit cable through one of the cable clamps on the
clamp rail ( ).
The clamp has 4 screw holes for the cable clamps so you can
adjust their position as needed.
/