Page is loading ...

2
ANALOG INSTRUCTIONS
Time Setting
1. Pull crown out to position 2.
2. Turn crown to set hour and minute hands to desired time.
3. Return crown to position 1.
1 2
ENGLISH

3
DATE MODELS
Date Setting
1. Pull crown out to position 2.
2. Turn the crown either clockwise or counter-clockwise and set the date for the previous
day.
The direction that moves the date varies on different watch models.
Time Setting
1. Pull crown out to position 3.
2. Turn counter-clockwise to advance the time and continue until the day changes to the
present day.
3. Set to the correct time.
Do not change the date between the hours of 10pm and 2am
.
This is the time when the
movement is in position to carry out the automatic date change, and any interference may
cause damage to the movement.
1 2 3
Rotate to set hour &
minute hands. Date
advances with each
24 hour rotation of
hour hand.
RAPID CORRECTION
OF DATE
CLOSED

4
2 EYE DAY/DATE MULTI-FUNCTION VX36
Date Setting
1. Pull crown out to position 2.
2. Turn clockwise to advance date hand.
3. Push crown back to position 1.
Date and Time Setting
1. Pull crown out to position 3.
2. Turn clockwise to advance hour and minute hands.
The hand showing days of the week will also move with the hour and minute hands.
Keep turning until you have reached the desired day.
1 2 3
DAT E
DAY

5
MULTIFUNCTION 6P23
Time Setting
1. Pull crown out to position 3.
2. Turn clockwise to advance hour and minute hands. 24-hour hand will move with hour
and minute hands. Keep turning to reach desired time.
3. Return crown to position 1.
Date Setting
1. Pull crown out to position 2.
2. Turn crown counter-clockwise to set date.
3. Return crown to position 1.
DAT E
24-HOUR HAND
1 2 3

6
THREE EYE MULTI-FUNCTION 6P29/6P79
Date Setting
1. Pull crown out to position 2.
2. Turn clockwise to advance the date hand.
3. Push crown back to position 1.
Day and Time Setting
1. Pull crown out to position 3.
2. Turn clockwise to advance hour and minute hands.
The hand showing days of the week will also move with the hour and minute hands.
Keep turning until you have reached the desired day.
24-Hour Sub-Dial Setting
The 24-hour hand moves correspondingly with the hour and minute hands. When setting
the time be sure to check that the 24-hour hand is set properly.
1 2 3
DAT E
24-HOUR
DAY

7
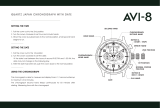
Time and Date Setting
1. Before setting the time, make sure the chronograph is stopped and set to zero
(12:00) position.
2. Pull crown out to position 2 and turn crown clockwise to set date to the previous day.
3. Pull crown out to position 3 when the second hand is at the 12:00 position, and turn
clockwise until the present date is displayed. Continue turning crown to set the correct
a.m./p.m. time.
4. Return crown to position 1.
NOTE: When crown is in position 2, do not press the pushers. Otherwise the
chronograph hands will move.
NOTE: To ensure accuracy, do not set the date between 9:00 p.m. and 1:00 a.m.
Chronograph Functions
Basic Function
1. Press A to start/stop the chronograph.
2. Press B to reset to zero.
CHRONOGRAPH STOPWATCH VD55
(with date-VD57)
A
B
1 2 3
MINUTE COUNTER
SECOND COUNTER
1/10 SECOND
COUNTER

8
Interval Timing
1. Press B while the chronograph is running.
2. Press B again to return to the chronograph.
3. Press A to finalize timing.
4. Press B to reset.
Adjusting the Chronograph Hands to Zero Position
If one or more chronograph hands are not in their correct zero (12:00) positions after
pressing B (for example, following a battery change):
1. Pull crown out to position 3.
2. Press A to move the chronograph 1/10 second counter one increment; press and hold
A for fast advance.
3. Press B to reset the second and minute counters one increment; press and hold B for
fast advance.
4. Return crown to position 1.

9
CHRONOGRAPH STOPWATCH JS25/VD54
(with date-VD53)
Time and Date Setting
1. Before setting the time, make sure the chronograph is stopped and set to zero
(12:00) position.
2. Pull crown out to position 2.
3. Turn crown clockwise until the previous day’s date is displayed.
4. Pull crown out to position 3 when the second hand is at the 12:00 position.
5. Turn crown to set time.
NOTE: 24-hour hand moves correspondingly with the hour and minute hands. When
setting the time be sure to check that the 24-hour hand is set properly.
6. Return crown to position 1.
NOTE: When the crown is in position 2, do not press the pushers. Otherwise the
chronograph hands will move.
Chronograph
1. Press A to start/stop the chronograph.
2. Press B to reset to zero.
Split Time (VD53/VD54)
1. Press B while the chronograph is running.
2. Press B again to return to the chronograph.
3. Press A to finalize timing.
4. Press B to reset.
A
B
1 2 3
MINUTE HAND
SECOND HAND
24-HOUR HAND

10
Chronograph Zero Reset
1. If either of the chronograph hands is not at the zero (12:00) position, pull crown out
to position 3.
2. Press A to move hands clockwise; press B to move hands counter-clockwise.
3. Return crown to position 1.

11
DIGITAL LED – BJ-3470
Normal Time Display
1. Press B to display time; press B again to change display mode. Mode sequence is time,
date and seconds.
2. LED automatically turns off after 5 seconds.
Time / Calendar Setting
1. In time display mode, press and hold A for 2 seconds to enter setting mode. 12/24-
hour format will begin flashing.
2. Press B to choose 12 or 24-hour format. For 12-hour setting, “P” will be displayed for
afternoon/evening hours. For 24-hour setting, no symbol will be displayed.
3. Press A to advance to hour.
4. Press B to increase digits; press and hold B for fast advance.
5. Press A to advance to next setting value.
6. Setting sequence is: 12/24-hour format, hour, minutes, seconds, year, month, date, and
exit setting mode.
NOTE: In setting mode, if no pusher is operated for 5 seconds, all changes will be
saved and the watch will automatically turn off.
BA

12
Link Removal
To remove a link from a pin link bracelet, you will need the bracelet holder, pin pusher,
and chain nose pliers (see pin link diagram).
1. Open the clasp on the bracelet.
2. Look on the inside of the bracelet and locate the arrows near the clasp (see diagram).
3. Place the band into the appropriate size slot of the bracelet holder with the arrows
pointing down (see diagram).
4. Center the desired pin to be removed over one of the holes in the bottom of the
bracelet holder.
5. With the pin pusher, push the pin, as far as possible, through the link.
6. Remove the watch from the bracelet holder and simply finish pulling out the pin with
the chain nose pliers.
NOTE:
Two pins hold each link in place and must be taken out before a link can be
removed.
Please note that the pins are partially split down the center.
PIN LINK DIAGRAM
BRACELET HOLDER
CHAIN NOSE PLIERS
PIN PUSHER
ARROWS

13
USE PRECAUTIONS - RESISTANCE TO WATER
Water Resistance Water-related Use
Caseback
Marking
Depth
Washing
Hands
Shower,
Bathing
Swimming,
Snorkeling
Scuba
Diving
— —
WR —
3 ATM
3 Bar,
30 Meters
5 ATM
5 Bar,
50 Meters
10 ATM
10 Bar,
100 Meters
20 ATM
20 Bar,
200 Meters
30 ATM
30 Bar,
300 Meters
50 ATM
50 Bar,
500 Meters
Always set the crown in closed position (the normal position).
Tighten screw-lock crown completely.
/