Page is loading ...

2
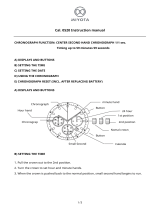
CHRONOGRAPH TWO EYE OS11
TIME SETTING
1. Pull crown out to position 3.
2. Turn crown to set the desired time.
3. Return crown to position 1.
DATE SETTING
1. Pull crown out to position 2 (the watch continues to run).
2. Turn crown until yesterday’s date appears.
3. Pull crown out to position 3 (the watch stops).
4. Turn crown until correct date appears.
5. Continue to turn crown until correct time appears.
6. Return crown to position 1.
CHRONOGRAPH OPERATION
1. Press
A to start/stop the chronograph.
2. Press B for reset.
ADJUSTING THE CHRONOGRAPH
1. Pull crown to position 3.
2. Press
A to reset the second hand to “0.”
3. Press B to reset the chronograph minute hand.
4. Return crown to position 1.
ENGLISH
Minute hand
Chronograph
minute hand
Chronograph
second hand
Hour hand
Date
321
Second
hand
A
B
NOTE: If you do not find your watch movement here, please go to www.
adidas.com/watches.
321
A
B

3
CHRONOGRAPH OS62
SETTING THE TIME
1. Pull crown out to position 3, so that the second hand stops at the zero position.
2. Turn crown to set hour and minute hands.
3. When crown is pushed back to position 1, in synchronization with a time signal,
small second hand begins to run.
321
A
B
Hour Hand
Chrono Hour Hand
Chrono Second Hand
Minute Hand
Chrono Minute Hand
Date
1/20 Second Chrono Hand
CHRONOGRAPH STOPWATCH OS10 (no date - OS30)
(1 crown/2 pushers)
TIME SETTING
1. Pull crown out to position 3.
2. Turn crown to set the desired time.
3. Return crown to position 1.
DATE SETTING
1. Pull crown out to position 2.
2. Turn crown counter-clockwise until the correct date is shown in the date window.
3. Return crown to position 1.
CHRONOGRAPH OPERATION
1. Press
A to start/stop the chronograph.
2. Press B for reset.
ADJUSTING THE CHRONOGRAPH
1. Pull crown to position 3.
2. Press
A to reset the second hand to “0.”
3. Press B to reset the chronograph minute and hour hands.
4. Reset the watch to the current time and return crown to position 1.
321
A
B
Minute Hand
Hour Hand
Second Hand

4
SETTING THE DATE
1. Pull crown out to position 2.
2. Turn crown counter-clockwise to set the date.
NOTE: If the date is set between the hours of around 9:00 PM and 1:00 AM, the date
may not change on the following day.
3. After the date has been set, push crown back to position 1.
USING THE CHRONOGRAPH
This chronograph is able to measure and display time in 1/20(1/1) second united up
to maximum of 12 hours. The retrograde chronograph 1/20(1/1) second hand runs
continuously for 60 seconds after starting, and then stops at the zero position.
Measuring time with the chronograph
1. Press B to change the watch to chronograph mode. The second hand stops at zero,
and changes to the chronograph 1/20(1/1) second hand.
2. The chronograph can be started and stopped each time A is pressed. The
chronograph 1/20(1/1) second hand stops at zero, 60 seconds after starting. When
A is pressed to stop the chronograph, the chronograph 1/20(1/1) second hand
advances rapidly to display the measured time.
3. Pressing B resets the chronograph and all hands return to their zero positions.
NOTE: Moving of the retrograde chronograph is a demo. Actual measurement will be
shown when it is stopped / STOP button is pushed.
CHRONOGRAPH RESET (including after replacing battery)
This procedure should be performed when the chronograph second hand and
chronograph 1/20(1/1) second hand do not return to zero after the chronograph has
been reset, and including after the battery has been replaced.
1. Pull crown out to position 3.
2. Press A to set the chronograph second hand to zero.
3. Press B to set the chronograph 1/20 second hand to zero. The chronograph hands
can be advanced rapidly by continuously pressing A or B.
4. Once the hands have been set to zero, reset the time and return the crown to
position 1.
5. Press B to check that the chronograph hands are reset to zero.
NOTE: Do not return crown to position 1 while chronograph second hand and 1/20
chronograph second hand are returning to zero. Each hand stops on the way when
crown is returned to position 1, and these positions are recognized as zero positions.

5
LED DIGITAL
TIME AND DATE MODE
1. Press A to view time.
NOTE: Animation will be displayed for 2
seconds before time is shown.
2. With time shown, press A to view date.
TIME SETTING
1. Press A to view time.
2. With time shown, press and hold B for 2 seconds.
3. Press A to select 12 or 24 hour format.
4. Press B for next setting field.
5. Press A to set value.
6. Repeat steps 4 and 5 until desired time is reached.
7. Press B to exit time setting mode.
DATE SETTING MODE
1. Press A to view time. With time shown, press A again to view date mode.
2. With time shown, press and hold B for 2 seconds.
3. Press A to set value.
4. Press B for next setting field.
5. Repeat steps 3 and 4 until desired time is reached.
6. Press B to exit date setting mode.
MULTIFUNCTION THREE EYE VX3NE1
(1 crown)
DAY AND TIME SETTING
1. Pull crown out to position 3.
2. Turn clockwise to advance hour and
minute hands. The hand showing days of
the week will also move with the hour and
minute hands. Keep turning until you have
reached the desired day.
DATE SETTING
1. Pull crown out to position 2.
2. Turn counter-clockwise to advance the date hand.
3. Return crown to position 1.
24-HOUR SUB-DIAL SETTING
The 24-hour hand moves correspondingly with the hour and minute hands. When
setting the time be sure to check that the 24-hour hand is set properly.
321
Day
24-Hour
Date
A
B
Mode
Set

6
DATE/TIME ANALOG-DIGITAL
SWITCHING DISPLAYS
1. Press A to advance from time mode to
calendar mode.
2. Press A again to return to time mode.
TIME/CALENDAR SETTING
1. In normal time display, Press B to enter
setting mode; year will begin flashing.
2. Press A to increase setting value.
3. Press B to set and advance to next setting value.
4. Setting sequence is year, month, date, 12/24-hour time, hour, minute, second.
5. Press nothing for 30 seconds, to automatically exit time/calendar setting mode.
10 LAP MEMORY DIGITAL FL145GB
REAL TIME DISPLAY MODE
1. Press A for EL in any mode.
2. Press C to toggle between Time 1 and Time 2.
3. Press and hold C to set Time 1 or Time 2 as
the default timer.
4. Press D to toggle chime on/off.
TIME/CALENDAR SETTING
1. In normal time display, press and hold A to enter setting mode; chime will begin
flashing.
2. Press C to increase setting value. Press D to decrease setting value.
3. Press B to set and advance to next setting value.
4. Setting sequence is chime, 12/24-hour time, hour, minute, second, year, month,
date, Auto EL.
5. Press A to save data and exit setting mode.
CHRONOGRAPH MODE
1. Press B to change to chronograph mode.
2. Press C to start chronograph; press D for lap when the chronograph is running.
3. Press D to change views while chronograph is running.
4. Press C to stop chronograph.
NOTE: When running, there is a maximum of 10 laps, afterward last lap will be
overwritten each time additional lap is recorded.
A
B
C
D
A
B

7
RECALL MODE
1. Press A to recall the memory when the chronograph is stopped.
2. Press A to view the next lap.
3. Press C or D to exit Recall Mode and go back to chronograph mode.
TIMER MODE
1. Press B to change to timer mode.
2. Press C to start timer.
3. Press C to stop timer. Press D to reset the timer when it is stopped.
TIMER SETTING
1. In timer mode, press and hold A to enter setting mode; timer type will begin
flashing.
2. Press C and D to select count down stop, count down repeat, or count up timer.
3. Press B to advance to next setting field.
4. Press C to decrease and D to increase.
5. Press B to set and advance to next setting value.
6. Setting sequence is timer type, hour, minute, second.
7. Press A to save data and exit setting mode.
NOTE: Alarm will sound at 2 beeps per second, and will beep for 30 seconds after
timer reaches zero.
ALARM MODE
1. Press B to change to alarm mode.
2. Press C to toggle between alarms 1, 2, 3, 4.
3. Press D to enable the alarm; press D again to disable the alarm.
4. Press B to exit alarm mode.
ALARM SETTING
1. In alarm mode, press and hold A to enter setting mode, hour will begin flashing.
2. Press C to increase; press D to decrease.
3. Press B to set and advance to next setting value.
4. Setting sequence is hour, minute.
5. Press A to exit setting mode.

8
TWEEN ANALOG-DIGITAL
NORMAL TIME DISPLAY
1. Press B to change modes.
2. Press A for EL.
3. Press C to select 12/24 hour format.
4. Press D to enable/disable hourly chime.
TIME SETTING
1. In time mode, press and hold A for 2 seconds to
enter time setting; hour will begin flashing.
2. Press C to increase setting value. Press D to decrease setting value.
3. Press B to enter next setting field.
4. Setting sequence is hour, minute, second, year, month, date.
5. Press A to exit setting mode.
ALARM MODE
1. Press B to enter alarm mode.
2. Press C to select alarm 1 or alarm 2.
3. Press D to enable/disable alarm.
ALARM SETTING
1. Press and hold A for 2 seconds to enter alarm setting; hour will begin flashing.
2. Press C to increase setting value. Press D to decrease setting value.
3. Press B to set minutes.
4. Press A to exit setting mode.
Note: Alarm turns on automatically when exiting setting mode.
TIMER MODE
1. Press C to start timer.
2. Press D to stop timer.
3. Press and hold D for 2 seconds to reset timer.
TIMER SETTING
1. In timer mode, press and hold A to enter setting mode; timer type will begin flashing.
2. Press C to select countdown/stop, count-up, or countdown repeat timer.
3. Press B to set and advance to timer preset value.
4. Press C to increase setting value; press D to decrease setting value.
5. Press A to exit setting mode.
CHRONO MODE
1. Press B to enter chrono mode.
2. Press C to start chrono.
3. Press D to stop chrono.
12
AC
BD

9
KIDS DIGITAL
TIME MODE
1. Press B to change modes.
2. Press A for EL.
3. Press C to select 12/24 hour format.
4. Press D to enable/disable hourly chime.
TIME SETTING
1. In time mode, press and hold A for 2 seconds to enter time setting.
2. Press C to increase setting value. Press D to decrease setting value.
3. Press B to enter next setting field.
4. Press pusher A to exit setting mode.
ALARM MODE
1. Press B to enter alarm mode.
2. Press A for EL.
3. Press C to select alarm 1 or alarm 2.
4. Press D to enable/disable alarm.
ALARM SETTING
1. Press and hold A for 2 seconds to enter alarm setting.
2. Press C to increase setting value. Press D to decrease setting value.
3. Press B to enter next setting field.
4. Repeat steps 2 and 3 until desired time is selected.
5. Press A to exit setting mode.
Note: Alarm turns on automatically when exiting setting mode.
CHRONO MODE
1. Press B to enter chrono mode.
2. Press C to start chrono.
3. Press D to stop chrono.
4. Press and hold D for 2 seconds to reset chrono.
NOTE: Maximum chrono time is 23 hours, 59 minutes, and 59 seconds. When chrono
reaches maximum time, it will stop running. Press and hold D to reset value to run
chrono. 1/00s resolution for first 59 minutes and 59.99 seconds.
A C
B
D
4. Press and hold D for 2 seconds to reset chrono.
NOTE: Maximum chrono time is 23 hours, 59 minutes, and 59 seconds. When chrono
reaches maximum time, it will stop running. Press and hold D to reset value to run
chrono. 1/00s resolution for first 59 minutes and 59.99 seconds.

10
10 LAP DIGITAL
NORMAL TIME DISPLAY
1. Press A for EL.
2. Press C to select T1 or T2 format.
TIME SETTING
1. In time mode, press and hold D for 2 seconds to enter time setting; hour will
begin flashing.
2. Press C to increase setting value.
3. Press B to enter next setting field.
4. Setting sequence is hour, minute, day, year, month, date.
5. Press D to exit setting mode.
ALARM MODE
1. Press B to enter alarm mode.
2. Press C to toggle alarm/chime on/off.
3. Press D to select Home Alarm or T2 Alarm.
ALARM SETTING
1. Press and hold D for 2 seconds to enter alarm setting; hour will begin flashing.
2. Press C to increase setting value.
3. Press B to set minutes.
4. Press D to exit setting mode.
Note: Alarm turns on automatically when exiting setting mode.
CHRONO MODE
1. Press B to enter chrono mode.
2. Press D to select split or lap mode. Split mode will display the full time of all
records after each split. Lap mode will display only the new lap time after each
record has been recorded.
3. Press C to start chrono.
4. Press C again to split time.
5. Repeat step 4 until desired number of laps have been reached (maximum 10).
6. Press D to stop chrono.
7. To review, press B to enter recall mode before resetting.
8. Press D again to reset chrono.
RECALL MODE
1. Press C to recall each lap (10 maximum).
2. Press D to return to chrono.
TIMER MODE
1. Press C to start countdown timer.
2. Press D to stop countdown timer. Press D again to reset timer.
A
B
C
D

11
TWIN ANALOG-DIGITAL
NORMAL TIME DISPLAY
1. Press A for EL.
2. Press E to toggle chime on/off.
3. Press and hold B to turn off LCD screen. Press
and hold B again for day and date. Press and hold
B again for normal time mode.
TIME SETTING
1. In time mode, press and hold A; city will begin flashing.
2. Press E to increase setting value and/or D to decrease setting value.
3. Press B to advance to next setting field.
4. Setting sequence is city, hour, minute, second, DST on/off, year, month, date,
12/24 hour format, month-date format.
5. Press A to exit.
ALARM MODE
1. Press B to enter alarm mode.
2. Press E to enable/disable alarm.
ALARM SETTING
1. In alarm mode, press and hold A to enter alarm setting mode; hour will begin
flashing.
2. Press E to increase setting value and/or D to decrease setting value.
3. Press B to advance to minute.
4. Press A to exit.
NOTE: Alarm status will be ON automatically after exit the AL setting mode. No
button operation for 60 seconds will auto-exit display with changes saved, but alarm
status is OFF.
WORLD TIME MODE
1. Press B to enter world time mode.
2. Press E and D to scroll up/down through cities.
3. Press C to turn on/off DST (Daylight Savings Time).
4. Press A when finished.
5. Press and hold A to exchange world time for local time.
AE
C
BD
TIMER SETTING
1. Press B to enter timer mode.
2. Press and hold D to enter setting mode; hour will begin flashing.
3. Press C to increase setting value.
4. Press B to enter next setting field.
5. Setting sequence is hour, minute, second.
6. Press D to exit setting mode.

12
WORDS CITY HOUR DIFFERENCE
MDY
HNL
ANC
LAX
DEN
CHI
NYC
CCS
RIO
ATA
CPV
LON
PAR
CAI
MOW
DXB
KHI
DAC
BKK
HKG
TYO
SYD
NOU
AKL
Midway
Honolulu
Anchorage
Los Angeles
Denver
Chicago
New York
Caracas
Rio de Janeiro
Antarctica
Cape Verde
London
Paris
Cairo
Moscow
Dubai
Karachi
Dacca
Bangkok
Hong Kong
Tokyo
Sydney
Noumea
Auckland
-11 hours
-10 hours
-9 hours
-8 hours
-7 hours
-6 hours
-5 hours
-4 hours
-3 hours
-2 hours
-1 hour
0 hours
+1 hour
+2 hours
+3 hours
+4 hours
+5 hours
+6 hours
+7 hours
+8 hours
+9 hours
+10 hours
+11 hours
+12 hours
TIMER MODE
1. Press B to enter timer mode.
2. Press E to select TIMER 1, 2 or 3.
3. Press C to start timer.
4. Press D to stop.
5. Press and hold D to reset timer.
NOTE: Maximum timer setting is 12 hours. When CD-REP is selected, loops 99
times maximum.
TIMER SETTING MODE
1. In timer mode, press and hold A to enter timer setting mode.
2. Press E to select CD-STP, CD-REP, or CD-UP.
3. Press B to advance to timer preset value.
4. Press E to increase setting value. Press D to decrease setting value.
5. Press A to exit setting mode.

13
CHRONO MODE
1. From any mode, press and hold E to enter chrono mode.
2. Press C to start chronograph.
3. Press D to stop chronograph.
4. Press and hold A to save data (if desired).
5. After data is saved, press A to return to chrono mode. If no data is saved, press
and hold D to reset chronograph.
6. Press B to return to time mode.
NOTE: While chrono is running, press E to change chrono views.
SPLIT/LAP
1. Press C to start chronograph.
2. Press C again to take lap reading.
3. Continue pressing C for desired number of laps (50 maximum).
4. Press D to stop chronograph.
5. Press and hold A to save data (if desired).
6. After data is saved, press A to return to chrono mode. If no data is saved, press
and hold D to reset chronograph.
NOTE: Maximum number of laps is 50. User cannot make a lap before 1 second from
the last lap measurement. If data allocation if full, display will prompt user to delete
stored data (oldest data will be offered for deletion first). SET-1 data can only be deleted
manually in data mode.
MY LOG MODE
1. Press B to enter data mode.
2. Press D to view stored sets. Press and hold D to delete current set. Press and
hold D further for 2 seconds to clear all stored sets.
3. Press C to view total, best, average, and laps of current set.

14
NORMAL TIME DISPLAY
1. Press A for EL.
2. Press B to change modes. Mode sequence is time, my log, alarm, timer.
3. Press D to flash to TIME 2; press and hold D to toggle TIME 1 and TIME 2.
4. Press E to toggle chime on/off. Press and hold E for chronograph mode on 50 Lap
Digital Models. On 10-30 Lap Digital Models, press and hold E for timer mode.
5. Press and hold A, B, D and E for 5 seconds to master reset the watch. All data will
be erased, and all settings will be set to default.
TIME/CALENDAR SETTING
1. In normal time display, press and hold A to enter setting mode; hour will begin
flashing.
2. Press E to increase setting value. Press D to decrease setting value.
3. Press B to set and advance to next setting value.
4. Setting sequence is hour, minute, second, year, month, date, 12/24-hour time,
date format.
5. Press A to save data and exit setting mode.
ALARM MODE
1. Press B to change to alarm mode.
2. Press D to toggle between alarms 1 and 2.
3. Press E to toggle alarm on/off.
ALARM SETTING
1. In alarm mode, press and hold A to enter setting mode; hour will begin flashing.
2. Press D to decrease; press E to increase.
3. Press B to set and advance to next setting value.
4. Setting sequence is hour, minute, T1/T2.
5. Press A to save data and exit setting mode.
NOTE: Alarm status will be ON automatically after exit the ALARM SETTING mode.
No button operation for 60 seconds will auto-exit with changes saved, but alarm
status OFF.
A E
C
BD
C
A
E
B
D
50 LAP DIGITAL 10-30 LAP DIGITAL

15
TIMER MODE
1. Press B to change to timer mode on 50 Lap Digital Models. On 10-30 Lap Digital
Models, press and hold E to change to timer mode.
2. Press C to start timer.
3. Press D to stop timer. Press and hold D to reset the timer when it is stopped.
4. Press E for next timer.
NOTE: For 50 Lap Digital Models, there are 3 timers. For 10-30 Lap Digital Models,
there are 5 timers.
TIMER SETTING
1. In timer mode, press and hold A to enter setting mode; timer type will begin flashing.
2. Press D and E to select count up timer, count down stop, or count down repeat, or
interval timer (see interval timer setting for separate instructions).
3. Press B to advance to next setting field.
4. Press D to decrease and E to increase.
5. Press B to set and advance to next setting value.
6. Setting sequence is timer type, hour, minute, second.
7. Press A to save data and exit setting mode.
INTERVAL TIMER SETTING
1. In timer mode, press and hold A to enter setting mode; timer type will begin flashing.
2. Press D or E to select interval timer.
3. Press B to advance to next setting field.
4. Press D to decrease and E to increase.
5. Press B to set and advance to next setting value.
6. Setting sequence is timer type (interval), hour, minute, second.
7. Press A to save data and advance to the next segment.
8. Repeat steps 5 and 6 until desired number of segments have been set (5
maximum for 50 Lap Digital Models, 6 maximum for 10-30 Lap Digital Models).
NOTE: When running, segments loop maximum 99 times.
CHRONOGRAPH MODE
1. From any mode, press and hold E for 2 seconds to change to chronograph mode
on 50 Lap Digital Models. On 10-30 Lap Digital Models, press B to change to
chronograph mode.
2. Press C to start chronograph; press C for lap when the chronograph is running.
3. Press E to change views while chronograph is running. Select between current
lap, total, or both.
4. Press D to stop chronograph when it is running; press and hold D to reset to zero
when the chronograph is stopped or press and hold A to save data to MY LOG.
NOTE: On 50 Lap Digital Models, the maximum number of laps is 50. On 10-30 Lap
Digital Models, the maximum number of laps is 10 or 30.

16
MY LOG MODE
1. Press B to change to my log mode.
2. Press E to view data within the selected SET.
3. Press D to advance through saved sets. Press and hold D to clear selected set.
Continue holding to clear all sets.
4. Press and hold E to race against any SET. This will put you in SHADOW RACE mode.
SHADOW RACING (only on 50 Lap Digital Models)
This function allows you to easily race against yourself from a previously stored
session of data that can be found under “MY LOG.” Take a lap reading at the marker
and the watch will tell you how you compare to your previous race.
1. Press B to change to MY LOG mode.
2. Press D and E to select set of data to race against.
3. Press and hold E to enter shadow racing chronograph.
NOTE: See chronograph mode instructions for chronograph operation.
4. Press and hold A to save run data when the chronograph is stopped.
5. Press B to return to normal time display.

17
100 LAP FRONT BUTTON PLUS DIGITAL
NORMAL TIME DISPLAY
1. Press A for EL.
2. Press B to change modes.
3. Press C for EL; press and hold C to toggle Auto EL on/off. When Auto EL is on,
press any key for EL.
4. Press D to flash Time Zone 2; press and hold D to toggle Time Zone 2 mode/
normal time display.
5. Press E for Chronograph mode; press and hold E to toggle chime on/off.
NOTE: To master reset the watch, press and hold A, B, D and E for 5 seconds. All data
will be erased, and all settings will be set to default.
TIME/CALENDAR SETTING
1. In normal time display, press and hold A to enter setting mode; touch/ask me off
will begin flashing.
2. Press D to toggle touch/ask me on/off.
NOTE: If touch/ask me is set to on, you will be asked in chronograph mode if you want
to activate the touch plate.
3. Press B to set and advance to next setting value.
4. Press D to decrease; press E to increase.
5. Setting sequence is: touch/ask me, city, hour, minute, second, DST on/off, year,
month, date, 12/24-hour time.
6. Press A to save data and exit setting mode.
TIME ZONE 2 MODE
1. In normal time display, press and hold D to enter time zone 2 mode; city will be at
the top of the display.
2. Press and hold E to make the time zone 2 city the normal time. All functions of the
normal time setting mode will carry over to the new time zone.
TIME ZONE 2 SETTING
1. In time zone 2 mode, press and hold A to enter setting mode; city will begin flashing.
2. Press D for previous city; press E for next city.
3. Press C to toggle DST on/off.
4. Press A to save data and exit setting mode.
A
E
B
D
C
A
E
B
D
C
Alarm On
Chime On
Auto EL

18
HKG
TYO
SYD
NOU
ACK
MDY
HNL
ANC
Hong Kong
Tokyo
Sydney
Noumea
Auckland
Midway
Honolulu
Anchorage
LAX
DEN
CHI
NYC
CCS
RIO
ATA
CPV
Los Angeles
Denver
Chicago
New York City
Caracas
Rio de Janeiro
Antarctica
Cape Verde
LON
PAR
CAI
MOW
DXB
KHI
DAC
BKK
London
Paris
Cairo
Moscow
Dubai
Karachi
Dacca
Bangkok
MY LOG MODE/VIEWING SETS
NOTE: In order to retrieve data in my log mode, you must first have saved information
in chronograph mode.
1. Press B to change to my log mode.
2. Press and hold A to edit set label.
3. Press C to view set data; press D and E to scroll through laps, lap total, best and
average lap data.
4. Press C to exit set.
5. Press D for previous set; press and hold D to clear selected set. Continue holding
to clear all sets.
6. Press E for next set. Hold to shadow race.
NOTE: For quick return to normal time display, press and hold B for 2 seconds.
EDITING SET LABELS
1. In my log mode, press and hold A to edit set label.
2. Press D to decrease letter, press E to increase letter.
3. Press B to set and advance to next letter.
4. Press A to save set label and exit setting mode.
ALARM MODE
1. Press B to change to alarm mode.
2. Press D to toggle between alarms 1 and 2.
3. Press E to toggle alarm on/off.
Note: For quick return to normal time display, press and hold B for 2 seconds.
ALARM SETTING
1. In alarm mode, press and hold A to enter setting mode; hour will begin flashing.
2. Press D to decrease; press E to increase.
3. Press B to set and advance to next setting value.
4. Setting sequence is hour, minute, normal time/time zone 2 city.
5. Press A to save data and exit setting mode.
TIMER MODE
1. Press B to change to timer mode.
2. Press D and E to select timer.
NOTE: For quick return to normal time display, press and hold B for 2 seconds.
NOTE: There are 5 timers set to the following default values: Timer 1 is 3 minutes,
Timer 2 is 5 minutes, Timer 3 is 10 minutes, Timer 4 is 30 minutes, Timer 5 is 1 hour.

19
USING THE TIMER
1. Press C to start timer.
2. Press D to stop timer. Press and hold D to reset.
TIMER SETTING
1. In timer mode, press and hold A to enter setting mode; timer type will begin flashing.
2. Press D and E to select count up timer, count down stop, or count down repeat.
3. Press B to set and advance to hour.
4. Press D to decrease and E to increase.
5. Press B to set and advance to next setting value.
6. Setting sequence is timer type, hour, minute, second.
7. Press A to save data and exit setting mode.
INTERVAL TIMER MODE
1. Press B to change to interval timer mode.
2. Press D to scroll through timers.
3. Press E to view different segments within each interval set.
NOTE: Module can store up to 3 interval sets, each of which can have a maximum of
6 segments.
USING THE INTERVAL TIMER
1. Press C to start timer.
2. Press E while interval timer is running to toggle views.
3. Press D to stop timer. Press and hold D to reset.
INTERVAL TIMER SETTING
1. In interval timer mode, press and hold A to enter setting mode; timer type will
begin flashing.
2. Press D and E to select count down stop or count down repeat timer.
3. Press B to set and advance to hour.
4. Press D to decrease and E to increase.
5. Press B to set and advance to next setting value.
6. Setting sequence is timer type, hour, minute, second.
7. Press B to advance to next segment, and repeat hour, minute, second setting.
8. Press A to save data and exit setting mode.
EDITING SEGMENTS
1. In interval timer mode, press D to select the timer.
2. Press E to select segment within the interval timer.
3. Press and hold A to edit segment; hour will begin flashing.
4. Press D to decrease and E to increase.
5. Press B to set and advance to next setting value.
6. Setting sequence is hour, minute, second.
7. Press A to save data and exit setting mode.
CHRONOGRAPH MODE
Your watch is equipped with the ability to turn the front button into a touch sensitive

20
plate. To activate the touch sensitive plate, set touch/ask me to “on” in time/calendar
setting. In chronograph mode, when asked if you want to activate the touch plate,
select “on.”
When touch mode is active, press C to start the chronograph and take lap readings.
The watch case-back and front button must be in contact with your skin for the
touch option to work (touch mode will not work if you are wearing the watch over
clothing or gloves). Also, the touch option does not work in water; it is meant
for dry conditions only. Keep the front pusher and case-back clean for optimum
performance. Remember to remove the caseback sticker after purchase.
1. From normal time display, press E to change to Chronograph mode.
NOTE: When entering chronograph mode, Free Memory Screen will flash on
display, showing the free lap and free set memory. If no data is stored, “memory
full” will display.
2. Press B to return to Normal Time Display.
3. Press and hold A to use race calculator before starting the chronograph.
4. Press C to start chronograph.
5. Press C for lap when the chronograph is running (up to 100 laps).
6. Press D to stop chronograph.
7. Press A to save run data when the chronograph is stopped.
8. Press and hold D to reset to zero when the chronograph is stopped.
RACE CALCULATOR
This function helps you to set benchmarks for every k/mile. Take a lap reading at the
marker and the watch will tell you how you compare to your ideal tempo.
1. In chronograph mode, press and hold A; mile/km units will begin flashing.
2. Press D and E to select kilometers or miles.
3. Press B to set and advance to next setting value.
4. Press D to decrease and E to increase.
5. Setting sequence is km/mile, distance 1-50, time goal hour, time goal minute, time
goal second.
6. Press A to select save data or race against data.
7. Press D to save data; press E to race against data and exit setting mode.
NOTE: Default set label will be set distance.
SHADOW RACING
This function allows you to easily race against yourself from a previously stored
session of data that can be found under “MY LOG.” Take a lap reading at the marker
and the watch will tell you how you compare to your previous race.
1. Press B to change to My Log mode.
2. Press D and E to select set of data to race against.
3. Press and hold E to enter shadow racing chronograph.
NOTE: See chronograph mode instructions for chronograph operation.
4. Press and hold A to save run data when the chronograph is stopped.
NOTE: User is then prompted to edit set label.
5. Press B to return to Normal Time Display.

21
REFEREE WATCH
NORMAL TIME DISPLAY
1. Press A for EL.
2. Press B to change modes. Mode sequence is time,
referee, timer type, chronograph, my log, alarm.
3.PressDtoashtoTIME2;pressandholdDto
toggle TIME 1 and TIME 2.
4. Press E to toggle chime on/off.
5. Press and hold A, B, D and E for 5 seconds to
master reset the watch. All data will be erased,
and all settings will be set to default.
TIME/CALENDAR SETTING
1. In normal time display, press and hold A to enter setting mode; auto EL “ON” will
beginashing.
2. Press E to increase setting value. Press D to decrease setting value.
3. Press B to set and advance to next setting value.
4. Setting sequence is hour, minute, second, year, month, date, 12/24-hour time,
date format.
5. Press A to save data and exit setting mode.
REFEREE MODE
1. Press B to change to Referee Mode.
2 Press D to select desired game time.
3. Setting sequence is Set 1, Set 2, Set 3, 45:00, 15:00, 40:00, 35:00, 30:00, 25:00,
20:00, 10:00, 5:00.
4. Press C to start timer.
5. Press C again to stop main timer, however overall game time will continue to run
at bottom.
6. Press C again to start timer again.
7. Press D to stop overall game time.
8. Press and hold D to reset timer when it is stopped.
REFEREE TIME SETTING
1. In Referee mode, press D to advance to Set 1, Set 2 or Set 3.
2.PressandHoldAtoentersettingmode;hourwillbeginashing.
3. Press E to increase setting value. Press D to decrease setting value.
4. Press B to set and advance to next setting value.
5. Setting sequence is hour, minute, second.
6. Press A to save data and exit setting mode.
THERE ARE 3 TYPES OF TIMERS:
Interval Timer, Timer, Training Timer.
1. Press B to change to Timer Mode, which ever timer was last chosen will be the
option to pop up.
AE
C
BD
/