LG LTUC368NLF1.APUNEI Owner's manual
- Category
- Split-system air conditioners
- Type
- Owner's manual
This manual is also suitable for

Ceiling Cassette
Air Conditioner
OWNER'S MANUAL
LG
IMPORTANT
• Please read this owner's manual carefully and thoroughly
before installing and operating your room air conditioner.
• Please retain this owner's manual for future reference after
reading it thoroughly.
Dear Owner,
Thank you for installing LG Air Conditioner.
Your best choice guarantees you a great
performance and service to make your life
comfortable & pleasant.
Highlander
P/No.-MFL62865704

2 Ceiling Cassette Air Conditioner
Ceiling Cassette Air Conditioner Owner’s Manual
TABLE OF CONTENTS
FOR YOUR RECORDS
Write the model and serial numbers here:
Model #
Serial #
You can find them on a label on the side of each unit.
Dealer's Name
Date Purchased
Staple your receipt to this page in the event you need
it to prove date of purchase or for warranty issues.
READ THIS MANUAL
Inside you will find many helpful hints on how to use
and maintain your air conditioner properly. Just a little
preventive care on your part can save you a great deal
of time and money over the life of your air conditioner.
You'll find many answers to common problems in the
chart of troubleshooting tips. If you review our chart of
Troubleshooting Tips first, you may not need to call
for service at all.
PRECAUTION
• Contact the authorized service technician for
repair or maintenance of this unit.
• Contact the installer for installation of this unit.
• The air conditioner is not intended for use by
young children or invalids without supervision.
• Young children should be supervised to ensure
that they do not play with the air conditioner.
• When the power cord is to be replaced,
replacement work shall be performed by
authorized personnel only using only genuine
replacement parts.
• Installation work must be performed in
accordance with the National Electric Code by
qualified and authorized personnel only.
Safety Precautions.........................3
Prior to Operation ..........................8
Introduction ....................................9
Electrical Safety ...........................10
Operating Instructions.................11
Maintenance and Service ............66
n

Owner's Manual 3
Safety Precautions
Safety Precautions
To prevent injury to the user or other people and property damage, the following instructions
must be followed.
Incorrect operation due to ignoring instruction will cause harm or damage. The seriousness
is classified by the following indications.
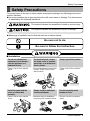
n Meanings of symbols used in this manual are as shown below.
This symbol indicates the possibility of death or serious injury.
This symbol indicates the possibility of injury or damage.
Be sure not to do.
Be sure to follow the instruction.
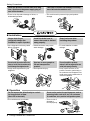
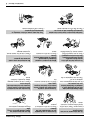
n Installation
Do not use a defective or
underrated circuit breaker.
Use this appliance on a
dedicated circuit.
• There is risk of fire or electric
shock.
For electrical work, contact
the dealer, seller, a qualified
electrician, or an Authorized
Service Center.
• Do not disassemble or repair the
product. There is risk of fire or
electric shock.
Always ground the product.
• There is risk of fire or electric
shock.
Install the panel and the
cover of control box
securely.
• There is risk of fire or electric
shock.
Always install a dedicated
circuit and breaker.
• Improper wiring or installation
may cause fire or electric shock
Use the correctly rated
breaker or fuse.
• There is risk of fire or electric
shock.
n

4 Ceiling Cassette Air Conditioner
Safety Precautions
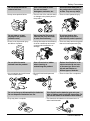
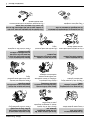
n Operation
Do not modify or extend the
power cable.
• There is risk of fire or electric
shock.
Do not install, remove, or
re-install the unit by yourself
(customer).
• There is risk of fire, electric
shock, explosion, or injury.
Be cautious when unpacking
and installing the product.
• Sharp edges could cause injury.
Be especially careful of the case
edges and the fins on the
condenser and evaporator.
For installation, always contact the
dealer or an Authorized Service Center.
• There is risk of fire, electric
shock, explosion, or injury.
Do not install the product on a
defective installation stand.
• It may cause injury, accident, or
damage to the product.
Be sure the installation area
does not deteriorate with age.
• If the base collapses, the air
conditioner could fall with it,
causing property damage,
product failure, and personal
injury.
Do not plug or unplug the
power supply plug during
operation.
• There is risk of fire or electric
shock.
Do not touch(operate) the
product with wet hands.
• There is risk of fire or electrical
shock.
Do not place a heater or
other appliances near the
power cable.
• There is risk of fire and electric
shock.
Do not let the air conditioner run for a
long time when the humidity is very high
and a door or a window is left open
.
• Moisture may condense and wet
or damage furniture.
Take care to ensure that power
cable could not be pulled out or
damaged during operation.
• There is risk of fire or electric
shock.
Do not place anything on
the power cable.
• There is risk of fire or electric
shock.

Owner's Manual 5
Safety Precautions
Do not allow water to run
into electric parts.
• It may cause There is risk of fire,
failure of the product, or electric
shock.
Do not store or use flammable
gas or combustibles near the
product.
• There is risk of fire or failure of
product.
Do not use the product in a
tightly closed space for a
long time.
• Oxygen deficiency could occur.
When flammable gas leaks,
turn off the gas and open a
window for ventilation
before turn the product on.
• Do not use the telephone or turn
switches on or off.
There is risk of explosion or fire
If strange sounds, or small or
smoke comes from product. Turn
the breaker off or disconnect the
power supply cable.
• There is risk of electric shock or
fire.
Stop operation and close the window
in storm or hurricane. If possible,
remove the product from the window
before the hurricane arrives.
• There is risk of property damage,
failure of product, or electric shock.
Do not open the inlet grill of the
product during operation.
(Do not touch the electrostatic
filter, if the unit is so equipped.)
• There is risk of physical injury,
electric shock, or product failure.
When the product is soaked
(flooded or submerged),
contact an Authorized
Service Center.
• There is risk of fire or electric
shock.
Be cautious that water could
not enter the product.
• There is risk of fire, electric shock,
or product damage.
G
a
s
o
li
n
Ventilate the product from time to time when
operating it together with a stove, etc.
• There is risk of fire or electric shock.
Turn the main power off when cleaning or
maintaining the product.
• There is risk of electric shock.

6 Ceiling Cassette Air Conditioner
Safety Precautions
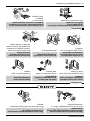
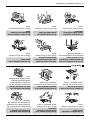
n Installation
n Operation
Always check for gas
(refrigerant) leakage after
installation or repair of product.
• Low refrigerant levels may cause
failure of product.
Install the drain hose to
ensure that water is drained
away properly.
• A bad connection may cause
water leakage.
Keep level even when
installing the product.
• To avoid vibration or water
leakage.
Do not install the product where the
noise or hot air from the outdoor unit
could damage the neighborhoods.
• It may cause a problem for your
neighbors.
Use two or more people to
lift and transport the
product.
• Avoid personal injury.
Do not install the product
where it will be exposed to sea
wind (salt spray) directly.
•
It may cause corrosion on the
product. Corrosion, particularly on
the condenser and evaporator fins,
could cause product malfunction or
inefficient operation.
90°
When the product is not be used for a long
time, disconnect the power supply plug or
turn off the breaker.
• There is risk of product damage or failure, or
unintended operation.
Take care to ensure that nobody could step
on or fall onto the outdoor unit.
• This could result in personal injury and product
damage.
Do not expose the skin directly to cool air
for long periods of time.
(Don't sit in the draft.)
• This could harm to your health.
Do not use the product for special purposes, such as
preserving foods, works of art, etc. It is a consumer
air conditioner, not a precision refrigeration system.
• There is risk of
damage or
loss of property.

Owner's Manual 7
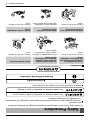
Safety Precautions
Do not block the inlet or
outlet of air flow.
• It may cause product failure.
Use a soft cloth to clean.
Do not use harsh
detergents, solvents, etc.
• There is risk of fire, electric shock,
or damage to the plastic parts of
the product.
Do not touch the metal parts of
the product when removing the
air filter. They are very sharp!
• There is risk of personal injury.
W
ax
Th
n
n
e
i
r
Do not step on or put
anyting on the product.
(outdoor units)
• There is risk of personal injury
and failure of product.
Always insert the filter securely.
Clean the filter every two weeks
or more often if necessary.
• A dirty filter reduces the efficiency
of the air conditioner and could
cause product malfunction or
damage.
Do not insert hands or other
objects through the air inlet or
outlet while the product is operated.
• There are sharp and moving parts
that could cause personal injury.
Do not drink the water
drained from the product.
• It is not sanitary and could cause
serious health issues.
Use a firm stool or ladder
when cleaning or
maintaining the product.
• Be careful and avoid personal
injury.
Replace the all batteries in the
remote control with new ones
of the same type. Do not mix
old and new batteries or
different types of batteries.
• There is risk of fire or explosion
Do not recharge or disassemble the batteries.
Do not dispose of batteries in a fire.
• They may burn or explode.
If the liquid from the batteries gets onto your
skin or clothes, wash it well with clean water. Do
not use the remote if the batteries have leaked.
• The chemicals in batteries could cause burns or
other health hazards.

8 Ceiling Cassette Air Conditioner
Prior to Operation
Prior to Operation
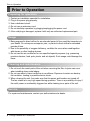
1. Contact an installation specialist for installation.
2. Plug in the power plug properly.
3. Use a dedicated circuit.
4. Do not use an extension cord.
5. Do not start/stop operation by plugging/unplugging the power cord.
6. If the cord/plug is damaged, replace it with only an authorized replacement part.
1. Being exposed to direct airflow for an extended period of time could be hazardous to
your health. Do not expose occupants, pets, or plants to direct airflow for extended
periods of time.
2. Due to the possibility of oxygen deficiency, ventilate the room when used together
with stoves or other heating devices.
3. Do not use this air conditioner for non-specified special purposes (e.g. preserving
precision devices, food, pets, plants, and art objects). Such usage could damage the
items.
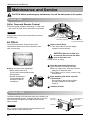
1. Do not touch the metal parts of the unit when removing the filter. Injuries can occur
when handling sharp metal edges.
2. Do not use water to clean inside the air conditioner. Exposure to water can destroy
the insulation, leading to possible electric shock.
3. When cleaning the unit, first make sure that the power and breaker are turned off.
The fan rotates at a very high speed during operation. There is a possibility of injury if
the unit’s power is accidentally triggered on while cleaning inner parts of the unit.
For repair and maintenance, contact your authorized service dealer.
Preparing for operation
Usage
Cleaning and maintenance
Service

Owner's Manual 9
Introduction
Introduction
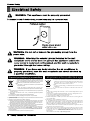
This symbol alerts you to the risk of electric shock.
This symbol alerts you to hazards that could cause harm to the
air conditioner.
This symbol indicates special notes.
NOTICE
Features
Anti-bacteria
Anti-bacteria
Air Outlet
Air Inlet
Remote
Controller
Symbols used in this Manual
WARNING: This appliance should be installed in accordance with national wiring
regulations. This guide acts as a guide to help to explain product features.
(Optional)
Remote
Controller
(Standard)
Wired
Wireless

Disposal of your old appliance (as per e-waste Rules)
1. When this crossed out wheeled bin symbol is depicted on the
product and its operator’s manual, it means the product is covered
by the e-waste Management and Handling Rules , 2011 and are
meant to be recycled, dismantled, refurbished or disposed off.
2. Dos
a. The product is required to be handed over only to the authorized
recycler for disposal.
b. Keep the product in isolated area, after it becomes non-
functional/un-repairable so as top revent its accidental breakage.
Don’t
a. The product should not be opened by the user himself/herself, but only by authorized
service p e rsonnel.
b. The product is not meant for re-sale to any unauthorized agencies/scrap dealer/
kabariwalah.
c. The product is not meant for mixing into household waste stream.
d. Do not keep any replaced spare part(s) from the product in exposed area.
3. Any disposal through unauthorized agencies/person will attract action under Environment
(Protection) Act 1986 .
4. Hazards of improper handling or accidental breakage
a.
b.
5. To locate a nearest collection centre or call for pick-up (limited area only) for disposal of
this appliance, please contact Toll Free No.1800-180-9999 for details. All collection
centre and pick up facilities are done by third parties with LG Electronics India Pvt. Ltd.
merely as a facilitator.
For more detailed information , please visit : http://www.lge.com/in
If batteries are disposed incorrectly, it can greatly harm the environment. The chemical
by-products are hazardousT. he metals and chemicals found in batteries can mix into
soil which may be hazardous to humans, plants and animals. If thrown in fire, they can
cause blast and release toxic gases which may be harmful for health.
The refrigerant (R-22) used can be combustible at low pressure. The potential health
effects of over exposure isd izziness, headache and heart irregularities
vius iqjkus midj.k dk fuiVku ¼bZ&vif’k"V ds vuqlkj½fu;e
1- tc bl dkVs x;s ifg;s okys fcu dk fpº+u fdlh midj.k vkSj blds vksisjVj dh
iqfLrdk ds lkFk layXu gksrk gSa rks bldk eryc gS fd bls "bZ&vif'k"V" ¼izca/ku
vkSj gFkkyu½ fu;e 2011 ds vUrxZr lfEefyr fd;k x;k gS] vkSj bls
uohuhdj.k] fo?kVu vkSj fuiVku ds fy, cuk;k x;k gSA
2- djsa&
d& midj.k dks flQZ vf/kd`r iqu% uohuhdj.kdrkZ dks gh fuiVkj.k djus gsrq
gLrkarfjr djsaA
[k& tc midj.k dk;Zjr u gks bls vyx {ks= esa j[kas rkfd midj.k ls gksus okyh
nq?kZVukvks ls cpk tk ldsA
uk djsa&
d& bl midj.k dks Lo;a/[kqn ugha [kksyuk pkfg, midj.k dks dsoy vf/kd`r vf/kdkjh ds }kjk gh
!
[kksyk tkuk pkfg,A
[k&bl midj.k dks iqu% fcØh ds fy, fdlh Hkh dckM+hokyk@Hkaxkj okyk@vukf/kd`r laLFkk dks u nsaA
x& bl midj.k dks fdlh ?kjsyw vif'k"V lkeku ds lkFk feykdj u j[ksaA
?k& midj.k ds cnys gq, ;k vkrafjd iqjtks dks [kqys {ks= esa u j[ksaA
3- ;fn fdlh vukf/kd`r foHkkx ;k O;fDr ds }kjk fuiVkj.k fd;k tkrk gS rks ;g i;kZoj.k ¼lqj{kk½ /kkjk
1986 ds vUrxZr vkrk gSA
4- nq?kZVukxzLr VwV@QwV rFkk vO;ofLFkr j[k&j[kko ls cps A
d& ;fn cSVfj;ksa dk fuiVkj.k v'kq) :i ls dj jgs gaS] rks ;g okrkoj.k dks cgqr uqdlku igqqWpk ldrk
gSaA jklk;fud midj.k [krjukd gksrs gaSA tks jlk;u vkSj /kkrq cSVfj;ksa esa ik, tkrs gaS] bls feV~Vh esa
feykus ij ;g euq";ksa] ikS/kksa vkSj i'kqvksa ds fy, [krjukd gks ldrh gaSA ;fn bls vkx esa Qsadrs gaS rks ;s
foLQksV dj ldrh gaS vkSj ;s tgjhyh xSlsa ns ldrk gS tks LokLF; ds fy, gkfudkjd gaSA
[k& jsÝhtjsaV ¼R-22½ de ncko ij ngu'khy gks ldrh gaS rFkk blls LokLF; ij nqLizHkko iM+ ldrk gS
tSls pDdj vkuk] flj nnZ vkSj g`n; xfr :dukA
5- mijksDr inkFkksZ ds fuiVkju ds fy, utnhdh fuiVkju laLFkku ¼ladh.kZ {ks=½ esa dkWy djsaA vf/kd
tkudkjh ds fy, gekjs Vksy Ýh uEcj 1800-180-9999 ij dkWy djsaA lHkh laxzg.k dsUnz o fid&vi
dh lqfo/kk,a FkMZ&ikVhZ ls tks "LG Electronics India Pvt. Ltd" dks viuh lsok,a iznku dj
jgh gksa] ls djok,aA
vf/kd tkudkjh ds fy, ns[ksa osclkbV % http://www.lge.com/in

Operating Instructions
Operating Instructions
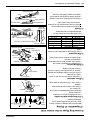
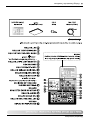
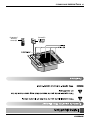
Indoor Unit, Outdoor Unit
Anti-bacteria
Outdoor Unit
Air Intake
(side, rear)
Connecting Wire
Drain Hose
Power Wire
Connection Tube
Air Outlet
Vents
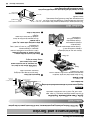
Heat pump model: Cassette Type Air Conditioner for cooling and heating
Cooling model: Cassette Type Air Conditioner for cooling
Anti-bacteria
Anti-bacteria
Air Outlet
Air Inlet
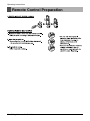
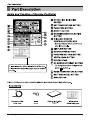
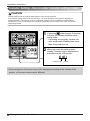
Wired Remote
Controller (Optional)
Operation Indication Lamps
Forced Operation : Operation procedures when remote control can't be used.
Defrost Mode : Lights up during defrost mode or hot start operation.
(heat pump model only)
Timer : Lights up during timer operation.
Signal Receptor : Receives the signal from remote control (signal receiving sound:
two short beeps and one long beep)
Filter Sign : Lights up after 2400 hours from the time of first operation.
On/Off : Lights up during system operation.
1 2
3
4
5
6
1
2
3
4
5
6
Wireless Remote Controller
(Standard)
Owner's Manual 11

Remote Control Preparation
12 Ceiling Cassette Air Conditioner
Operating Instructions

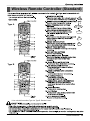
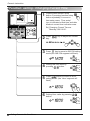
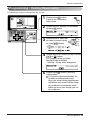
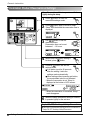
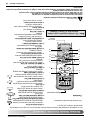
Wireless Remote Controller (Standard)
Owner's Manual 13
Type A
JE
T
C
OO
L
A/SWING
P
OW
E
R
TEMP
FAN SPEED
MODE
SLEEP
TIMERON OFF
FAN
ROOM
TIMER
Type B
* Your unit shall have either Type A or Type B Remote Control.

ON
Cooling
Healthy
Dehumidification
Auto
Operation
Heating
(Heat pump model only)
To lower the temperature
To raise the temperature
1
2
3
4
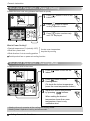
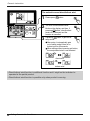
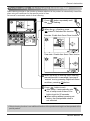
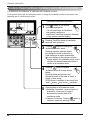
Fan speed is on low. Fan speed is on medium. Fan speed is on high.CHAOS Air
Press the START/STOP BUTTON to
turn the unit on.
The unit will respond with a beep.
Open the door of the remote controller and press the
operation mode button. Each time the button is pressed, the
operation mode is shifted in the direction of the arrow.
For cooling or heating operation set the desired indoor
temperature by pressing the ROOM TEMPERATURE
SETTING BUTTONS.
For cooling the temperature can be set within 18°C~30°C and
for heating the temperature range is 16°C~30°C.
Set the fan speed with the remote controller. You can select the fan speed in four steps-low,
medium, high and CHAOS by pressing the INDOOR FAN SPEED SELECTOR BUTTON.
Each time the button is pressed, the fan speed mode is shifted.
1
2
3
4
Natural wind by the CHAOS logic
For
fresher
feeling,
press
the
INDOOR
FAN
SPEED
SELECTOR
BUTTON
select
and
set
to
CHAOS
mode.
In this mode, the wind blows like a natural breeze by automatically changing fan speed according to the CHAOS logic.
Operation Mode
14 Ceiling Cassette Air Conditioner
* Your unit shall have either Type A or Type B Remote Control.
Operating Instructions

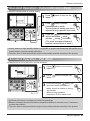
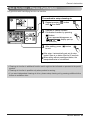
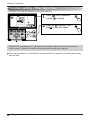
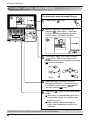
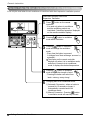
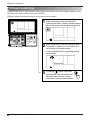
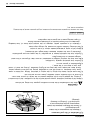
During Healthy Dehumidification Operation
If you select the dehumidification mode on the OPERATION MODE
SELECTION BUTTON, the product starts to run the dehumidification
function. It automatically sets the room temperature and airflow volume to
the best condition for dehumidification, based on the sensed current room
temperature.
In this case, however, the setting temperature is not displayed on the remote
controller and you are not able to control the room temperature either.
Durin g the health y dehumidifi cation functio n, the airflo w volume is
automatically set according to the optimization algorithm responding to the
current room temperature status, so that the room condition is kept healthy
and comfortable even in the very humid season.
Healthy
Dehumidification
Auto Operation
Healthy Dehumidification Operation
Auto
In this operation mode the actual setting temperature and the fan speed
are automatically set by the electronic control logic based on the current
room temperature. If you feel hot or cold press the temperature setting
buttons respectively for more cooling or heating effect.
NOTE : You cannot set the actual setting temperature and the indoor fan
speed in this operation mode. But you can use the Chaos swing
in this operation.
If the system is not operating as desired, switch manually to
another mode.
To run the healthy dehumidification mode follow steps 1, and 2 and 4
(See operation mode)
To run the auto operation follow steps 1, and 2. (See operation mode)
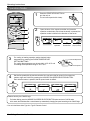
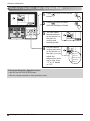
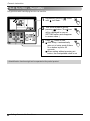
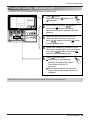
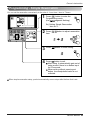
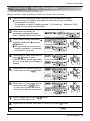
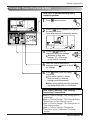
Setting the Time operation
Time can be set only when you have pressed the Reset button. If you have just replaced the batteries,
the Reset button should be pressed to reset the time.
Press the Start/Stop button.
Press 2nd F button
and check if 2nd F
icon is on.
Press the Time Setting buttons until the
desired time is set.
Press the Timer SET button.
Note: Check the indicator
for A.M. and P.M.
CANCEL
SET
Owner's Manual 15
* Your unit shall have either Type A or Type B Remote Control.
Operating Instructions

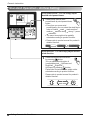
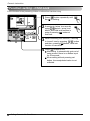
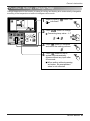
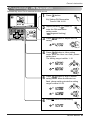
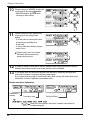
Jet Cool/Heat Operation
PLASMA Purification Operation (Optional)
Jet cool function can be used to cool the room quickly in hot summer. When this
function is turned on, the air conditioner runs in cooling operation mode with super
high fan speed and 18°C setting temperature for fast and effective cooling.
Plasma filter is a technology developed by LG to get rid of microscopic
contaminants in the intake air by generating a plasma of high charge electrons.
This plasma kills and destroys the contaminants completely to provide clean and
hygienic air.
You can activate this operation by pressing the JET COOL BUTTON.
To change from jet cool mode to high fan speed cooling mode, press the JET COOL BUTTON or
INIDOOR FAN SPEED SELECTOR BUTTON or the ROOM TERPERATURE SETTING BUTTON again.
• Jet cool function cannot be activated during heating or auto changeover operations.
• In case of Inverter, Art Cool and Art Cool Wide(non-Deluxe) model, you can use jet heat function by
pressing JET COOL BUTTON for heating operation.
• Art Cool and Art Cool Wide models close the side discharges during jet cool/heat operation, for strong
cooling and heating.
NOTE
Plasma purification can be started by pressing the PLASMA BUTTON on the remote controller.
Repressing it will deactivate the operation.
This feature can be used in any operation mode and any fan speed can be used while
plasma filter is functioning.
NOTE
16 Ceiling Cassette Air Conditioner
* Your unit shall have either Type A or Type B Remote Control.
Operating Instructions

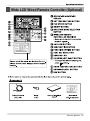
Wide LCD Wired Remote Controller (Optional)
Owner's Manual 17

18
Ceiling Cassette Air Conditioner

19
Owner's Manual

Installation instruction
Wall
Side
Wall
Side
Wall
Side
Wall
Side
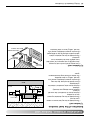
<Connecting order>
<Separating order>
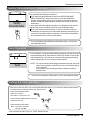
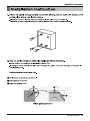
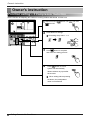
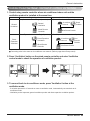
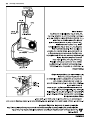
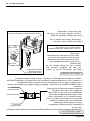
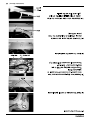
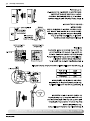
3. Please fix remote controller upper part into
the setup board attached to the surface of the
wall, as the picture below, and then, connect
with setup board by pressing lower part.
- Please connect not to make a gap at the remote controller
and setup board?s upper and lower, right and left part.
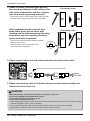
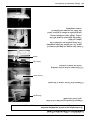
When separating remote controller from
setup board, as the picture below, after
inserting into the lower separating hole using
screw driver and then, spinning clockwise,
remote controller is separated.
- There are two separating holes. Please individually
separate one at a time.
- Please be careful not to damage the inside
components when separating.
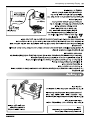
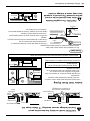
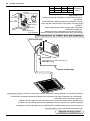
4. Please connect indoor unit and remote controller using connection cable.
5. Please use extension cable if the distance between wired remote controller and
indoor unit is more than 10m.
Please check if connector is normally connected.
Connecting cable
Indoor
Unit side
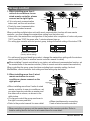
When installing the wired remote controller, do not bury it in the wall.
(It can cause damage in the temperature sensor.)
Do not install the cable to be 50m or above.
(It can cause communication error.)
• When installing the extension cable, check the connecting direction of the connector of the remote controller
side and the product side for correct installation.
• If you install the extension cable in the opposite direction, the connector will not be connected.
• Specification of extension cable: 2547 1007 22# 2 core 3 shield 5 or above.
CAUTION
20
Ceiling Cassette Air Conditioner
Page is loading ...
Page is loading ...
Page is loading ...
Page is loading ...
Page is loading ...
Page is loading ...
Page is loading ...
Page is loading ...
Page is loading ...
Page is loading ...
Page is loading ...
Page is loading ...
Page is loading ...
Page is loading ...
Page is loading ...
Page is loading ...
Page is loading ...
Page is loading ...
Page is loading ...
Page is loading ...
Page is loading ...
Page is loading ...
Page is loading ...
Page is loading ...
Page is loading ...
Page is loading ...
Page is loading ...
Page is loading ...
Page is loading ...
Page is loading ...
Page is loading ...
Page is loading ...
Page is loading ...
Page is loading ...
Page is loading ...
Page is loading ...
Page is loading ...
Page is loading ...
Page is loading ...
Page is loading ...
Page is loading ...
Page is loading ...
Page is loading ...
Page is loading ...
Page is loading ...
Page is loading ...
Page is loading ...
Page is loading ...
Page is loading ...
Page is loading ...
Page is loading ...
Page is loading ...
Page is loading ...
Page is loading ...
Page is loading ...
Page is loading ...
Page is loading ...
Page is loading ...
Page is loading ...
Page is loading ...
Page is loading ...
Page is loading ...
Page is loading ...
Page is loading ...
Page is loading ...
Page is loading ...
Page is loading ...
Page is loading ...
Page is loading ...
Page is loading ...
Page is loading ...
Page is loading ...
Page is loading ...
Page is loading ...
Page is loading ...
Page is loading ...
Page is loading ...
Page is loading ...
Page is loading ...
Page is loading ...
Page is loading ...
Page is loading ...
Page is loading ...
Page is loading ...
-
 1
1
-
 2
2
-
 3
3
-
 4
4
-
 5
5
-
 6
6
-
 7
7
-
 8
8
-
 9
9
-
 10
10
-
 11
11
-
 12
12
-
 13
13
-
 14
14
-
 15
15
-
 16
16
-
 17
17
-
 18
18
-
 19
19
-
 20
20
-
 21
21
-
 22
22
-
 23
23
-
 24
24
-
 25
25
-
 26
26
-
 27
27
-
 28
28
-
 29
29
-
 30
30
-
 31
31
-
 32
32
-
 33
33
-
 34
34
-
 35
35
-
 36
36
-
 37
37
-
 38
38
-
 39
39
-
 40
40
-
 41
41
-
 42
42
-
 43
43
-
 44
44
-
 45
45
-
 46
46
-
 47
47
-
 48
48
-
 49
49
-
 50
50
-
 51
51
-
 52
52
-
 53
53
-
 54
54
-
 55
55
-
 56
56
-
 57
57
-
 58
58
-
 59
59
-
 60
60
-
 61
61
-
 62
62
-
 63
63
-
 64
64
-
 65
65
-
 66
66
-
 67
67
-
 68
68
-
 69
69
-
 70
70
-
 71
71
-
 72
72
-
 73
73
-
 74
74
-
 75
75
-
 76
76
-
 77
77
-
 78
78
-
 79
79
-
 80
80
-
 81
81
-
 82
82
-
 83
83
-
 84
84
-
 85
85
-
 86
86
-
 87
87
-
 88
88
-
 89
89
-
 90
90
-
 91
91
-
 92
92
-
 93
93
-
 94
94
-
 95
95
-
 96
96
-
 97
97
-
 98
98
-
 99
99
-
 100
100
-
 101
101
-
 102
102
-
 103
103
-
 104
104


LG LTUC368NLF1.APUNEI Owner's manual
- Category
- Split-system air conditioners
- Type
- Owner's manual
- This manual is also suitable for
Ask a question and I''ll find the answer in the document
Finding information in a document is now easier with AI
Related papers
-
LG LTUC488MLF2.APUNE Owner's manual
-
LG AMNW18GL2A2.ENWHEVH User manual
-
-
-
LG AMNH09GB1A2.ENWABTK User manual
-
-
-
-
-
Other documents
-
Mitsubishi PEH-5EAK User manual
-
Haier AD482XMAAA Operation and Installation Manual
-
Haier AD482AHERA Operation & Instruction Manual
-
-
Samsung CC36BTVA User manual
-
Whirlpool AMD 306 User guide
-
Argoclima DADOS XL Operating instructions
-
 Interlink SY7690WW Installation guide
-
Argo Extreme 11 Operating Instructions Manual
-
Hitachi HCWA21NEWH Operating instructions
