Highpoint SSD7103 is a powerful NVMe RAID controller card that can greatly enhance the performance and storage capacity of your computer system. With support for multiple NVMe SSDs, it provides ultra-fast data transfer speeds and reliable RAID protection, making it ideal for demanding applications such as video editing, data analysis, and gaming. Its advanced features, including RAID 0, 1, 5, and 10 configurations, ensure data integrity and redundancy, while the compact form factor allows for easy integration into various systems.
Highpoint SSD7103 is a powerful NVMe RAID controller card that can greatly enhance the performance and storage capacity of your computer system. With support for multiple NVMe SSDs, it provides ultra-fast data transfer speeds and reliable RAID protection, making it ideal for demanding applications such as video editing, data analysis, and gaming. Its advanced features, including RAID 0, 1, 5, and 10 configurations, ensure data integrity and redundancy, while the compact form factor allows for easy integration into various systems.


-
 1
1
-
 2
2
-
 3
3
-
 4
4
-
 5
5
-
 6
6
-
 7
7
-
 8
8
-
 9
9
-
 10
10
-
 11
11


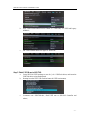
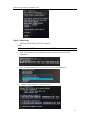
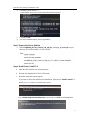
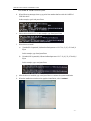
Highpoint SSD7103 Installation guide
- Type
- Installation guide
- This manual is also suitable for
Highpoint SSD7103 is a powerful NVMe RAID controller card that can greatly enhance the performance and storage capacity of your computer system. With support for multiple NVMe SSDs, it provides ultra-fast data transfer speeds and reliable RAID protection, making it ideal for demanding applications such as video editing, data analysis, and gaming. Its advanced features, including RAID 0, 1, 5, and 10 configurations, ensure data integrity and redundancy, while the compact form factor allows for easy integration into various systems.
Ask a question and I''ll find the answer in the document
Finding information in a document is now easier with AI
Related papers
-
Highpoint SSD7202 Quick Installation Guide
-
-
Highpoint SSD7101A-1 Installation guide
-
-
-
-
Highpoint SSD7540 User guide
-
-
-
Highpoint SSD7120 User guide