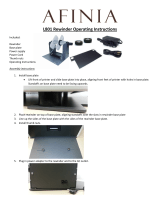
Godex EZ2050 User manual

Category
Label printers
Type
User manual

This manual is also suitable for

Godex EZ2050 is a versatile barcode printer that offers both thermal transfer printing, using a ribbon to transfer ink to various materials, and direct thermal printing, which uses heat to print on specially coated paper. With its 203 dpi resolution and print speed of up to 5 inches per second, the EZ2050 can produce clear and legible labels, tags, and receipts. It features a compact design, making it suitable for space-constrained environments, and is easy to set up and use with its intuitive operator panel and user-friendly software.

Godex EZ2050 is a versatile barcode printer that offers both thermal transfer printing, using a ribbon to transfer ink to various materials, and direct thermal printing, which uses heat to print on specially coated paper. With its 203 dpi resolution and print speed of up to 5 inches per second, the EZ2050 can produce clear and legible labels, tags, and receipts. It features a compact design, making it suitable for space-constrained environments, and is easy to set up and use with its intuitive operator panel and user-friendly software.

1
EZ2050/EZ2150 BARCODE PRINTER
USER MANUAL
User Manual
Version
Issue Date
P/N
: EZ2050 series
: Rev. D
: 2013.07.18
: 920-014411-00
Contents
EZ2050/EZ2150
USER MANUAL
CONTENTS
Contents
1
. BARCODE PRINTER ......................................................................
1
1-1. Box content .............................................................................................
1
1-2. Getting to know your printer .................................................................
2
2
. PRINTER SETUP .............................................................................
4
2-1. Loading the label roll .............................................................................
4
2-2. Loading the ribbon .................................................................................
7
2-3. Connecting the printer to the host computer ...................................
8
2-4. Installing the driver ..................................................................................
9
3
. OPERATOR PANEL ..................................................................... 1
1
3-1. Operator panel – introduction .......................................................... 11
3-2. Function buttons – introduction ......................................................... 12
3-3. Settings mode ...................................................................................... 13
3-4. Label Calibration and Self Test .......................................................... 15
3-5. Dump mode ......................................................................................... 17
3-6. Error alerts .............................................................................................. 18
4
. ACCESSORIES ........................................................................... 1
9
4-1. internal rewinder .................................................................................. 19
4-2. Installing the rewinder guide .............................................................. 21
4-3. Label dispenser .................................................................................... 22
4-4. Installing the cutter .............................................................................. 24
4-5. Installing the Parallel adapter ............................................................ 26
4-6. Installing the Applicator interface .................................................... 28
5
. MAINTENANCE AND ADJUSTMENT .......................................... 3
0
5-1. Installing / removing the print head module................................... 30
5-2. Adjusting the print line ........................................................................ 31
5-3. Adjusting the ribbon tension .............................................................. 32
5-4. Cleaning the thermal print head ...................................................... 33
5-5. Adjusting the balance and print head tension .............................. 34
5-6. Ribbon shield settings .......................................................................... 35
5-7. Cutter settings ...................................................................................... 36
5-8. Troubleshooting .................................................................................... 37
A
PPENDIX
Decleration
EZ2050/EZ2150
USER MANUAL
FCC COMPLIANCE STATEMENT
FOR AMERICAN USERS
This equipment has been tested and found to comply with the limits for a CLASS A digital device,
pursuant to Part 15 of the FCC Rules. These limits are designed to provide reasonable protection
against harmful interference when the equipment is operated in a commercial environment. This
equipment generates, uses, and can radiate radio frequency energy and, if not installed and used
in accordance with the instructions, may cause harmful interference to radio communications.
Operation of this equipment in a residential area is likely to cause harmful interference in which case
the user will be required to correct the interference at own expense.
EMS AND EMI COMPLIANCE STATEMENT
FOR EUROPEAN USERS
This equipment has been tested and passed with the requirements relating to electromagnetic
compatibility based on the standards EN 55022:2010 Class A, EN61000-3-2:2006/A2:2009, EN 61000-3-3:2008
and EN 55024:1998/A1:2001/A2:2003, IEC 61000-4-2:2008 series, The equipment also tested and passed
in accordance with the European Standard EN55022 for the both Radiated and Conducted emissions limits.
EZ2050 SERIES
TO WHICH THIS DECLARATION RELATES
IS IN CONFORMITY WITH THE FOLLOWING STANDARDS
IEC 60950-1:2005(2nd Edition)+Am 1:2009, GB4943-2001 GB9254-2008(Class A) GB17625.1-2003,
EN 55022:2010 Class A, EN61000-3-2:2006/A2:2009, N 61000-3-3:2008 and EN 55024:1998/A1:2001/A2:2003,
IEC 61000-4-2:2008 series, CAN/CSA C22.2 No. 60950-1-03, date July, 2011, UL 60950-1, 1st Edition, 2007-10-31,
CFR 47, Part 15
WARNING
This is a Class A product. In a domestic environment this product may cause radio interference
in which case the user may be required to take adequate measures.
此为Class A产品,在生活环境中,该产品可能造成无线电干扰,在这种情况下,可能需要用户对其干扰采取切实可行
的措施。
Declaration
Safety instructions
EZ2050/EZ2150
USER MANUAL
SAFETY INSTRUCTIONS
Please read the following instructions carefully.
1. Keep the equipment away from humidity.
2. Before you connect the equipment to the power outlet, please
check the voltage of the power source.
3. Make sure the printer is off before plugging the power connector
into the power jack.
4. It is recommended that you connect the printer to a surge
protector to prevent possible transient overvoltage damage.
5. Be careful not to get liquid on the equipment to avoid electrical
shock.
6. For safety and warranty reasons, ONLY qualified service personnel
should open the equipment.
7. Do not repair or adjust energized equipment under any
circumstances.
Safety instructions
**** Danger of explosion if battery is incorrectly replaced. Replace only with the equivalent type recommended by
the manufacturer.
**** Dispose of used batteries according to the manufacturer’s instructions.
**** Only use with designated power supply adapter model.
**** Changes or modifications not expressly approved by the party responsible for compliance could void the user's
authority to operate the equipment.
Specifications are subject to change without notice.
Caution
1
1 Barcode Printer
POWER
RIBBON
DENSITY
MEDIA
SPEED
FEED
CANCEL
PAUSE
1.1 Box Content
Please check that all of the following items are included with your printer.
EZ2050/EZ2150 Barcode Printer
USB Cable
CD
Including QLabel software
and user manual.
Label Stock
Ribbon Module
Empty Ribbon Core
Ribbon
Power Adapter
Power Cord
EZ2050 Series Quick Guide
EZ2050/EZ2150 Series
2
1 Barcode Printer
1.2 Getting to Know Your Printer
External view
1.
Operator panel
2.
Lower cover plate
3.
Viewing window
4.
Printer cover
4
3
1
2
1.
Feed slot for continuous labels
2.
Auto-Calibration button
3.
Parallel port (optional)
4.
Applicator interface (optional)
5. N
Ethernet port
6.
USB port
7.
Serial port (DB-9)
8.
On/Off switch
9.
Power jack
10.
Feed slot for continuous labels
1
2
6
8
10
3
4
9
7
5
3
1 Barcode Printer
1
2
3
4
5
6
7
12
11
10
9
8
1.
Ribbon rewind hub
2.
Ribbon supply hub
3.
Print mechanism
4.
Platen roller
5.
Tear-off plate
6.
Release lever for print head
7.
Adjustment wheel for sensor
8.
Paper guide
9.
Label tension guide
10.
Label supply hub
11.
Label roll guide
12.
Release catch
1
1.
Movable sensor
4
2 Printer Setup
This printer supports the following printing methods:
Thermal transfer printing (TTP)Requires a ribbon for transferring a printed image to a medium.
Direct thermal printing (DTP)Does not require a ribbon, only thermal paper.
Please check which printing method you are using and alter the settings accordingly in the printer driver,
printer menu, and/or software.
2
1
1
. Place the printer on a flat surface and open the printer cover.
2.
Pull out the print head release lever as shown in the illustration (1) and turn it
anticlockwise to a top right position (2).
2
1
3.
4.
Pull the release catch for the label roll guide to the right as shown by the blue arrow 1.
Now slide the label roll guide forward and fold it up as shown by the blue arrow 2.
2.1 Loading the label roll
5
2 Printer Setup
5
. Place the label roll on the label supply hub, pushing it right up to the printer housing
.
(Do not apply too much pressure to avoid damaging the label stock.)
6
. Fold the label roll guide back down and push it against the label roll.
Note
W
hen moving the label roll guide, hold it only by the end that is attached to the bracket
,
not by its top.
7
. Load the label roll into the printer as shown in the illustration. Pass it through the
printer as indicated by the blue arrows.
1
2
3
8
. Pass the label stock through the sensor and up to the tear-off plate.
Note
R
emember to set the movable sensor to gap, black mark, or tag hole by changing the position of
the sensor with the adjustment wheel.
6
2 Printer Setup
9.
The labels pass between the wall of the printer housing and the adjustable paper
guide.
Note
P
ass the labels through the printer as shown in the illustration.
10.
Return the print head release lever to its original position.
11. Then close the printer cover.
7
2 Printer Setup
2.2 Loading the Ribbon
1. Place the printer
on a flat surface
and open the
printer cover.
2. Pull out the print
head release
lever as shown in
the illustration (1)
and turn it
anticlockwise to a
top right position
(2).
2
1
3.
Place a new
ribbon on the
ribbon supply
hub. Then place
an empty ribbon
core on the
ribbon rewind
hub.
4. The two
illustrations on the
right show you
how to install the
ribbon
depending on
the ribbon type
(ink side in or out).
Ink side out
Ink side in
5. Pass the ribbon
under the print
head and back
up on the other
side. Attach it to
the empty ribbon
core.
Note
Do not pass the
ribbon under the
sensor.
8
2 Printer Setup
2.3 Connecting the Printer to the Host Computer
1. Please make sure that the printer is switched off.
2. Connect the power cord to the AC adapter and connect the adapter to the printer.
3. Connect the USB cable to the printer and host computer.
4. Switch on the printer. The operator panel should now light up.
9
1. Insert the product CD in the CD/DVD drive of the host computer and open the "Seagull Drivers" folder on the CD.
Select the icon for the driver file and click it to start the installation.
2. Follow the instructions on the screen. The Driver Wizard guides you through the installation procedure.
Select "Install printer drivers".
3. Specify your printer model.
Godex EZ2050
Installing Printer Driver Directly from CD Folder
2 Printer Setup
10
2 Printer Setup2 Printer Setup
4. Specify the port used to connect the printer to the host computer.
6. Once the installation is complete, a summary of the printer settings is displayed.
Check whether the printer settings are correct and click "Finish" to start copying the driver files.
Wait until copying is complete, then finish the installation.
5. Enter a printer name and assign the appropriate rights.
Godex EZ2050
Godex EZ2050
Godex EZ2050
Godex EZ2050
11
2 Printer Setup
7. Once the driver installation is complete, the new printer should appear in the "Printers and Faxes" folder.
Godex EZ2050
Godex EZ2050
12
3 Printer Setting and Control
3.1 Operation Panel
Operation Panel Introduction
Function buttons
FEED
PAUSE
CANCEL
LED indicators
POWER
The POWER (Ready) LED
lights up when the printer
has started up and is
ready to print.
RIBBON /
DENSITY
(1) Ribbon status
indicator
(2) Density adjustment
indicator in Setting
Mode
MEDIA /
SPEED
(1) Media status
indicator
(2) Speed adjustment
indicator in Setting
Mode
13
3 Setting and Control for Operation Panel
3.2 Function buttons – introduction
FEED button
When you press the FEED button, the printer moves the label to the defined stop
position. If you are using continuous labels, pressing the FEED button will move label
stock until you release the button again. If you are using individual labels, pressing
the FEED button will move only one label. If the label does not stop at the correct
position, you need to run the auto-detection func
tion on the label stock (see
Section 3-5).
PAUSE button
Pressing the PAUSE button while the printer is in standby mode will set the printer to
pause mode. In this mode, the printer can receive commands, but it can only
process them when it is reset to standby mode. Pressing the PAUSE button again will
reset the printer to standby mode.
Pressing the PAUSE button during printing will interrupt printing. When the PAUSE
button is pressed aga
in, the printer resumes printing. Example: While a 10-label print
job is running, you press the PAUSE button to pause the printer. Two of the labels
have been printed. To resume printing and print the remaining eight labels, you
press the PAUSE button again.
CANCEL button
Pressing the CANCEL button during printing cancels a print job. The current print job
is cancelled. Example: While a 10-label print job is running, you press the CANCEL
button. Two of the labels have been printed. The print job is cancelled and the
remaining eight labels are not printed.
You can combine the FEED, PAUSE and CANCEL buttons in a number of ways to perform
different pri
nter functions:
Function
Button
Beeps
Description
Self test
+ Power On
3 beeps
Switch on the printer and keep the
button pressed until you hear 3 beeps.
Dump mode
+ Power
On
3 beeps
1
beep
After the self test, keep the button
pressed until you hear a beep.
Auto-
detection
+ Power On
3 beeps
Switch on the printer and keep the
button pressed until you hear 3 beeps.
Factory
settings
+
+
Power On
2 x 2
beeps
Switch on the printer and keep the
and
buttons pressed until you hear 2
beeps. This resets the printer to the factory
settings.
Download
mode
+ Power
On
1 beep
Switch on the printer and keep the
button pressed until you hear a beep. This
mode is for download of the firmware
only.
Settings
mode
3 beeps
Switch on the printer and keep the
button pressed for about 3-4 seconds,
until you hear 3 beeps.
14
3 Setting and Control for Operation Panel
3.2 Settings mode
In settings mode, you can change different settings, such as the printing mode or media
type.
1. Switch on the printer and make sure that the POWER (Ready) LED lights up.
2. Press the PAUSE button and keep it pressed for about 3-4 seconds until you hear 3
beeps.
3. In settings mode, the buttons have the following functions:
: Minus / Enter
: Menu / Next
: Plus / Exit
Press the
button to select the adjustment items; press the button or the
button to change the setting values.
4. To exit the settings mode, you need to go back to the beginning of setting mode
and decide whether to save the changes you have made or exit without saving.
Once you have saved or discarded your changes, the printer will switch back to
standby mode.
Press the
button and keep it pressed for about 3-4 seconds until you hear 3 beeps.
Blinking
Steady
DENSITY SPEED Description
Start / Exit
Setting mode
Exit
withou
t
saving
Save &
exit
DENSITY and SPEED lights
steady to indicator the strat
or the end of setting mode.
Darkness
Decre
ase
the
setting
value
Increas
e the
setting
value
DENSITY light flashes and
then blinks for each
pressing. The buzzer will
beep when the adjustment
reaches the maximum or
minimal.
Speed
Decre
ase
the
setting
value
Increas
e the
setting
value
SPEED light flashes and
then blinks for each
pressing. The buzzer will
beep when the adjustment
reaches the maximum or
minimal.
15
3 Setting and Control for Operation Panel
Direct
Thermal /
Thermal
Transfer
DT
mode
TT
mode
When reaching this item,
press button to set the
printer to TT mode, press
button to set the
printer to DT mode and
press
button to go to
next item.
Stop Position
Decre
ase
the
setting
value
Increas
e the
setting
value
DENSITY light blinks and
Speed light flashes. The
buzzer will beep when the
adjustment reaches the
maximum or minimal.
Buzzer Off On
When reaching this item,
press button to set the
printer buzzer ON, press
button to set the
printer buzzer OFF and
press
button to go
back to Start / Exit Setting
mode.
Return to the Start / Exit Setting mode
16
3 Setting and Control for Operation Panel
3.4 Label Calibration and Self Test
Label Calibration
The printer can automatically detect and store label height.
That means the host computer does not need to transmit the label height to the printer.
Self Test
Self-test function lets you check whether the printer is functioning normally.
Here is how you run the label size calibration and self test.
1. Check that the label stock is loaded correctly.
2. Turn off the printer.
3. Turn the printer on again, keeping the FEED button pressed. When the LED starts to flash red, release the FEED
button. The printer will now measure the label stock and store the label height.
4. Once the printer has successfully measured the label stock, it will print a self-test label.
The contents of a self-test printout are listed below.
Model & Version
USB ID setting
Serial port setting
MAC address of Ethernet port
IP protocol setting
IP address of Ethernet port
Gateway setting
Netmask setting
Number of DRAM installed
Image buffer size
Number of forms
Number of graphics
Number of fonts
Number of Asian fonts
Number of Databases
Number of Scalable fonts
Free memory size
Speed, Density, Ref. Point, Print direction
Label width, Form length, Stop position
Cutter, Label Dispenser, Mode
Sensor Setting
Code Page
EZ2050:GX.XXX
USB S/N:12345678
Serial port:96,N,8,1
MAC Addr:xx-xx-xx-xx-xx-xx
DHCP Enable
IP xxx.xxx.xxx.xxx
Gateway xxx.xxx.xxx.xxx
Sub-Mask xxx.xxx.xxx.xxx
##################################
1 DRAM installed
Image buffer size:1500 KB
0000 FORM(S) IN MEMORY
0000 GRAPHIC(S) IN MEMORY
000 FONT(S) IN MEMORY
000 ASIAN FONT(S) IN MEMORY
000 DATABASE(S) IN MEMORY
000 TTF(S) IN MEMORY
4073 KB FREE MEMORY
^S4 ^H8 ^R000 ~R200
^W102 ^Q100,3 ^E18
Option:^D0 ^O0 ^AD
Reflective AD:1.96 2.84 2.49[0.88_23]
Code Page:850
  • Page 1 1
  • Page 2 2
  • Page 3 3
  • Page 4 4
  • Page 5 5
  • Page 6 6
  • Page 7 7
  • Page 8 8
  • Page 9 9
  • Page 10 10
  • Page 11 11
  • Page 12 12
  • Page 13 13
  • Page 14 14
  • Page 15 15
  • Page 16 16
  • Page 17 17
  • Page 18 18
  • Page 19 19
  • Page 20 20
  • Page 21 21
  • Page 22 22
  • Page 23 23
  • Page 24 24
  • Page 25 25
  • Page 26 26
  • Page 27 27
  • Page 28 28
  • Page 29 29
  • Page 30 30
  • Page 31 31
  • Page 32 32
  • Page 33 33
  • Page 34 34
  • Page 35 35
  • Page 36 36
  • Page 37 37
  • Page 38 38
  • Page 39 39
  • Page 40 40
  • Page 41 41
  • Page 42 42
  • Page 43 43
  • Page 44 44
  • Page 45 45
  • Page 46 46

Godex EZ2050 User manual

Category
Label printers
Type
User manual
This manual is also suitable for

Godex EZ2050 is a versatile barcode printer that offers both thermal transfer printing, using a ribbon to transfer ink to various materials, and direct thermal printing, which uses heat to print on specially coated paper. With its 203 dpi resolution and print speed of up to 5 inches per second, the EZ2050 can produce clear and legible labels, tags, and receipts. It features a compact design, making it suitable for space-constrained environments, and is easy to set up and use with its intuitive operator panel and user-friendly software.

Ask a question and I''ll find the answer in the document

Finding information in a document is now easier with AI