Page is loading ...

SERVICE MANUAL
HOSHIZAKI
DISHWASHER
JWE-2400CUA-L-25B
JWE-2400CUA-R-25B
NO. J002-794
ISSUED: APR. 1, 2011
REVISED: SEP. 6, 2011
MODEL

IMPORTANT
Only qualifi ed service technicians should install, service, and maintain the
unit. No service or maintenance should be undertaken until the technician
has thoroughly read this Service Manual. Failure to service and maintain
the equipment in accordance with this manual may adversely affect safety,
performance, component life, and warranty coverage.
Hoshizaki provides this manual primarily to assist qualifi ed service technicians in the
maintenance and service of the unit.
Should the reader have any questions or concerns which have not been satisfactorily
addressed, please call, write, or send an e-mail message to the Hoshizaki Technical
Support Department for assistance.
HOSHIZAKI AMERICA, INC.
618 Highway 74 South
Peachtree City, GA 30269
Attn: Hoshizaki Technical Support Department
Phone: 1-800-233-1940 Technical Support
(770) 487-2331
Fax: 1-800-843-1056
(770) 487-3360
E-mail: [email protected]
Web Site: www.hoshizaki.com
NOTE: To expedite assistance, all correspondence/communication MUST include the
following information:
• Model Number
• Serial Number
• Complete and detailed explanation of the problem.

IMPORTANT
This manual should be read carefully before the unit is serviced or maintenance
operations are performed. Only qualifi ed service technicians should install,
service, and maintain the unit. Read the warnings contained in this booklet
carefully as they give important information regarding safety. Please retain this
booklet for any further reference that may be necessary.
CONTENTS
I. Specifi cations ------------------------------------------------------------------------------------------------ 1
A. Specifi cation Sheet ------------------------------------------------------------------------------------- 1
1. JWE-2400CUA-L-25B ------------------------------------------------------------------------------ 1
2. JWE-2400CUA-R-25B ------------------------------------------------------------------------------ 2
B. Nameplate Rating --------------------------------------------------------------------------------------- 3
C. Dimensions/Connections ------------------------------------------------------------------------------ 4
1. JWE-2400CUA-L-25B ------------------------------------------------------------------------------ 4
2. JWE-2400CUA-R-25B ------------------------------------------------------------------------------ 5
II. General Information ---------------------------------------------------------------------------------------- 6
A. Construction ---------------------------------------------------------------------------------------------- 6
1. Dishwasher -------------------------------------------------------------------------------------------- 6
2. Booster Tank ------------------------------------------------------------------------------------------ 7
3. Control Box -------------------------------------------------------------------------------------------- 8
B. Functions -------------------------------------------------------------------------------------------------- 9
1. Increasing Rinse Water Flow Rate -------------------------------------------------------------- 9
C. Sequence of Operation -------------------------------------------------------------------------------- 9
1. Auto Fill Cycle ----------------------------------------------------------------------------------------- 9
2. Ready Cycle (Unit Inactive) ----------------------------------------------------------------------10
3. Wash Cycle/Rinse Cycle --------------------------------------------------------------------------10
4. Table Limit Switch -----------------------------------------------------------------------------------11
5. Emergency Stop Button ---------------------------------------------------------------------------11
6. Drain----------------------------------------------------------------------------------------------------11
D. Sequence of Operation Flow Chart ----------------------------------------------------------------12
E. Timing Chart ---------------------------------------------------------------------------------------------13
1. Auto Fill Cycle ----------------------------------------------------------------------------------------13
2. Wash Cycle/Rinse Cycle --------------------------------------------------------------------------14
F. Control Board and Operation Board ---------------------------------------------------------------15
1. Control Board Location ----------------------------------------------------------------------------15
2. Control Board Layout ------------------------------------------------------------------------------16
3. Control Board Diagram ----------------------------------------------------------------------------17
4. Operation Panel Layout ---------------------------------------------------------------------------18
5. Features -----------------------------------------------------------------------------------------------18
6. Controls, Adjustments, and Lamps -------------------------------------------------------------18
7. Service Menu and Error Log ---------------------------------------------------------------------19
8. Temperature Display -------------------------------------------------------------------------------21
9. Error Codes ------------------------------------------------------------------------------------------21
10. Buzzer -------------------------------------------------------------------------------------------------21
11. Operation Time Display ----------------------------------------------------------------------------22
i

12. Special Modes ---------------------------------------------------------------------------------------22
III. Service Diagnosis ----------------------------------------------------------------------------------------24
A. Diagnostic Procedure ---------------------------------------------------------------------------------24
B. Error Codes ----------------------------------------------------------------------------------------------26
1. Error Code Table ------------------------------------------------------------------------------------26
2. Error Code Log --------------------------------------------------------------------------------------27
3. Error Code Details ----------------------------------------------------------------------------------28
C. Service Flow Charts -----------------------------------------------------------------------------------41
1. Unit Will Not Start -----------------------------------------------------------------------------------41
2. Dishes Not Clean -----------------------------------------------------------------------------------43
3. Inadequate Rinse -----------------------------------------------------------------------------------45
4. Dishwasher Will Not Start Wash/Rinse Cycle -----------------------------------------------46
5. No or Inadequate Detergent/Rinse Aid Supply ----------------------------------------------47
6. Wash Tank Water Boils ----------------------------------------------------------------------------47
7. Wash Tank Water Not Draining ------------------------------------------------------------------48
D. Float Switch Check and Cleaning ------------------------------------------------------------------49
1. Float Switch Check ---------------------------------------------------------------------------------49
2. Float Switch Cleaning ------------------------------------------------------------------------------49
E. Thermistor Check --------------------------------------------------------------------------------------50
IV. Removal and Replacement of Components -------------------------------------------------------51
A. Removal of Panels -------------------------------------------------------------------------------------51
B. Removal and Replacement of Wash Pump Motors -------------------------------------------51
C. Removal and Replacement of Rinse Pump Motor ---------------------------------------------52
D. Removal and Replacement of Gear Motor ------------------------------------------------------55
E. Removal and Replacement of Conveyor ---------------------------------------------------------56
F. Removal and Replacement of Crankshaft --------------------------------------------------------57
G. Removal and Replacement of Control Box ------------------------------------------------------58
H. Removal and Replacement of Thermistor -------------------------------------------------------58
I. Removal and Replacement of Control Board or Operation Board --------------------------59
1. Control Board ----------------------------------------------------------------------------------------59
2. Operation Board -------------------------------------------------------------------------------------60
J. Removal and Replacement of Heater -------------------------------------------------------------61
K. Removal and Replacement of Float Switch -----------------------------------------------------62
L. Removal and Replacement of Thermostat -------------------------------------------------------63
V. Cleaning and Maintenance Instructions -------------------------------------------------------------64
A. Daily Maintenance -------------------------------------------------------------------------------------64
B. Weekly Maintenance ----------------------------------------------------------------------------------69
1. Heater --------------------------------------------------------------------------------------------------69
2. Exterior ------------------------------------------------------------------------------------------------69
C. Monthly Maintenance ---------------------------------------------------------------------------------69
1. Water Supply Line ----------------------------------------------------------------------------------69
D. Descaling (As Required) -----------------------------------------------------------------------------70
E. Shutdown -------------------------------------------------------------------------------------------------70
F. Long Storage, Relocation, Disposal, Transfer ---------------------------------------------------72
VI. Operating Instructions -----------------------------------------------------------------------------------72
VII. Technical Information -----------------------------------------------------------------------------------73
A. Water Circuit ---------------------------------------------------------------------------------------------73
B. Wiring Diagram -----------------------------------------------------------------------------------------74
ii

Important Safety Information
Throughout this manual, notices appear to bring your attention to situations which could
result in death, serious injury, or damage to the unit.
WARNING
Indicates a hazardous situation which could result in death or
serious injury.
NOTICE
Indicates a situation which could result in damage to the unit or
property.
IMPORTANT
Indicates important information about the use and care of the
unit.
WARNING
This product should be destined only to the use for which it has been expressly
conceived. Any other use should be considered improper and therefore
dangerous. The manufacturer cannot be held responsible for injury or damage
resulting from improper, incorrect, and unreasonable use.
To reduce the risk of death, electric shock, serious injury, or fi re, follow
basic precautions including the following:
• Only qualified service technicians should install, service, and maintain the
unit.
• Electrical connection must be hard-wired and must meet national, state, and
local electrical code requirements. Failure to meet these code requirements
could result in death, electric shock, serious injury, fi re, or severe damage to
equipment.
• This unit requires independent power supplies for the dishwasher and for the
booster tank. See the nameplate for proper voltage and breaker/fuse sizes.
Failure to use proper breakers or fuses can result in tripped breakers, blown
fuses, or damage to existing wiring. This could lead to heat generation or fi re.
• THIS UNIT MUST BE GROUNDED. Failure to properly ground this unit could
result in death or serious injury.
• Use the “ON/OFF” button on the operation panel to turn off the unit, then turn
off the dishwasher and booster tank power supplies before servicing. Lockout/
Tagout to prevent the power supplies from being turned back on inadvertently.
• Do not make any alterations to the unit. Alterations could result in electric
shock, injury, fi re, or damage to the unit.
• To avoid possible burns and spills, be sure to drain the wash tank and internal
booster tank and let the components cool before servicing. When draining the
internal booster tank, wait until the water temperature falls below 104°F (40°C).
• When disassembling components that have been in contact with detergent,
wear rubber gloves and goggles. Before starting disassembly, thoroughly
read the detergent safety instructions. Contact with skin may cause irritation
and contact with eyes may cause blindness.
• When using an acidic descaling cleaner, wear rubber gloves and goggles.
Contact with skin may cause irritation, and contact with eyes may cause
blindness. Do not use or mix with a dishwashing detergent. Some detergents
may generate toxic chlorine gas.
iii

1
I. Specifi cations
A. Specifi cation Sheet
1. JWE-2400CUA-L-25B
DISHWASHER SIDE BOOSTER SIDE
3 phase 3-wire 208-230V/60Hz (±10%) /
2 power supply lines
㩷
208V : 18.4kVA(51.1A)
230V : 22.1kVA(55.5A)
208V : 20.6kVA(57.2A)
230V : 25.3kVA(63.5A)
Max Running 51.2A
Rated Motor 9.0A
Max Running 63.3A
26.0A
Max 19.86kW
Rated Motor 3.06kW
Power Factor 84%
Max 25.20kW
AC SUPPLY VOLTAGE
POWER SUPPLY CAPACITY
AMPERAGE
STARTING AMPERAGE
ELECTRICAL COMSUMPTION
HEATER
16.80kW(230V) 25.20kW(230V)
RACK SIZE
NUMBER OF LARGE DISHES / RACK
CAPACITY
WATER COMSUMPTION
PASSING HEIGHT
DIRECTION OF OPERATION
19-3/4" × 19-3/4"(500 × 500mm)
16 plates (9.1” DIA)
240/200/160racks/hour
㩷
adjustable in 3 steps (rotary switch)
114Gal/hour(432L/hour), 0.48 Gal/rack(1.8L/rack) - at 240rack/hour
20.5" (520mm)
Left to Right
OUTSIDE DIMENSIONS
EXTERIOR
DOOR
LEG
W57.3" × D27.6" × H58.1" (W1,455 × D700 × H1,475mm)
Stainless Steel
Vertically Sliding Service Panel(Opening:W25.6" × H18.9")
Stainless Steel Adjustable 9.4" - 11.0"
Upper and Lower Fixed Spray
Wash 1HP x 2, Rinse 0.134HP
Draw Out Overflow Pipe, Overflow Drain
Rack Detection (Wash/Rinse)
Residual Heat Drying
Filter Collection
Not Provided
Wash Water Temperature / Rinse Water Temperature (selectable by switch)
Ready, Auto Fill, Wash, Error Code
27.2Gal (103L)
Automatic Hot Water Supply by
Microprocessor Control
Wash: 160ºF (71ºC) min.
Thermistor Control: 163ºF(73
㩷
C) – 168
㩷㪝
(76
C)
12.4Gal (47L)
Automatic Hot Water Supply by
Water Valve
Rinse: 180ºF (82ºC) min.
Thermistor Control: 182ºF(83ºC)-185ºF (85ºC)
WASH SYSTEM ,RINSE SYSTEM
PUMP
DRAIN SYSTEM
START
DRY SYSTEM
REFUSE DISPOSAL
DETERGENT
DISPLAY
TANK CAPACITY
HOT WATER SUPPLY
TEMPERATURE CONTROL
CONNECTION – WATER SUPPLY
– DRAIN
Inlet: 3/4"FPT
Outlet: 1-1/2"MPT
CONTROL Microprocessor control
Water Level Switch,
Bimetal Thermostat (Manual - Reset),
Thermistor (Auto - Reset)
Float Switch,
Bimetal Thermostat (Manual - Reset),
Thermistor (Auto - Reset)
BOIL – DRY PROTECTION
SAFETY SYSTEM
Service Panel Switch, Emergency Stop by Microprocessor Control
Table Limit Switch, Emergency Stop Button, Conveyor Overload Protector
WEIGHT Net 430lb (195kg) / Gross 584lb (265kg)
PACKAGE
Carton + Crate
W62.6"×D32.9"×H65.9" (W1,590mm ×D 835mm × 1,675mm)
CERTIFICATION
NSF ANSI-3, ETL, cETL, Energy Star
ACCESSORIES-SUPPLIED
Universal rack (19-3/4" x 19-3/4"), Instruction manual, Installation manual
Maintenance sheet, Curtain(L), Curtain(S) x 2, Shaft - curtain(L), Shaft - curtain (S) x 2
Guard(L), Guard(R), Hook - Drain, Table limit Switch, Upper wash spray arm,
Operation box assembly, Cable cover, Inlet water strainer & Packing
ACCESSORIES-REQUIRED Universal rack (addition), Ventilation hoods x 2, Drain Tempering Kit
OPERATION CONDITIONS
Ambient Temperature: 41 - 95ºF (5ºC - 35ºC), Voltage Range: Rated Voltage ±10%
Recommends Water Hardness : 4gpg (grains per gallon) (68.5ppm) or less
Water Supply Temperature: 110 - 167ºF (43ºC - 75ºC) ( Recommends 140 ºF (60ºC))
Water Supply Pressure (Gauge Static Pressure): 10 - 70PSIG (0.07 - 0.48 MPa)
Exhaust Requirements : 200CFM(Entrance End),400CFM(Discharge End)
* The rated properties are based on measurements at ambient temperature of 86ºF (30ºC) according to the Technical
Requirements for Electrical Appliances.
* We reserve the right to make changes in specifications and design without prior to notice.

2
2. JWE-2400CUA-R-25B
DISHWASHER SIDE BOOSTER SIDE
3 phase 3-wire 208-230V/60Hz (±10%) /
2 power supply lines
㩷
208V : 18.4kVA(51.1A)
230V : 22.1kVA(55.5A)
208V : 20.6kVA(57.2A)
230V : 25.3kVA(63.5A)
Max Running 51.2A
Rated Motor 9.0A
Max Running 63.3A
26.0A
Max 19.86kW
Rated Motor 3.06kW
Power Factor 84%
Max 25.20kW
AC SUPPLY VOLTAGE
POWER SUPPLY CAPACITY
AMPERAGE
STARTING AMPERAGE
ELECTRICAL COMSUMPTION
HEATER
16.80kW(230V) 25.20kW(230V)
RACK SIZE
NUMBER OF LARGE DISHES / RACK
CAPACITY
WATER COMSUMPTION
PASSING HEIGHT
DIRECTION OF OPERATION
19-3/4" × 19-3/4"(500 × 500mm)
16 plates (9.1” DIA)
240/200/160racks/hour
㩷
adjustable in 3 steps (rotary switch)
114Gal/hour(432L/hour), 0.48 Gal/rack(1.8L/rack) - at 240rack/hour
20.5" (520mm)
Right to Left
OUTSIDE DIMENSIONS
EXTERIOR
DOOR
LEG
W57.3" × D27.6" × H58.1" (W1,455 × D700 × H1,475mm)
Stainless Steel
Vertically Sliding Service Panel(Opening:W25.6" × H18.9")
Stainless Steel Adjustable 9.4" - 11.0"
Upper and Lower Fixed Spray
Wash 1HP x 2, Rinse 0.134HP
Draw Out Overflow Pipe, Overflow Drain
Rack Detection (Wash/Rinse)
Residual Heat Drying
Filter Collection
Not Provided
Wash Water Temperature / Rinse Water Temperature (selectable by switch)
Ready, Auto Fill, Wash, Error Code
27.2Gal (103L)
Automatic Hot Water Supply by
Microprocessor Control
Wash: 160ºF (71ºC) min.
Thermistor Control: 163ºF(73
㩷
C) – 168
㩷㪝
(76
C)
12.4Gal (47L)
Automatic Hot Water Supply by
Water Valve
Rinse: 180ºF (82ºC) min.
Thermistor Control: 182ºF(83ºC)-185ºF (85ºC)
WASH SYSTEM ,RINSE SYSTEM
PUMP
DRAIN SYSTEM
START
DRY SYSTEM
REFUSE DISPOSAL
DETERGENT
DISPLAY
TANK CAPACITY
HOT WATER SUPPLY
TEMPERATURE CONTROL
CONNECTION – WATER SUPPLY
– DRAIN
Inlet: 3/4"FPT
Outlet: 1-1/2"MPT
CONTROL Microprocessor control
Water Level Switch,
Bimetal Thermostat (Manual - Reset),
Thermistor (Auto - Reset)
Float Switch,
Bimetal Thermostat (Manual - Reset),
Thermistor (Auto - Reset)
BOIL – DRY PROTECTION
SAFETY SYSTEM
Service Panel Switch, Emergency Stop by Microprocessor Control
Table Limit Switch, Emergency Stop Button, Conveyor Overload Protector
WEIGHT Net 430lb (195kg) / Gross 584lb (265kg)
PACKAGE
Carton + Crate
W62.6"×D32.9"×H65.9" (W1,590mm ×D 835mm × 1,675mm)
CERTIFICATION
NSF ANSI-3, ETL, cETL, Energy Star
ACCESSORIES-SUPPLIED
Universal rack (19-3/4" x 19-3/4"), Instruction manual, Installation manual
Maintenance sheet, Curtain(L), Curtain(S) x 2, Shaft - curtain(L), Shaft - curtain (S) x 2
Guard(L), Guard(R), Hook - Drain, Table limit Switch, Upper wash spray arm,
Operation box assembly, Cable cover, Inlet water strainer & Packing
ACCESSORIES-REQUIRED Universal rack (addition), Ventilation hoods x 2, Drain Tempering Kit
OPERATION CONDITIONS
Ambient Temperature: 41 - 95ºF (5ºC - 35ºC), Voltage Range: Rated Voltage ±10%
Recommends Water Hardness : 4gpg (grains per gallon) (68.5ppm) or less
Water Supply Temperature: 110 - 167ºF (43ºC - 75ºC) ( Recommends 140 ºF (60ºC))
Water Supply Pressure (Gauge Static Pressure): 10 - 70PSIG (0.07 - 0.48 MPa)
Exhaust Requirements : 200CFM(Entrance End),400CFM(Discharge End)
* The rated properties are based on measurements at ambient temperature of 86ºF (30ºC) according to the Technical
Requirements for Electrical Appliances.
* We reserve the right to make changes in specifications and design without prior to notice.

3
B. Nameplate Rating
For certifi cation marks, see the nameplate on the dishwasher.
We reserve the right to make changes in specifi cations and design without prior notice.

4
C. Dimensions/Connections
1. JWE-2400CUA-L-25B
Units: mm [in.]

5
2. JWE-2400CUA-R-25B
Units: mm [in.]

6
II. General Information
A. Construction
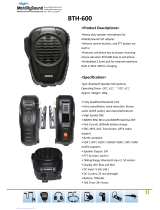
1. Dishwasher
The illustration below shows JWE-2400CUA-L-25B (left-to-right rack fl ow).
Operation Panel
Emergency Stop Button
Rinse Spray Arm (stationary)
Rinse Start Switch
Wash Start Switch
Conveyor
Table Limit Switch
Wash Spray Arm (stationary)
Service Panel Switch
Booster Tank
Water Valve
Backup Water
Level Float Switch
Water Level Float Switch
Water Level Safety
Float Switch
Water Level Sensor
Booster Tank Thermistor
Booster Tank Heater
Rinse Pump
Wash Pump
(Upper/Lower Spray Arm)
Wash Tank Thermistor
Wash Tank Heater
Wash Tank (26 gallons)
Conveyor Motor
Rack Flow
Vertically Sliding
Service Panel

7
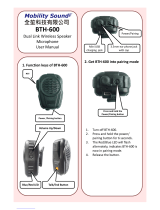
2. Booster Tank
Top View
Front View
Sheathed Heater [H7 - 15]
Hot Water Outlet Pipe
Overfl ow Pipe
Thermostat Plate
Inlet Water
Valve [WV]
Inlet Pipe
Thermal Protector [TH7 - 12]
(heater boil dry protection)
Water Level Float Switch [FS1]
(downward end)
Backup Water Level Float Switch [FS2]
(upward end)
Water Level Safety Float Switch [FS3]
(downward end)
Thermistor [TH2]
(hot water temperature control)
Strainer
Drain Hose
Band Heater
Thermal Protector [TH14]

8
3. Control Box
Control Board
Fan MotorFan
Terminal Block
TB1: For Dishwasher
TB2: For Booster Tank
Conveyor Speed
Switch
Relay
X10: Rinse PM Control
X11: Service Panel Switch
X12: Phase Reversal Relay
X13: Booster Tank Water Valve
X14: Conveyor Drive Signal
X15: Booster Tank Heater Control Relay
Magnetic Contactor
(Lower Wash Spray Arm PM)
Magnetic Contactor
(Upper Wash Spray Arm PM)
Voltage Tap Switch
Magnetic Contactor
MC1, 2: Wash Tank Heater Control
(MC1: right, MC2: left)
Inverter
* NOTICE: To prevent failure, do
not change settings.
Terminal Block
TB3: Detergent/Rinse Aid Feeder
Control Transformer
(Control Board)
Phase Reversal Relay
Main Transformer
(Control Supply)
Magnetic Contactor
MC5 - 7: Booster Tank Heater Contactors
(MC5: upper, MC6: lower left, MC7: lower
right)
Buzzer

9
B. Functions
1. Increasing Rinse Water Flow Rate
Upper Rinse Spray Arm
The rinse water fl ow rate is factory adjusted to 1.90 gal/min
(7.2 L/min). To increase the fl ow rate to 3.17 gal/min (12 L/
min), follow the steps below. Hot water supply of at least
3.44 gal/min (13 L/min) and 113°F (45°C) will be required.
Nut
Clean Pipe
Lower Rinse
Spray Arm
Spacer
1) Remove the upper and lower rinse spray arms.
2) Loosen the clean pipe nut, and remove the clean pipe.
3) Remove the spacer (with 4.5 mm DIA hole) from the nut at the unit side.
4) Replace the clean pipe and the upper and lower rinse spray arms in their correct positions.
C. Sequence of Operation
The steps in the sequence are as outlined below.
1. Auto Fill Cycle
"AUTO FILL" lamp fl ashing and "RINSE TEMP." or "WASH TEMP." lamp on.
If BT WLF/S is open when the "ON/OFF" button is pressed, WV energizes after BT auto fi ll
delay time (factory default: 10 seconds).
When BT WLF/S closes, WV de-energizes, the "AUTO FILL" lamp fl ashes and the auto fi ll
cycle starts.
RPM energizes for length of time set by the auto fi ll cycle rinse time setting (factory default:
13 minutes). For details, see "Auto Fill Cycle Rinse Time" (service menu item 03) in "II.F.7.b)
Service Menu Chart."
At the end of the auto fi ll cycle, there is a 5-second dwell time. CB checks WT WLS. If WT
WLS is closed, BZ beeps, the "AUTO FILL" lamp goes off and the "READY" lamp comes
on. If WT WLS is open, BZ beeps continuously, the "AUTO FILL" lamp goes off and "A1"
fl ashes in the display. For details, see "III.B.3.a) Auto Fill Error (A1)."
If the BT water level goes down and BT WLF/S opens during the auto fill cycle, WV
energizes after BT auto fi ll delay time (factory default: 10 seconds). For adjustment of this
delay time, see "Booster Tank Auto Fill Delay Time" (service menu item 08) in "II.F.7.b)
Service Menu Chart." If delay time is set shorter, WV energizes/de-energizes frequently
and BT may not supply hot water of proper temperature.
If SP is opened during the auto fi ll cycle, SPS opens, RPM de-energizes. The "AUTO FILL"
lamp keeps flashing and the rinse cycle time keeps counting down. When SPS closes
again, RPM energizes.
If WLS is closed when the "ON/OFF" button is pressed, the "READY" lamp comes on and
the unit is ready to start.
Note:
1. If SP is opened during the auto fi ll cycle, RPM de-energizes to stop hot water supply.
If SP is left open for a long time, WT may not fi ll by the end of the auto fi ll cycle. In this
case, WT WLS opens when the unit starts, and the supplementary fi ll cycle begins.
2. WTH is energized when WT WLS closes during the auto fi ll cycle.
3. BTH is energized during the auto fi ll cycle if WLSF/S is closed.

10
4. If BT WLF/S fails, BT BUWLF/S assumes control. If BT BUWLF/S remains closed for 1
minute, o1 or o2 error appears in the display. For details, see "III.B. Error Codes."
5. The wash/rinse start switch is inactive during the auto fi ll cycle.
2. Ready Cycle (Unit Inactive)
"READY" lamp and "RINSE TEMP." or "WASH TEMP." lamp on.
WT WLS closed. After a rinse cycle, RPM de-energizes, and the "READY" lamp comes on.
WTH energizes when WT water temperature is at the wash temperature setpoint or
lower. WTH de-energizes when WT water temperature is 5°F (3°C) above the setpoint.
For details, see "Wash Temperature Setpoint" (service menu item 04) in "II.F.7.b) Service
Menu Chart."
BTH energizes when BT water temperature is 3°F (2°C) below the rinse temperature
setpoint or lower. BTH de-energizes when BT water temperature reaches the setpoint.
WV energizes/de-energizes when BT WLF/S opens/closes. For details, see "Rinse
Temperature Setpoint" (service menu item 05) in "II.F.7.b) Service Menu Chart."
Note:
1. The thermistors control WT and BT water temperatures.
2. If one of the thermistors has an open or short circuit, WTH or BTH de-energizes and an
error code appears in the display.
3. WTH and BTH are controlled regardless of SPS operation.
3. Wash Cycle/Rinse Cycle
"WASH" lamp and "RINSE TEMP." or "WASH TEMP." lamp on.
When a rack is loaded from the wash compartment entrance and the wash start switch
closes, WPM energizes, power is supplied to DFT and the "WASH" lamp comes on. WPM
draws water from WT and sends it through the wash spray arms. The upper spray arm
WPM starts fi rst, followed by the lower spray arm WPM. Then, the conveyor starts to move
the rack. After the wash start switch opens and the extended wash cycle time (factory
default: 30 seconds) has expired, WPM de-energizes and power is cut to DFT. For details,
see "Extended Wash Cycle Time" (service menu item 01) in "II.F.7.b) Service Menu Chart."
When the rinse start switch closes, RPM energizes and power is supplied to RFT. RPM
draws water from BT and sends it through the rinse spray arms. Rinse aid is fed into the
rinse water line and sprayed from the rinse spray arms together with rinse water. Any
excess water in WT drains through the overfl ow pipe. After the rinse start switch opens
and the extended rinse cycle time (factory default: 15 seconds) has expired, RPM de-
energizes, power is cut to RFT, the "WASH" lamp goes off and the "READY" lamp comes
on. For details, see "Extended Rinse Cycle Time" (service menu item 02) in "II.F.7.b)
Service Menu Chart."
After both WPM and RPM de-energize, the conveyor stops. If SP is opened during
operation, SPS opens, WPM and RPM de-energize and the conveyor stops. If the wash/
rinse start switch is closed when SPS closes, WPM and RPM energize and the conveyor
restarts.
Note:
1. If WT WLS opens after WPM energizes, WPM de-energizes and RPM energizes for
the supplementary fi ll cycle time (factory default: 450 seconds) to supply hot water into

11
WT. The conveyor does not start during the supplementary fi ll cycle. "A3" appears in the
display and the "AUTO FILL" lamp fl ashes. BZ beeps three times only at the beginning.
If WT WLS is still open after the supplementary fi ll cycle, another cycle starts. If WT
WLS still does not close, "A3" appears in the display, BZ beeps and the unit shuts down.
For adjustment of the supplementary fi ll cycle time, see "Supplementary Fill Cycle Time"
(service menu item 07) in "II.F.7.b) Service Menu Chart." For details, see "III.B.3.c)
Wash Tank Water Level Error (A3)."
2. If WT WLS and the wash start switch are closed after RPM runs for the supplementary
fi ll cycle time, WPM energizes and the conveyor starts.
3. If SP is opened and closed during operation and the wash/rinse start switch is open, the
unit does not resume operation. Load another rack to close the wash start switch. The
unit resumes operation if SP is closed during the extended wash/rinse cycle time.
4. Table Limit Switch
If a rack reaches the end of the clean dishtable and actuates TLS lever (TLS closed),
WPM and RPM de-energize, the conveyor stops and "L1" appears in the display. When
the rack is removed and TLS lever returns to the original position (TLS open), WPM and
RPM energize and the conveyor starts after 3 seconds unless the wash/rinse start switch
is open.
5. Emergency Stop Button
To shut down the unit in case of emergency, press ESB on top of the unit (wash
compartment exit side). To resume operation, turn ESB clockwise to unlock and press the
"ON/OFF" button on the operation panel.
Note: The unit is inoperative without ESB connected at the time of installation.
6. Drain
This unit does not have a drain valve.
The overfl ow pipe in WT drains excess water from WT. To completely drain WT, remove
the overfl ow pipe.
To drain BT, use the “ON/OFF” button on the operation panel to turn off the unit, then turn
off the dishwasher and booster tank power supplies. Lockout/Tagout to prevent the power
supplies from being turned back on inadvertently.
Use BT drain hose to drain BT. WARNING! To avoid possible burns, allow BT water
temperature to fall below 104°F (40°C) before draining.
Legend: BT–booster tank; BTH–booster tank heater; BUWLF/S–backup water level fl oat
switch; BZ–buzzer; CB–control board; DFT–detergent feeder terminals (detergent
feeder not provided by Hoshizaki); DS–door switch; ESB–emergency stop button;
RFT–rinse aid feeder terminals (rinse aid feeder not provided by Hoshizaki);
RPM–rinse pump motor; SP–service panel; SPS–service panel switch; WLSF/
S–water level safety float switch; TLS–table limit switch; WLF/S–water level
fl oat switch; WLS–water level sensor; WPM–wash pump motor; WT–wash tank;
WTH–wash tank heater; WV–inlet water valve

12
D. Sequence of Operation Flow Chart
Cycle Steps 1. Auto Fill Cycle 2. Ready Cycle (Unit Inactive) 3. Wash Cycle 4. Rinse Cycle
• SPS must be closed for RPM to energize • Cycle started by wash start switch • Cycle started by rinse start switch
• RPM time: (service menu item 03) • SPS must be closed for WPM to energize • SPS must be closed for RPM to energize
• RFT de-energized during Auto Fill Cycle • The upper spray arm WPM starts first,
followed by the lower spray arm WPM
Initial startu
p
be
g
ins here
WT WLS check.
Go to Ready
C
y
cle if closed.
WT WLS closed
WV ener
g
ized/de-ener
g
ized b
y
WTH ener
g
ized when WT water temp. WPM ener
g
ized
(
power supplied to DFT RPM ener
g
ized
(
power supplied to RFT
BT WLF/S at wash temp. setpoint (service menu when WPM energized) when RPM energized)
RPM ener
g
ized
(
time=service menu
item 04) or lower
WPM de-ener
g
ized when WSS opens RPM de-ener
g
ized when RSS opens
item 03)
WTH de-ener
g
ized when WT water
and the extended wash cycle time and the extended rinse cycle time
BTH ener
g
ized when BT WLSF/S
temp. is 5ºF (3ºC) above wash temp. (service menu item 01) has expired (service menu item 02) has expired
closed setpoint (service menu item 04) (power cut to DFT when WPM (power cut to RFT when RPM
WTH ener
g
ized when WT WLS BTH ener
g
ized when BT water temp.
de-energized) de-energized)
closed 3ºF (2ºC) below rinse temp. setpoint
GM ener
g
ized when WPM ener
g
ized GM ener
g
ized while WPM and RPM ener
g
ized
V
FCT ener
g
ized when RPM
(service menu item 05) or lower
WTH ener
g
ized when WT water temp. at WTH ener
g
ized when WT water temp. at
energized
BTH de-ener
g
ized when BT water
wash temp. setpoint (service menu item wash temp. setpoint (service menu item
temp. reaches rinse temp. setpoint 04) or lower 04) or lower
WT WLS open
(service menu item 05)
WTH de-ener
g
ized when WT water temp. WTH de-ener
g
ized when WT water temp.
WV ener
g
ized/de-ener
g
ized b
y
is 5ºF (3ºC) above wash temp. setpoint is 5ºF (3ºC) above wash temp. setpoint
BT WLF/S (service menu item 04) (service menu item 04)
BTH de-ener
g
ized when BT WLSF/S BTH ener
g
ized when BT water temp. 3ºF BTH ener
g
ized when BT water temp. 3ºF
opens (2ºC) below rinse temp. setpoint (service (2ºC) below rinse temp. setpoint (service
WTH de-ener
g
ized when WT WLS
menu item 05) or lower menu item 05) or lower
opens
BTH de-ener
g
ized when BT water temp. BTH de-ener
g
ized when BT water temp.
V
FCT de-ener
g
ized
reaches rinse temp. setpoint (service reaches rinse temp. setpoint (service
menu item 05) menu item 05)
WV ener
g
ized/de-ener
g
ized b
y
BT WLF/S WV ener
g
ized/de-ener
g
ized b
y
BT WLF/S
BTH de-ener
g
ized when BT WLSF/S BTH de-ener
g
ized when BT WLSF/S
opens opens
WTH de-ener
g
ized when WT WLS o
p
ens WTH de-ener
g
ized when WT WLS o
p
ens
V
FCT ener
g
ized when WPM
V
FCT ener
g
ized when WTH ener
g
ized
energized
WPM and GM de-energized
RPM energized
(time=service menu item 07)
"A3"error appears in display.
repeats twice
Dishwasher Sequence Flow Chart
JWE-2400CUA-25B
WT WLS open
Legend:
BT–internal booster tank
BTH–internal booster tank heater
DFT–detergent feeder terminals
GM-gear motor (conveyor)
RFT–rinse aid feeder terminals
RPM–rinse pump motor
RSS-rinse start switch
SPS–service panel switch
VFCT-vent fan control terminals
WLF/S–water level float switch
WLS–water level sensor
WLSF/S-water level safety float switch
WPM–wash pump motor
WSS-wash start switch
WT–wash tank
WTH–wash tank heater
WV–inlet water valve
WT WLS
check
"A1" error appears
in display.
WT WLS
"A3"error appears
in display.
unit shuts down
WT WLS
monitored
during Wash
Cl

13
E. Timing Chart
1. Auto Fill Cycle
"ON/OFF" Button ON
OFF
"AUTO FILL" Lamp ON
OFF
"READY" Lamp ON
OFF
"WASH" Lamp ON
OFF
Service Panel Switch CLOSED
OPEN
Rinse Pump ON
OFF
Water Valve ON
OFF
(Repeat)
Water Level Float Switch CLOSED
OPEN
Backup Water Level
Float Switch
CLOSED
OPEN
Water Level Safety Float
Switch
CLOSED
OPEN
Booster Tank Thermistor Setpoint
Booster Tank Heater ON
OFF
Water Level Sensor CLOSED
OPEN
Buzzer ON
OFF
Wash Tank Heater ON
OFF
* Factory default, adjustable by service men
u
If the booster tank water level float switch does not close after 10 minutes in booster tank auto fill, error code "A2" (booster tank auto
fill error) appears in the display, and the unit shuts down.
Note 3:
Note 1:
Note 2:
Booster tank auto fill delay time (*10 seconds): If auto fill cycle starts immediately after the booster tank water level float switch opens,
the booster tank fills up too soon, and the water valve energizes/de-energizes frequently, resulting in no hot water supply.
After the rinse pump motor de-energizes, there is a 5-second dwell time to stabilize the water level before checking the water level
sensor status.
Auto Fill Cycle Rinse Time (*13 min) 2 gal (7.8L)/min x 13 min = 20 gal (101L)
Approx. 13 gal (50L) water level
Note 2
Note 1 Note 1
Note 3
Booster Tank
Service menu item 03

14
2. Wash Cycle/Rinse Cycle
"ON/OFF" Button ON
OFF
"AUTO FILL" Lamp ON
OFF
"READY" Lamp ON
OFF
"WASH" Lamp ON
OFF
Service Panel Switch CLOSED
OPEN
Water Level Sensor CLOSED
OPEN
Wash Start Switch CLOSED
OPEN
Upper Wash Pump ON
OFF
Lower Wash Pump ON
OFF
Rinse Start Switch CLOSED
OPEN
Rinse Pump ON
OFF
Conveyor (Gear Motor) ON
OFF
Buzzer ON
OFF
Wash Tank Thermistor
Wash Tank Heater ON
OFF
* Factory default, adjustable by service men
u
Setpoint
Note 3: The conve
y
or stops when both the wash pump and the rinse pump de-ener
g
ize
Note 4: The rack handle shape opens the wash/rinse start switch for a moment. But the extended wash/rinse cycle time prevents interruption of the
wash/rinse cycle.
If another rack is loaded durin
g
this time to close the wash start switch, wash c
y
cle continuesNote 1:
Note 2: If another rack is loaded durin
g
this time to close the rinse start switch, rinse c
y
cle continues
Extended Wash Cycle Time (*30 sec)
Note 1
Extended Rinse Cycle Time (*15 sec)
Note 2
Dela
y
Time
(
0.5 sec
)
Load rack
Note 3
Note 4
Note 4
Service menu item 01
Service menu item 02

15
F. Control Board and Operation Board
• A Hoshizaki exclusive solid-state control board and operation board are employed in all
Hoshizaki dishwasher units.
• All models are pretested and factory set.
NOTICE
1. The control board and operation board are fragile; handle very carefully.
2. The control board and operation board contain integrated circuits, which
are susceptible to failure due to static discharge. It is especially important to
touch the metal part of the unit when handling or replacing the control board
or operation board.
3. Do not touch the electronic devices on the control board or operation board
or the back of the control board or operation board.
4. Do not attempt to repair the control board or operation board.
5. Do not short out power supply to test for voltage.
1. Control Board Location
The control box is located behind the front panel. Follow the instructions and warnings for
safe and effi cient operation of the unit.
Control Box
/