Paxar Monarch Pathfinder Ultra Gold User manual
- Category
- Label printers
- Type
- User manual
This manual is also suitable for

TC6037CMUM Rev. AA 2/03 ©2003 Paxar Americas, Inc. All rights reserved.


Table of Contents i
TABLE OF CONTENTS
Introduction..........................................................................................1-1
Features ...........................................................................................1-1
Terms to Know ..................................................................................1-2
Label Sizes .......................................................................................1-3
How this Manual is Organized.............................................................1-4
Getting Started .....................................................................................2-1
Using the Keypad and the Display.......................................................2-2
Using the Function Keys..................................................................2-3
Reading the Display ...........................................................................2-4
Entering a Sample Format ..................................................................2-5
Printing the Sample Format ................................................................2-7
Using the Operator Data Entry Form....................................................2-8
Sample Operator Data Entry Form..................................................2-10
Operator Data Entry Form Page 1 ..................................................2-11
Operator Data Entry Form Page 2 ..................................................2-12
Configuring the Printer ..........................................................................3-1
General Options ................................................................................3-2
Toggle Backlight .............................................................................3-2
Set Print Method .............................................................................3-2
Set Date.........................................................................................3-3
Set Time ........................................................................................3-3
Set I2 of 5 Scan Lengths .................................................................3-3
Reset/Clear Formats .......................................................................3-3
Select Currency ..............................................................................3-4
Set Supply Type .............................................................................3-4
Suppress Warnings .........................................................................3-4
Format Header Options ......................................................................3-5
Generate Fmt Name ........................................................................3-5

ii Table of Contents
Format Text Options ..........................................................................3-5
Use Default Gap .............................................................................3-5
Use Default Color ...........................................................................3-6
Set Default Color ............................................................................3-6
Use Default Character Rotation........................................................3-6
Format Bar Code Options ...................................................................3-7
Use Default UPC Appearance ..........................................................3-7
Set Default UPC Appearance ...........................................................3-7
Use Default Alignment.....................................................................3-8
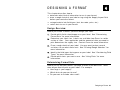
Designing a Format...............................................................................4-1
Design Overview................................................................................4-1
Determining Format Data....................................................................4-1
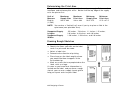
Determining the Print Area .................................................................4-2
Drawing Rough Sketches....................................................................4-2
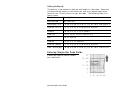
Using Supply Layout Grids .................................................................4-3
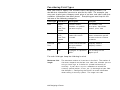
Considering Field Types.....................................................................4-4
Starting the Design Process ...............................................................4-6
Placing Fields on a Format .................................................................4-7
Defining Text Fields ..............................................................................5-1
About Text Fields...............................................................................5-1
Entering a Sample Text Field..............................................................5-6
Printing the Sample Text Format .........................................................5-9
Using a Combo Text Field ................................................................5-10
Entering a Sample Combo Text Field.................................................5-12
Printing the Sample Combo Format ...................................................5-17
Defining Bar Code Fields.......................................................................6-1
About Bar Code Fields .......................................................................6-1
Setting the Appearance ...................................................................6-5
Setting the Density..........................................................................6-6
Entering Simple Bar Code Fields.........................................................6-6
Sample 1: Simple Fixed Bar Code ....................................................6-7
Printing the Simple Fixed Bar Code Format..........................................6-9
Sample 2: Simple Variable Bar Code ..............................................6-10
Printing the Simple Variable Bar Code Format....................................6-13

Table of Contents iii
About Combo Bar Code Fields ..........................................................6-14
Entering a Sample Combo Bar Code Field .........................................6-15
Printing the Sample Combo Bar Code Format ....................................6-22
Bar Code Specifications ...................................................................6-23
UPC Bar Codes ............................................................................6-23
EAN Bar Codes.............................................................................6-24
Code 128 Bar Codes .....................................................................6-25
MSI..............................................................................................6-25
Interleaved 2 of 5 Bar Codes .........................................................6-25
Code 39 Bar Codes .......................................................................6-26
Codabar Bar Codes.......................................................................6-26
Code 93 .......................................................................................6-26
Defining Constant Text Fields................................................................7-1
About Constant Text Fields.................................................................7-1
Entering a Sample Constant Text Field................................................7-5
Printing the Sample Constant Text Format ...........................................7-7
Defining Line Fields ..............................................................................8-1
About Line Fields...............................................................................8-1
Entering a Sample Line Field (Segments) ............................................8-3
Printing the Sample Line (Segment) Format .........................................8-5
Entering a Sample Line Field (Vectors)................................................8-6
Printing the Sample Line (Vector) Format ............................................8-8
Defining Special Fields .........................................................................9-1
About Price and System Date/Time Fields ...........................................9-1
Entering a Sample Price Field.............................................................9-6
Printing the Sample Price Format........................................................9-8
Entering a Sample Date/Time Field ...................................................9-10
Printing the Sample Date/Time Format ..............................................9-13

iv Table of Contents
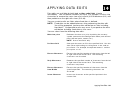
Applying Data Edits ............................................................................10-1
Using Data Edits..............................................................................10-2
Printing the Format .......................................................................10-5
Padding Data................................................................................10-6
Printing the Format .......................................................................10-9
Extracting Characters.................................................................. 10-10
Printing the Format ..................................................................... 10-13
Stripping Characters ................................................................... 10-14
Printing the Format ..................................................................... 10-17
Extracting Characters from the Middle .......................................... 10-18
Printing the Format ..................................................................... 10-21
Inserting Characters.................................................................... 10-22
Printing the Format ..................................................................... 10-27
Make Into Price........................................................................... 10-28
Printing the Format ..................................................................... 10-29
Make Into Shoe Size ................................................................... 10-30
Printing the Format ..................................................................... 10-33
Editing a Format .................................................................................11-1
Copying a Format ............................................................................11-1
Editing a Field .................................................................................11-2
Adding a Field ..............................................................................11-2
Printing the Format .......................................................................11-4
Deleting a Field ............................................................................11-4
Printing the Format .......................................................................11-5
Modifying an Existing Field ............................................................11-6
Printing the Format .......................................................................11-8
Changing Header Information.........................................................11-9
Printing the Format ..................................................................... 11-11
Deleting a Format .......................................................................... 11-12
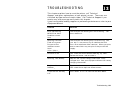
Troubleshooting..................................................................................12-1
Troubleshooting Information .............................................................12-2
If You Receive an Error Message ...................................................12-2
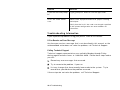
Calling Technical Support..............................................................12-2

Table of Contents v
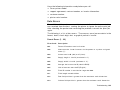
Data Errors .....................................................................................12-3
Format Errors (1 - 99) ...................................................................12-3
Batch Errors (100 - 199) ................................................................12-5
Option Errors (200 - 249)...............................................................12-5
Online Configuration Errors (250 - 299) ..........................................12-6
Check Digit Errors (300 - 324)........................................................12-8
General Packet Errors (400 - 435)..................................................12-8
Data Formatting Failures ..................................................................12-9
Machine Faults .............................................................................. 12-10
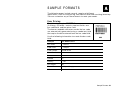
Sample Formats .................................................................................. A-1
Item Pricing...................................................................................... A-1
Item Identification ........................................................................... A-12
Receiving/Inventory ........................................................................ A-19
Using Fonts......................................................................................... B-1
Monospaced Font Magnification ......................................................... B-2
Proportional Font Magnification.......................................................... B-3

vi Table of Contents

Introduction 1-1
INTRODUCTION
The Monarch Pathfinder Ultra
Gold
6037™ configurable
printer lets you design custom labels to fit your needs. You can use the
printer for a variety of applications.
♦ Print in-store merchandise marking labels to mark every item in your
store with scannable bar codes for increased data accuracy.
♦ Print shelf labels with the product bar code number, description, and
price.
♦ Print labels for restocking of merchandise. Just scan a bar-coded
product and the printer duplicates the bar code.
♦ Print warehouse carton labels for easy carton sorting.
Features
The flexibility of this printer also provides you with the ability to:
♦ Print a variety of tags ranging from .55 to 4.0 inches in length.
♦ Print numeric, alphanumeric, or special characters. You can print 14
fonts: monospaced or proportionally spaced fonts.
♦ Use 24 different bar codes.
♦ Print horizontally or vertically on the label.
♦ Design data entry prompts for the Operator.
♦ Scan bar codes.
♦ Select different currency symbols for International use.
♦ Print combination fields. This feature allows the Operator to enter data
once, and use it in multiple fields.
1

1-2 Introduction
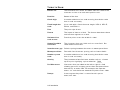
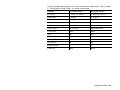
Terms to Know
Barrier bar The horizontal bars above and below I2of5 bar codes used
to ensure a clean scan and avoid partial scans.
Baseline Bottom of the font.
Check digit A number added to a bar code ensuring that the bar code
data is read accurately.
Fixed length bar
code
A bar code with a fixed character length: UPC-A, UPC-E,
EAN-8, and EAN-13.
Font The print style of text.
Format The layout of data on a label. The format determines where
and how data appears on a label.
Horizontal bar
code or text
Data that prints across the width of a label.
Human Readable
characters
The characters that are visible such as a text field. Bar
codes embed characters.
Intercharacter gap Default spacing between characters in monospaced fonts.
Monospaced font Font with fixed character spacing such as Letter Gothic.
Number system
code
A number added to a bar code ensuring that the bar code
data is read accurately.
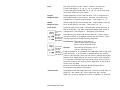
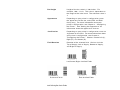
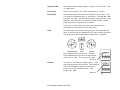
Overlay The placement of one field over another such as a line on
top of a price signifying a price reduction.
79.99
Pad Characters Characters that are added to the left or right of a field
allowing you to fill in empty spaces when the entered data
does not fill an entire field. For example, the Operator
enters “23” and the format automatically adds zeros: 2300.
Prompt A message on the printer’s screen that tells you to
enter/scan data.

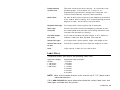
Introduction 1-3
Proportionally
spaced font
Font with variable character spacing – all characters have
different widths. For example, an “i” versus a “w.”
Proportionally spaced fonts include CG Triumvirate, CG
Triumvirate Condensed, and CG Triumvirate Bold.
Quiet Zone An area of white space required at the beginning and end of
a bar code to allow scanning. Also at the beginning/end and
edges of a label. Also know as non-print zone.
Segment line type A line type with a starting point and an end point.
Start/stop
character
Distinct characters used at the beginning and end of each
bar code symbol that provides initial timing references and
indicates the direction of scanning.
Variable length
bar code
A bar code of variable character length: I2 of 5, Code 39,
Codabar, Code 128, MSI, PostNet, and Code 93.
Vector line type A line type with a starting point, angle, and length of line.
Vertical bar code
or text
Data that is rotated and prints down the length of a label.
Void Light area on a label in a bar code or text.
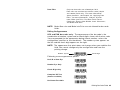
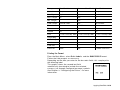
Label Sizes
The printer allows you to print the following label sizes.
Supported Supply
Widths:
1.20 Inches
1.50 Inches
2.00 Inches
Supported Supply Lengths:
.55 inches
.79 inches
1.1 inches
1.5 inches
2.0 inches
3.0 inches
4.0 inches
NOTE: Most of the sample formats in this manual use 2” X 2” labels unless
indicated otherwise.
Call 1-800-543-6650 for more information about the various label sizes and
label types available with this printer.

1-4 Introduction
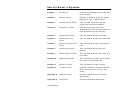
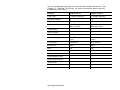
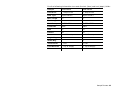
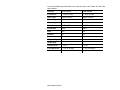
How this Manual is Organized
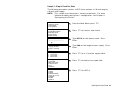
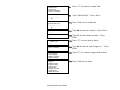
Chapter 1
Introduction
Provides an overview of the printer and
terms to know.
Chapter 2
Getting Started
Provides a checklist to get you started,
keypad tips, and a sample format.
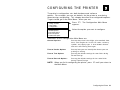
Chapter 3
Configuring the Printer
Tells you how set defaults for your
printer and select print methods.
Chapter 4
Designing a Format
Provides instructions on how to
determine the kind of data you want on a
label and where to place the data.
Chapter 5
Defining Text Fields
Tells you how to design a text field.
Chapter 6
Defining Bar Code
Fields
Tells you how to design a bar code field.
Chapter 7
Defining Constant Text
Fields
Tells you how to design a constant text
field.
Chapter 8
Defining Line Fields
Tells you how to design lines and
borders.
Chapter 9
Defining Special Fields
Tells you how to design time, date, and
price fields.
Chapter 10
Applying Data Edits
Tells you how to pad data, extract data,
and insert it into another field.
Chapter 11
Editing a Format
Tells you how to change a format.
Chapter 12
Troubleshooting
Provides solutions to the most common
errors and provides a list of all error
codes.
Appendix A
Sample Formats
Provides sample formats of various
applications.
Appendix B
Using Fonts
Provides information about fonts.

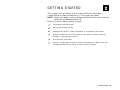
Getting Started 2-1
GETTING STARTED
This chapter tells you how to start using the printer and provides a
sample format to show you how easy it is to create your labels.
NOTE: Before you begin, read the
Equipment Manual
that came with your
printer on the documentation CD.
Use this checklist when creating a format.
3 Load labels into the printer.
3 Charge the battery handle.
3 Configure the printer. Refer to Chapter 3, “Configuring the Printer.”
3 Create a format, which is the layout of your data on a label. Refer to
Chapter 4, “Designing a Format.”
3 Print and test your label.
3 Prepare an Operator Data Entry form for the Operator. Refer to “Using
the Operator Data Entry Form” at the end of this chapter.
2

2-2 Getting Started
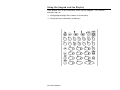
Using the Keypad and the Display
Your printer has an 8-line display and a 48-key keypad. This section
provides tips on
♦ Navigating through the screens on the display
♦ Using the most commonly used keys.

Getting Started 2-3
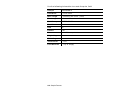
Using the Function Keys
The key combinations on the list below make scrolling and navigating easier.
Key Combination Description
f 1 Turns the backlight on the display on or off.
f 2 Sets the print method.
f 3 Select the currency symbol.
f 4 Battery Level Status
f 5 Exit
f 6 Set the supply type.
f Í Takes you to the beginning of a list. For example, if you
have 11 formats, pressing f Í takes you to format 1.
f Î Takes you to the end of a list. For example, if you have 11
formats, pressing f Î takes you to format 11.
NOTE: See the
Equipment Manual
for information about using special
characters.

2-4 Getting Started
The keys listed below are the most commonly used.
Key Description
b Returns you to the previous screen.
g Moves the cursor the left and deletes the character on the left.
Enter Accepts your selection.
Í,Î Moves the cursor left or right in a data entry field. Í also serves
as Ï and Î also serves as Ð when scrolling through the options
in a menu.
Ï,Ð Scrolls up or down through the options in a menu. When your
selection is highlighted, press Enter.
fÍ,
fÎ
When inside a data entry field, fÍ moves the cursor to the
extreme left (beginning of data) and fÎ moves the cursor to
the extreme right (end of data).
s Enters upper-case alpha mode. Press it a second time to enter
lower-case alpha mode. Pressing it a third time returns to normal
mode.
NOTE: See the
Equipment Manual
for more information.
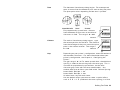
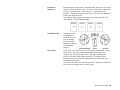
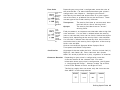
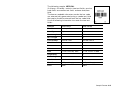
Reading the Display
The icons listed below tell you what data entry mode you are in. No
displayed icons indicate normal mode, where you can enter the characters
pictured on the face of the keys.
If you see You are in
F Function Key Mode.
Ï Upper-case Alpha Mode.
Ð Lower-case Alpha Mode.
C Control Key Mode.
A Alt Key Mode.
NOTE: See the
Equipment Manual
for more information.

Getting Started 2-5
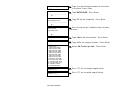
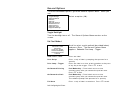
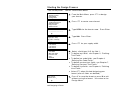
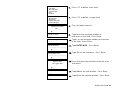
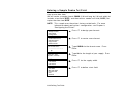
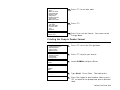
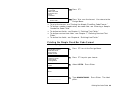
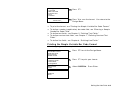
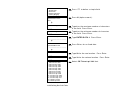
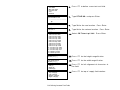
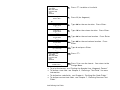
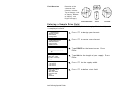
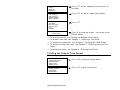
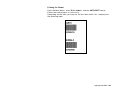
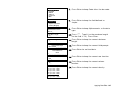
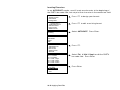
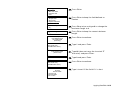
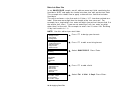
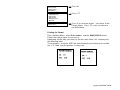
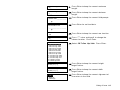
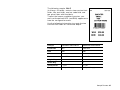
Entering a Sample Format
Turn on the printer. You will see the Main Menu.
- = Main Menu = -
1. Design Formats
2. Print Labels
3. Configuration
1. Press 1 to design your formats.
- = Design Menu = -
1. Create New Format
2. Edit Old Format
3. Copy Format
4. Delete Format
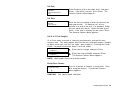
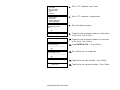
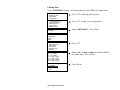
2. Press 1 to create a new format.
Enter Format Name
> _ _ _ _ _ _ _ _ _ _ _ _ _
Ï
3. Type SIZE. Press Enter.
Enter Length of
supply (55 – 400)
(eg. 400 = 4 inches)
> _ _ _
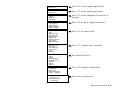
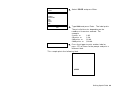
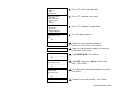
4. Type 200 for a 2-inch long label. Press Enter.
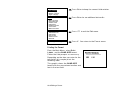
Select Supply Width
1. 1.20 Inches
2. 1.50 Inches
3. 2.00 Inches
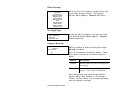
5. Press 3 for the supply width.
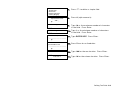
Select Type: Fld #1
1. Text Field
2. Bar Code Field
3. Constant Text
4. Line
5. Finished
6. Press 1 to define a text field.
Select Field Class
1. Simple Field
2. Price Field
3. System Date/Time
4. Combo (Merged)
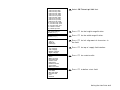
7. Press 1 to define a simple field.
Numeric or
Alpha-Numeric Data?
A/N > _
Ï
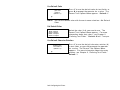
8. Press A (alpha-numeric).
Enter Max. Length
> _ _ _
9. Type 10 as the maximum number of characters
in the field. Press Enter.

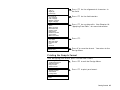
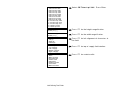
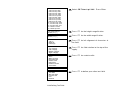
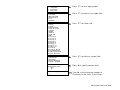
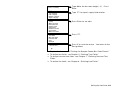
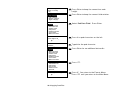
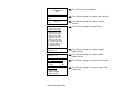
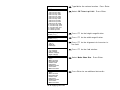
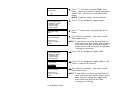
2-6 Getting Started
Enter Min. Length
> _ _ _
10. Type 1 as the minimum number of characters
in the field. Press Enter.
Enter Field Prompt
> _ _ _ _ _ _ _ _ _ _ _ _ _ _ _ _
Ï
11. Type ENTER SIZE. Press Enter.
Enter Fixed Data
Press ENTER if none
> _ _ _ _ _ _ _ _ _ _ _ _ _ _ _ _
Ï
12. Type /TL for the fixed data. Press Enter.
Add fixed data
Before or After
entry chars? B/A
> _
Ï
13. Press A to print the fixed data after the entry
characters.
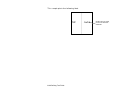
Enter Row #
> _ _ _
14. Type 100 for the row location. Press Enter.
Enter Col. #
> _ _ _
15. Type 10 for the column location. Press Enter.
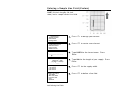
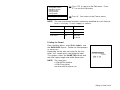
- = Select Font = -
1. CG Trium 6.5 1000
2. CG Trium 8 pt 1001
3. CG Trium 10p 1002
4. CG Trium 12p 1003
5. CG Trium 18 p 1004
6. CG Trium 22p 1005
7. CG TrCon 6.5 1006
8. CG TrCon 8 pt 1007
9. CG TrCon 10p 1008
10. CG TrCon 12p 1009
11. CG TrCon 18p 1010
12. CG TrCon 22p 1011
13. LetGoth 6.5 1012
14. LetGoth 9pt 1013
16. Select CG Trium 8 pt 1001. Press Enter.
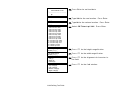
Enter Height Mag for
this font (1-7) > _
17. Press 1 for the height magnification.
Enter Width Mag for
this font (1-7) > _
18. Press 1 for the width magnification.

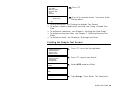
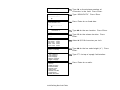
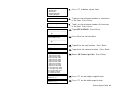
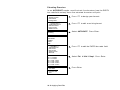
Getting Started 2-7
Set Justification
1. Left (L)
2. Right (E)
3. Center (B)
19. Press 1 for the alignment of characters in
the field.
Top of Field at:
1. Top of Supply
2. Left of Supply
3. Bottom of Supply
4. Right of Supply
20. Press 1 for the field rotation.
Select Edit #1
1. None
2. Make into Price
3. Pad Data Field
4. Extract Chars
5. Strip Chars
6. Extract from Mid
7. Insert Chars
8. Make Shoe Size
21. Press 1 for no data edits. See Chapter 10,
“Applying Data Edits,” for more information.
Select Type:Fld#2
1. Text Field
2. Bar Code Field
3. Constant Text
4. Line
5. Finished
22. Press 5.
Save current
format? Y/N > _
23. Press Y to save the format. You return to the
Design Menu.
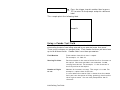
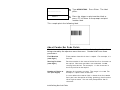
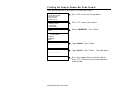
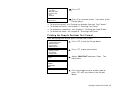
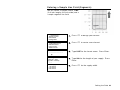
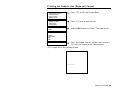
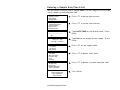
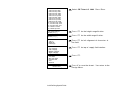
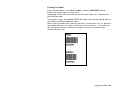
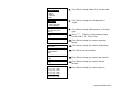
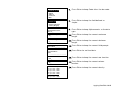
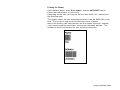
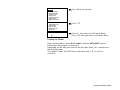
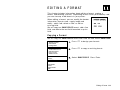
Printing the Sample Format
After designing your format, print it to see how it looks.
- = Design Menu = -
1. Create New Format
2. Edit Old Format
3. Copy Format
4. Delete Format
1. Press b to exit the Design Menu.
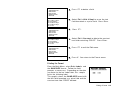
- = Main Menu = -
1. Design Formats
2. Print Labels
3. Configuration
2. Press 2 to print your format.
Select Format
to Print

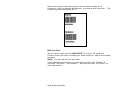
2-8 Getting Started
- = Format Menu = -
SIZE
3. Select SIZE and press Enter.
ENTER SIZE
_ _ _ _ _ _
4. Type XLarge. Press Enter. The label prints.
Printed: 1
5. Press the trigger to print another label or press
b to return to the prompt and print a
different label.
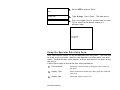
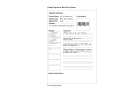
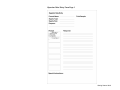
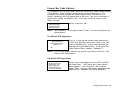
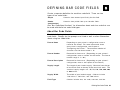
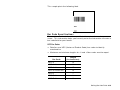
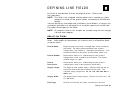
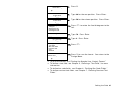
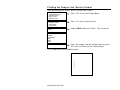
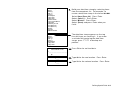
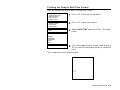
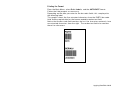
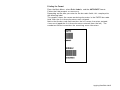
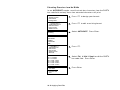
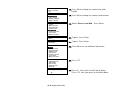
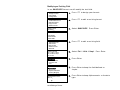
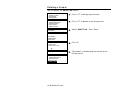
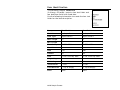
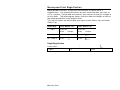
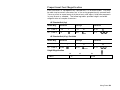
Using the Operator Data Entry Form
After you create a format, fill out the operator data entry form. This form can
be used as an instruction sheet for your operators to follow while they print
labels. Record the data entry prompts that the operator will see when using
the printer.
Follow these steps to record the data entry procedures.
1. Format Name
Enter the Format Name in the upper right corner of
the form.
2. Supply Type
Enter information about the supply type the Operator
must use.
3. Supply Size
Enter the supply size to use.
Page is loading ...
Page is loading ...
Page is loading ...
Page is loading ...
Page is loading ...
Page is loading ...
Page is loading ...
Page is loading ...
Page is loading ...
Page is loading ...
Page is loading ...
Page is loading ...
Page is loading ...
Page is loading ...
Page is loading ...
Page is loading ...
Page is loading ...
Page is loading ...
Page is loading ...
Page is loading ...
Page is loading ...
Page is loading ...
Page is loading ...
Page is loading ...
Page is loading ...
Page is loading ...
Page is loading ...
Page is loading ...
Page is loading ...
Page is loading ...
Page is loading ...
Page is loading ...
Page is loading ...
Page is loading ...
Page is loading ...
Page is loading ...
Page is loading ...
Page is loading ...
Page is loading ...
Page is loading ...
Page is loading ...
Page is loading ...
Page is loading ...
Page is loading ...
Page is loading ...
Page is loading ...
Page is loading ...
Page is loading ...
Page is loading ...
Page is loading ...
Page is loading ...
Page is loading ...
Page is loading ...
Page is loading ...
Page is loading ...
Page is loading ...
Page is loading ...
Page is loading ...
Page is loading ...
Page is loading ...
Page is loading ...
Page is loading ...
Page is loading ...
Page is loading ...
Page is loading ...
Page is loading ...
Page is loading ...
Page is loading ...
Page is loading ...
Page is loading ...
Page is loading ...
Page is loading ...
Page is loading ...
Page is loading ...
Page is loading ...
Page is loading ...
Page is loading ...
Page is loading ...
Page is loading ...
Page is loading ...
Page is loading ...
Page is loading ...
Page is loading ...
Page is loading ...
Page is loading ...
Page is loading ...
Page is loading ...
Page is loading ...
Page is loading ...
Page is loading ...
Page is loading ...
Page is loading ...
Page is loading ...
Page is loading ...
Page is loading ...
Page is loading ...
Page is loading ...
Page is loading ...
Page is loading ...
Page is loading ...
Page is loading ...
Page is loading ...
Page is loading ...
Page is loading ...
Page is loading ...
Page is loading ...
Page is loading ...
Page is loading ...
Page is loading ...
Page is loading ...
Page is loading ...
Page is loading ...
Page is loading ...
Page is loading ...
Page is loading ...
Page is loading ...
Page is loading ...
Page is loading ...
Page is loading ...
Page is loading ...
Page is loading ...
Page is loading ...
Page is loading ...
Page is loading ...
Page is loading ...
Page is loading ...
Page is loading ...
Page is loading ...
Page is loading ...
Page is loading ...
Page is loading ...
Page is loading ...
Page is loading ...
Page is loading ...
Page is loading ...
Page is loading ...
Page is loading ...
Page is loading ...
Page is loading ...
Page is loading ...
Page is loading ...
Page is loading ...
Page is loading ...
Page is loading ...
Page is loading ...
Page is loading ...
Page is loading ...
Page is loading ...
Page is loading ...
Page is loading ...
Page is loading ...
Page is loading ...
Page is loading ...
Page is loading ...
Page is loading ...
Page is loading ...
Page is loading ...
Page is loading ...
Page is loading ...
Page is loading ...
Page is loading ...
Page is loading ...
Page is loading ...
Page is loading ...
Page is loading ...
Page is loading ...
Page is loading ...
Page is loading ...
Page is loading ...
Page is loading ...
Page is loading ...
Page is loading ...
Page is loading ...
Page is loading ...
Page is loading ...
Page is loading ...
Page is loading ...
Page is loading ...
Page is loading ...
Page is loading ...
Page is loading ...
Page is loading ...
Page is loading ...
Page is loading ...
Page is loading ...
Page is loading ...
Page is loading ...
Page is loading ...
Page is loading ...
Page is loading ...
Page is loading ...
Page is loading ...
Page is loading ...
Page is loading ...
Page is loading ...
Page is loading ...
-
 1
1
-
 2
2
-
 3
3
-
 4
4
-
 5
5
-
 6
6
-
 7
7
-
 8
8
-
 9
9
-
 10
10
-
 11
11
-
 12
12
-
 13
13
-
 14
14
-
 15
15
-
 16
16
-
 17
17
-
 18
18
-
 19
19
-
 20
20
-
 21
21
-
 22
22
-
 23
23
-
 24
24
-
 25
25
-
 26
26
-
 27
27
-
 28
28
-
 29
29
-
 30
30
-
 31
31
-
 32
32
-
 33
33
-
 34
34
-
 35
35
-
 36
36
-
 37
37
-
 38
38
-
 39
39
-
 40
40
-
 41
41
-
 42
42
-
 43
43
-
 44
44
-
 45
45
-
 46
46
-
 47
47
-
 48
48
-
 49
49
-
 50
50
-
 51
51
-
 52
52
-
 53
53
-
 54
54
-
 55
55
-
 56
56
-
 57
57
-
 58
58
-
 59
59
-
 60
60
-
 61
61
-
 62
62
-
 63
63
-
 64
64
-
 65
65
-
 66
66
-
 67
67
-
 68
68
-
 69
69
-
 70
70
-
 71
71
-
 72
72
-
 73
73
-
 74
74
-
 75
75
-
 76
76
-
 77
77
-
 78
78
-
 79
79
-
 80
80
-
 81
81
-
 82
82
-
 83
83
-
 84
84
-
 85
85
-
 86
86
-
 87
87
-
 88
88
-
 89
89
-
 90
90
-
 91
91
-
 92
92
-
 93
93
-
 94
94
-
 95
95
-
 96
96
-
 97
97
-
 98
98
-
 99
99
-
 100
100
-
 101
101
-
 102
102
-
 103
103
-
 104
104
-
 105
105
-
 106
106
-
 107
107
-
 108
108
-
 109
109
-
 110
110
-
 111
111
-
 112
112
-
 113
113
-
 114
114
-
 115
115
-
 116
116
-
 117
117
-
 118
118
-
 119
119
-
 120
120
-
 121
121
-
 122
122
-
 123
123
-
 124
124
-
 125
125
-
 126
126
-
 127
127
-
 128
128
-
 129
129
-
 130
130
-
 131
131
-
 132
132
-
 133
133
-
 134
134
-
 135
135
-
 136
136
-
 137
137
-
 138
138
-
 139
139
-
 140
140
-
 141
141
-
 142
142
-
 143
143
-
 144
144
-
 145
145
-
 146
146
-
 147
147
-
 148
148
-
 149
149
-
 150
150
-
 151
151
-
 152
152
-
 153
153
-
 154
154
-
 155
155
-
 156
156
-
 157
157
-
 158
158
-
 159
159
-
 160
160
-
 161
161
-
 162
162
-
 163
163
-
 164
164
-
 165
165
-
 166
166
-
 167
167
-
 168
168
-
 169
169
-
 170
170
-
 171
171
-
 172
172
-
 173
173
-
 174
174
-
 175
175
-
 176
176
-
 177
177
-
 178
178
-
 179
179
-
 180
180
-
 181
181
-
 182
182
-
 183
183
-
 184
184
-
 185
185
-
 186
186
-
 187
187
-
 188
188
-
 189
189
-
 190
190
-
 191
191
-
 192
192
-
 193
193
-
 194
194
-
 195
195
-
 196
196
-
 197
197
-
 198
198
-
 199
199
-
 200
200
-
 201
201
-
 202
202
-
 203
203
-
 204
204
-
 205
205
-
 206
206
-
 207
207
-
 208
208
-
 209
209
-
 210
210
-
 211
211
-
 212
212
-
 213
213
-
 214
214
-
 215
215
-
 216
216


Paxar Monarch Pathfinder Ultra Gold User manual
- Category
- Label printers
- Type
- User manual
- This manual is also suitable for
Ask a question and I''ll find the answer in the document
Finding information in a document is now easier with AI
Related papers
-
Paxar 6035 User manual
-
Paxar Monarch Pathfinder Ultra Silver User manual
-
-
-
-
-
-
-
-
Monarch 9474 User manual
Other documents
-
-
Avery Dennison Monarch 9416 XL User manual
-
-
Avery Dennison 9855 Printer Reference guide
-
Avery 9800 User manual
-
Avery Dennison 6039 User manual
-
-
-
Avery Dennison ADTP2 Reference guide
-
Avery Dennison 9493SNP Reference guide