Page is loading ...

SAFETY INFORMATION
Please read and understand these instructions before attempting to assemble,
install, or operate this product.
INSTALLATION INSTRUCTIONS
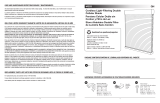
Step 1: Check Package Contents
Before installing your shade, make sure all parts listed below are present. If any
part is missing or damaged, please do not assemble, install, or operate. To
request replacement parts, contact customer service at 1-877-804-5504, Monday
through Friday from 8:30 a.m. to 5:00 p.m. EST.
Contents include:
• Cordless Cellular S
hade
• Mounting Hardware Kit
Mounting Hardware Kit includes:
Mounting Bracket Handle Wood Screw
1
AA
A
BB
CC
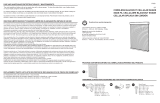
CORDLESS CELLULAR SHADE

Part Quantity
Mounting Bracket 2 (for 20 in. to 36 in. widths)
3 (for 37 in. to 47 in. widths)
4 (for 48 in. to 72 in. widths)
Handle 1
Wood Screw 4 (for 20 in. to 36 in. widths)
6 (for 37 in. to 47 in. widths
8 (for 48 in. to 72 in. widths)
Step 2: Gather Additional Tools Required
The following tools are not included, but will be needed to complete your
installation.
• Measuring tape
• Drill with 3/32-inch bit
• Pencil
• Screwdriver
• Step ladder - optional
Step 3: Install the Mounting Brackets
Estimated Assembly Tim
e: 30 minutes
The shade may be installed either inside or outside the window frame. A
mounting bracket should be positioned on each end of the head rail. Wider
shades that require three or more brackets should be spaced evenly between the
two outermost brackets. Always position the brackets so there is no interference
with cords and mechanisms inside the head rail. The procedure outlined below
will assure proper bracket placement.
1. For outside mounting, clip the mounting (AA) onto the head rail of shade
(A). Hold shade (A) level at the height desired and center it over the
window opening. Mark the exact location of each mounting bracket (AA)
with a pencil. Remove the mounting brackets (AA) from the head rail of
shade (A). Pre-drill the screw holes and then secure bracket (AA) to the
wall or window molding with wood screws (CC).
2. For inside mounting, clip the mounting brackets (AA) onto the head rail of
shade (A). Hold shade (A) in place and make pencil mark at the rear of
ea
ch mounting bracket (AA). Remove the mounting brackets (AA) from
1
2
.
.
.

the head rail. Pre-drill the screw holes and then secure the mounting
bracket (AA) to the wall or window molding with wood screws (CC).
3. Lift the head rail of shade (A) into position such that the inner front edge of
the head rail slides into the slot at the front of each mounting bracket (AA).
Push the head rail upward until the flexible tab at the bottom of each
mounting bracket (AA) snaps onto the back of the head rail. Check
carefully to make sure each mounting bracket (AA) is properly snapped
into place.
Step 4. Attach the Handle
Attach the handle (BB) to the center of the bottom rail of shade (A). Check
carefully to make sure the handle (B) is properly snapped into place.
CLEANING INSTRUCTIONS
The vinyl head rail and bottom rail can be wiped clean with a damp sponge. To
clean the shade fabric, use a feather duster or vacuum lightly using a soft brush
attachment.
2
3
4
3

REPLACEMENT PARTS
If you require replacement parts, contact customer service at 1-877-804-5504,
Monday through Friday from 8:30 a.m. to 5:00 p.m. EST. Please be sure to
provide the following information, if possible:
• The complete model or item number of your product
• A description of the product
• The description of the part needed: AA Mounting Bracket; BB Handle; CC
Wood Screw
ONE-YEAR LIMITED WARRANTY
For a period of one (1) year from the date of purchase, the manufacturer will
replace this window covering with one of equal or superior value, if this window
covering is found to be defective in material or workmanship. To obtain warranty
service, contact our customer service department at 1-877-804-5504. This
warranty does not cover damage of defects caused by or resulting from improper
maintenance, negligent or improper use, abuse, misuse, neglect, accidents, act
of God, alteration, commercial use, installation, removal, or reinstallatio
n.
This warranty is restricted to normal consumer use within the United States and
Canada. MANUFACTURER WILL NOT BE LIABLE FOR INCIDENTAL OR
CONSEQUENTIAL DAMAGES; SOME STATES DO NOT ALLOW THE
EXCLUSION OR LIMITATION OF INCIDENTAL OR CONSEQUENTIAL
DAMAGES, SO THE ABOVE LIMITATION OR EXCLUSION MAY NOT APPLY
TO YOU. This warranty gives you specific legal rights, and you may also have
other rights, which vary from state to state.
QUESTIONS?
Contact customer service at 1-877-804-5504, Monday through Friday from 8:30
a.m. to 5:00 p.m. EST.
Printed in Taiwan
4

FRENCH
Questions?
Appelez le service à la clientèle au 1-877-804-5504, du lundi au vendredi de 8 h
30 à 17 h 00 (heure normale de l'est)
CONTENU DE L’EMBALLAGE
ACCESSOIRES DE FIXATION
AA. Support de montage
23 in. - 36 in. = x 2
37 in. - 47 in. = x 3
48 in. - 72 in. = x 4
58,42 cm - 91,44 cm = x 2
93,98 cm - 119,38 cm = x 3
121,92 cm - 182,88 cm = x 4
AA
BB
CC
5
STORE CELLULAIRE SANS FIL

SPANISH
¿Tiene Preguntas?
Llame al servicio al cliente al 1-877-804-5504, 8:30 a.m. - 5 p.m., hora del Este,
de lunes a viernes.
CONTENIDO DEL PAQUETE
ACCESORIOS INCLUIDOS
AA. Soporte de montaje
23 in. - 36 in. = x 2
37 in. - 47 in. = x 3
48 in. - 72 in. = x 4
58,42 cm - 91,44 cm = x 2
AA
BB
CC
9
PERSIANA CELULAR INALÁMBRICO
/