Page is loading ...

H O W T O I N S TA L L Y O U R R A I L I N G
C O M M E N T I N S TA L L E R V O T R E R A M P E
What you should know!
• Carefully mark the position of the newels & wrought iron
panels before boring holes.
• Always glue all wood parts before joining them together.
• Always drill a pilot hole in every hardwood component
before using screws.
• A handrail bolt fastener (sold separately) is required to install
railing to newels
.
• One newel fastener (sold separately) is required
for the installation of newels.
Ce que vous devez savoir!
• Marquer attentivement la position des poteaux et des
panneaux de fer forgé avant de percer les trous.
• Toujours coller toutes les parties de bois assemblées
ensemble.
• Toujours pré-percer dans chaque composante de bois dur
avant de poser les vis.
• Un boulon de main courante (vendu séparément) est requis
pour fixer la rampe aux poteaux.
• Un goujon d’acier (vendu séparément) est requis pour
l’installation des poteaux.
W R O U G H T I R O N
F E R F O R G É
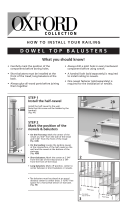
Install the half-newel
Fix the half-newel to the wall.
Note that this screw will be hidden by the handrail.
(fig. # 1)
Fixer le demi-poteau
Fixer le demi-poteau au mur.
Notez que la vis sera cachée par la rampe. (fig. # 1 )
Mark the position of the newels
& panels
• On the first step: mark the center of the newel at 2 3/4”
from the side of the tread and 6” from the front of the
tread (fig. #2A ).
• On the landing: Locate the landing newel, at the
intersection of half newel on the wall and the newel at
the bottom of staircase. (fig. #2B )
•
Wrought iron panels: Mark off positions in the center
line, between newels, center to center (max. 3 15/16”
free space), for both horizontal and staircase sections.
(fig. #3 )
Marquer l’emplacement des
poteaux & panneaux
• Sur la première marche: marquer le centre du poteau à
2 3/4” du côté de la marche et 6” du devant de la
marche. (fig. #2A )
•
Sur le palier: Localiser le poteau de palier, à l’intersection
du demi-poteau au mur et du poteau au bas de l’escalier.
(fig. #2B )
• Panneaux de fer forgé: Marquer l’emplacement dans la
ligne de centre, entre les poteaux, centre à centre
(max. 3 15/16” d’espace libre) qu’il s’agisse d’une section
horizontale ou escalier. (fig. #3 )
1
3
E
qua
l
s
pa
ce
/
E
s
pa
c
e
é
g
a
l
E
q
ua
l
s
p
a
c
e
2A
2
2B
E
s
p
a
c
e
é
g
a
l
36”
NOTE: Before installa-
tion, always check local
building codes as some
requirements may vary.
NOTE: Veuillez tou-
jours vérifier le code
du bâtiment de
votre région avant
l'installation puisque
certaines restrictions
peuvent varier.

Staircase section
• Place handrail on treads against the newels. Mark both ends.
ATTENTION: If your handrail is leaning against the moulding of the
newel, you must add the thickness of that moulding before cutting.
(fig. #
4A-B)
• Fix handrail bolt to newel at bottom of the staircase at 35 3/4” over the
tread. Fix handrail to newels. (fig. #
4A-B)
• Pre-drill underneath the handrail with a drill bit of 1/8” to fix the top of
the wrought iron panels and screw.
Section escalier
• Placer la main courante sur les marches et contre les poteaux. Marquer
les extrémités. ATTENTION: Si votre main courante est appuyée contre la
moulure du poteau, vous devez additionner l’épaisseur de cette moulure
avant d’effectuer votre coupe. (fig. #
4A-B)
• Fixer le boulon de main courante au poteau au bas de l’escalier à 35 3/4”
au-dessus de la marche. Fixer la main courante aux poteaux. (fig. #
4A-B)
• Pré-percer le dessous de la rampe avec une mèche de 1/8” pour fixer le
haut des panneaux de fer forgé et visser.
Horizontal section
• Cut handrail to required length.
• Fix handrail bolts to newel at 35 1/2” from the floor.
• Take out 1/4” x 1” edge from underneath of the handrail at one end only for
easy insertion. (fig. #
5A)
• Fix handrail solidly to newels. (fig. #
5)
• Fix the edge under the handrail with glue.
• Fix wrought iron panels. NOTE: The loop at the top of each panel must be in
the same direction as in the staircase section.
Section horizontale
• Couper la main courante selon la longueur requise.
• Fixer les boulons de main courante sur les poteaux à 35 1/2” du sol.
• Retirer une lisière de 1/4” x 1” sous la main courante à une seule
extrémité pour facilité l’insertion. (fig. #
5A)
• Fixer solidement la main courante aux poteaux. (fig. #
5)
• Coller et fixer la lisière sous la main courante.
• Fixer les panneaux de fer forgé.
NOTE: La boucle au haut des panneaux
doit être dans le même sens que celle dans la section escalier.
Final touch
• Remove all excess glue.
• To solidify, do not touch your railing for a period of 24 hours.
• Varnish, stain or paint to suit your decor, according to the selected
wood species.
Touche finale
• Enlever tout excès de colle.
• Pour aider à solidifier, ne pas toucher à votre rampe pendant 24 heures.
• Vernir, teindre ou peindre pour agencer avec votre décor, selon l'essence
de bois choisie.
35 3/4"
35 1/2"
Item OPR350
Item OPRBB
2 Finishing nails 2”
2 clous finition 2”
5
5A
4
4A
Installation of newels
Level and fix newels at previously marked locations, by using glue and
shims if required.
Installation des poteaux
Fixer les poteaux de niveau aux endroits prédéterminés, en utilisant de la
colle et des cales si nécessaire.
4B
COLONIAL ELEGANCE INC.
3800, Du Tricentenaire
Montreal, QC, H1B 5T8
Tel: 514-640-1212
Tel: 800-361-2030
Fax: 514-640-1744
Internet: www.colonialelegance.com
E-mail: [email protected]
20081002
/